
SAML-based Single Sign-On Setup for Shelf with Microsoft Entra ID: How-to Guide
Document Version History
Version number | Modified by | Modifications made | Date modified | Status |
1.0 | Shelf | Initial release of the document. | 28 Jan 2022 | Expired |
1.1 | Shelf | First update/modification of the guide as a result of the improvements to the service and processes; new structure and layout of the guide have been developed and implemented; new screenshots have been added and verbiage has been fixed/updated. | 21 Apr 2022 | Expired |
1.2 | Shelf | The guide was updated to include the new section on the configuration of user plan types for Shelf. New figures were also added. | 24 May 2022 | Expired |
1.3 | Shelf | The guide was updated to include the Login section with the relevant text and graphics. | 23 April 2024 | Expired |
1.4 | Shelf | The guide was updated to adjust to Azure AD’s rebranding into Microsoft Entra ID. | 24 May 2024 | Active |
Glossary
Term | Meaning |
Microsoft Entra ID (formerly Azure Active Directory / Azure AD) | A cloud-based identity and access management service. This service helps your employees access external resources, such as Microsoft 365, the Azure portal, and thousands of other SaaS applications. Microsoft Entra ID also helps them access internal resources. These are resources like apps on your corporate network and intranet, along with any cloud apps developed by your own organization. |
Base64 | The industry standard format for SSL certificate content. The most common web servers will generate certificate signing requests as well as accept SSL certificates in base64 format. |
SAML | It stands for Security Assertion Markup Language whose primary role in online security is that it enables you to access multiple web applications using one set of login credentials. |
SCIM | It stands for the System for Cross-domain Identity Management that is an open standard that developed from the need for a way to synchronize user information between multiple applications. |
SSO | This acronym stands for the Single Sign-On which is an authentication method that enables users to securely authenticate with multiple applications and websites by using just one set of credentials. |
Introduction
This document’s goal is to walk you through the whole process of configuring the Single Sign-On (SSO) method for Shelf Application using Microsoft Entra ID (formerly Azure Active Directory (Azure AD)). The Single Sign-On authorization method is expected to help you avoid any manual entry of your username and password to sign in to Microsoft Entra ID. This feature provides your users easy access to your cloud-based applications without needing any additional on-premises components.
In our case, the properly configured SSO via Microsoft Entra ID is expected to ensure a seamless access to the Shelf App and its full use in accordance with your business needs.
After reading this guide, you will be able to:
If you have any questions regarding this document or if you need any assistance or support in its relation or the Shelf App and its settings, please contact Shelf’s Technical Support at support@shelf.io or within the Shelf App.
Creating the Shelf App in Microsoft Entra ID
To create the Shelf App in Microsoft Entra ID, follow the below steps.
Open the Microsoft Azure Portal and log in to your account. When on the Azure Portal’s main page, search for the Enterprise applications service by starting to enter its name in the search field on top of the page. The search-as-you-type feature is supported here.
 Figure 1. Searching for enterprise applications on Azure
Once the needed service is found, select it to navigate to the needed page - Enterprise applications | All applications - of the Azure Portal.
When on this page, find and click the + New application button to start creating your new application on the Azure portal.
 Figure 2. Viewing the Enterprise applications page
On the page that appears, click the + Create your own application button.
In the pane that appears in the right part of the window, enter the name of the application as “Shelf (SAML)” and select the Integrate any other application you don't find in the gallery (Non-gallery) checkbox. Once done, click the Create button.
 Figure 3. Creating new application
Once the application has been created, you are redirected to the application page where you can overview and/or configure various application’s parameters. In the left-side panel on this page, find and select the Single sign-on option to proceed.

Figure 4. Viewing the Application page
On the page that appears, select the SAML option card as your SSO method.
 Figure 5. Selecting the SSO method
Click the Edit button in the Basic SAML Configuration card.

Figure 6. Accessing the basic SAML configurations
Copy the required values from the respective Shelf SSO settings fields as shown in Figure 16. These values must be Single sign on URL and Audience URL (Identifier). Paste them into the respective fields of the Basic SAML Configuration pane of the Azure Portal as shown in the figures below.
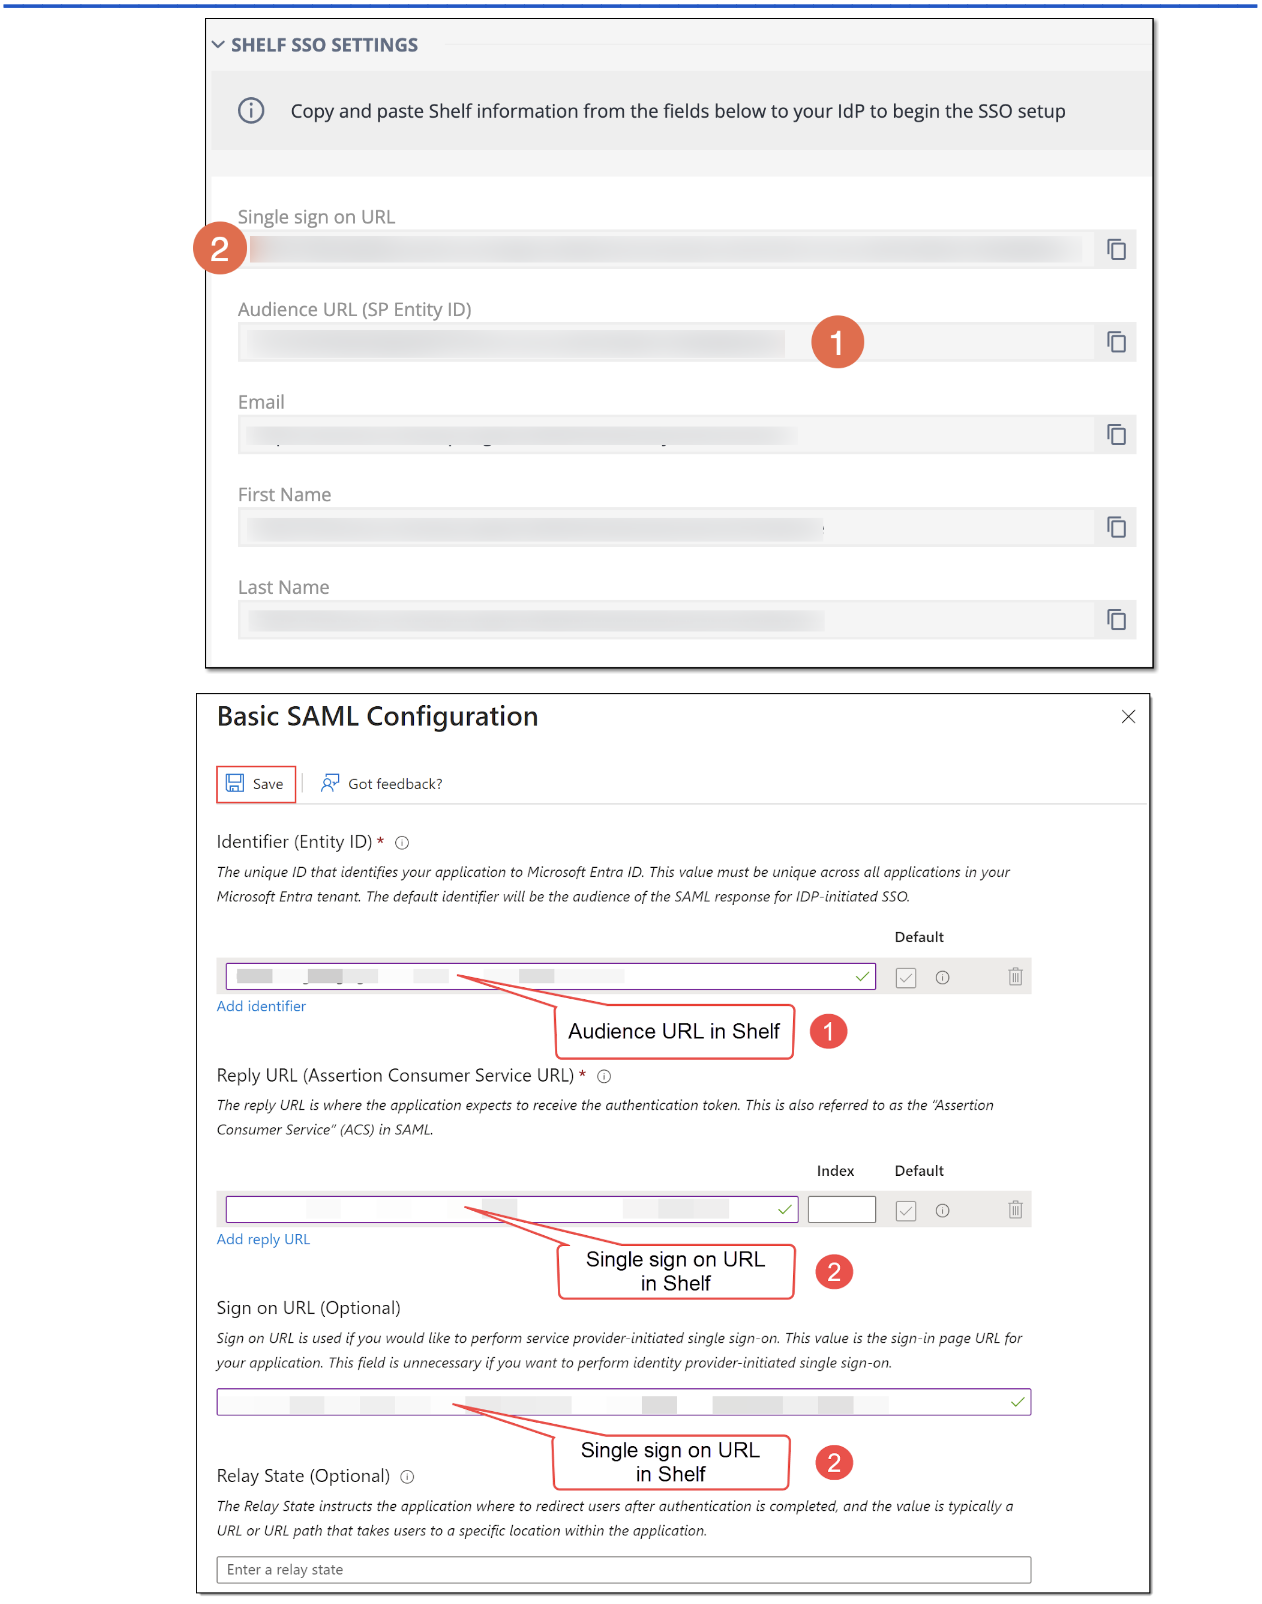
Figure 7. Filling in the Basic SAML Configuration fields
Once the new Basic SAML Configuration values have been successfully saved and you see the confirmation message, close the Basic SAML Configuration pane and go to the Attributes & Claims card and click the Edit button there.

Figure 8. Viewing SAML configuration saving confirmation

Figure 9. Starting editing Attributes and Claims
On the Attributes and Claims page that appears, add additional claims such as “emailaddress”, “givenname”, “name” and “surname” with actual attributes based on your AD user’s profile.

Figure 10. Editing Attributes and Claims
Once done, navigate back to the SAML-based Sign-on page of Azure Portal using breadcrumbs. On this page, locate the SAML Signing Certificate card and download the Base64 certificate by clicking the respective Download button as shown in the figure below. Save the downloaded certificate on your computer following the OS prompt

Figure 11. Downloading base64 certificate
Once done with the certificate downloading and saving, navigate to the Set up Shelf (SAML) card. Copy the values sitting in the Login URL, Microsoft Entra Identifier, and Logout URL fields and save them to any text file for further use. You will later need them, as well as the downloaded Base64 certificate, at the next configuration step, that is when enabling the Single Sign-On feature in Shelf.

Figure 12. Finding and copying Microsoft Entra ID and Login/Logout URLs in Azure
Go to the Users and groups submenu in the left-side panel. On the Users and groups page that appears, click the +Add user/group button and assign users or groups, which need to have access to Shelf via Microsoft Entra ID SS
 Figure 13. Adding user/group
Once all Basic SAML Configuration settings have been successfully configured, you can now proceed to configuring the relevant settings on the Shelf side.
Enabling Single Sign-On in Shelf
- Log in to your Shelf account and navigate to the Admin Panel. Once it opens, find and select the Single Sign-On option. It navigates you to the SSO page where you need to check if the Enable SSOcheckbox is selected. If it is not, select it as shown in the figure below.

Figure 14. Checking the SSO in Shelf
- Make sure to select the proper SSO provider option, Custom SAML, in the SSO Providerdropdown list box. Mind the information provided in the warning in the following figure.

Figure 15. SSO provider note
- Make sure that all SSO settings fields are populated.

Figure 16. Viewing Shelf SSO settings
- Navigate to the SSO IDENTITY PROVIDER SETTINGS block in Shelf and fill in all fields shown in the figure below with the relevant data from the Set up Shelf (SAML)card in Azure.

Figure 17. Populating the SSO provider parameters in Shelf
- When populating the fields, follow their mappings explained in Table 1 below.
Table 1. Mapping of SAML-based SSO parameters in Azure with SSO Identity Provider parameters in Shelf
SSO parameter in Azure
SSO parameter in Shelf
Login URL
IdP SSO Sign-on URL
Microsoft Entra Identifier
SSO Issuer (IdP Entity ID)
Logout URL
N/A
Certificate (Figure 11)
X.509 Certificate
- When populating the fields, follow their mappings explained in Table 1 below.
- Once all the needed fields are populated and the certificate is inserted, click the SAVEbutton and then confirm your choice by clicking the respective button in the confirmation pop-up window.

Figure 18. Saving the SSO configuration in Shelf
- Once you have successfully completed the above steps, it means that the Single Sign-On feature becomes enabled in Shelf. Its result is that all your users are forced to log in to the Shelf App using the SSO method. Note that as soon as you have confirmed your choice, all users are logged out from the Shelf App, with the admin that has configured and enabled this SSO method staying logged-in only.
- After the SSO setup is over, your users can log in to Shelf using Microsoft Entra ID from the standard login page at https://login.shelf.io. See the section below for details.
Logging in to Shelf via Microsoft Entra ID SSO
To be able to log in to your Shelf account via Microsoft Entra ID, you need first to log out of Shelf. After that, you will see the following screen: 
Figure 19.Viewing the Shelf login screen with the SSO login option
Now, click SIGN IN WITH SSO and log in using your Microsoft credentials to access your Shelf account.
Figure 20. Proceeding to Microsoft login page to log into Shelf via Azure AD
Once the SSO feature has been enabled in Shelf and you are able to log in to your Shelf account via Microsoft Entra ID, you can see that the new tab—SCIM—appears next to the SSO tab on the Single Sign-On page in Shelf. In this tab, you can now configure your SCIM provisioning. For learning how to do that, go to the Enabling SCIM section below.
Figure 21. Viewing the SCIM tab data on Shelf’s Single Sign-On page
Enabling SCIM
- When on the Single Sign-On page in Shelf’s Admin Panel, select the SCIM tab. Then in the window that appears, select the Enable SCIM checkbox and click the SAVEbutton. In order to make the changes become enabled, reload the page

Figure 22. Enabling SCIM in Shelf
- Once the settings are successfully saved, go to your Shelf App on Azure Portal and, in the left-side panel on the Shelf (SAML) | Overview page, select the Provisioning option. On the Provisioning page that appears, click the GET STARTEDbutton.

Figure 23. Accessing Shelf App’s Provisioning page on Azure Portal
- On the page that appears, in the Provisioning Mode dropdown list box, select the Automatic option. Fill in the required Tenant URL* and Secret Tokenfields in accordance with the figure and table below.

Figure 24. Configuring the provisioning parameters
Table 2. Provisioning configuration fields
Field name
Description
Tenant URL*
Paste the data from the SCIM Base URL field of the SCIM tab in Shelf.
Secret Token
Paste the token copied from the SCIM Bearer Token field of the SCIM tab in Shelf.
Once the fields are populated, click the Test Connection button. If no error messages are displayed, it means that the connection has been successfully established. Click the Save button as shown in the figure above.
- Once the settings have been saved on Azure Portal, the respective message is displayed.

Figure 25. Success message
- Now, go back to your Shelf App’s Provisioning page on Azure Portal, find and select the Edit attribute mappingsbutton to start changing the actual configuration for mappings.

Figure 26. Initiating mappings editing
- On the page that appears, switch the Provisioning Status toggle on and then click the Savebutton.

Figure 27. Activating the provisioning status
- Once the provisioning status has been activated, you need to change the mappings accordingly. To do so, click the Mappingsfield on the same page and make sure to configure the required parameters in accordance with the below figures.

Figure 28. Configuring attribute mappings
- The mappings for the Provision Microsoft Entra ID Groupsitem shall be configured as follows:

Figure 29. Configuring mappings for Provision Microsoft Entra ID Groups
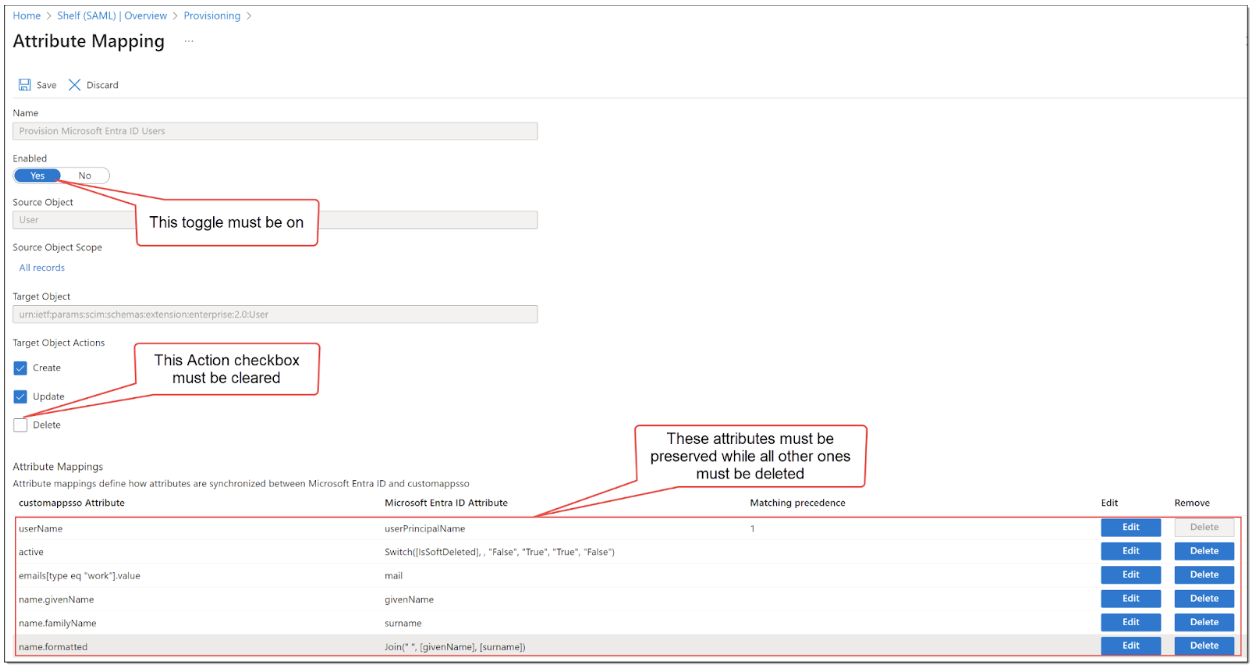
Figure 30. Configuring mappings for Provision Microsoft Entra ID Users
Configure User Plan Types for Shelf (Optional)
📢 | The default plan type is the option selected for the account by the Shelf Support Team. In case if the shelfPlanTypeId property is not provided for the user via SCIM, the default plan type is expected to be set and used. |
- Go to the Provisioning page on the Azure Portal. For this purpose, go to the Enterprise applications section, select your SAML-enabled Shelf App instance, and then in the left-side panel on the Shelf (SAML) | Overview page, select the Provisioningoption.

Figure 31. Accessing the Provisioning section of your Shelf App instance
- Once on the Provisioning page, find and select the Edit attribute mappingsoption.

Figure 32. Accessing the attribute mappings
- Next, on the page that appears, find and select the Mappings option to open the dropdown list and select the Provision Microsoft Entra ID Usersoption there.

Figure 33. Accessing the Microsoft Entra ID users mappings
- On the Attribute Mappings page that opens, scroll down and select the Show advanced optionscheckbox.

Figure 34. Access advanced mapping options
- Scroll down the opened section and click the Edit attribute list for customappssooption.

Figure 35. Accessing the attribute list editing mode
- In the window that appears, scroll down and add the shelfPlanTypeId value in the first empty field of the Name column. Make sure that it has String in the respective Type column field. Once done, click the Savebutton.

Figure 36. Adding a new attribute to the list
- Once the new attribute is successfully saved, you are redirected to the Attribute Mappings page where you need to click the Add New Mappinglink button.

Figure 37. Adding a new mapping
- In the Edit Attributepanel that appears in the right part of the window, fill in the fields as shown in the figure below.

Figure 38. Filling in the new mapping attribute fields
Important Notes
This integration will work only when you have specified first and last name for every user.
You must have a valid email as userName or a work/corporate email. The work/corporate email is always preferred. If there is no work email, then userName will be used as the primary email. (The N.B Email field in the Contact Information section should be filled in as well and correspond to the User principal name in Identity section, otherwise, you will get a “Your email is invalid” error message on the Login screen)
There is no hard delete available both for the user groups and for the users. Users can be deactivated only.
To patch the user email in Shelf, you need to add the user’s work/corporate email in the Azure user profile. Updating the principalName value will not work for this purpose.
It is strongly recommended to maintain userPrincipalName and work/corporate email intact, so they are the same in both fields. Otherwise, it can cause issues if the email specified as userPrincipalName needs to be changed to another one (work/corporate email must be updated to the same new email in order to enable its proper operation in Shelf App).
User groups are provisioned without additional configuration needed. It’s being imported into the Shelf instance alongside with users. Library access and other settings should be done on the Shelf side afterwards. Nested user groups will not be provisioned.