Shelf Users and Permissions Functionality: User and Permission Management Overview


Document Version History

Version number

Modified by

Modifications made

Date modified

Status

1.0

Shelf

Initial release of the document.

15 Feb 2021

Expired

1.1

Shelf

The document was updated to include modifications to the user interface of the Shelf User and Permission Management functionality. New verbiage added to the User Groups section. Figures updated to match the UI changes.

22 June 2022

Active


Document Purpose 

This guide has been developed to answer the following questions: 
  • What user roles exist on Shelf?
  • What permissions do they have?
  • What are user groups?
  • How do you use them?
  • What are the benefits of using user groups versus standard permissions?

If you require further assistance, feel free to contact us at support@shelf.io, via the live chat on the Shelf website or from the in-app chat support within the Shelf platform.


Introduction

Being a high performance Knowledge and Content Management System, Shelf provides great capabilities to work with knowledge articles and various content for various audiences, both inside your organization and externally. For this purpose, Shelf features the built-in role- and permission-based access system that defines who access what and to what degree or depth. 

Shelf has 4 (four) user roles with different permission sets:
  • Admin
  • Collaborator
  • Member
  • View-only

When adding a new user, an account admin must select the following user role by default, unless instructed differently. 

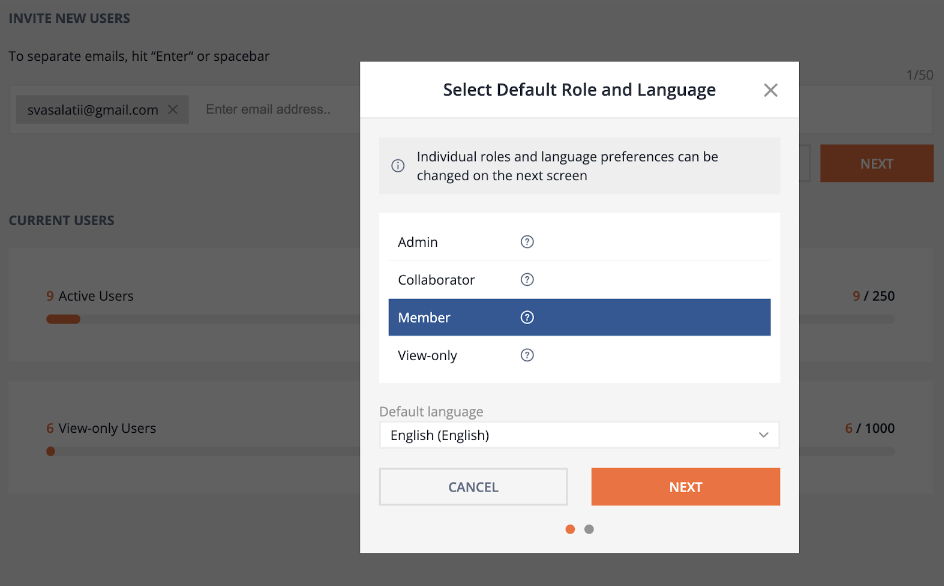
Figure 1. Adding new Member user

Any user role can later be changed to any user role by an account admin on the Manage Users page of the Shelf Admin Panel. For this purpose, go to the Admin Panel, open the Manage Users page, and then next to the needed user select their new user role from the dropdown list that opens by the click on the respective field in the User Role column.

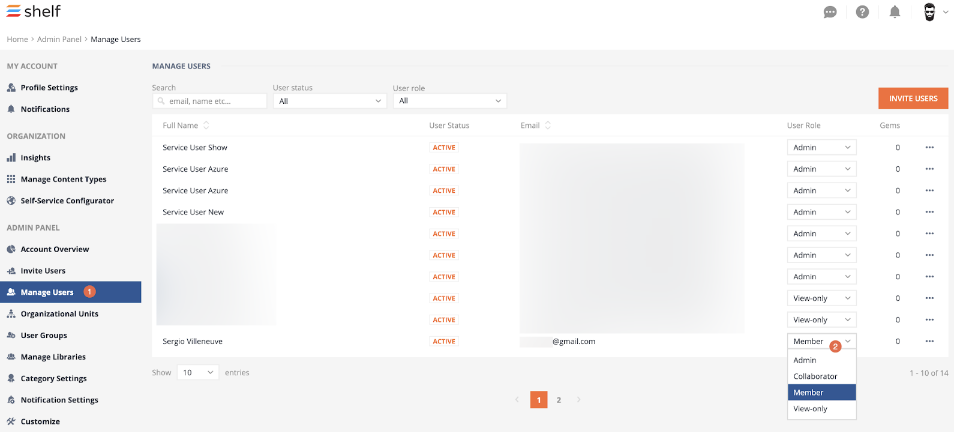
Figure 2. Changing the Shelf user role 

Each user type defines what permissions the user is expected to have on Shelf, unless they are overridden with individual (the Library or Manage Member modal windows) or the User Group permissions for a particular library. 

For instance, if you open the Manage Members form for any library and add a Collaborator (a user with the Collaborator user role) to the selected library, then the user will have the Collaborator role in this library, unless you change this role in the Manage Members modal window or via the User Groups functionality.

Figure 3. Selecting user role for library members
As regards the User Groups functionality, it does not restrict user role changes, and any user in your account can assume any role in a library (i.e. a Collaborator in your account can become a View-only in a particular library).

User groups allow you to enable or revoke access to libraries faster as you no longer need to add each user to all the libraries individually (create a user group and assign it the appropriate permission level to each of the libraries).

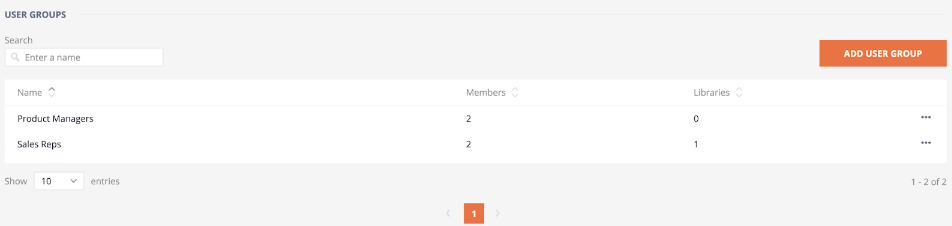
Figure 4. Viewing available user groups on Shelf

More detailed descriptions of the Shelf User and Permission Management capabilities, including those relating to user roles and user groups, are provided in the respective sections below.


User Roles

As mentioned in the Introduction section above, there are four user roles available for the Shelf users. Let’s see how each of these roles is different from the other ones.


Admin User Role

Any user with the Admin user role: 
  • Has a private library on Shelf
  • Can access the Admin Panel on Shelf
  • Can access Shelf’s Insights, Self-Service Configurator, and other administrative features
  • Can create own content (Gems) and edit any Gems created both by them or by other users
  • Can create libraries and folders
  • Can interact (leave comments/add ratings/view change history etc.) with content to the extent defined by their account role in the Customize menu of Shelf’s Admin Panel.


Collaborator User Role 

A user that has the Collaborator user role:
  • Has a private library on Shelf
  • Can create own content (Gems) and edit any Gems created both by them or by other users on Shelf
  • Can create libraries and folders
  • Can interact (leave comments/add ratings/view change history etc.) with content to the extent defined by their account role in the Customize menu of Shelf’s Admin Panel.


Member User Role 

Users with the Member user role are permitted to:
  • Create own content (Gems) and edit any Gems created by them
  • Interact (leave comments/add ratings/view change history etc.) with content to the extent defined by their account role in the Customize menu of Shelf’s Admin Panel.


View-only User Role 

Users that was created with the View-only role are allowed to:
  • View content
  • Interact (leave comments/add ratings/view change history etc.) with content to the extent defined by their account role in the Customize menu of Shelf’s Admin Panel
  • Create a Folder (in those Libraries where they have the Admin role).

Now that you have read and understood the difference between all four user roles available in the Shelf System, it is necessary to understand permissions the Shelf users may have relating to libraries on Shelf.


Individual Library Permissions

Important: 
A user’s account role becomes the user’s default role in a library (i.e. a user with the Collaborator account role, when added to the library individually, is expected to have the Collaborator role permissions in this library). 

The role can be changed in the Manage Members window that can be accessed as shown in the figure below.

Figure 5. Accessing the Manage Members window for the needed library

At the same time, not any user role can be changed to any other user role as there are some limitations in this relation. For example, a View-only role cannot be upgraded to a Collaborator role. The table below defines this condition in a clear manner.

Table 1. Account Roles versus Library Roles on Shelf


Let’s use the example from the Introduction section when a user with the Collaborator account role acquires a View-only role within a specific library as shown in Figure 3. 

This role change means that once it is implemented, the user is only able to view content in this library and interact (leave comments/add ratings/view change history etc.) with that content to the extent defined by their account role in the Customize menu of Shelf’s Admin Panel. It also means that the user is not able to perform the following actions:
  • Manage the library members 
  • Edit or delete the library
  • Create new content in this library
  • Edit content created by other users.

Once we have overviewed users, user roles, and their individual permissions across Shelf and its libraries, we can go further and familiarize ourselves with the User Groups functionality that provides a more advanced method of managing users and their permissions on Shelf.


User Groups

Important: 
It needs to be noted that user groups are expected to become the only method to manage permissions in libraries, so it’s worth taking the time to figure them out to set yourself up for success. 

The User Groups functionality enables you to do the following:
  • Enable or revoke user access to libraries much faster as you no longer need to add/remove each user to/from the needed library(-ies) individually
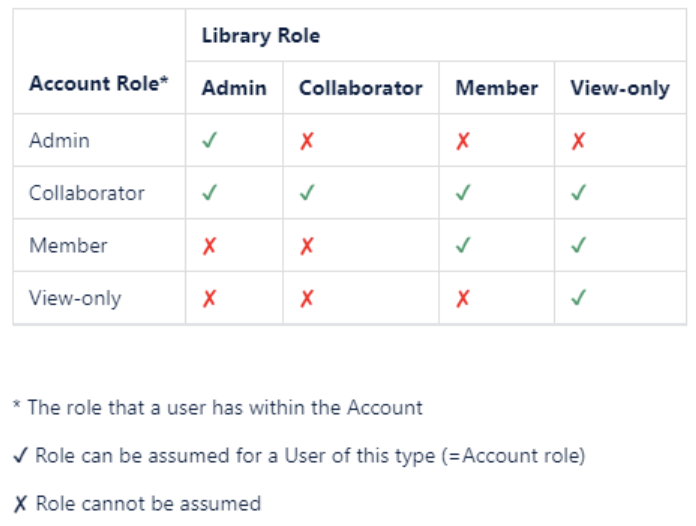
  • Override limitations of individual permissions as any account role is now expected to be able to assume any user role in a library.

All you have to do is create a user group, add user group members, and add libraries to which user group members are expected to have access on a permission level you set for each library.

The procedure below describes the steps you need to take in order to make use of the User Groups functionality on Shelf.

  1. Once logged in to Shelf under your Admin account, go to the Admin Panel, find and select the User Groups option, and then on the User Groups page find and click the ADD USER GROUP button.
    Figure 6. Accessing the User Groups functionality and starting to add new user group
  2. In the window that opens, enter any name and any description for the new user group, then click the SAVE button.
    Figure 7. Adding the user group name and description
  3. Once the new user group is saved, open it via the More Actions menu (...) next to it.

    Figure 8. Opening the newly created user group

  4. Go to the Members tab and add users to this new user group. For this purpose, once in the Members tab, click the MANAGE MEMBERS button.

    Figure 9. Starting to add new members to the new user group

  5. In the dedicated user group window that opens, select the user(s) you want to add to the new user group by selecting the respective checkboxes in the left part of the window. In case there are multiple users on the list, you can use the built-in search feature and search for the needed user or users by their name or email address. If you look for several users, you can use a comma to separate their names or email addresses entered in the search field. 
    Once you have found and selected the needed user(s), click the arrow icon in the center of the window to move them to the list of the user group members displayed in the right part of the window. Once the user(s) are added to the list, click the DONE button to save changes.

    Figure 10. Adding users to the new user group

  6. Once the needed user(s) is(are) added to the user group, open the Library Permissions tab to add library(-ies) this user group is expected to have access to. For this purpose, click the ADD LIBRARIES button once in the Library Permissions tab.
    Figure 11. Adding libraries for the new user group
  7. In the Select Libraries window that opens, choose the library(-ies) you want to add by selecting the respective checkbox(-es)and click the ADD button.

    Figure 12. Selecting libraries

  8. Once you have added the needed library(-ies), using the dropdown User Role field, select the role the user group members are going to have in relation to the added library(-ies). 

    Figure 13. Role-based permissions in the library for user group members
As you can see, each of the roles you are about to assign to the user group members has its own set of permissions in the library, that is what exactly members of this user group are permitted to do in the library. Details on the permissions for each role are provided in the User Roles section.
You can also add more libraries by clicking the ADD LIBRARIES button directly in the specific library block of the Library Permissions tab.

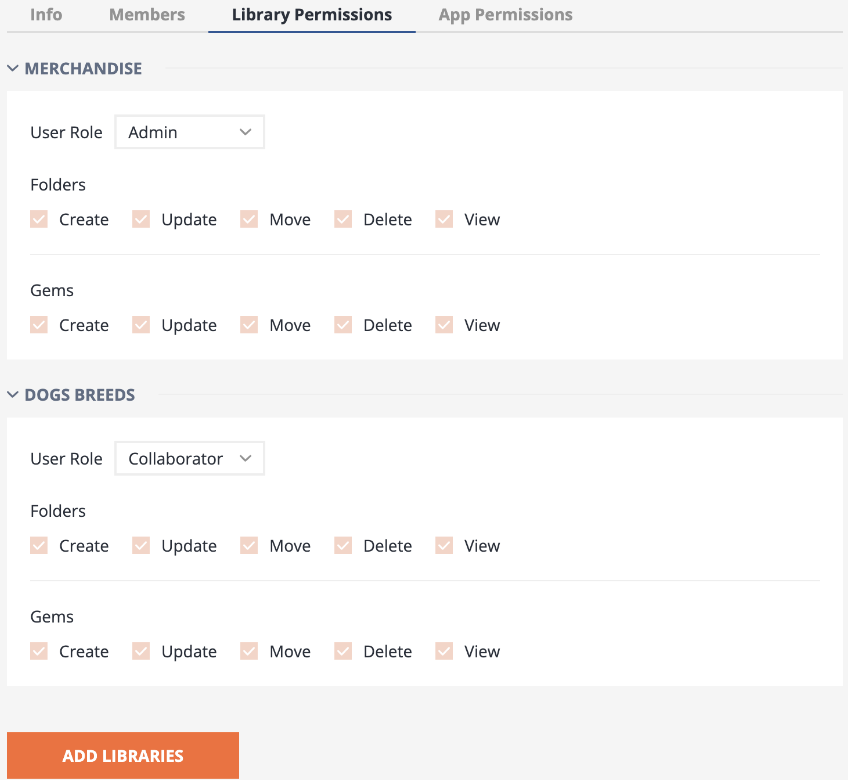
Figure 14. Handling several libraries in the Library Permissions tab

The respective permissions - Create, Update, Move, etc. - depend on the user role and are preset, meaning that they are view-only and cannot be changed. They are displayed for informational purposes only.

Once you have selected the needed role for your new user group members for the selected library(-ies), you have configured the user group permissions for the subject library(-ies).


Individual User vs. User Group Permissions

Below is the brief description of the difference between permissions granted to individual users and user groups.
  • Individual user permissions (granted through the Manage Members modal window) are more important than the permissions granted to the same library via the User Groups functionality. 
  • If there are several user groups added to the same library and some members of one user group are also members of other user group(s) with different role-based permissions, then the user group with a higher level of permissions will prevail. For example, if a user is a member of the user group with the View-only role and at the same time a member of the user group with the Collaborator role, then this user will have the higher level of permissions in the given library, that is the Collaborator permissions.

There are some examples in the subsections below, so jump to them to learn more.


User’s Individual Role Differs from User’s Role granted via User Group

Conditions: a user that was granted the View-only role in a library in an individual manner (via the Manage Members modal window) and at the same time the Admin role to the same library via the User Groups functionality. 

Outcome: the user has the View-only role level of permissions in the library.

Reason: individual permissions prevail over the permissions granted via the User Groups functionality.


User’s Access to One Library via Different User Groups 

Conditions: a user is a member of two user groups which both have access to the same library but provide a different level of permissions: User Group 1 has the View-only permissions in the library, and User Group 2 has the Admin permissions there.

Outcome: the user has the Admin permissions in the library.

Reason: when any user has access to the same library via different user groups, the higher level of permissions is expected to prevail, that is the user is expected to enjoy permissions of the user group with a higher role.


App Permissions for User Groups 

In addition to providing quick access to users to the organization’s libraries on Shelf, the User Groups functionality also makes it possible to grant users access to certain Shelf apps. To enable such an access for your user group members, navigate to the App Permissions tab in the respective User Group window.

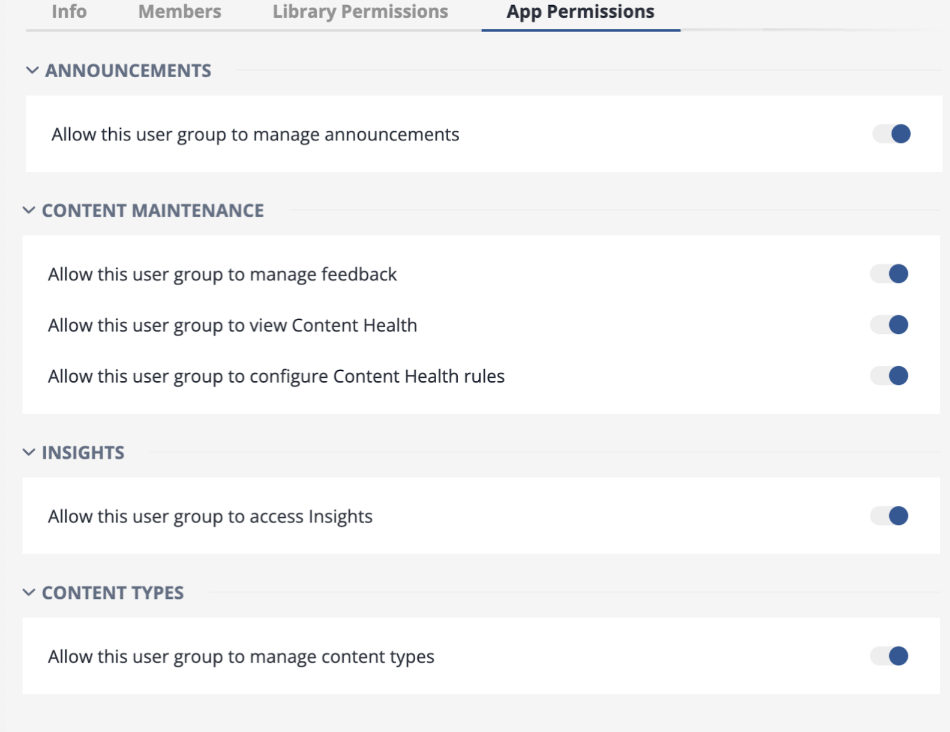
Figure 15. Configuring user group access to Shelf apps
Once the access to a certain app is enabled for a user that is a member of the respective user group, this user becomes able to see and access the enabled app functionality and features.

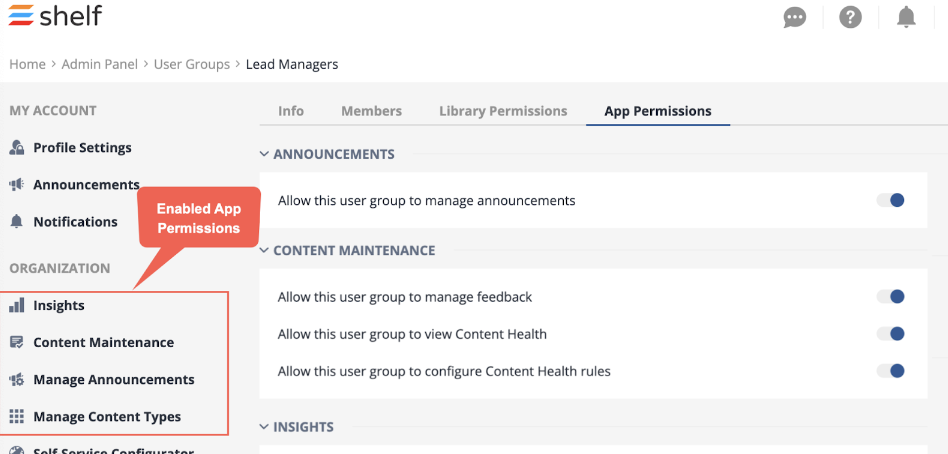
Figure 16. Viewing the apps to which the user group obtained access via App Permissions
Note that the set of app permissions available for configuration in the App Permissions tab of the respective user group window depends on the features enabled for your account by a respective Shelf account representative. Therefore some accounts may not have certain app permissions available for other accounts.


User Management 

The Shelf Platform allows your organization’s account administrators to manage other users under that account. To access the user management functionality, in the Admin Panel, find and select the Manage Users option.

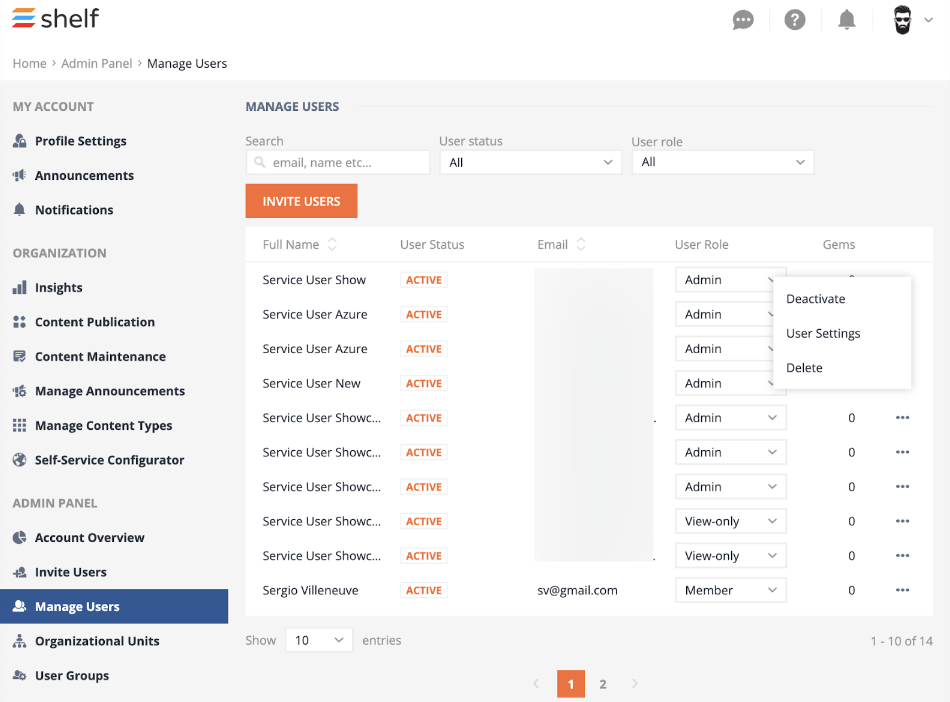
Figure 17. Accessing the User Management functionality

Administrators are able to perform the following actions on the users:
  • Add new users to the organization’s account via the Invite Users approach - the user profile is created and the invitation is sent to the user’s email address.
  • Change roles of existing users simply by selecting a new role from the list of available roles.
  • Disable existing users simply by selecting the Deactivate option of the More Actions (...) menu.
  • Deleting existing users simply by selecting the Delete option of the More Actions (...) menu.
  • Editing user settings via the User Settings option of the More Actions (...) menu.

The User Settings option allows you to edit user’s first (1), middle (2), and last (3) names and email address (4), and also enable the Content Publication Workflow bypass (5) for the user if the CPW feature has been enabled within your organization’s account.

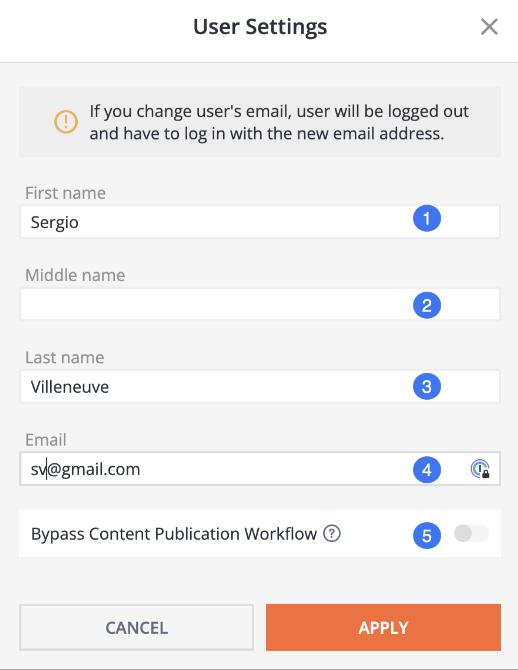
Figure 18. Configuring the user settings

Details on the Content Publication Workflow feature, its configuration, purpose, and other CPW-related matters can be found in the respective CPW User Guide document.