
Shelf Self-Service Portal Custom Domain Guide (via DNS)
Getting Started
This guide requires making changes to DNS. Make sure you have entitled personnel to help you with the setup.
After you create your Self-Service Portal (SSP) on Shelf, your content is available through the Default Self-Service Portal domain by default. Your URL will look like this: https://xxxxxx-yyyyyy-zzzzzz.shelf-ssp.com/
You can find this URL in the SSP settings on Shelf.

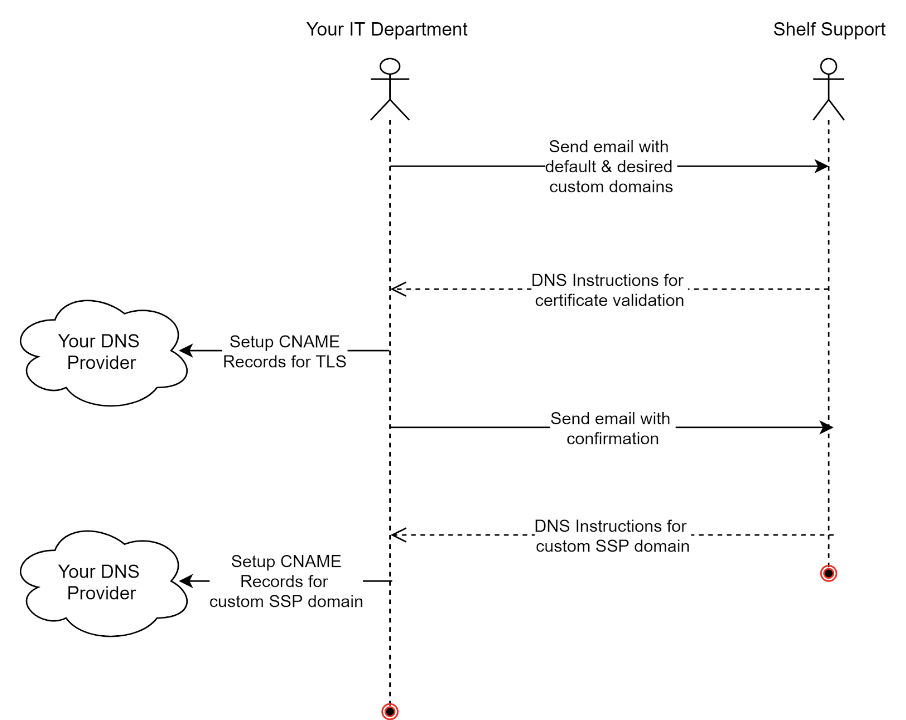
This guide covers the steps necessary to customize your URL to a branded domain that represents your business. This process involves configuring two DNS records used for validating a TLS certificate and mapping from support.yourcompany.com to some-id.shelf-ssp.com.
The first step is to communicate the details in the Custom Self-Service Portal domain below to your Shelf Account Representative. Shelf Support will reach out with the next steps of the process required to complete your setup.
Limitations
- This configuration covers simple subdomain mapping. Hosting SSP on a sub-path of a top-level domain is out of scope. For example, if your primary domain is acmeholdings.com, then you are able to redirect support.acmeholdings.com to your Shelf Service Portal. However, you are not able to map acmeholdings.com/support to your SSP.
- You can only configure 1 custom subdomain for 1 Self-Service Portal.
- If your setup requires multiple custom subdomains mapping to multiple self-service portals, please coordinate with your Shelf Account Representative.
1. Contacting Shelf Support
Contact Shelf support or your Shelf Account Representative with the intention of setting up a custom domain for your SSP portal. Provide them with the following details:
Default Self-Service Portal domain: some-id.shelf-ssp.com
Custom Self-Service Portal domain: support.yourcompany.com
Shelf personnel will issue a TLS certificate for your desired custom domain. They will send you instructions with the DNS configuration that you need to complete on your end in order to grant Shelf rights to manage the TLS certificate.
2. Creating a CNAME DNS Record to verify the TLS certificate
This step needs to be completed within 48 hours of receiving an email from Shelf support. If you are unable to complete this step in 48 hours, you will need to start this process from the beginning and repeat the first step.
You’ll get an email with the following details:
...
Domain: support.yourcompany.com
DNS Record type: CNAME
CNAME record name: _xxx.support.yourcompany.com.
CNAME record value: _yyy.abcdef.acm-validations.aws.
....
Domain: support.yourcompany.com
DNS Record type: CNAME
CNAME record name: _xxx.support.yourcompany.com.
CNAME record value: _yyy.abcdef.acm-validations.aws.
....
Please create a DNS record as described and let Shelf support know it’s finished. Wait for the last set of instructions.
3. Creating a CNAME DNS Record for Self-Service Portal
Shortly you’ll receive another email with the final instructions for DNS setup. Follow the steps in the email to create an additional CNAME DNS record from support.yourcompany.com to the hostname provided to you by Shelf support. Please do not delete the first CNAME record from step 2 as this is used to verify domain ownership for issuing a TLS certificate.