Shelf SAML Single Sign-On with SCIM: Okta Setup Guide
- Document details
- Okta Integration Network and Shelf app
- Configuring Shelf app in OIN
- Configuring Single Sign-On in Shelf
- Enabling and configuring SCIM in Shelf OIN app
- Logging in to Shelf via Shelf-initiated SSO for Okta
- Logging in to Shelf via Okta-initiated SSO (Shelf OIN app)
- Known issues and their troubleshooting
Document details
Document version history
Version number | Modified by | Modifications made | Date modified | Status |
1.0 | Shelf | Initial release of the document. | 7 Feb 2022 | Expired |
1.1 | Shelf | Changes and updates to the document to bring it to compliance to Shelf’s documentation standards. | 28 Jul 2022 | Expired |
1.2 | Shelf | Multiple changes, additions, and corrections to the document to reflect the current state of the Shelf and Okta integration. | 14 Dec 2023 | Expired |
1.3 | Shelf | Major update to the document to bring it to compliance with Okta's documentation style guide and requirements. | 29 Oct 2024 | Expired |
1.4 | Shelf | Major update due to implementation of the Okta OIN Shelf app and respective changes in the Shelf SSO configuration and usage flow. | 05 Dec 2024 | Active |
Document purpose
This document describes the required steps to enable and configure Single Sign-On to Shelf via Okta. This feature will help you and your users authenticate yourselves and access your Shelf resources via Okta, without the need to use several sets of credentials.
In case you require assistance, please don’t hesitate to contact us at support@shelf.io or via the Shelf Platform chat.
Glossary
Term | Definition |
Shelf KMS | Shelf Knowledge Management System, an AI-enabled content creation, storage, and management platform that helps businesses keep their information up-to-date, streamline workflows, enhance decision-making, and expedite content creation. Shelf KMS provides a seamless search journey with naturally intuitive interactions to make finding content easy. This ease of search achieves enterprise-level findability backed by AI. |
SSO | Single Sign-On, a technology which combines several different application login screens into one. With SSO, a user only has to enter their login credentials (username, password, etc.) one time on a single page to access all of their SaaS applications. |
SAML | Security Assertion Markup Language, an open standard used for authentication. Based upon the Extensible Markup Language (XML) format, web applications use SAML to transfer authentication data between two parties - the identity provider (IdP) and the service provider (SP). The technology industry created SAML to simplify the authentication process where users needed to access multiple, independent web applications across domains. |
SCIM | System for Cross-domain Identity Management, an open standard-based protocol that allows for a secure automation of the exchange of user identity data between your company’s cloud applications (like Shelf KMS) and any service providers (like Okta). It manages user identity data so that all the operations related to user adding, editing, deleting etc. |
JIT | Just in Time (JIT) Provisioning is used to create users the first time they log in to an application via a third-party identity provider. JIT provisioning eliminates the need to provision users or create user accounts manually. This saves effort and time. JIT Provisioning is independent of the SSO protocol used by the application but it’s vital to note that for this approach to work, the web application must support JIT Provisioning. |
OIN | Okta Integration Network, is a comprehensive catalog of pre-built integrations that connect Okta’s identity management services with thousands of third-party applications. These integrations facilitate seamless and secure access management, user provisioning, and single sign-on (SSO) capabilities. Administrators can add and customize applications for their users through the Okta admin panel, simplifying the deployment and management of enterprise applications. |
Prerequisites
Prior to proceeding with all the needed actions to create the Shelf app in Okta and configure the relevant Single Sign-On settings to integrate Shelf and Okta, make sure that the following preconditions are met:
You must have the Admin user role in Okta
You must have the Admin user role in Shelf
Enterprise Single Sign-On feature must be enabled for your Shelf account.
Supported features
Once installed and configured, Shelf integration in Okta is expected to support the following features:
Service provider(SP)-initiated SSO
Identity provider(IdP)-initiated SSO
JIT provisioning (for non SCIM scheme).
When SCIM is enabled for Shelf Okta SSO integration, the following features are expected to be supported:
Adding users
Updating user attributes
Managing users
Deactivating users
Adding user groups
Importing users
Importing user groups
Pushing users
Pushing user groups
Okta Integration Network and Shelf app
What is OIN
The Okta Integration Network (OIN) is an ecosystem of pre-built integrations that connect Okta’s identity management services with thousands of third-party applications. This network simplifies the process of managing user identities, access controls, and security across various platforms, enhancing both user experience and organizational security.
Purpose of OIN
The primary purpose of the OIN is to streamline the integration of Okta’s identity and access management (IAM) capabilities with external applications. This includes:
Single Sign-On (SSO): Allowing users to access multiple applications with a single set of credentials, reducing password fatigue and improving security
User Provisioning: Automating the creation, updating, and deactivation of user accounts across different applications, ensuring that user access is always up-to-date and compliant with organizational policies
Security and Compliance: Ensuring that all integrations meet stringent security standards, thereby protecting sensitive data and maintaining compliance with regulatory requirements.
Shelf app in OIN
The OIN includes over 7,000 integrations with a wide range of third-party applications, from productivity tools like Microsoft Office 365 and Google Workspace to specialized software like Salesforce and Slack. Since recently, Shelf is also a part of OIN.
Shelf app in OIN serve several key purposes for our customers:
Enhanced Productivity: By integrating with Shelf, OIN helps organizations streamline workflows and improve collaboration. For example, users can access their content and diverse capabilities of the Shelf platform with a single login, saving time and reducing the need for multiple passwords
Improved Security: Security-focused approach implemented in Shelf OIN app enhances the overall security posture of our customer organizations. Our customers can be confident that only authorized users can access sensitive information and components
Seamless User Experience: By providing a unified login experience across various applications, OIN reduces the friction associated with accessing multiple platforms, including Shelf. This leads to higher user satisfaction and productivity
Scalability and Flexibility: Our customer organizations can easily add or remove individual users, user groups, set up or withdraw their permissions, matching the organization’s business development. These operations are simple and can be done, for example, in Shelf and then simply pushed to OIN.
Unlike the flow described in the previous version of this document, you no longer need to create Shelf app to start setting up Shelf SSO with Okta: the app is already in the OIN application catalog.
What you need to do is to configure both Shelf app in OIN and SSO settings in Shelf. The sections below walk you through this procedure.
Configuring Shelf app in OIN
As mentioned above, Shelf app is already published to the OIN, so there is no need to create it.
However, you still need to configure Shelf app so that your users are able to access their Shelf resources via (1) Okta-enabled SSO option in their standard Shelf login screen, or (2) Shelf app in their Okta dashboard.
Let’s see how you can configure Shelf app in the OIN.
Log in to your Okta account using your Admin role credentials.
On the dashboard page that appears, find and select the Applications option in the navigation menu in the left part of the window.
Once expanded, select the Applications suboption.
- On the Applications page that opens, click Browse App Catalog to start looking for Shelf app.
 Figure 1. Starting finding Shelf app
 - In the App Catalog window, you can use app sections or the search field to find Shelf app. When found, click anywhere on the app card to open it.
 Figure 2. Viewing Shelf app in OIN App Catalog
 - Once on the Shelf app page, click the +Add integration button to start installing and setting-up Shelf OIN app on your Okta instance.
 Figure 3. Adding Shelf OIN app to user’s Okta instance
 On the page that opens, you need to add the required settings to your Shelf OIN app.
 Figure 4. Accessing Shelf OIN app general settings in Okta
Make sure to fill in the required fields using values explained below.
List of parametersAccount ID: the identification of user’s account in Shelf KMS.
You can get this value in your Shelf instance. To do that, log in to your Shelf account and then navigate to Admin Panel. Once there, open the Account Overview option in the navigation menu. In the window that appears, you can see and copy your Shelf Account ID.
Figure 5. Finding and copying Shelf Account ID
Shelf Auth0 Domain: URL of your Shelf Auth0 domain; based on your domain region, use one of the following values:
- US: https://shelfio.auth0.com- Canada: https://shelfca.auth0.com
- Europe: https://shelfio.eu.auth0.com.
Shelf Auth0 Tenant: the identification (name) of your Shelf Auth0 domain user group, use the following value: shelfio.
You can also select the relevant checkbox if you want other users to see the Shelf app icon in the OIN App Catalog.Click Done to save changes.
When the configuration changes are saved, you are redirected to the Shelf OIN app page with the General tab open. However, you need to go to the Sign On tab. Open it and scroll down to the Credentials Details section and in the Application username format field select the Email option from the dropdown list.
 Figure 6. Setting application username format in Okta
Save your changes to the settings.
Once done, the basic configurations for Shelf app in OIN are complete. The next step is to link your Shelf app to your Shelf instance. Read the section below to find out how you can do it.
Configuring Single Sign-On in Shelf
Enabling SSO in Shelf
To enable Single Sign-On in Shelf, perform the following steps.
Log in to your Shelf account under your Admin role user.
Navigate to Admin Panel and open the Single Sign-On menu in the navigation panel.
 Figure 7. Accessing and enabling SSO in Shelf
- In the window that opens, in the SSO tab, select the Enable SSO checkbox.
- Click the SSO Provider* field and then select the Custom SAML option in the dropdown list.
Setting up SSO in Shelf
Now you need to add some details from your Shelf OIN app to Shelf KMS SSO configuration. To do so, perform the following steps.
In the new browser window or tab, open your Okta instance, and log in to it under your Admin role user.
Once logged in, find and open your Shelf OIN app.
On the Shelf OIN app page, go to the Sign On tab.
 Figure 8. Accessing Sign On details in Shelf OIN app
In the tab, scroll down the Sign on methods section and click >More details.
- In the expanded section, you will need to copy two parameter values and download and save the certificate:

Figure 9. Accessing Shelf OIN parameters to be populated in Shelf KMS
Table 1. Shelf OIN app’s SAML 2.0 sign-on method parameters
Parameter
Description
Issuer
An entity that issues the authentication tokens used for Single Sign-On (SSO). Specifically for our case, it is the URL that identifies the Okta authorization server responsible for issuing tokens to access Shelf.
Sign on URL
A specific URL where authentication requests are sent during the Single Sign-On (SSO) process. This URL is crucial for directing users to the correct endpoint for logging in to Shelf using SSO.
Signing Certificate
A digital certificate used to sign SAML assertions and other security tokens. This ensures the integrity and authenticity of the tokens exchanged between Okta (as the Identity Provider (IdP)) and Shelf (as the service provider (SP)).
- Now go back to your Shelf instance window/tab with the Single Sign-On page open. Scroll down to the SSO Identity Provider Settings section and fill in the fields there with the data you copied from Okta, using the following scheme:
Issuer(Okta) > SSO Issuer (IdP Entity ID) (Shelf)
Sign on URL (Okta) > IdP SSO Sign-on URL (Shelf)
Signing Certificate (Okta) > X.509 Certificate (Shelf)
To paste the X.509 certificate, go to the file to which you have downloaded Okta’s Signing Certificate, open it in any text editor such as Notepad or similar, select the entire certificate’s text, including -----BEGIN CERTIFICATE and END CERTIFICATE -----, and paste the selection into the respective field in Shelf.
 Figure 10. Opening Signing Certificate (aka X.509 Certificate) in Notepad
Figure 11. Populating SSO settings in Shelf
Save changes to Shelf SSO configurations by clicking Save.
Once done, you have finished the procedure of enabling and configuring virtually all SSO settings on the Shelf side. What is left to do, is to enable SCIM protocol both on the Shelf and Okta side. Jump below to learn how you can do that.
Enabling SCIM in Shelf
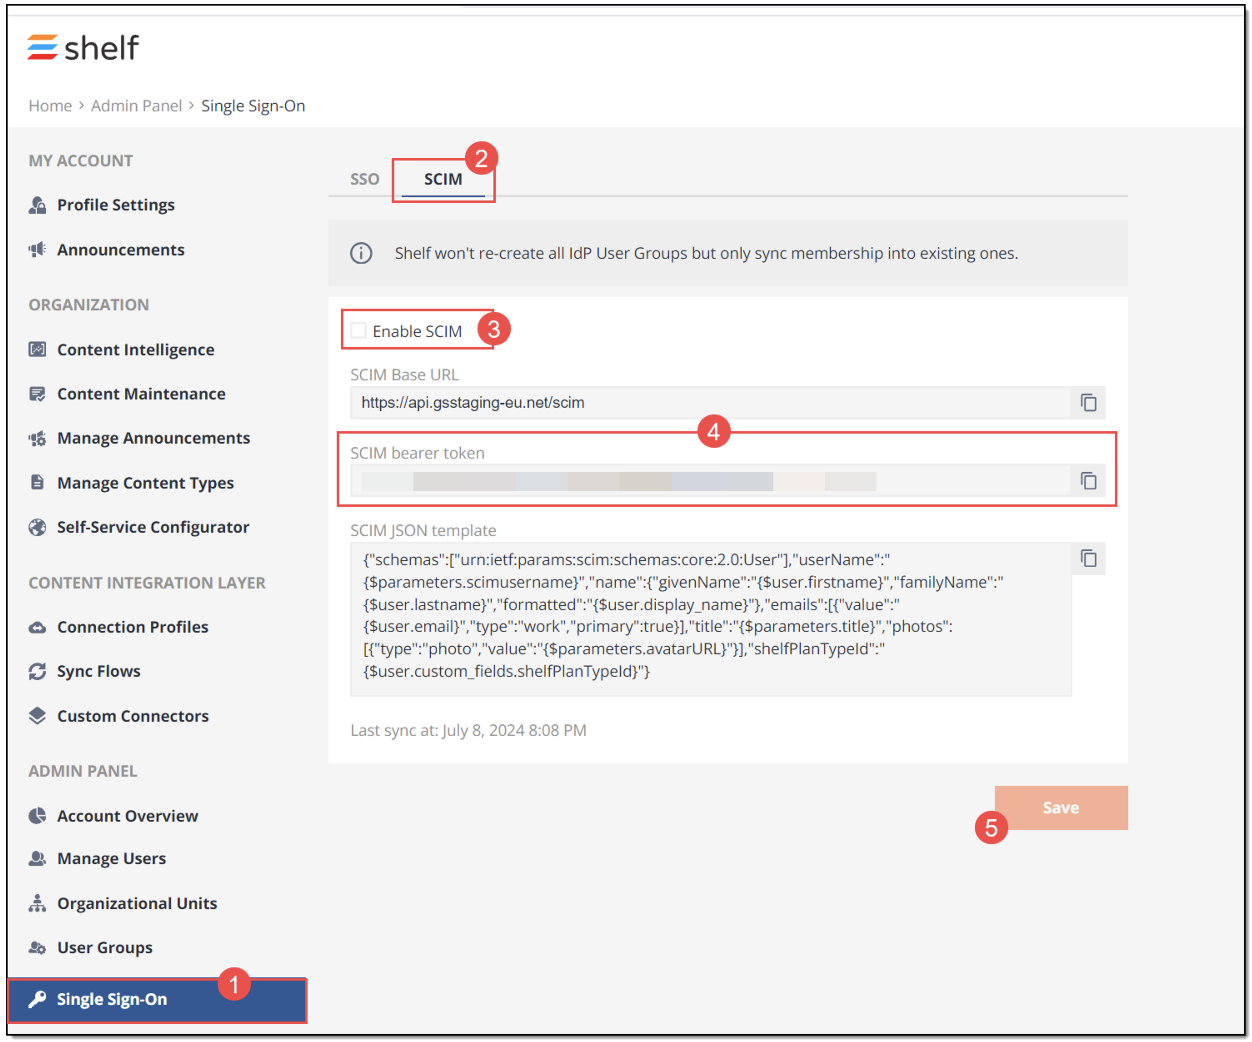
For enabling the SCIM protocol in Shelf, once logged in to your Shelf account, go to Admin Panel > Single Sign-On (1) > SCIM (2) tab and select the Enable SCIM checkbox (3) there. Click Save (5) to save changes.

Figure 12. Enabling SCIM in Shelf
Once done, your SCIM configurations in Shelf are basically completed. However, what you still need to do on this page is to copy and save the SCIM bearer token (4) - you will need it when enabling and configuring SCIM for your Shelf OIN app on the Okta side.
Enabling and configuring SCIM in Shelf OIN app
After enabling and configuring SCIM in Shelf KMS, you need to do the same on the Okta side in your Shelf OIN app. To do so, follow the below procedure.
Once logged in to your Okta account under the Admin role user, find and open your Shelf OIN app.
On the app page that appears, open the Provisioning tab.

Figure 13. Accessing SCIM configurations in Okta
In the Provisioning tab, file and click Configure API Integration.
In the window that appears next, select the Enable API integration checkbox and then enter the SCIM bearer token you have copied and saved when enabling and configuring SCIM on the Shelf side.
 Figure 14. Populating Shelf SCIM bearer token and testing Shelf API
Click Test API Credentials to verify the API token operation.
If the token is correct and no other issues occur, you can expect to see the message about successful verification of Shelf.
Figure 15. Successfully verifying Shelf API Credentials
- Click Save to finish SCIM configurations on the Okta side.
Completing all the above steps and procedures means that you have successfully enabled and configured Single Sign-On both in Shelf and in Okta.
Adding users to Shelf app in Okta
Prior to logging in to your Shelf instance via Okta-initiated SSO, you need to add users, who are expected to be permitted to use this SSO method of accessing Shelf, to the Shelf OIN app for which you have enabled and configured SSO in Okta and in Shelf.
To do so, perform the following steps:
📢 | For the purpose of this document, let’s describe adding ourselves as a user to the Shelf app created in Okta. |
- When on the Shelf OIN app page that appears, navigate to the Assignments tab and then open the Assign dropdown menu. Select the Assign to Peopleoption.
 Figure 16. Accessing user assignment menu
📢
If you need to add a group of persons—e.g. your organization’s business unit, department, or team—as users who are permitted to use Shelf OIN app in Okta, select the Assign to Groups option, then select the needed user group within your organization, and then follow the steps described for assigning individual users.

- In the popup window that opens, find the needed user (in our case—yourself) and click the Assign button next to it.
 Figure 17. Selecting user for adding to Shelf app
 - In the next window, make sure you have selected the right user. If yes, click Save and Go Back.

Figure 18. Confirming user
- Click Done. You are redirected to the Shelf app page > Assignments tab, where you can make sure the needed person—you—is listed as the user assigned for the Shelf OIN app.
 Figure 19. Viewing the list of users assigned for Shelf app
Logging in to Shelf via Shelf-initiated SSO for Okta
📢 | Before telling users they can start logging in to their Shelf accounts via Okta SSO, you first need to assign them—users—to Shelf app you have configured in OIN. If a user that hasn’t been assigned to Shelf OIN app tries to log in to their Shelf account via Okta SSO, they will see an error message "User is not assigned to application". |
Make sure you know credentials (email address/password) for your Okta domain. Once you have them, perform the following steps:
Navigate to the Shelf web application, considering the geography and domain:
https://yourcompanyaccount.shelf.io or
https://yourcompanyaccount.shelf-eu.com or
https://yourcompanyaccount.shelf-ca.com etc.
After you hit Enter on your keyboard, you can expect to see the following screen. Figure 20. Viewing the Shelf login screen with the SSO login option
- Click Sign In with SSOand log in using your Okta credentials (username and password) to access your Shelf account.

Figure 21. Logging in to Shelf using Okta credentials
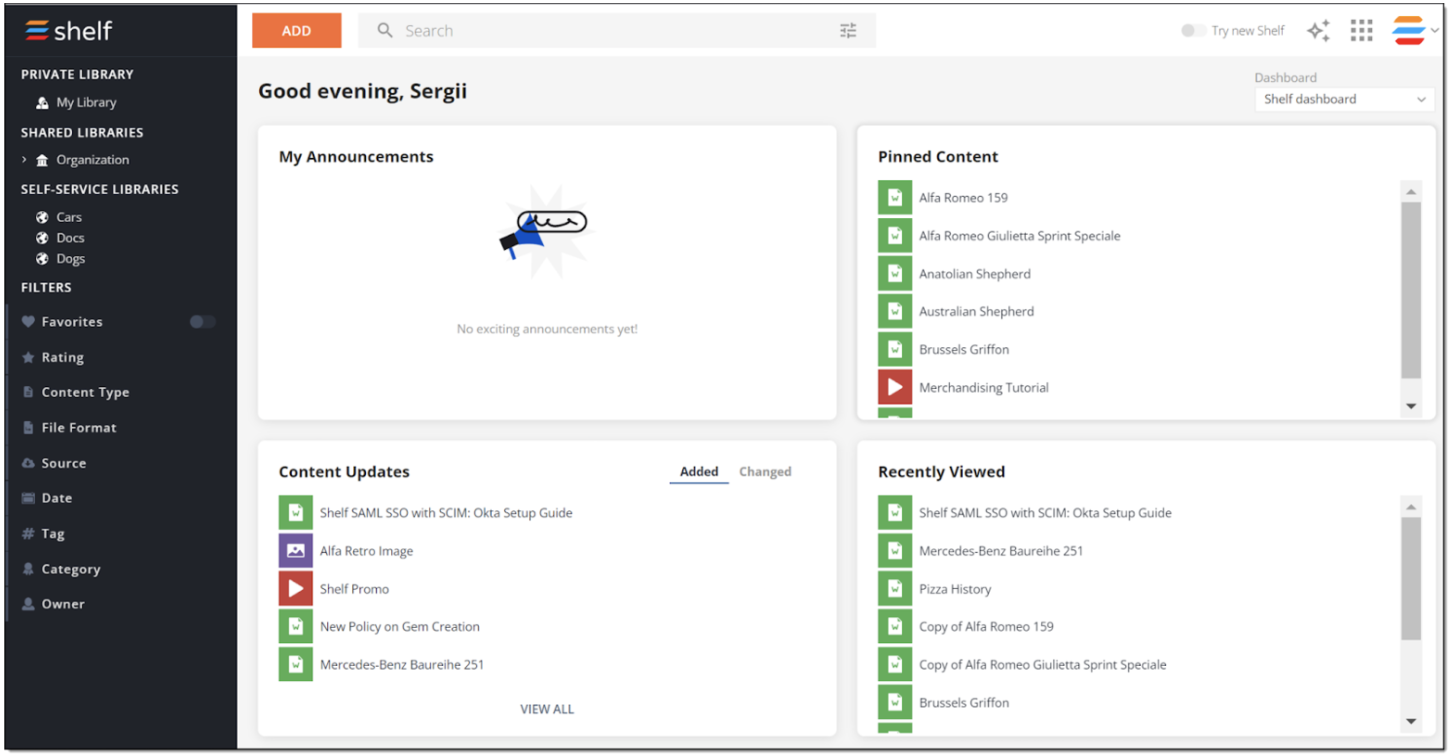
If your credentials are correct, you are logged in to your Shelf account and get to the Shelf KMS homepage as shown in the figure below.
 Figure 22. Viewing Shelf homepage after successful login
Logging in to Shelf via Okta-initiated SSO (Shelf OIN app)
📢 | Before telling users they can start logging in to their Shelf accounts via Okta SSO, you first need to assign them—users—to Shelf app you have configured in OIN. If a user that hasn’t been assigned to Shelf OIN app tries to log in to their Shelf account via Shelf OIN app, they will see an error message "User is not assigned to application". |
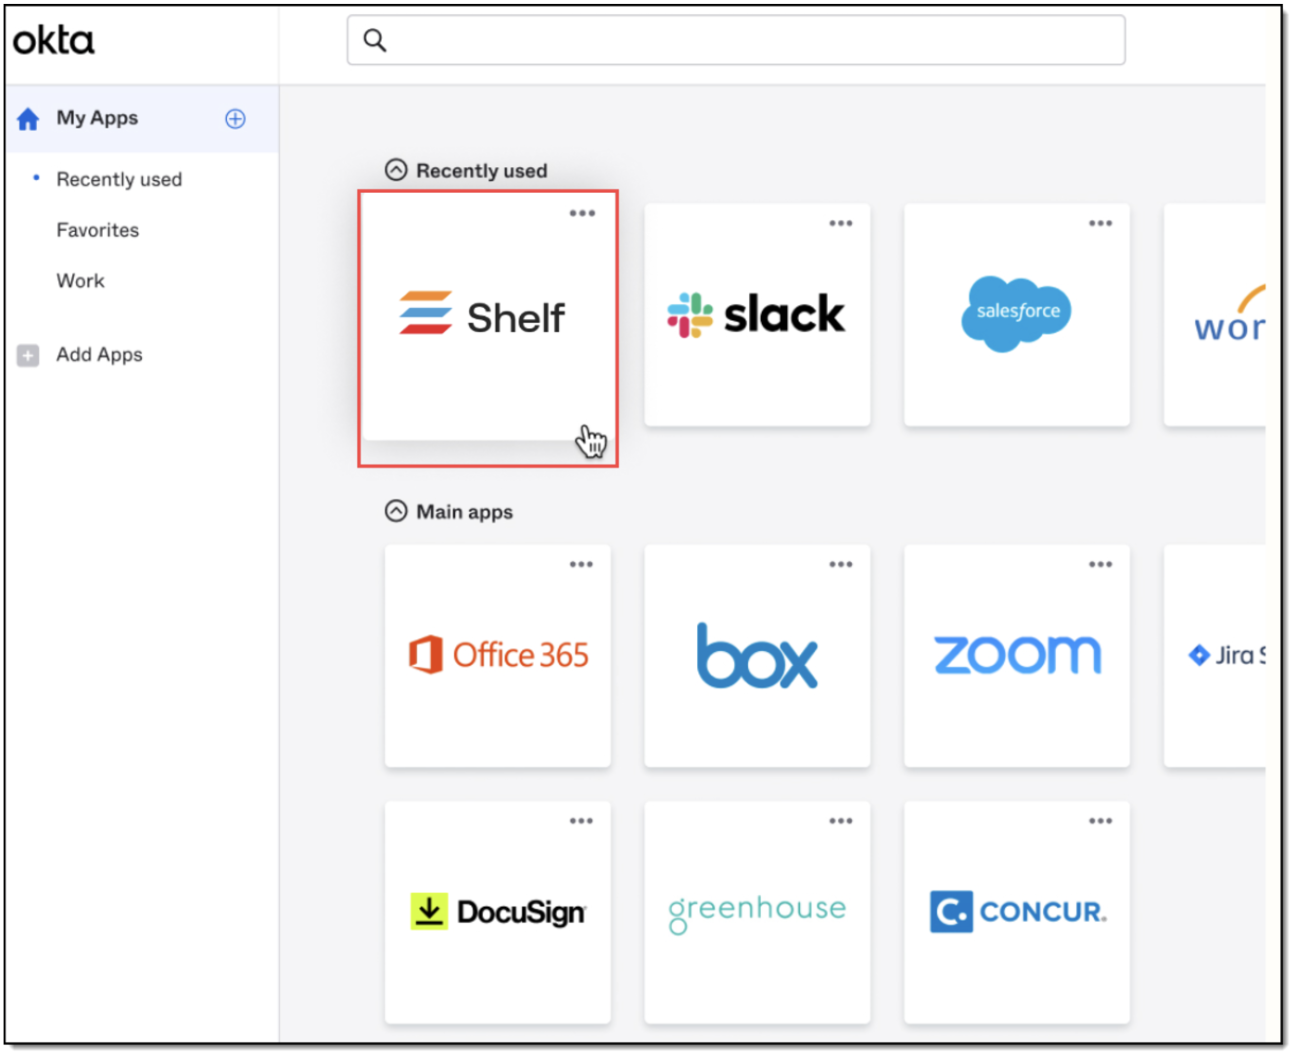
After all the needed users have been assigned to your Shelf OIN app, they are now able to sign in to their accounts on Shelf KMS directly from Shelf OIN app on the Okta End-User Dashboard.
To do so, they need the Shelf OIN app in the app catalog on their Okta Dashboard and click on it. Following that they will be logged in to their Shelf KMS accounts.
 Figure 23. Finding and using Okta Shelf app to log in to Shelf KMS
 Figure 24. Viewing Shelf KMS Home dashboard after login
Known issues and their troubleshooting
N/A
