Shelf Content Publication Workflow Overview Guide 


Document version history

Version number

Modified by

Modifications made

Date modified

Status

1.0

Shelf

Initial release of the document.

30 April 2024

Active


Document purpose

This document has been developed for those customers’ end users who are using Shelf Knowledge Management System (Shelf KMS) to create, edit, and manage various content. The document’s goal is to answer the following questions: 
  • What is the Shelf Content Publication feature?
  • Who are the main users and what purposes does this feature serve?
  • How is it configured?
  • How is it used in practice?

If you require further assistance, feel free to contact us at support@shelf.io or from the in-app chat support within the Shelf platform.


Glossary

Prior to starting to learn about the Contentful connector and its configuration and usage, you need to learn the terminology used by Shelf.

Shelf KMS (Next Generation Knowledge Management System) is a knowledge management platform that employs AI capabilities to create, edit, process, store, export/import, and otherwise handle various content. The platform sports multiple AI-enabled features such as Search Copilot, Analytics Copilot, Semantic Search, Content Intelligence etc., all of which are intended to optimize and centralize customer organizations’ knowledge and provide fast, accurate, and consistent answers.

Gem is a Shelf’s term for a content item stored in or synced to Shelf KMS.


Prerequisites

For using Shelf’s Content Publication Workflow (CPW) you need to have it enabled for your organization and for your Shelf KMS account. 

To find out whether CPW has been enabled for your organization, contact your organization’s administrator(s). 

For enabling CPW on your Shelf KMS account, verify that the below requirement is met:
  • Admin Panel must be accessible on your Shelf KMS account


Content Publication Workflow and its purpose

Understanding Shelf's Content Publication Workflow

In the dynamic landscape of content management, ensuring that content reaches its intended audience efficiently and effectively is paramount. To address this need, Shelf introduces the Content Publication Workflow (CPW) feature—a robust tool akin to Attlasian’s Jira task management platform for content. Just as Jira streamlines project management, CPW streamlines content management by providing users with a structured framework to create, process, assign, and publish content tasks seamlessly.


Key features of Shelf's CPW

Task management

CPW operates as a standalone app within the Shelf ecosystem, offering users the ability to create, update, and delete tasks for both existing and new content items (Gems). These tasks are then processed through a predetermined workflow, ensuring that content moves through each stage efficiently and in accordance with established protocols.


Workflow management

Centralized workflow management lies at the heart of CPW. Users can assign tasks to specific individuals or teams, track their progress, and ensure that content moves through the requisite stages—from creation to publication—without unnecessary delays or bottlenecks.


Content change requests

One of the standout features of CPW is its capability to facilitate content change requests. Content users can submit requests for updates or modifications, providing a streamlined mechanism for continuous improvement. Content managers and admins, in turn, have the authority to review and approve these requests, ensuring that changes align with organizational objectives and quality standards.


Roles and responsibilities

Content users (Members)

Members of the CPW ecosystem have the ability to initiate or request content changes, submitting them for approval through the platform. This empowers users to contribute to the content management process actively, fostering a culture of collaboration and continuous improvement.


Content admins and managers

Content administrators and managers wield greater control within the CPW environment. They are responsible for reviewing and approving content updates, ensuring that changes adhere to organizational guidelines and objectives. Additionally, they have the authority to restrict and control access to publishing and editing content, safeguarding the integrity and security of the content management system.

Overall, Shelf's Content Publication Workflow feature represents a paradigm shift in content management, providing organizations with a comprehensive solution to streamline content creation, review, and publication processes. By leveraging CPW, users can navigate the complexities of content management with ease, ensuring that content is delivered to the right audience at the right time, every time.

In the subsequent chapters of this guide, we will dig deeper into the functionalities and best practices of Shelf's CPW, providing users with the knowledge and tools necessary to maximize their content management capabilities.


Enabling Content Publication Workflow on Shelf KMS account

Additionally to enabling Content Publication Workflow for your organization, which is done by Shelf, it is needed to be enabled for your individual account in Shelf KMS.  
To do so, perform the following steps.
  1. Once logged in to your Shelf KMS account, open the menu by clicking the drawer icon near your user picture in the top right corner of the window.
  2. In the menu, select the Admin Panel option.
  3. After being redirected to the Admin Panel page, find and select the Customize option in the left sidebar. 
  4. On the Customize page that opens, find and switch the Content Publication Workflow toggle on.

    Figure 1. Enabling CPW on Shelf KMS account


    Once done, you should be able to see the Content Publication option in your Shelf KMS account menu.

    Figure 2. Verifying CPW is enabled on Shelf KMS account

Now, you can start using Shelf’s Content Publication Workflow feature for your organization’s content creation, publication, and management.


Using Content Publication Workflow

This chapter and its subsections are designed to describe how Shelf’s Content Publication Workflow is used by various roles: Content Admins, Content Managers, and Members. 


Using CPW as content administrators 

Content administrators typically focus on the technical aspects of content management, such as organizing content within systems or platforms (in our case - Shelf KMS), managing user permissions, ensuring compliance with regulations, and overseeing the implementation of metadata and taxonomy schemes. They also have decision-making authority related to technical aspects of content management, such as system configurations, permissions, and workflow automation.

In regards to Content Publication Workflow, content admins are responsible for controlling access to content creation and publishing per users. 


Managing CPW permissions via User Groups

Shelf’s User Groups feature is a tool that allows content admins to grant or withdraw permissions to CPW functionality to or from CPW users. 

This can be done both for the existing user groups and for the new ones. Let’s see how the CPW permissions are configured for a new user group. 


Granting/withdrawing CPW permissions to/from a user group

  1. As a content admin, access the Admin Panel in Shelf KMS and navigate to the User Groups option in the left sidebar panel.  
  2. Once on the User Groups page, click ADD USER GROUP. In the modal window that appears, add a title and, if needed, some description for the new user group. Click SAVE.

    Figure 3. Accessing the User Groups feature and adding new user group

  3. Once the user group is added, the page refreshes and you find yourself in the Info tab. Open the Members tab and then click MANAGE MEMBERS to add members to the user group. In the new modal window that appears, find and select the needed users and add them to the user group. Confirm by clicking DONE.

    Figure 4. Adding users to user group

  4. Now that the user group has been created and users have been added to it, navigate to the App Permissions tab, scroll down to the Content Publication Workflow section or simply select the Content Publication Workflow label under the tab. Once there, switch the needed toggle on.

    Figure 5. Granting/withdrawing CPW permissions to/from user group

The toggles mentioned above basically allow for 

  • granting/withdrawing CPW permissions to/from content users - Request content changes toggle (allows requesting content changes such as content deletion, existing content updating, and new content creation)
  • granting/withdrawing CPW permissions to/from content managers - Access Content Publication Workflow (allows editing CPW tasks, change task assignees and deadlines, and cancel or publish tasks) and Access CPW Dashboard analytics toggles (allows access to CPW task analytics such as number of completed tasks, number of tasks to be reviewed, etc.)

Note that the Access CPW Dashboard analytics toggle is only displayed when the Access Content Publication Workflow (CPW) option is enabled.


Enabling/disabling CPW bypassing for individual users

In addition to granting CPW permissions to user groups and withdrawing those from such user groups, content admins can allow or disallow individual users to bypass CPW flow so that these users are able to directly create, edit, publish, or delete content items. 

To enable CPW bypass for a user, the following needs to be done:
  1. On the Admin Panel homepage, find and select the Manage Users option in the left sidebar panel.
  2. On the Manage Users page that appears, find the needed user via the search capabilities or just by scrolling down the user list.
  3. When the user is found, open it by clicking on its entry directly or via the More actions menu > Open.

    Figure 6. Accessing individual user settings in Shelf Admin Panel 

  4. On the user page that opens, find and switch the Bypass Content Publication Workflow toggle on. Click SAVE to confirm and save changes.

    Figure 7. Enabling individual user to bypass CPW when working with content

For disabling the CPW bypass for a user who has it enabled, access the user properties through the Manage Users menu as shown above and switch the Bypass Content Publication Workflow toggle off.

In short, if the Bypass Content Publication Workflow toggle is switched on, content users are able to bypass managers approval for publishing/editing content and can freely create and edit content on the Gem page. At the same time, if the toggle is off, all content editing capabilities are disabled on the Gem page and now are handled via the Content Publication app, also requiring content managers’ approval to create/edit/delete content.


Managing access to task statuses

Content admins can also manage other CPW users’ access to tasks statuses in order to allow them view and use only the needed and their role-specific statuses. The main idea of this capability is to prevent CPW users from mistakenly changing or updating statuses not for their tasks. 

To open or restrict access to certain statuses for CPW users, you need to:

1. Via the User Groups feature in the Admin Panel, find and open the needed user groups which users you want to allow or disallow access to certain CPW task statuses. 

2. On the User Group page, go to the App Permissions tab and then select the Content Publication Workflow label under it.

3. Switch on the Access Content Publication Workflow (CPW) toggle on. It results in the display of the list of task statuses underneath, with the toggles to enable/disable access to the specific task status. Switch the needed one(s) on or off to let or deny the user group’s members access to such statuses.

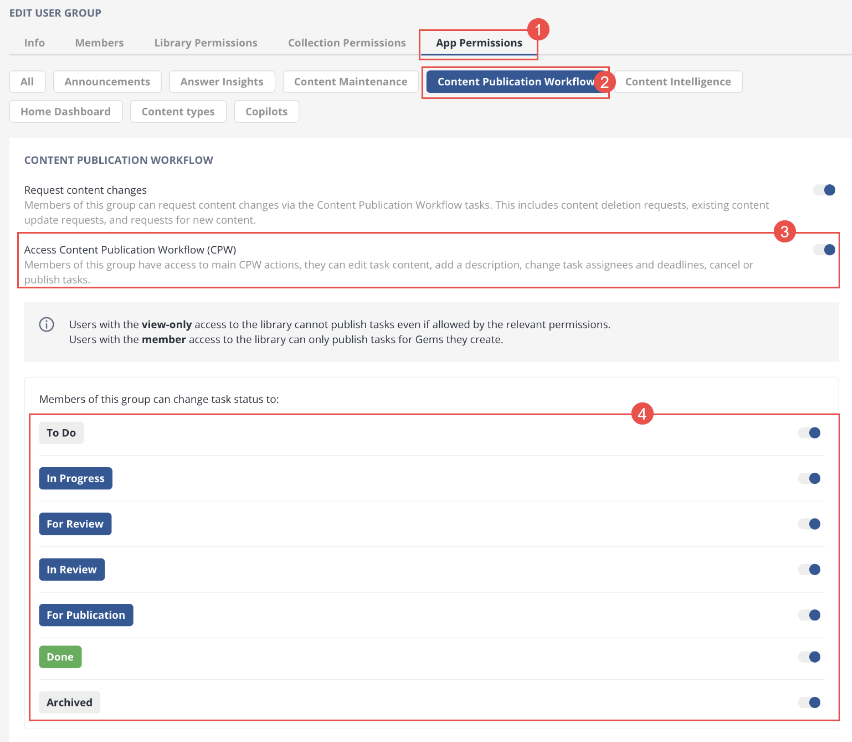
Figure 8. Enabling/disabling access to CPW task statuses for user group’s members 
By default, after activating the Access Content Publication Workflow (CPW) toggle, all task statuses available in the relevant CPW flow are enabled (ON).

Note that switching a task status toggle on (for example, the For Publication status enabled) allows members of the selected user group to move their CPW tasks from any status to the enabled status. In our case - For Publication enabled - the user group members can move their tasks from any status (e.g., from To Do or In Progress or For Review or In Review) to For Publication but not to Done or Archived.

It needs to be mentioned that allowing/denying access to CPW task statuses applies to all libraries to which CPW users have access via any of their respective user groups.

Also, when a CPW user is permitted to access certain task statuses in one library but restricted in accessing them in another library, the higher level of permission should prevail.

Finally, if you change this permission while the user for which you open/close access to the task status is on the task page, the error message will be displayed to the user reading You lack permission to transition the task to this status.


Using CPW as content managers

Opposite to content administrators, Content managers are more focused on the strategic aspects of content management. They oversee content organization and compliance and are involved in content planning, creation, editing, publishing. Content managers also interact with content creators, editors, stakeholders, and consumers. They collaborate with teams to develop content plans, provide guidance and feedback on content creation, and analyze user engagement metrics to optimize content performance.

The main task of content managers in Shelf CPW is to oversee the content creation/editing and publishing process. This also includes review and approving activities. To accomplish that, content managers work with various content-related analytics and tasks. 


Working with CPW analytics

To start working with the CPW capabilities including its analytics, you need to open the Content Publication Workflow application. To do so, once logged in to your Shelf KMS account, click the drawer icon next to your user picture and select the Content Publication option from the dropdown menu.

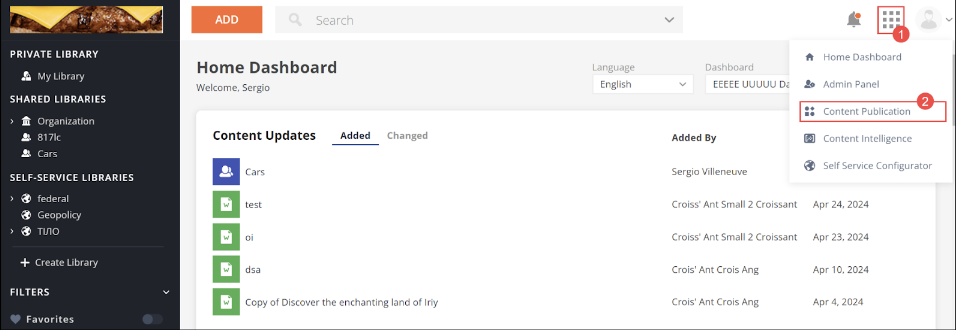
Figure 9. Accessing CPW in Shelf KMS

Once done, you are redirected to the CPW Dashboard page where you can see all analytics relating to your and your team’s content-specific activity.

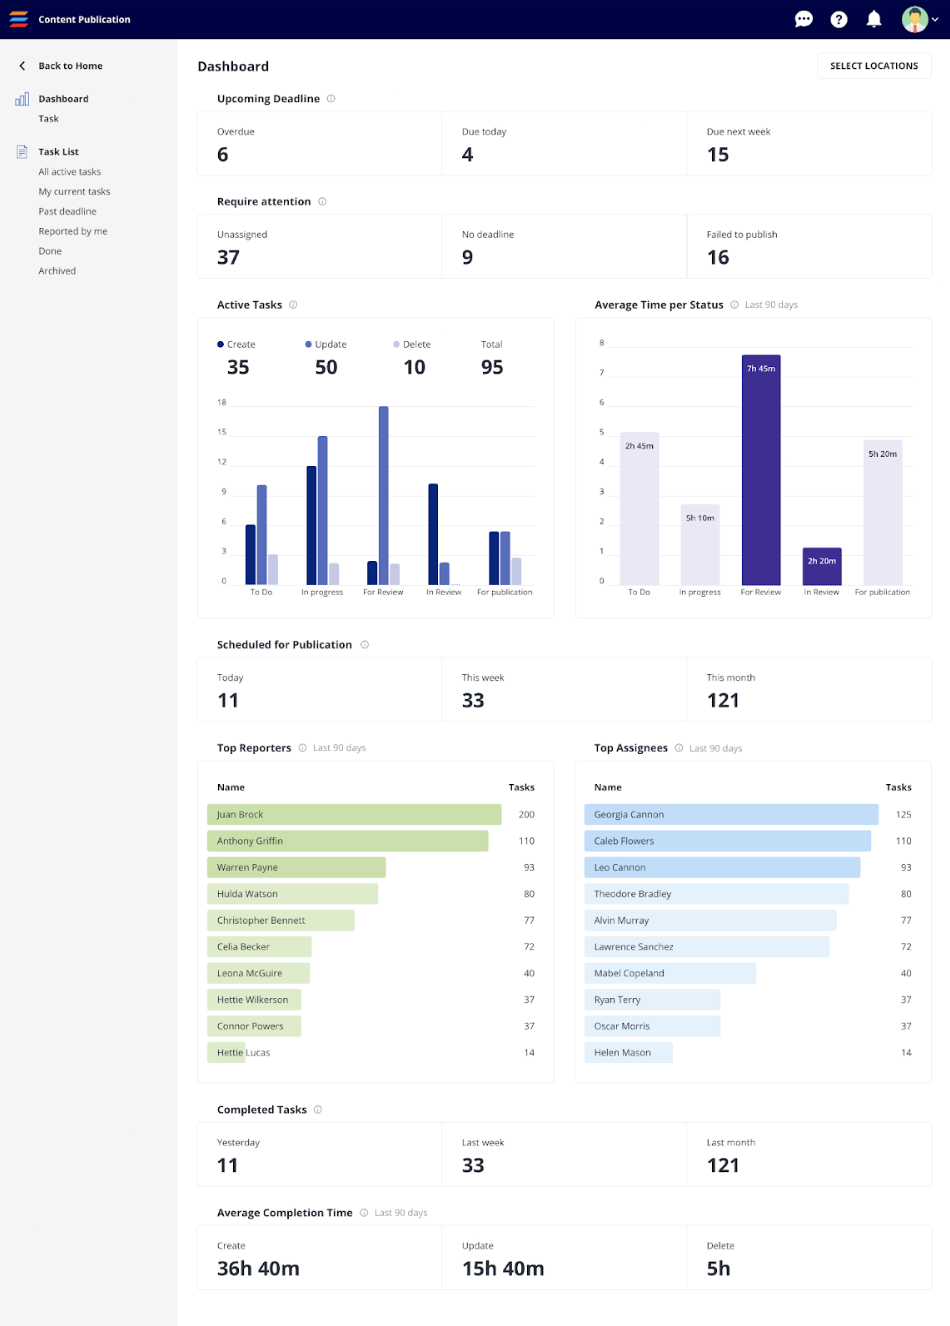
Figure 10. Viewing CPW Dashboard

On the Dashboard page, you can see multiple analytics details and widgets you can explore further. 
In particular, you see 
  • how many tasks are active
  • how many tasks require your attention
  • how many tasks due on this day
  • how many tasks are overdue 
  • how many tasks have no assignee
  • how many tasks have no completion date set 
  • how many tasks have been scheduled for publication 
  • how many tasks have not been published due to some reasons 
  • how many tasks have been completed (and statistics for specific periods) as well as 
  • details on the content task type - Create, Update, Delete 
  • information about task completion duration, and
  • statistics on the best CPW users - reporters (those who report issues with content and request its improvement) and performers (those who complete CPW tasks as assigned). 

Each of the widgets or cards is clickable and redirects you to the properly filtered Tasks page.

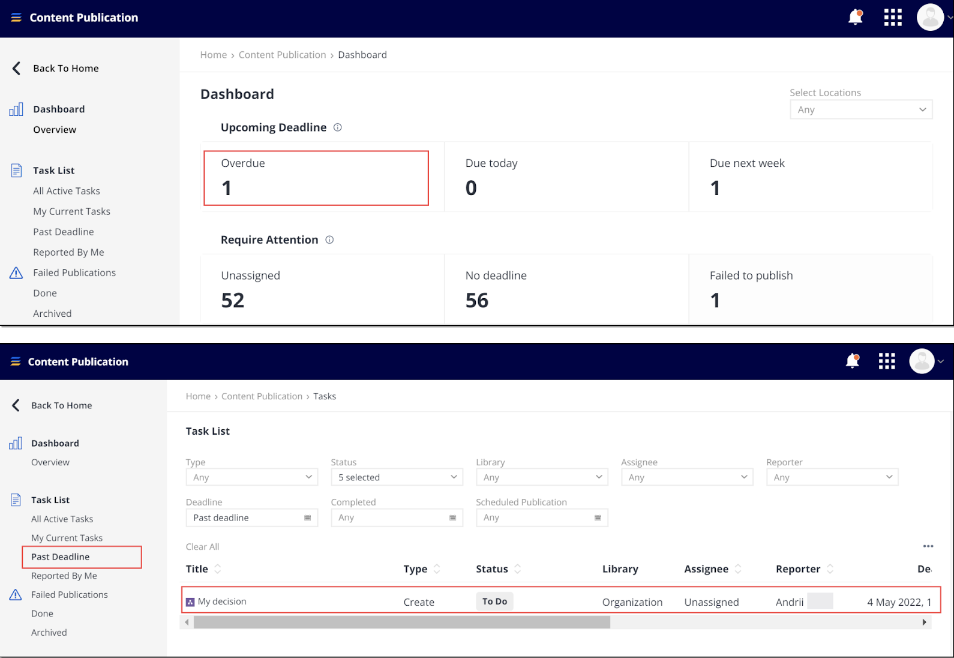
Figure 11. Opening the Overdue Tasks widget and accessing the Past Deadline report

The navigation menu in the left sidebar panel of the Content Publication page provides the same capability allowing you to quickly switch between various reports on CPW tasks. Read more about tasks and working with them in the chapter below.


Working with CPW tasks

Working with CPW tasks is in fact your main responsibility as a content manager. However, before jumping to the details of how you can manage tasks, you first need to learn what types CPW tasks are available in general.


Task types

The Create task
This task is one of the three types of tasks that can be created in the scope of the CPW feature. This type is used for creating new content (Gems). Users can create the Create task from various places such as Shelf KMS homepage, Gem page, or Feedback page.

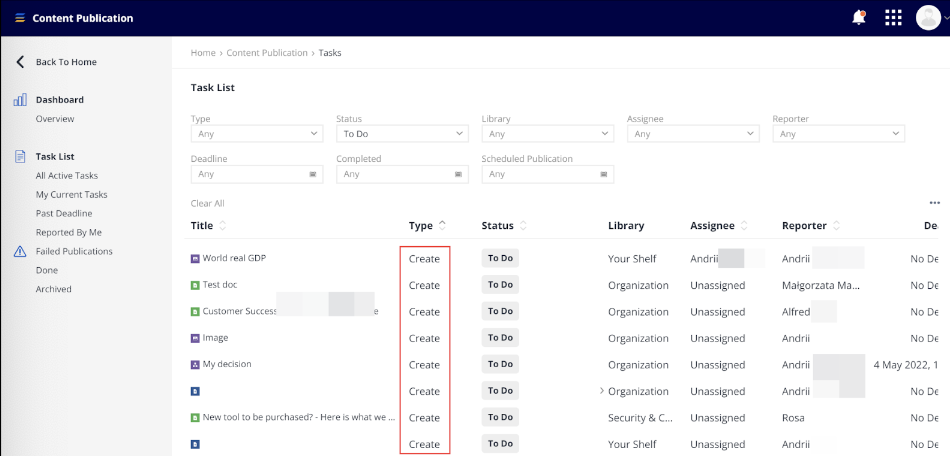
Figure 12. Viewing Create type tasks in CPW

The Update task
This task is the second type of the CPW tasks. To create an Update task, a content item (Gem) must already exist. Users can request to move Gems from one library to another, change titles or replace attachments. All of those actions and some more can be done in the scope of the Update task.

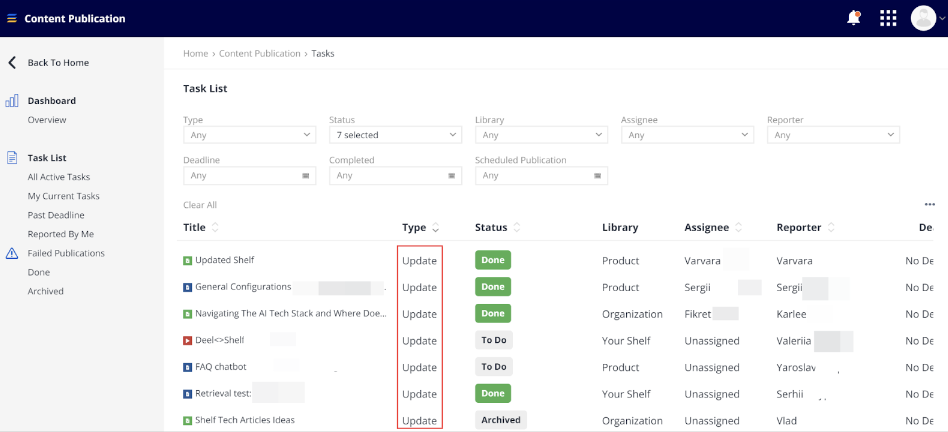
Figure 13. Viewing Create type tasks in CPW

The Delete task
This type of CPW tasks is created on already existing content items (Gems) which needs to be removed or deleted. 

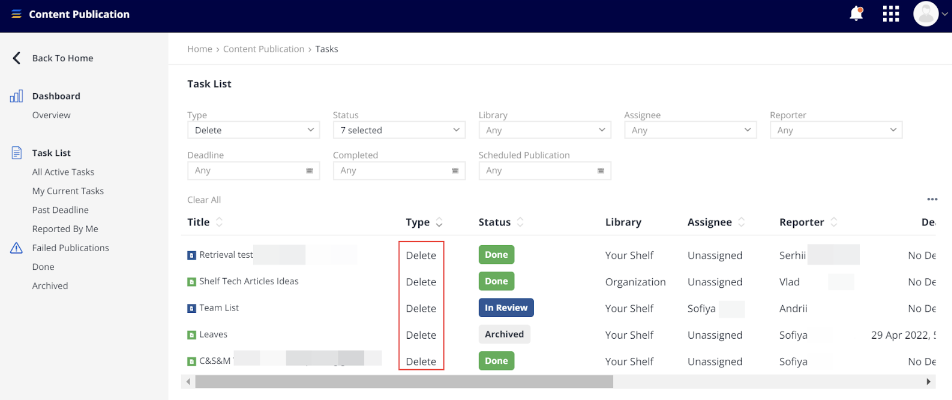
Figure 14. Viewing Delete type tasks in CPW


Accessing tasks

As mentioned above, you can access the CPW tasks capabilities both from the Dashboard widgets and from the sidebar panel. 


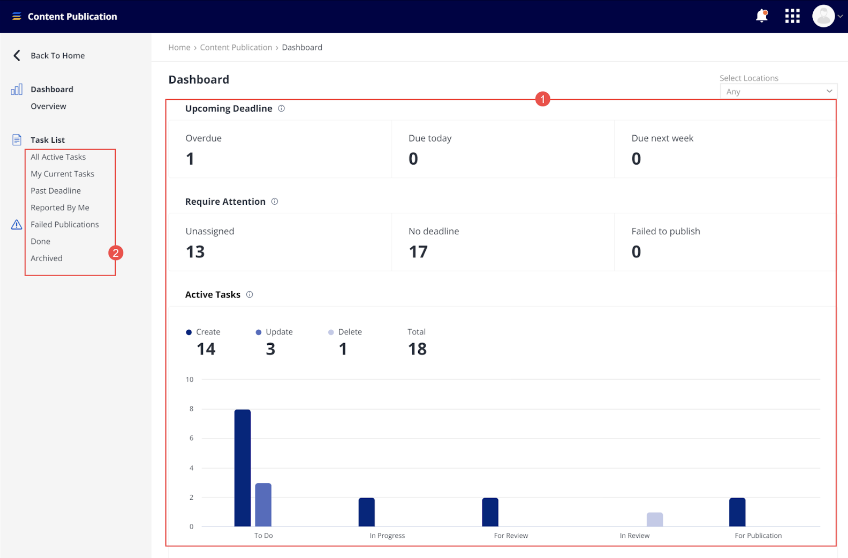
Figure 15. Accessing tasks from Dashboard and from sidebar panel


Working with task lists and filters


Task lists

Using the Task List options you can directly access various CPW tasks.
These include your own tasks, that is tasks assigned to you or requiring your attention - you need to review them, send back to a user that worked on content under those tasks, delete, or publish.  These tasks are collected in the respective section in the sidebar panel - My Current Tasks.

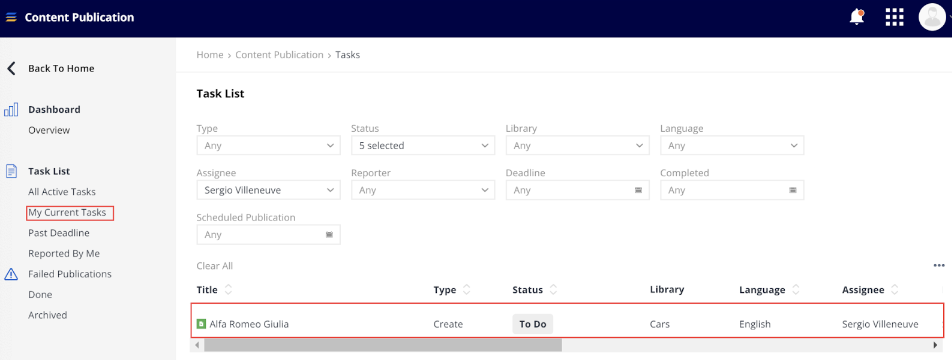
Figure 16. Viewing own CPW tasks

You can also view all active tasks, overdue tasks, tasks you have reported, tasks which failed publications, completed tasks, and archived tasks, by selecting the respective option in the sidebar panel.

On the Task List page, regardless of the contents, you can see various useful information broken down into columns.


  1. Title - shows the task (and Gem) title
  2. Type - displays a CPW task type: Create/Update/Delete
  3. Status - shows a CPW task status which can be one of the preconfigured or custom statuses
  4. Library - indicates a library where the Gem is stored or should be stored 
  5. Assignee - shows to whom the task is assigned; by default, if no assignee has been added, the column displays Unassigned
  6. Reporter - displays the name of a user who requested content changes
  7. Deadline - shows when the task is due
  8. Completed - details whether the task is or is not completed
  9. Scheduled Publication - shows whether there is a prescheduled publication set for the content item
  10. Last Changed - displays when the task (and Gem) has been last changed
  11. Created - shows when the task has been created.


Filters

In addition to that, you can use multiple filters to display only those tasks you are interested in. Multiselect is supported in most filters.


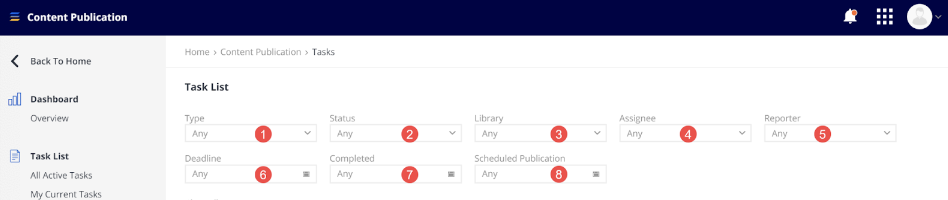
  1. Type - allows you to filter tasks by their type - Create/Update/Delete or Any
  2. Status - filters tasks by status which can be one of the preconfigured or custom statuses
  3. Library - filters by library where the Gem is stored or should be stored
  4. Assignee - filters tasks by users to who tasks have been assigned
  5. Reporter - filters tasks by users who requested content changes
  6. Deadline - filters tasks by dates/periods when they need to be completed
  7. Completed - filters tasks by dates/periods when they have been completed
  8. Scheduled Publication - filters tasks by their scheduled publication date/period


Downloading task lists as CSV

Once on the Task List page, additionally to simply viewing the needed lists of CPW tasks you can also download these lists in a CSV format for further use. Click the More actions menu icon and select the relevant option in the popup menu.

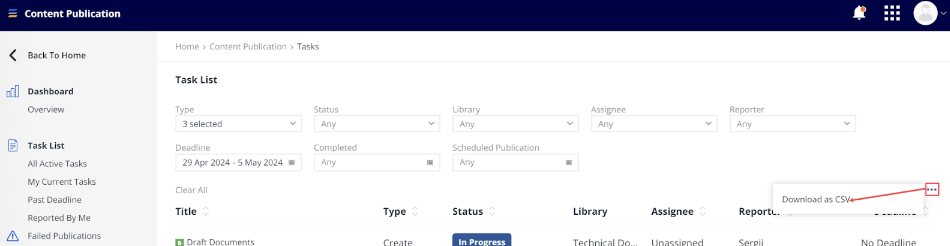
Figure 17. Downloading task list to CSV file


Working with individual tasks

From any Task List page, you can open any individual task to view or work with it. 

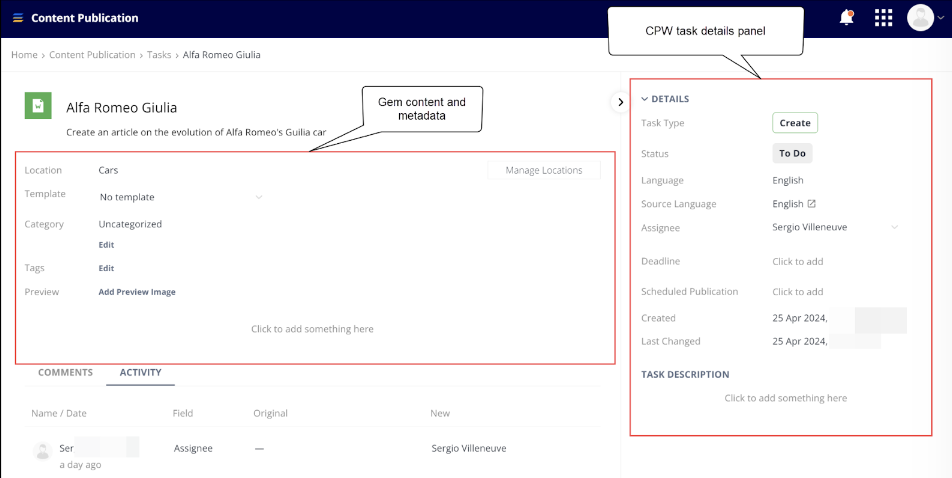
Figure 18. Viewing CPW task and its details

Let’s see what you as a content manager can do with individual CPW tasks.


Editing content item (Gem)

  • Add or edit the content item’s title and description, if needed

    Figure 19. Editing content item title and description

  • Add a template for the content item creation

    Figure 20. Adding template for content item


  • Add or edit tag(s) and/or category(-ies)

    Figure 21. Adding/editing categories and tags

  • Add/replace a preview image to better highlight the content item among other content in the folder or library

    Figure 22. Adding/editing content item’s preview image

  • Add/edit content item’s text/imagery/links/etc.

    Figure 23. Adding/editing text or other elements to content item

  • Change the content item’s location

    Figure 24. Managing content item’s location


  • Add/edit/delete, and view other collaborator’s, comment(s)

    Figure 25. Viewing/adding/editing/deleting comment(s) to content item


  • View activity on the content item - what changes have been done to it and who has made such changes. 

    Figure 26. Viewing activity on content item 


Editing task and/or task details

Figure 27. Viewing task details and managing/editing task


  • View task type (1)
  • View and/or change task status (2); possible options are:
    • To Do
    • In Progress
    • In Review
    • For Review
    • For Publication
    • Done
    • Archived

      Figure 28. Changing task status 

  • View and/or add the content item’s language (3) (if there is a need to add translations of the content item)

  • View the content item’s source in its source language (4) (if the content item is a translation)

  • View and/or change the task assignee (5)
    Figure 29. Viewing/changing the task assignee 

  • View/set the task completion deadline (6)

    Figure 30. Viewing/setting the task deadline


  • View/set the scheduled publication date for the content item (7)

    Figure 31. Viewing/setting the content item’s scheduled publication date

  • View the task creation date (8)

  • View the task latest updating date (9)

  • View/edit the task description (10) 

    Figure 32. Viewing/adding task description


Publishing tasks

Once a CPW task has passed all the fulfillment stages and is ready for publication, you can publish it. To do so, change the task status to Done and confirm the task publishing decision in the respective modal window that appears afterwards.

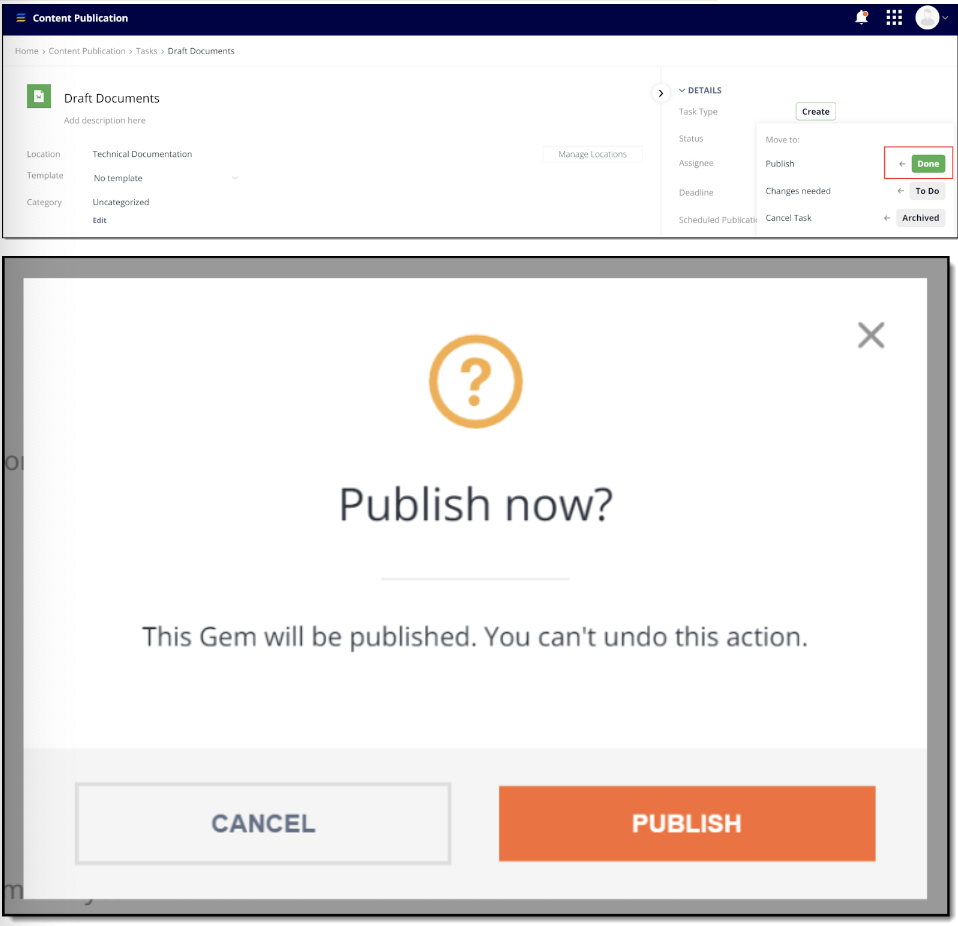
Figure 33. Publishing CPW tasks

This action works for all types of CPW tasks - Create/Update/Delete. Depending on the task type, the associated content item will be created, updated, or deleted.

Scheduled Publications option: if you have no permission to the Done status, you will not be able to schedule content publication and this option will be disabled in the Task Details panel. 


Allowing/disallowing users to bypass CPW

In certain cases content managers can let or deny specific users (content creators etc.) bypass the standard CPW flow, that is following all the content creation/updating/publishing task flow. To do so, you need to follow the procedure described in the relevant section above.

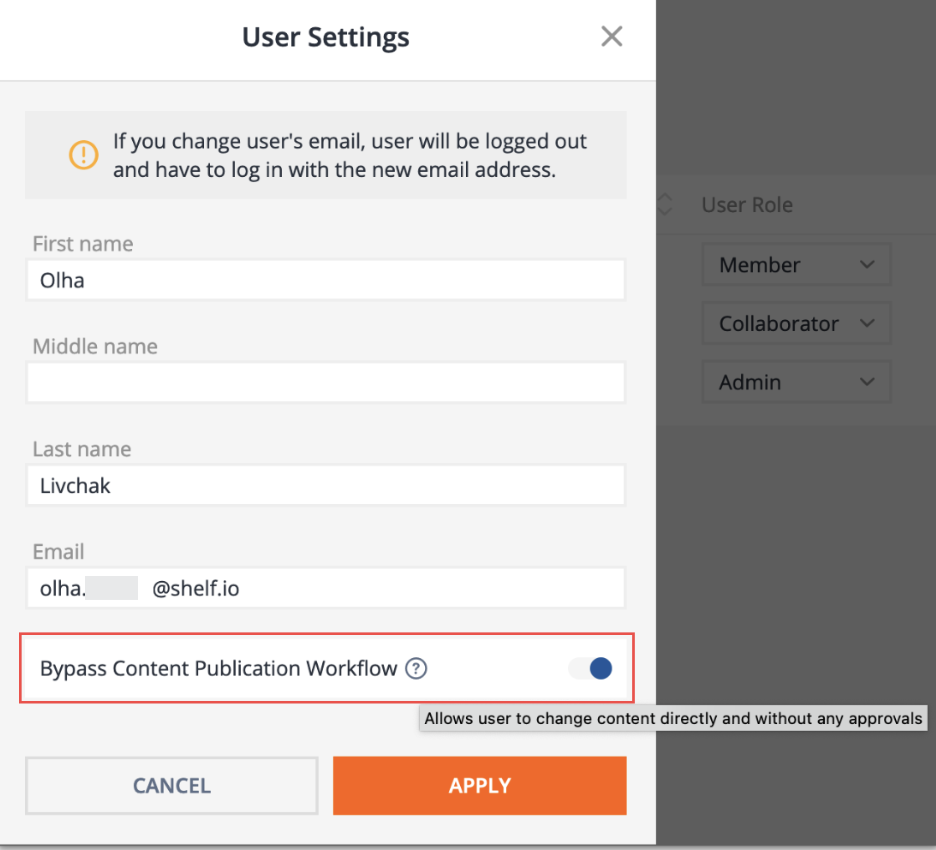
Figure 34. Enabling/disabling CPW bypassing for specific users


Using CPW as content users

To understand how CPW changes your work with content in Shelf as a content user, you need first to see how you normally create content in Shelf KMS.


Creating/editing content without CPW 

To create content in Shelf KMS if CPW is disabled for your organization and/or your account, you need to follow the below steps.
  1. Once logged in to your Shelf account and on the Shelf KMS homepage, find and click the Add button in the upper part of the window.
  2. In the dropdown menu, select the Create Content option.

    Figure 35. Creating content in Shelf KMS without CPW

  3. On the page that appears, select the needed type of content you want to create.

    Figure 36. Selecting content type

  4. On the content item page that opens, add all the needed content attributes - title, description, body/images/links, location (library/folder), category(-ies), tag(s) etc., and then click the Create button in the upper right corner of the window.

    Figure 37. Adding the content item details and saving it 

Once the above steps are completed, your new content item is created and saved to the selected location - library and/or folder. 

The same approach applies to editing content items: you can edit them directly by opening, if you have the relevant permissions to the library/collection where it is stored and if your user role allows editing content.


Creating/editing content with CPW

If CPW is enabled for your user group, you cannot create or edit unstructured content (text/image Gems, documents, wiki articles, Decision Tree Gems and other types of content items other than libraries and folders) under a standard content creation/editing procedure. You need to follow the CPW procedure and its steps, described below.

Note that if you want or need to create content in your private library, you do not have to follow the CPW procedure. In this case, you simply create the private content items.


You can also still create a structured content item - library or folder - directly, without CPW.


Requesting new content

To initiate content creation procedure via CPW, perform the following steps.
  1. Once logged in to your Shelf account and on the Shelf KMS homepage, find and click the Add button. 
  2. In the dropdown menu, find and select the Request New Content option.

    Figure 38. Requesting new content creation

  3. On the Request New Content page that appears, select the needed content type to be created.

    Figure 39. Selecting the new content type

  4. In the popup window that opens, enter the content title, select its language, and indicate the library/folder where it needs to be stored. 

    Figure 40. Adding title, language and location requirements for new content

  5. Confirm your choice in the confirmation popup window and see the CPW task creation success notification. Note that this is the Create type task. See more about CPW task types in the relevant section above.

    Figure 41. Confirming CPW task creation and viewing its creation success message

  6. On the success popup, click Manage Publication to add some more details to the CPW task you have just created to request new content. You can add an assignee (who needs to create new content), deadline, schedule publication date, and some task description where you can provide more details/requirements to the content you need.

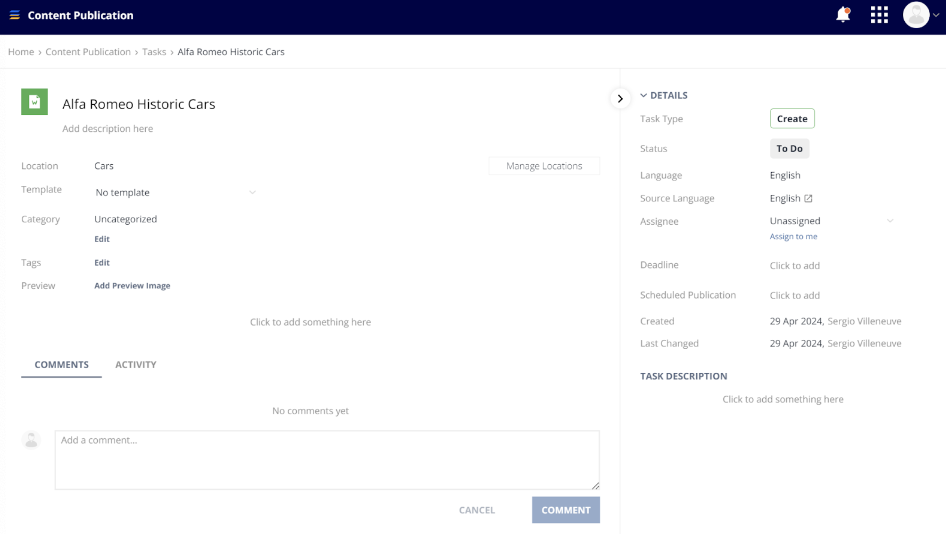
Figure 42. Adding more details/requirements for CPW task

Once your task is completed (by assignee), reviewed, approved, and published (by content manager), the content you have requested via CPW appears in Shelf KMS, in the library/folder you have indicated.

Figure 43. Verifying content item creation in requested library/folder


Requesting content change

If you need to update/change or otherwise edit some content stored in Shelf KMS, you need to create an Update type CPW task. To do so, follow the below steps.
  1. Once logged in to your Shelf account, find the content item you need to update. Click it to open.
    Figure 44. Finding and opening content item to be changed/updated
  2. On the content item—Gem—page, open the More actions menu by clicking the respective icon. In the dropdown menu that opens, find and select the Request change option.

    Figure 45. Initiating content change from the Gem page

  3. Confirm your choice in the popup window that opens next. Once done, you will see the CPW task creation success message. 

    Figure 46. Confirming CPW task creation and viewing its creation success message


  4. Following that, click Manage Publication to open the newly created CPW task and add important requirements to it, such as assignee, deadline, scheduled publication date, comment(s), and other details in the Task Description section.

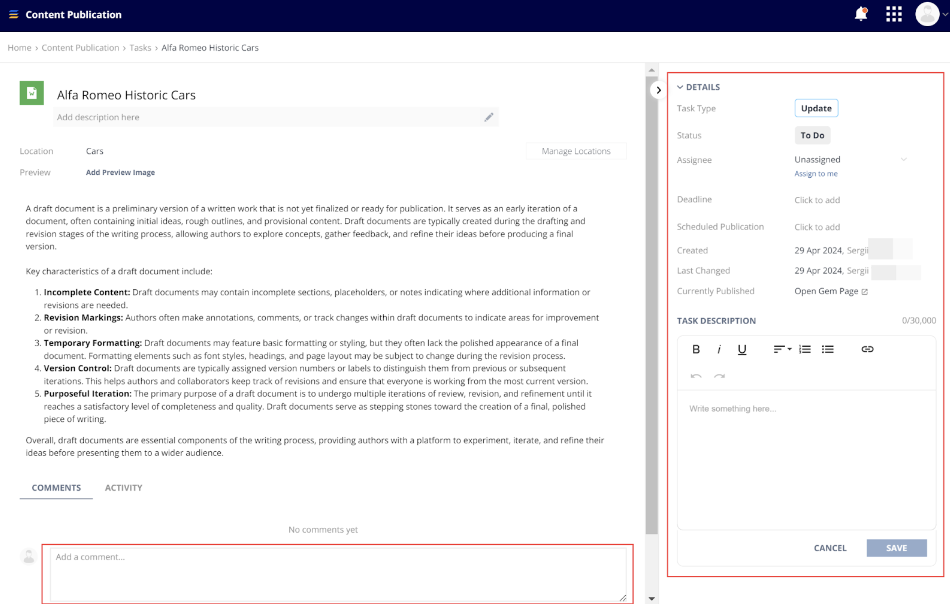
Figure 47. Viewing CPW task for content change and adding details/requirements to it


Once your task is completed (by assignee), reviewed, approved, and published (by content manager), the content change you have requested via CPW is performed, and the updated content item appears in Shelf KMS.


Requesting content location change

If, while browsing your content in Shelf KMS, you have determined that some content item is stored in a wrong location, you can request its change. To do so, follow the below steps.
  1. Find the content item you need to update. Click it to open. 
  2. On the Gem page that opens, go to the More actions menu and select the Request location changes option from the dropdown list.
    Figure 48. Initiating content location change from the Gem page
  3. In the Request Location Changes popup window that appears, click Add Location. Then, in the Select Location window that opens next, select the needed new location from the available list. Confirm by clicking Select. Finally, delete the old location for your content item and click Request.
    Figure 49. Selecting new location and deleting old location for content item
  4. Confirm your decision to create the CPW task in the popup window that opens next. Following that, you will see the CPW task creation success message. 

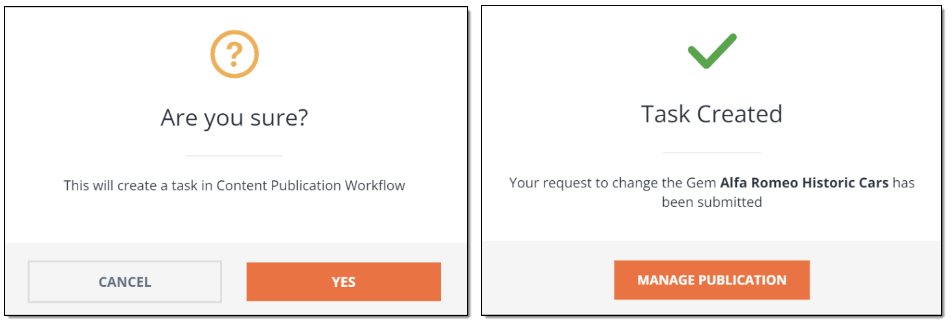
Figure 50. Confirming CPW task creation and viewing its creation success message

Once your task is completed (by assignee), reviewed, approved, and published (by content manager), the content location change you have requested via CPW is performed, and the required content item appears in its new location on Shelf KMS.

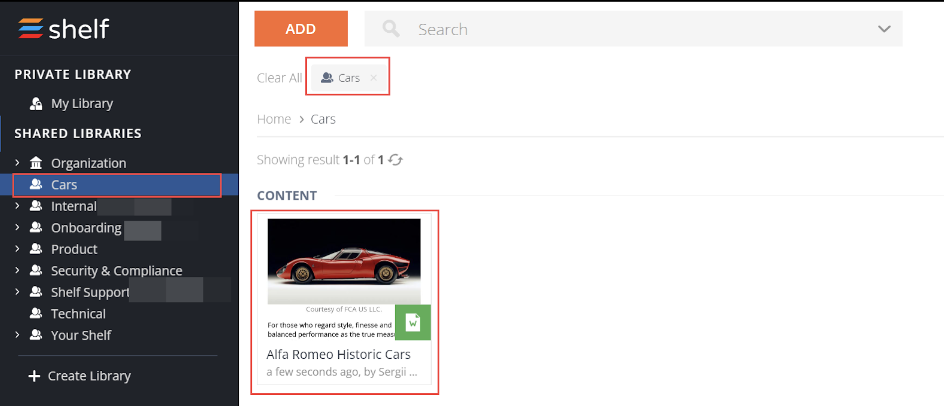
Figure 51. Verifying that content item location has changed


Requesting content deletion

Sometimes you may find content items that are no longer needed or deprecated. In this case, you can request their deletion.

To do so, follow the below steps.

1. Go to the library/folder where the no longer needed content item is stored.
 
1.1. Open the content item’s More actions menu directly from within the library/folder page, by clicking the respective icon. Then, in the dropdown list, find and select the Request deletion option.

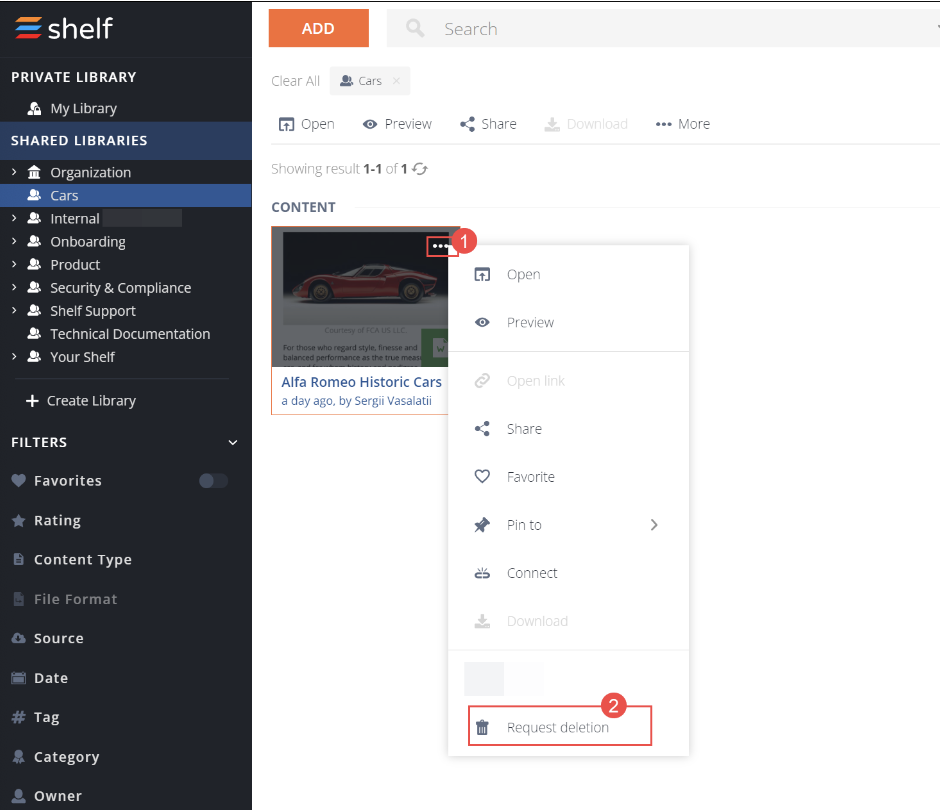
Figure 52. Initiating content deletion from the library in Shelf KMS

1.2. Find and open the needed content item. Once on its page, go to its More actions menu by clicking the respective icon. Then, in the dropdown list, find and select the Request deletion option.

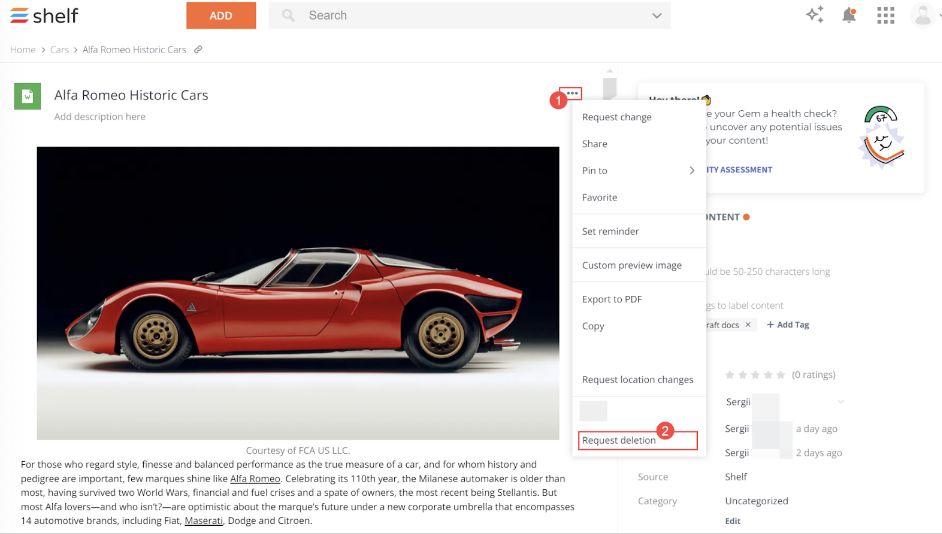
Figure 53. Initiating content deletion from the Gem page in Shelf KMS

2. Confirm your decision to create the CPW task in the popup window that opens next. Following that, you will see the CPW task creation success message. 

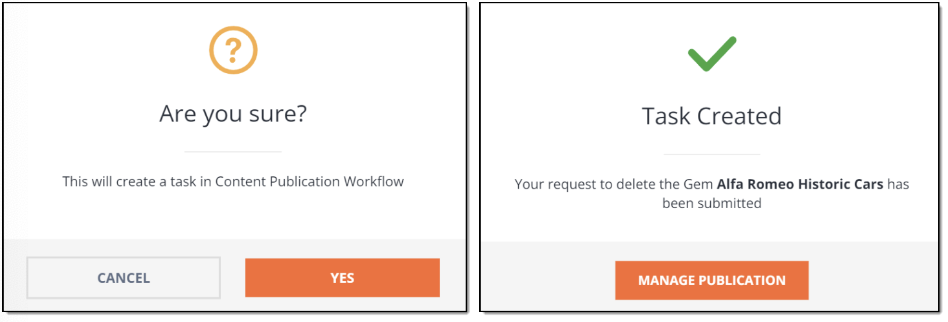
Figure 54. Confirming CPW task creation and viewing its creation success message

Once your task is completed (by assignee), reviewed, approved, and published (by content manager), the content deletion you have requested via CPW is performed, and the required content item is deleted from Shelf KMS.

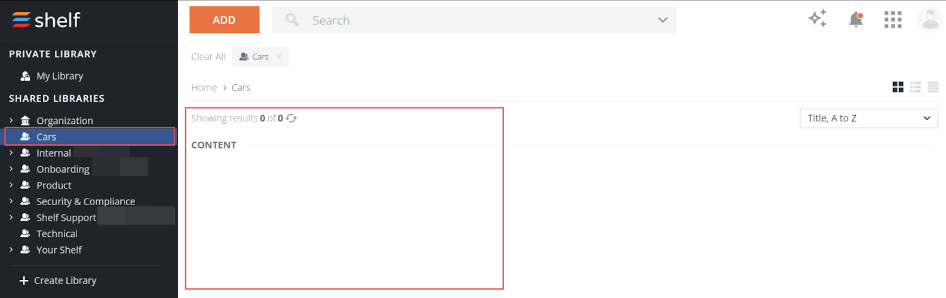
Figure 55. Verifying that the needed content item has been deleted

CPW users whose CPW permissions granted via User Groups or otherwise do not allow creating, editing/updating, or deleting content, are actually able to do that if:
  • CPW bypass is enabled for them
  • They create, edit/update or delete private content, that is content in their private/personal libraries.