
Shelf App for Salesforce: Installation and Configuration Guide
Document version history
Version number | Modified by | Modifications made | Date modified | Status |
1.0 | Shelf | Initial release of the document | 5 April 2022 | Expired |
1.1 | Shelf | The guide was updated to incorporate multiple modifications and changes added to the Shelf App. | 6 May 2022 | Expired |
1.2 | Shelf | The guide was updated to incorporate some notes about the influence of the configurations on Answer Assist and regarding the Shelf URL field. | 25 May 2022 | Expired |
1.3 | Shelf | The guide was updated to match the major overhaul of the Shelf Assist component for Salesforce. Screenshots were replaced with the up-to-date ones. Installation package updated. | 21 September 2022 | Expired |
1.4 | Shelf | The guide was updated to include the new version of the installation package. | 29 September 2022 | Expired |
1.5 | Shelf | The guide was updated to include the new version of the installation package. | 27 October 2022 | Expired |
1.6 | Shelf | The guide was updated to include sections relating to v.2.x package specifics. Screenshots and text have been reworked to meet the version differences. | 13 February 2023 | Expired |
1.7 | Shelf | The guide was updated to include the new section about addition to Shelf App and Shelf Answer Assist widget. | 11 April 2023 | Expired |
1.8 | Shelf | The guide was updated to include a new section about Utility Bar enabling and configuring. New text was also added to describe the Shelf Assist 3.0 widget and its operation in Salesforce. Multiple changes and/or modifications were also made to text and imagery across the document. | 8 June 2023 | Expired |
1.9 | Shelf | The guide was updated to include instruction how to set up Datadog API key | 1 October 2023 | Expired |
2.0 | Shelf | The guide was updated to include the steps required to edit the Answer Assist label text. | `16 October 2023 | Expired |
2.1 | Shelf | The guide was updated to include the link to the new Shelf App installation package that now contains the error logger handler to show Error messages in console log. It is now possible to avoid the display of multiple error notifications if the Shelf permission set is not assigned to a Salesforce user. | 25 April 2024 | Expired |
2.2 | Shelf | The guide was updated to include the added support of the Amazon Connect Contact Id field. | 29 May 2024 | Active |
Shelf App installation package version
Introduction
Prerequisites
- You must have access to a Shelf instance as the Salesforce App is unable to work without access to a Shelf instance.
- You must have admin permissions in regard to your Salesforce instance.
- The Shelf App DOES NOT USE any Service or Sales Cloud specific items.
- The Shelf App does not work in Incognito mode in a browser
- Google Chrome and Safari are supported browsers
Installation and configuration
Add the package
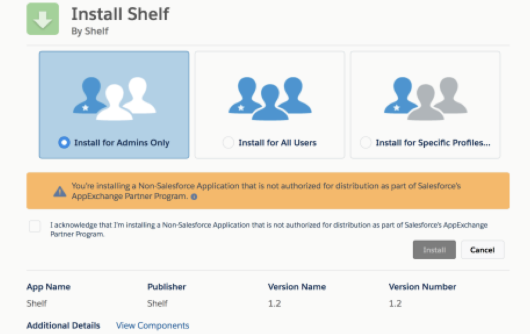
Figure 1. Browsing the Installation screen
- Indicate users for which you want to install the Shelf App by selecting the respective installation options, for example - Install for All Users.
- Select the I acknowledge… checkbox to confirm that you are aware that the Shelf App is not placed on Salesforce AppExchange and is distributed on an as is basis.
- Click the Installbutton.

Figure 2. Initiating the installation
- Since the app is using third-party services, you need to approve the access by clicking the Continuebutton:

Figure 3. Enabling third-party services in version 1.x and 2.x packages
 Figure 3a. Enabling third-party services in version 3.x package
 - Once the installation is underway, you will see a progress bar displayed. Once the installation is finished, the Installation Complete! the message is displayed. You will also receive a corresponding email message titled “Package Shelf Install Successful”. Once the respective messages are received, click the Donebutton to close the installation window.

Figure 4. Finishing the installation process
Configure the package
Configuring version 1.x and version 2.x packages
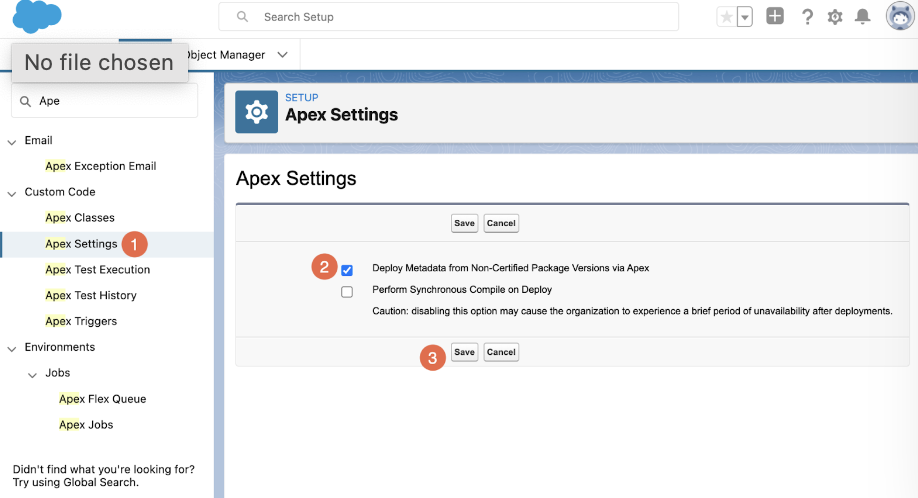 Figure 5. Enabling metadata deployment from non-certified package versions via Apex
Configuration procedure for version 1.x package
- Once the initial installation is successfully completed, you are able to see the Shelf App on the list of installed packages. To get to this list, follow the path: Setup (Home) > Installed Packages.

Figure 6. Viewing installed packages
- Near the installed Shelf App, click the Configurelink button to get to the configuration options for the Shelf App.

Figure 7. Viewing configuration options for Shelf App
Table 1. Details of Shelf App’s configuration options
Option | Details |
Shelf Environment (Region) | This dropdown list field allows selecting a needed environment for your Shelf App use. There can be various available options here, for example:
|
Subdomain | It indicates the subdomain (or account name) for your Shelf account (e.g. https://yourcompany.shelf.io). For configuration you should set up “yourcompany” name only. |
Configuration procedure for version 2.x package
- Once the initial installation is successfully completed, you need to open the Shelf configuration menu. To do so, go to your Salesforce instance’s Application menu and search for the Shelf Configurationapplication there.
 Figure 8. Finding the Shelf Configuration application in the Salesforce Application menu
 - Once you have found the Shelf Configuration application, open it and complete the configuration options as needed. Refer to Table 1 above for details on the configuration options.

Figure 9. Completing the configuration options for Shelf App
Configuring version 3.x package
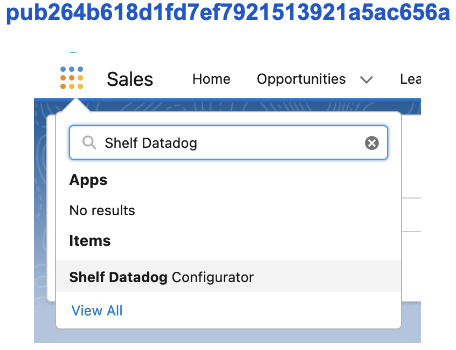 Figure 10. Accessing Shelf Datadog Configurator app
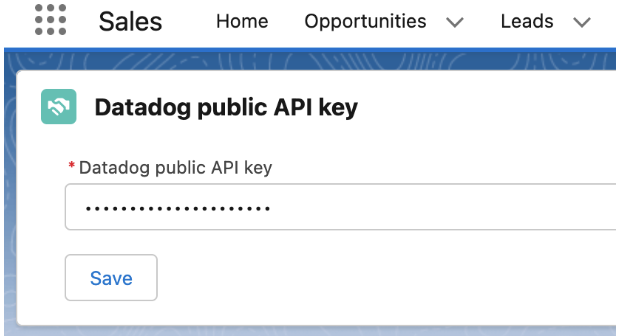
Figure 11. Viewing and copying the Datadog public API key
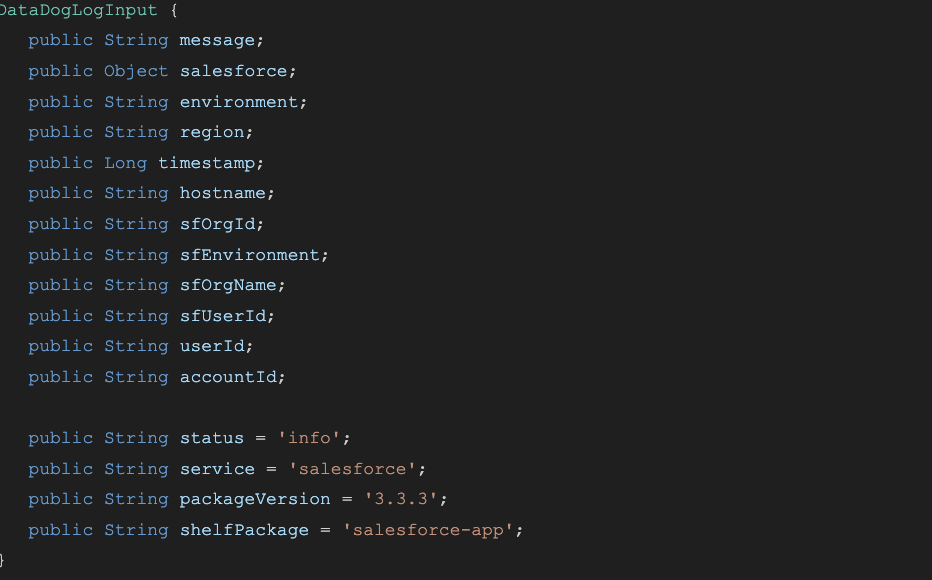
- message (error or warning message),
- Salesforce environment-related information, like hostname, Org name, User ID, environment type, etc
- Shelf environment-related information, like server region, account id
- AgentAssist Utilitybar menu click
- The duplicated Utilitybar component is loaded
- AgentAssist failed initialization
- AgentAssist config fetching
- AgentAssist loading duration
- Fetching suggestions for Salesforce Record
- Fetching suggestions for the Chat
- Error message for failed component loading
Configure access
- Go to Setup (Home) > Permissions Sets > Shelf Assist Access.

Figure 12. Accessing permission sets
- In the Permission Sets window that appears, click the Manage Assignmentsbutton.

Figure 13. Starting permission set assignment
- In the window that opens, click the Add Assignment button. Then, in the window that appears next, select the checkbox(es) next to the needed user(s) and click the Next button.


Figure 14. Assigning a user
- In the next window, select a suitable expiration option for the user you are assigning, by selecting the appropriate checkbox. Once done, click the Assign button to complete the assignment procedure.

Figure 15. Setting the expiration date for the assigned user
Configure Shelf components
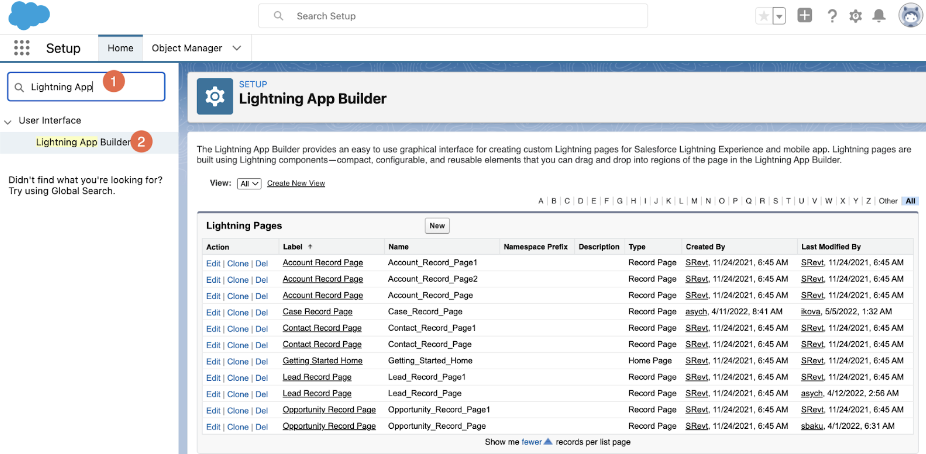
Figure 16. Accessing Lightning App Builder
- To start editing, click the Edit link button near the needed Lightning Page.

Figure 17. Starting the Lightning record page editing
- In the next window that appears, you can simply drag and drop a needed Shelf component or components from the left-side Components panel’s block titled Custom - Managed.

Figure 18. Placing Shelf Assist component on the page (package 1.x and 2.x versions)

Figure 18a. Placing Answer Assist component on the page (package 3.x version)
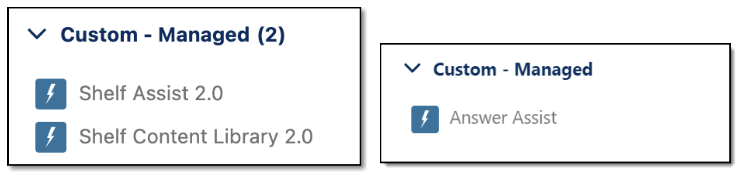
Table 2. Shelf components and their details
Component | Details |
Version 1.x components | |
Shelf Content Library | It is a content library where you can browse all the available Gems. |
Shelf Assist | It is a component that activates the Shelf Answer Assist widget capable of embracing the functionality of all the other components. Old Shelf Assist component is also available but if you want to enjoy new design and other improvements, you need to switch to Shelf Assist 2.0. |
Shelf Related Content* | It is a larger component that will contain content linked to the appropriate record. |
Shelf Related Content - Compact* | It is a smaller component that will contain content linked to the appropriate record. |
Shelf Sidebar Search* | It is a search component that will contain functionality to search content. |
Version 2.x components | |
Shelf Content Library 2.0 | See the description above. |
Shelf Assist 2.0 | See the description above. |
Version 3.x components | |
Answer Assist | See the description above |
Utility Bar | It is a component that serves as a widget bar and enables quick access to announcements and suggestions in Shelf Assist. This component is not displayed in the Custom - Managed block of the Components panel but is accessible from the bottom of the page. |
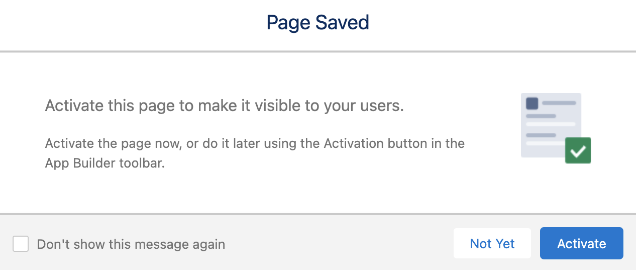
Figure 19. Page activation prompt
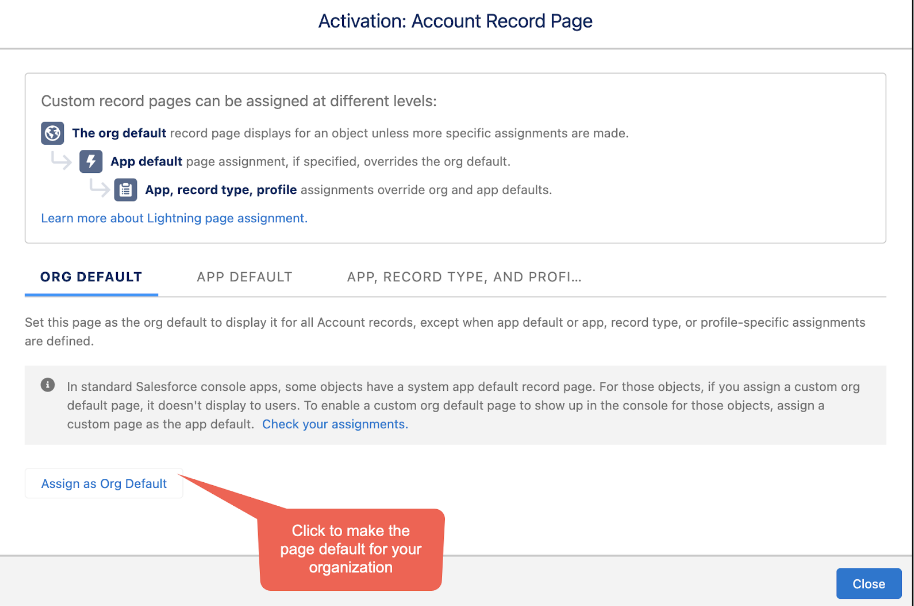
Figure 20. Setting the page as default

Figure 21. Selecting the page form factor
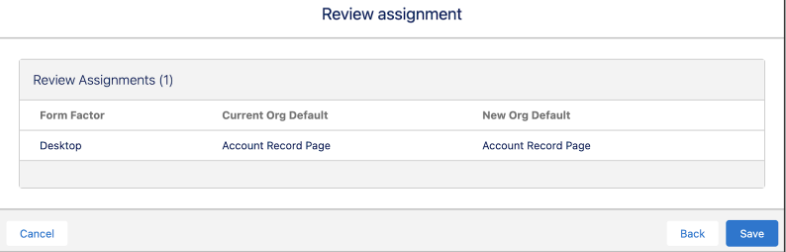
Figure 22. Reviewing and saving the page
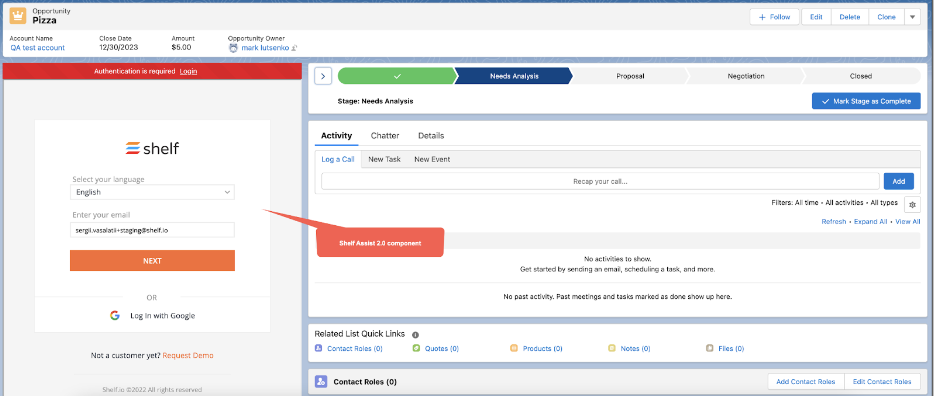
Figure 23. Viewing your Account Record page with the added Shelf Component
Configure Shelf Assist
Configuring Answer Assist on Shelf
- Log in to Shelf under your Admin credentials and navigate to the Admin Panel. Then select the Answer Assist Configurator submenu in the Admin Paneltree menu.

Figure 24. Accessing Answer Assist Configurator on Shelf
Select a configuration to open its settings.

Figure 25. Accessing Answer Assist configuration
- Go to the Advancedtab and add the desired configuration for Shelf Assist. For each object in Salesforce to which you intend to add Shelf Assist, define the fields that Shelf should interpret in order to render context-aware suggestions. See an example configuration below that configures Shelf’s Answer Assist for Cases in Salesforce ServiceCloud and for Opportunities in Salesforce SalesCloud. {

Figure 26. Accessing and configuring Advanced settings of Answer Assist
"salesforce": {
"suggestionAttributes": {
"Case": {
"fields": [
"Description",
"Subject",
“amazonconnect__AC_Contact_Id__c”]
},
"Opportunity": {
"fields": ["Name"]
}
}
}
}
Note:
As seen from the code snippet above, the Amazon Connect Contact Id field support has been added for the Salesforce Case object. The respective API name is amazonconnect__AC_Contact_Id__c. This support allows using Connect ID as Conversation ID (Interaction ID) and replacing Case Record ID. - Save the configuration by clicking the SAVE button.
Note:The Assist Advanced Configuration is not limited to Salesforce and may contain other settings as well.
Note:
Make sure to add the following lines to JSON code in the Advanced tab:
},
"assist": {
"enabled": true
These lines are responsible for enabling the context-mapped suggestions in Shelf’s Answer Assist.
Figure 27. Viewing the context suggestions enabling lines
- Once the configuration is saved, go to the General tab and copy the Configuration ID.Once done, save the copied Answer Assist Configuration ID to a file for further use.

Figure 28. Copying Answer Assist Configuration ID
Configuring dynamic context-mapped suggestions
- Setup the content mapping in the Content Mapping submenu in the Shelf Admin Panel.

Figure 29. Starting the Content Mapping
- Initiate the search with a filter you want to map an external Salesforce field to. In this exemplary case, we use Unit__c Salesforce field as the tag filter on Shelf to narrow down the suggestions.

Figure 30. Running tag-filtered search and viewing search results
- Copy the search result URL in the browser search bar.
- Go to https://{your_subdomain}.shelf.io/admin-panel/content-mappings/
- Click the ADD MAPPING button. Then, In the mappingValue field, paste the copied search result URL, but replace the selected tag (pizza, in our case) with a dynamic variable, which in this exemplary case is {{tag}} .

Figure 31. Setting the mappingValue
- Once done, click the OK button of the mappingValue field and then SAVE. Now, your Content Mapping configuration is saved.
- Initiate the search with a filter you want to map an external Salesforce field to. In this exemplary case, we use Unit__c Salesforce field as the tag filter on Shelf to narrow down the suggestions.
- Now, you need to configure the Answer Assist context suggestions. Go to the Answer Assist Configurator in your Admin Panel, navigate to the Advanced tab, and make the respective changes to the JSON, paying attention to the following details:id - the unique value among different contextTypestype - “text”accessor - the JSON path to an external Salesforce context value.

Figure 32. JSON code in Answer Assist Configurator’s Advanced tab
 Figure 33. Intent value in the Content Mapping Configuration
Figure 34. IntentGroupId value in the Content Mapping Configuration
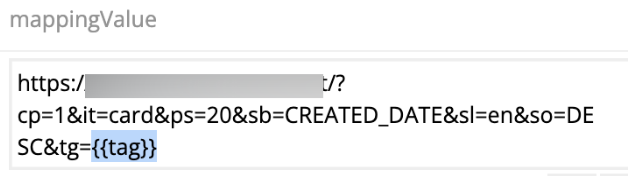
Figure 35. mappingValue in the Content Mapping Configuration
Make sure to set proper values in the JSON code. Our exemplary case’s JSON is expected to be as follows:
{ |
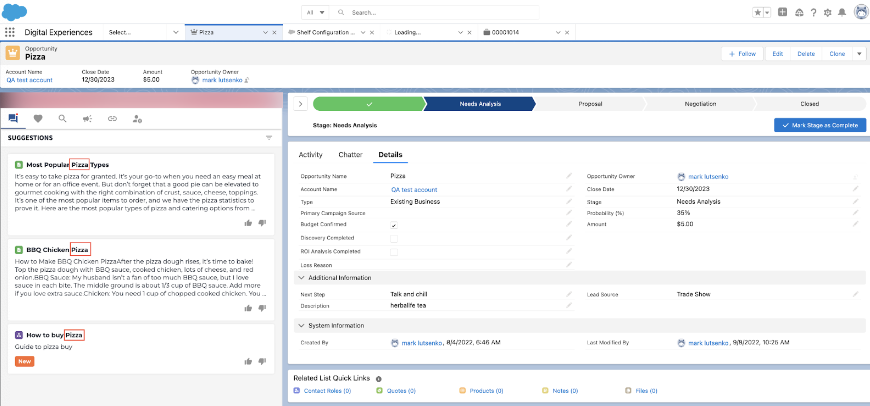
Figure 36. Viewing content suggestions in the Shelf Assist component on Salesforce
Configuring Shelf Assist on your Salesforce instance
- Navigate to the page where you want to add the Shelf Answer Assist component and open the Setup menu.

Figure 37. Accessing the page setup
- Select the Edit Page option from the menu.

Figure 38. Starting the page editing
- Select the respective Answer Assist component (Shelf Assist 1.0, Shelf Assist 2.0 or Answer Assist (for version 3.x packages) from the respective block in the Components panel, and drag and drop in any needed place of the page you want it to be displayed.

Figure 39. Placing Shelf Answer Assist on Salesforce page
- Copy the Configuration ID you have previously copied on the Shelf side and paste it into the respective field of the Shelf Assist properties.Note:Note that now you don’t need to fill in the Shelf URL field as the URL address is automatically fetched from the Shelf App’s general settings, in particular - from the Metadata Configuration window. The Shelf URL field though not subject to manual population is retained in the Answer Assist Configuration window due to the Salesforce regulations.

Figure 40. Adding the Shelf’s Answer Assist Configuration ID on Salesforce
- Save changes by clicking the Save button. Once done, go back to the page and check if everything works as expected.

Figure 41. Viewing Salesforce page with the Shelf Assist component
Adding custom label for Shelf Answer Assist
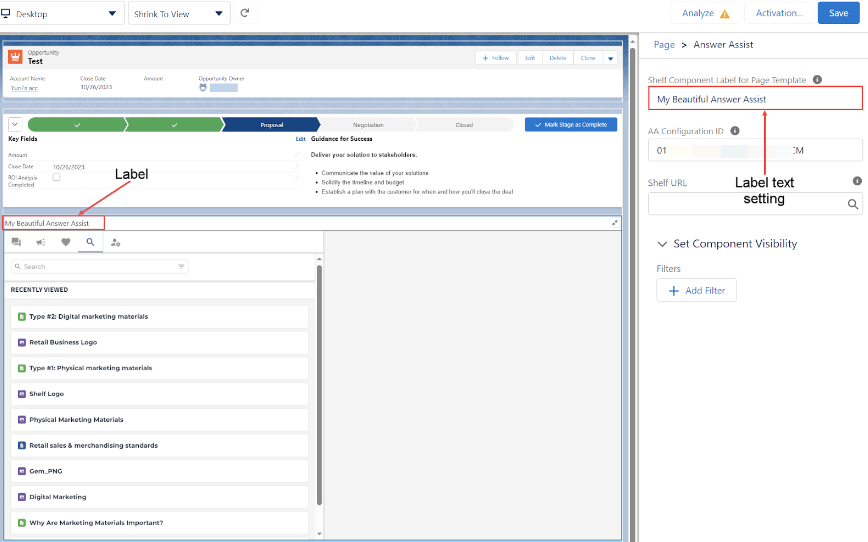
Figure 42. Editing the Answer Assist label

Figure 43. Viewing the edited text for the Answer Assist label
Enable and configure the Utility Bar component (for version 3.x packages only)
Enabling Utility Bar
- Answer Assist must be enabled for your Shelf account
- Shelf App version 3.0 must be installed and configured on your Salesforce instance
- Go to the Setup page.
- Find and expand the Apps section in the left sidebar panel.
- Select the App Manager option in the Apps menu.
- In the Lightning Experience App Manager window that appears, find the Sales app with Lightning type (or any app according to your business requirements).
- Click the More Actions button to open the app’s context menu.
- Select the Edit option in the menu.

Figure 44. Accessing the Sales app in Salesforce
- In the App Settings window that appears, find and select the Utility Items (Desktop Only) option in the left sidebar panel.
- Following that click the Add Utility Item button.

Figure 45. Adding a new Utility Item in Sales App
- In the dropdown menu that appears on the screen, find and select the Answer Assist option.

Figure 46. Adding Answer Assist to Utility Bar
Configuring Utility Bar with Shelf Assist
After selecting Answer Assist—and, respectively, pre-adding it to Utility Bar—you need to perform its configuration. The figure below shows what configuration items are available and how you can complete them.
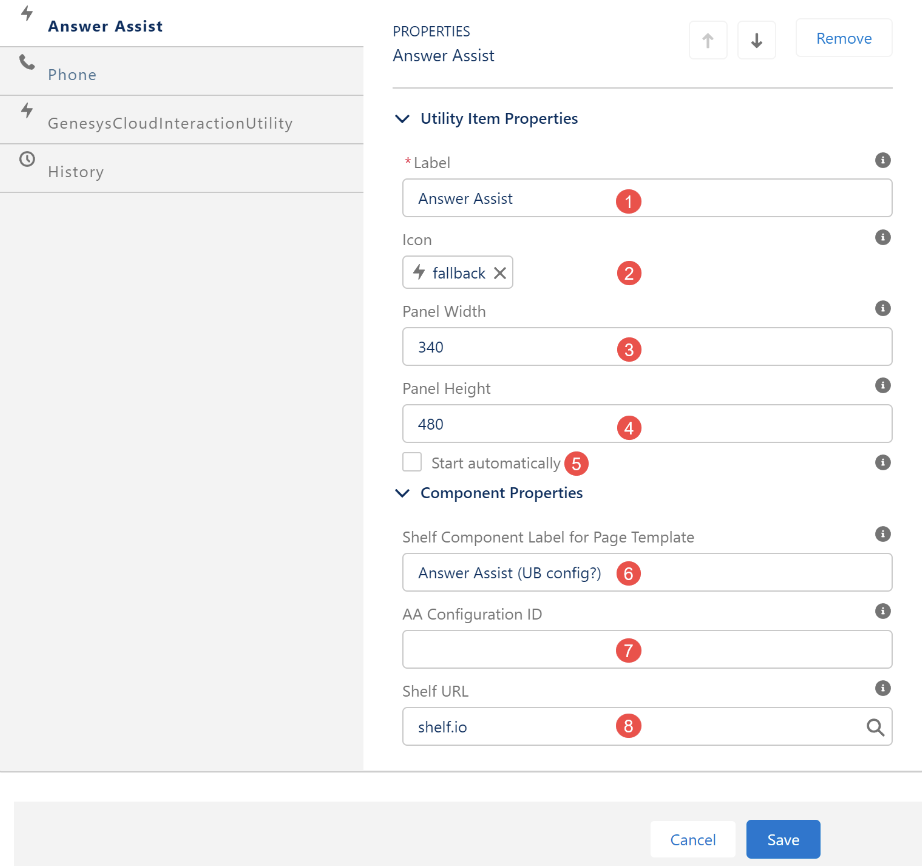
Figure 47. Configuring Answer Assist as a Utility Bar item
- Label: In this field you can identify how your Answer Assist needs to be named in Utility Bar. You can leave it default—Answer Assist—or enter any desired name. Note that this field is mandatory and cannot be left blank.
- Icon: This is responsible for the icon assigned to Answer Assist as a Utility Bar item. You can leave it default or delete the default one and select any suitable one.
- Width: This setting is responsible for the width of the popup window in which Answer Assist is to open from Utility Bar. Note that the maximum width cannot exceed 720 px.
- Height: This setting is responsible for the height of the popup window in which Answer Assist is to open from Utility Bar.
- Start automatically: If you select this checkbox during the configuration, your Answer Assist as a Utility Bar item will start automatically once you log into your Salesforce. If not, you need to launch it manually by clicking the Utility bar App button.
- Shelf Component Label for Page Template: This attribute allows you to adjust the text of the Answer Assist component’s label as displayed on your Salesforce pages. Details can be found in the respective subsection.
- AA Configuration ID: This is where you need to enter some specific Configuration ID for your Answer Assist in Shelf. If you leave it blank, the first default configuration in the list of Answer Assist configurations is used.
- Shelf URL: This is the address line for your Shelf instance domain that can be different based on your geography or market.
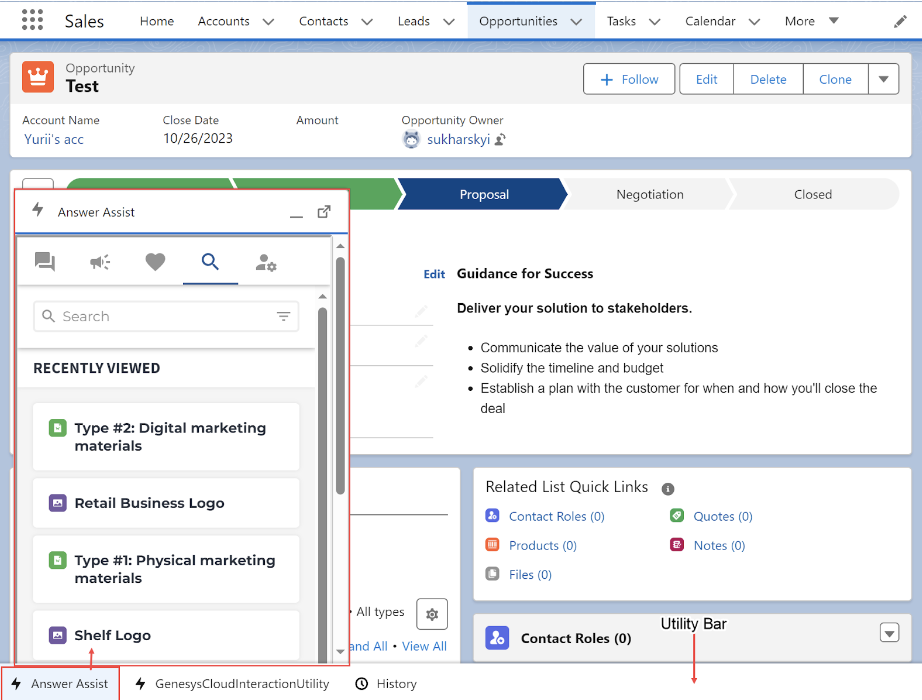
Figure 48. Viewing Utility Bar and Answer Assist widget added to it
Using Answer Assist as a Utility Bar item
Let’s see what you can do with it.
- Once you open the Answer Assist widget from Utility Bar, it remains open when you navigate across your Salesforce pages. However, if you navigate to any of your Opportunity or Case pages, the widget is automatically reloaded. It occurs to fetch suggestions from Shelf.
 Figure 49. Navigating in Salesforce with Answer Assist opened from Utility Bar
 - If you have opened the Answer Assist widget from Utility Bar and need to clear the display for better visibility of some Salesforce page elements, you can minimize the widget back to Utility Bar by clicking the Minimize button on the widget. When minimized to Utility Bar, the Answer Assist widget remains active and all the requests and suggestions are sent and received as usual.

Figure 50. Minimizing Answer Assist back to Utility Bar
- If you have minimized Answer Assist to Utility Bar and the new suggestion(s) is/are triggered, the respective notification arrives at the widget in Utility Bar. You can make this notification disappear by re-opening the widget from Utility Bar or by opening the Case or Opportunity page with the added Answer Assist component where the suggestion(s) has/have been triggered.

Figure 51. Viewing notification on Answer Assist widget in Utility Bar

Figure 52 Removing the notification by reopening Answer Assist from Utility Bar

Figure 53. Removing the notification by opening the Opportunity page with the added Answer Assist component
- If you have the Answer Assist component added to any of your Case or Opportunity pages and attempt to open the Answer Assist widget from Utility Bar, you will see a warning message about the already running component in the widget.In order to remove it, you need to reopen the Salesforce page you are on without the Answer Assist component and refresh it

Figure 54. Opening Answer Assist from Utility Bar with the Answer Assist component working
Using Answer Assist from Utility Bar as a popup browser window
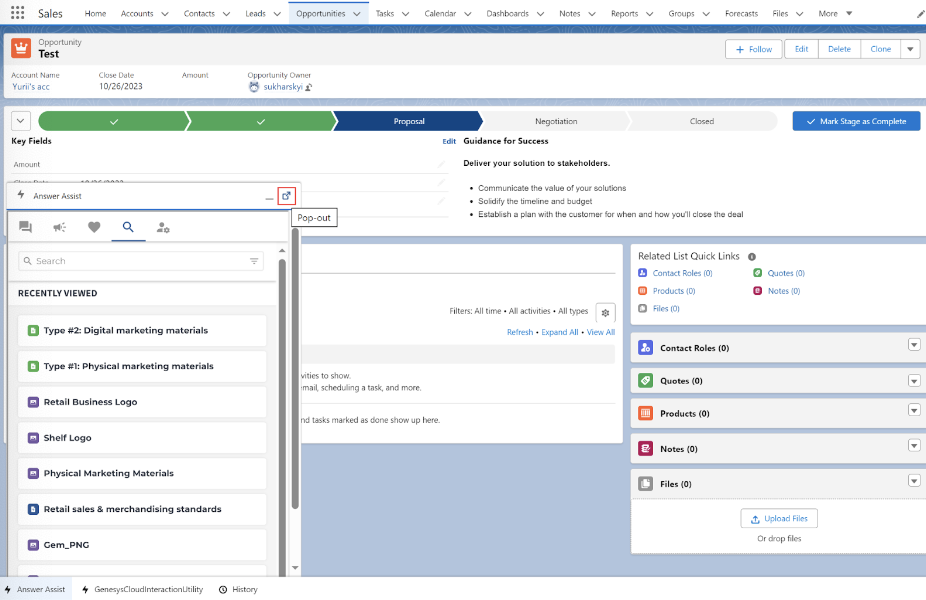
Figure 55. Opening the Answer Assist widget as a popup browser window
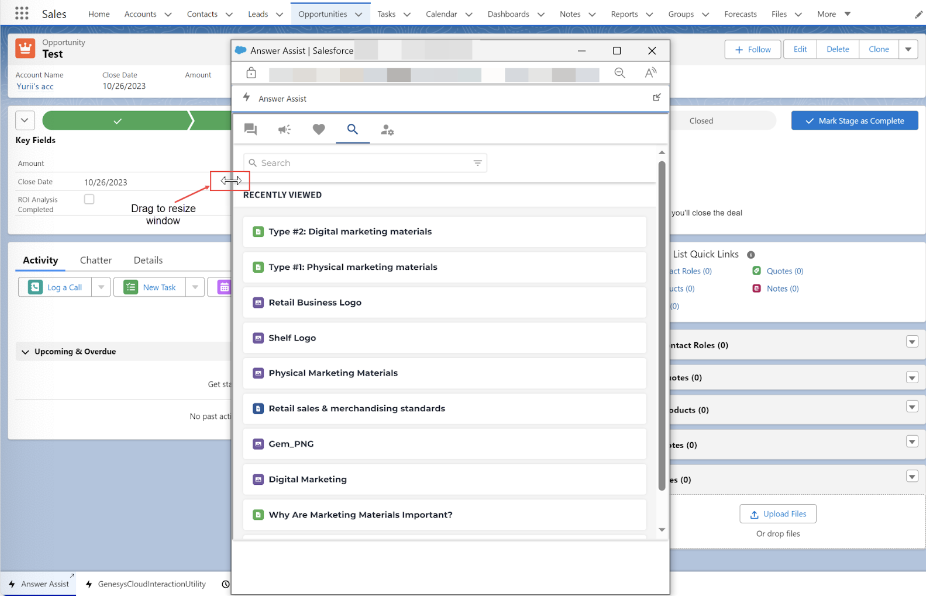 Figure 56. Opening, resizing, and repositioning the widget as a popup window
 First login
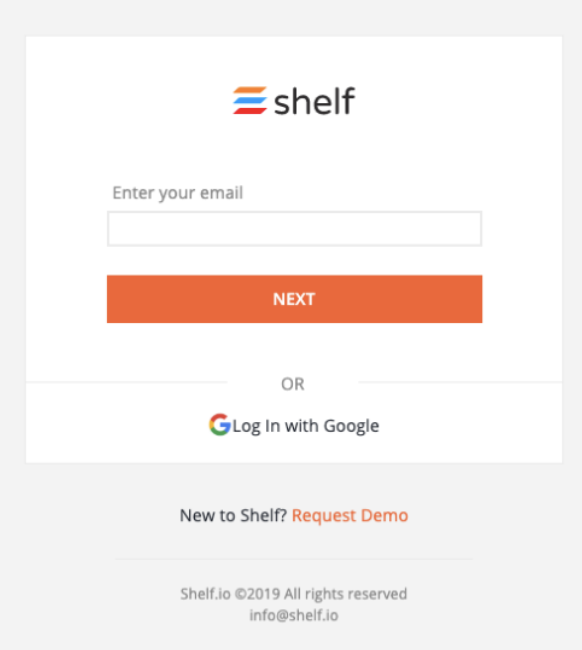
Figure 57. Shelf Login window on Salesforce
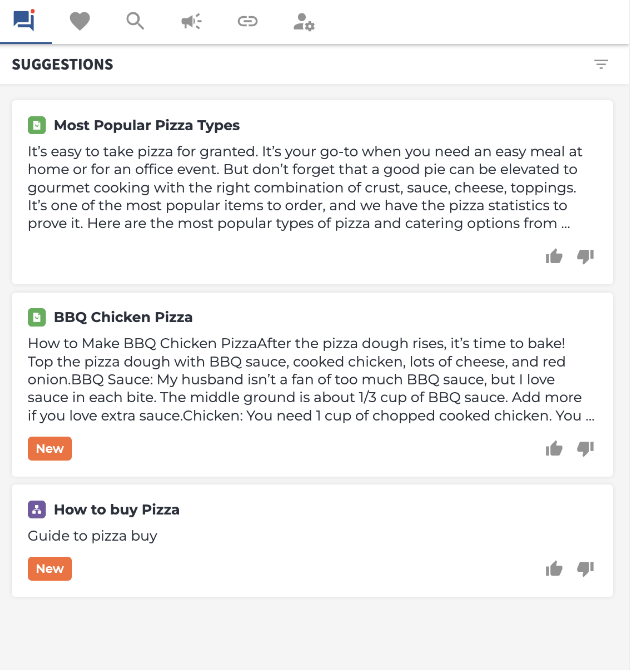
Figure 58. Shelf Answer Assist showing suggestions
Shelf App tips
Deleting comments in Gems (ver 1.x and 2.x)
- You are logged in to your account in Shelf App on Salesforce
- You have a Gem in one of your libraries in Shelf KMS that has some comments.
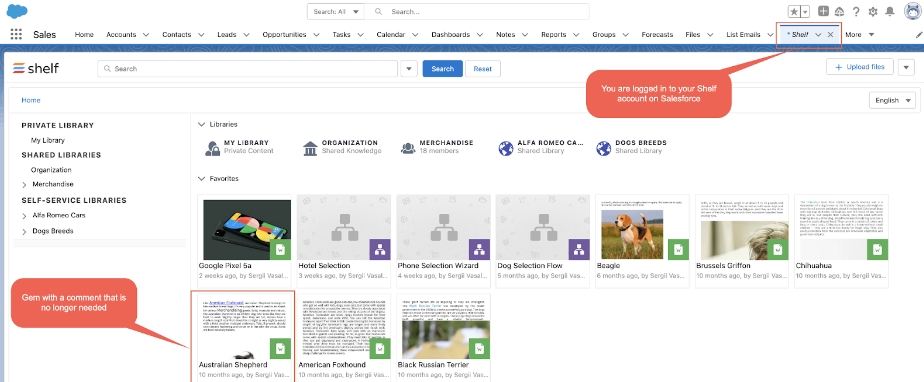
Figure 59. Viewing Shelf on Salesforce
- Find the needed Gem in Shelf App on Salesforce.
- Open the Gem by hovering over it and selecting the Open option from its context menu.

Figure 60. Opening a Gem in Shelf on Salesforce
- Scroll down to the bottom of the Gem and find the Comments tab there. It is opened by default, so when you reach the bottom of the Gem, you can expect to see comments.

Figure 61. Deleting a comment in Gem
- Find the comment you want to delete and open its context menu. Select the Remove Comment option in the dropdown list as shown in the figure above.
- In the popup window that appears, confirm your choice by clicking OK.

Figure 62. Confirming the comment removal
- The Gem page is automatically updated and the notification message is displayed telling that the comment has been successfully removed from the Gem. It means that the subject comment has been deleted and is no longer displayed in the Comments section of the Gem.
Highlighting search results (ver 2.x)
- You are logged in to your account in Shelf App on Salesforce
- You have Gems in your libraries on Shelf.
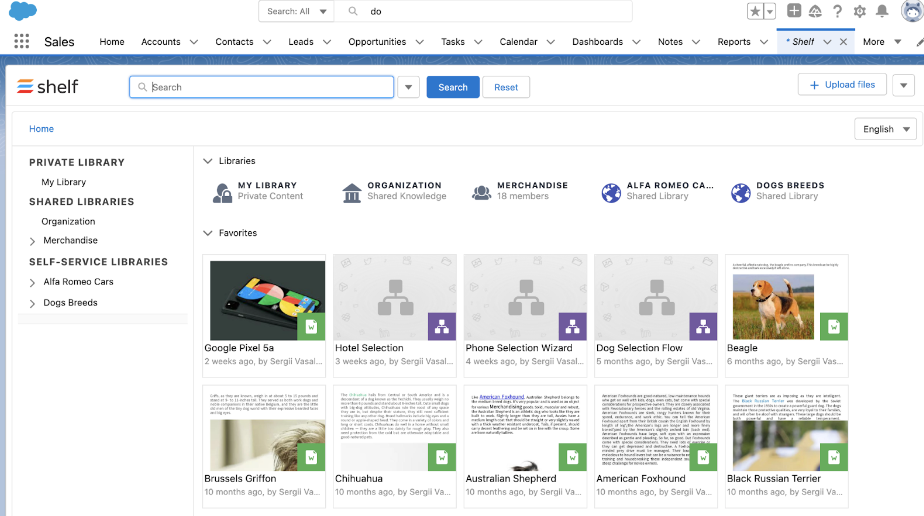
Figure 63 Viewing the Shelf App page on Salesforce
- On the homepage of the Shelf App on Salesforce, conduct a search by entering some keyword(s) in the Search field as shown in the figure below.

Figure 64. Performing search in Shelf App on Salesforce
- Once the search is done, you will see search results, where the keyword you used is already highlighted. But that is not what we expect to see. To get to the needed destination, click the More Results button next to the Gem of your interest.

Figure 65. Accessing the detailed search results for the selected Gem
Further, once you see the list of occurrences of the keyword you have been looking for, click on the highlighted keyword in the occurrence that matches your search.

Figure 66. Viewing more results for a selected Gem
Once you have done it, the Gem will open in a new popup window where the keyword you have used in the search is highlighted in text.

Figure 67. Viewing the found Gem with highlighted search keywords
Keyphrases consisting of two or more words are supported by this capability.

Figure 68. Viewing the found Gem with highlighted search keyphrase
Viewing Gems in the Full Screen mode (ver 2.x)
- Once you are in your Shelf App on Salesforce, logged in under your valid credentials, you can find and open any needed Gem. The Gem opens in a new popup window in the center of the screen.

Figure 69. Viewing the Gem in the popup window
- You can open the Gem in the full-screen mode by clicking the Expand button as shown in the figure above.
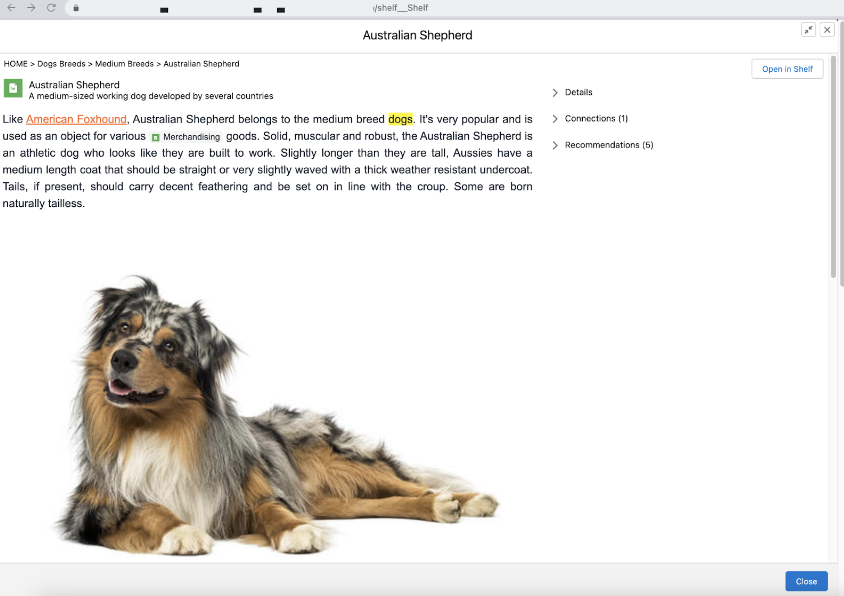
Figure 70. Viewing the Gem in the full-screen mode
Collapsing and expanding Shelf Answer Assist widget (ver 2.x)
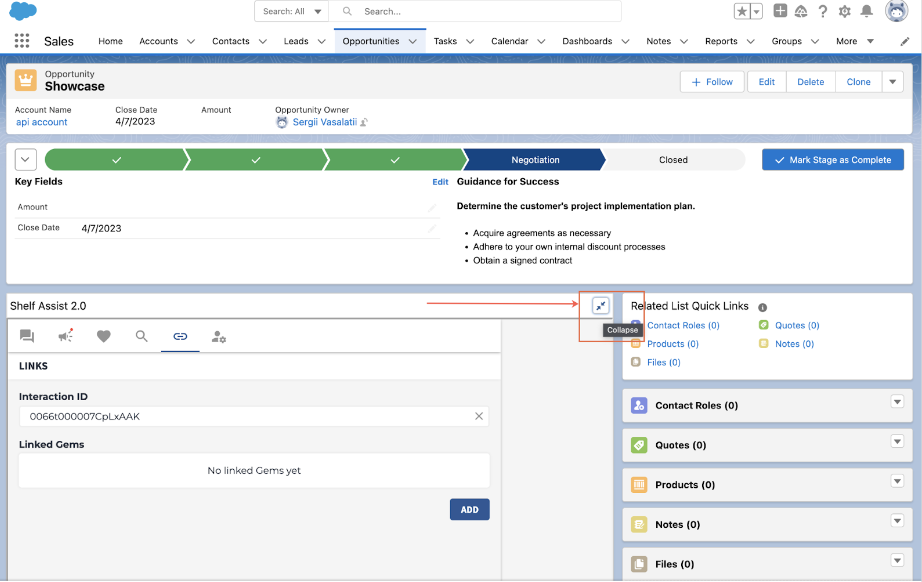 Figure 71. Collapsing the Shelf Answer Assist 2.0 widget
As a result, the widget becomes collapsed and does not clutter your page up.
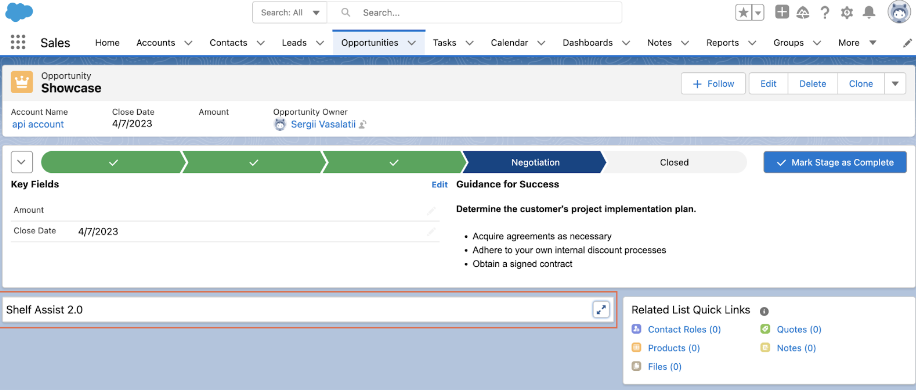
Figure 72. Viewing the Shelf Answer Assist 2.0 widget collapsed
Upgrade
Once you receive the URL for the new version of the package, you can initiate the installation process by opening the URL in your browser, entering username and password for the Salesforce organization in which the package should be installed, and clicking the Login button.
After the successful logon, you should expect to see the screen with the available update installation options.
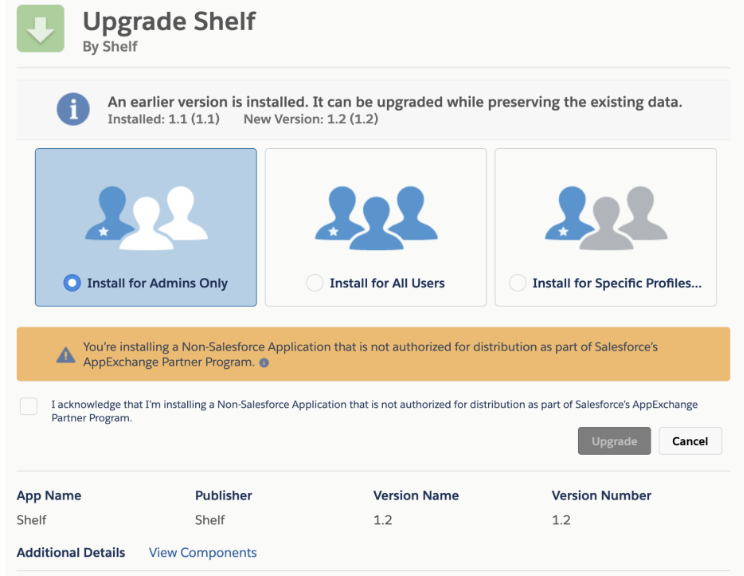
Figure 73. Viewing the update installation window
- remove all the installed Shelf Salesforce components of the 1.x version from your pages
- remove the assigned users from the configured permission set
- uninstall Shelf Salesforce package of the 1.x version
- install Shelf Salesforce package of the 2.x version/3.x version
- follow all the needed configuration steps.
Uninstalling Shelf App package
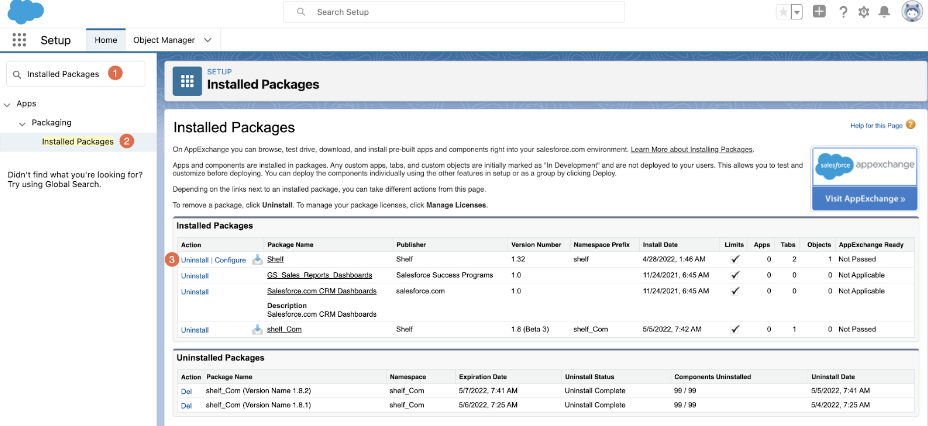
Figure 74. Uninstalling Shelf App on Salesforce

Figure 75. Confirming the Shelf App uninstall