
Shelf Answer Assist End-to-End Guide
Document Version History
Version number | Modified by | Modifications made | Date modified | Status |
1.0 | Shelf | Initial release of the document. | 26 October 2022 | Expired |
1.1 | Shelf | Version of the guide was updated to absorb new structure of the document and the Answer Assist configuration and use flow. | 11 November 2022 | Expired |
1.2 | Shelf | New section was added on the IVR configuration via context mappings. Figures were renumbered accordingly to accommodate new imagery. | 27 January 2023 | Expired |
1.3 | Shelf | Enabling and configuring the Artificial Intelligence Suggestions section was expanded with a subsection about scoreAttributes parameter and its configuration. | 1 February 2023 | Expired |
1.4 | Shelf | Multiple amendments and additions made to the document. New chapter added to describe the new Shelf Search Suggestions feature. New chapters added to describe the Interaction History feature. | 13 June 2024 | Expired |
| 1.5 | Shelf | The guide has been updated due to the deprecation of the AI Suggestions feature and implementation of the Real-Time Suggestions feature. Multiple changes to text and imagery have been made throughout the document. | 16 November 2024 | Expired |
| 1.6 | Shelf | The guide has been updated to reflect the new capabilities implemented in Shelf Answer Assist: hiding individual content mapping filter fields from the Suggestions tab, and disabling and enabling the ability to open Search Results and Gems from Answer Assist Widget in Shelf KMS. | 20 December 2024 | Active |
Document Purpose
This document has been developed specifically for the customers of Shelf’s Answer Assist to:
Give the users of the Shelf Answer Assist product (hereinafter - AA or the Product) an understanding of its capabilities so that they can utilize the Product to meet their business needs.
Provide the AA users with information on how to enable its various features.
This End-to-End Guide covers all aspects of the Product interface, features, and capabilities, as well as the generic - suitable for all integrations - configuration settings. Details on the configuration of customer-specific integrations are laid down in the respective integration-specific Shelf Answer Assist installation and configuration guides to be provided to customers along with this End-to-End Guide.
Once any new feature has been implemented in the Product, this Guide is subject to change without notice to include new descriptions and imagery.
If you require further assistance, please do not hesitate to contact us at support@shelf.io or from the in-app chat support within the Shelf platform.
1. Answer Assist and Its Purpose
Answer Assist is one of Shelf’s Answer Automation products designed and developed to help contact centers and organizations quickly and reliably deliver accurate answers to customer questions.
Answer Assist works as an on-demand online reference library, 24/7/365, where agents can easily access the necessary information (or content) to help customers resolve their issues and get answers to their questions.
It can be integrated with your contact center’s web-enabled solution that supports third party plugins.
Featuring built-in AI, context suggestions, federated search and content feedback capabilities, Shelf Answer Assist:
Increases agents’ efficiency and productivity
Search suggestions featured in Answer Assist help agents find precise answers and surface them to customers directly in the interface of the system where it is integrated
Optimizes admin effort and service quality
Thanks to a simple yet robust Answer Assist configuration, Shelf makes it easier for your administrative team to help you help your organization’s customers in a faster and more efficient manner
Ensures long-term customer satisfaction
Shelf’s extensibility enables a more complete understanding of agent performance, from knowledge effectiveness to overall customer interactions, facilitating continuous improvement
With its proprietary suggestions and content mapping configurations, Shelf Answer Assist finds suggestions by reading customer messages, identifying their intent, and offering relevant answers for agents directly in their work tool.
What Makes Shelf Answer Assist Different
By default, your agents can enjoy the Search and Gem modules of the Shelf Answer Assist out of the box. The Suggestions and Favorites modules are also available from the very beginning but they need to be switched on in the Shelf Admin Panel.
The other modules - Feedback, Announcements, and Links - are enabled on the Shelf side upon request following which your organization’s admin can switch these on for the needed accounts.
Below is a short summary of the Shelf Answer Assist modules and their purpose.
Suggestions: The key functionality of Answer Assist that provides your agents with a quick and easy way to answer your customers’ questions.
Favorites: Agents can save specific content and frequently used content to Favorites. This functionality offers faster and easier access to the content agents use everyday.
Search: Another fundamental feature of the Shelf Answer Assist; it identifies specific keywords and phrases within documents, PDFs, Word, PPT, Excel, images, Wiki pages, and Articles; your agents can search content by various and multiple filters such as date added, recently changed, tags, categories, content type, file type, favorites, and ratings.
Feedback: There are two types of Feedback in Answer Assist - feedback on content and feedback on suggestions. Feedback on content allows using your agents’ knowledge of the content efficiency. Their Feedback is critical to keeping content accurate and up to date. Agents can submit content feedback directly from Answer Assist, so content managers can quickly implement recommended improvements and updates. Meanwhile, feedback on suggestions enables Shelf to improve the accuracy and relevance of suggestions via your agents’ feedback on suggestions they receive. A quick upvote or downvote helps improve the algorithm to make better suggestions over time.
Announcements: Through this functionality, your agents can be notified of the important content changes or updates. This feature can be also used to ensure and track compliance of your agents with your organization policies. Content managers can see which users receive and acknowledge specific updates. Agents can access Announcements and confirm they have read important information directly inside the Answer Assist widget.
Links: This functionality lets your agents link content they used to answer customers’ questions to interactions with such customers. It might be needed if the compliance or any other regulation or policy of your organization demands agents to specify what exactly is used to respond to customer requests.
Enabling or disabling a certain module is implemented on the Shelf side and affects the user interface of the Shelf Answer Assist displayed to your content managers and agents. Each of the above functionalities is explained in detail in the sections below.
2. Content and Context in Answer Assist
Before you proceed with making yourself familiar with other details on Answer Assist, you need to get an understanding of what the Content, Context and Content Mapping mean in terms of Answer Assist and why Shelf needs them to enable effective operation of the Answer Assist product.
2.1 Content
In Shelf’s terminology, content is any Gem created or stored on the Shelf Platform. It can be of various types. See the figure below for the types of content in Shelf.
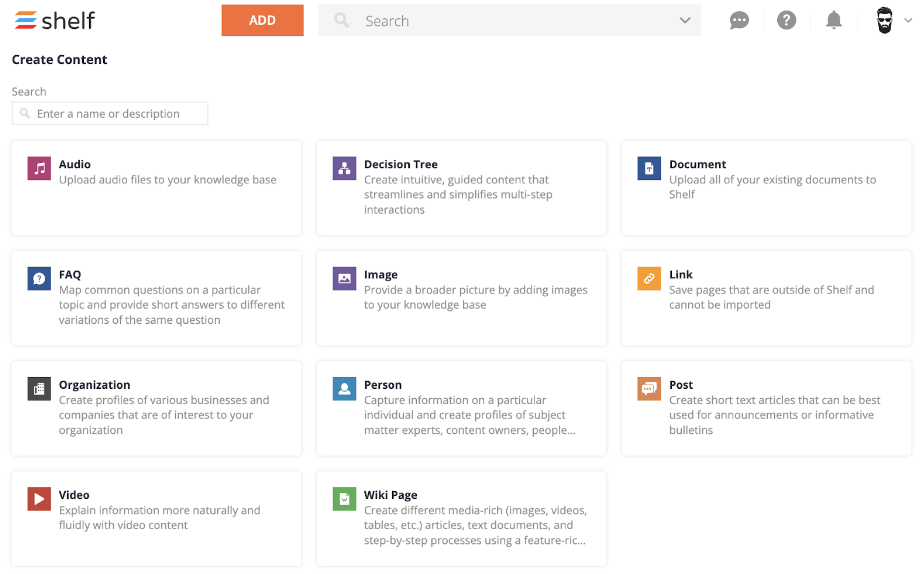
Figure 1. Gem types in Shelf
- Gem type: in addition to the Gem types shown in the figure above, there is also the Custom type of Gems that can be configured to your specific needs, and the other two Gem types which are enabled upon request by Shelf administrators - FAQ and Decision Tree. Once these two types of Gems are enabled for your organization, they can be enabled for the needed users - content managers or agents.
- Gem category: this option allows you to assign any needed Gem any needed category(-ies) for a better grouping, filtering, or classification
 Figure 2. Viewing and managing Gem categories in Shelf
 - Gem tag: this option helps you better cover use cases for your content and allows you to assign any needed Gem any needed tag(s).
 Figure 3. Viewing and managing Gem tags in Shelf
2.2 Context
- your customer’s country, because different countries have different conditions on payments or refunds,
- your customer’s segment, because you can group your customers by their importance for your organization’s business and establish different request handling procedures for different customer groups,
- your business segment, because you can establish different request handling procedures for different business units of your organization.
- any other classification or categorization data you treat as important for distinguishing your customers or their domains.
3. Shelf Answer Assist Use Flow
3.1. Preparing the Shelf Answer Assist for Use
3.1.1. Shelf Admin Panel
Once logged in, go to the Admin Panel.
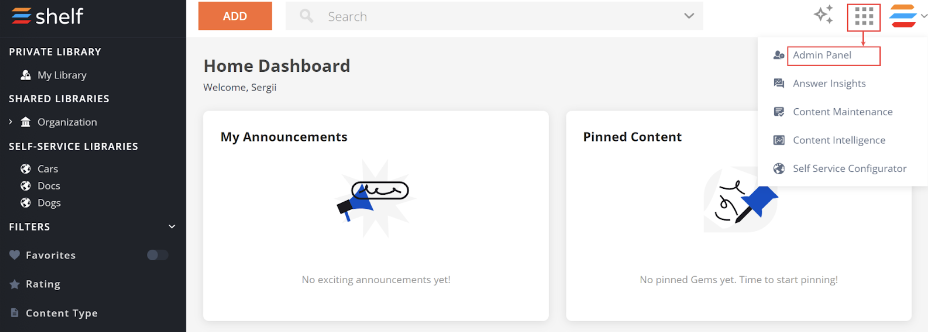
Figure 4. Accessing the Admin Panel in Shelf
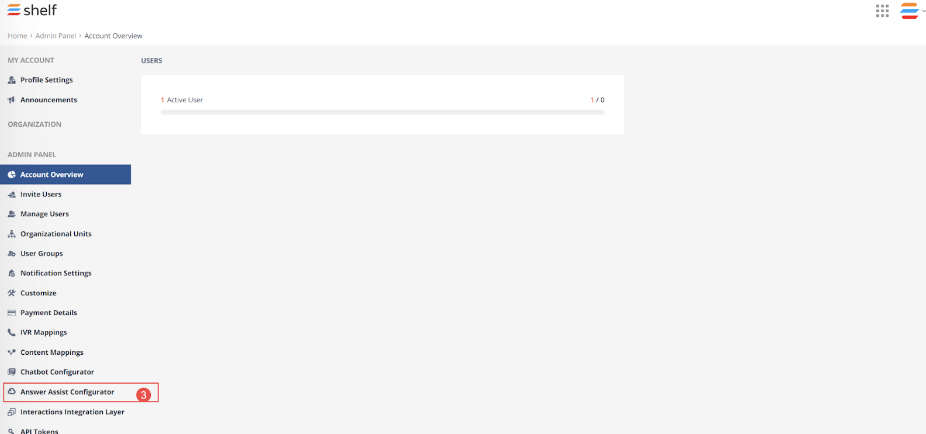
Figure 5. Accessing the Answer Assist Configuration menu
Answer Assist Configurator Settings
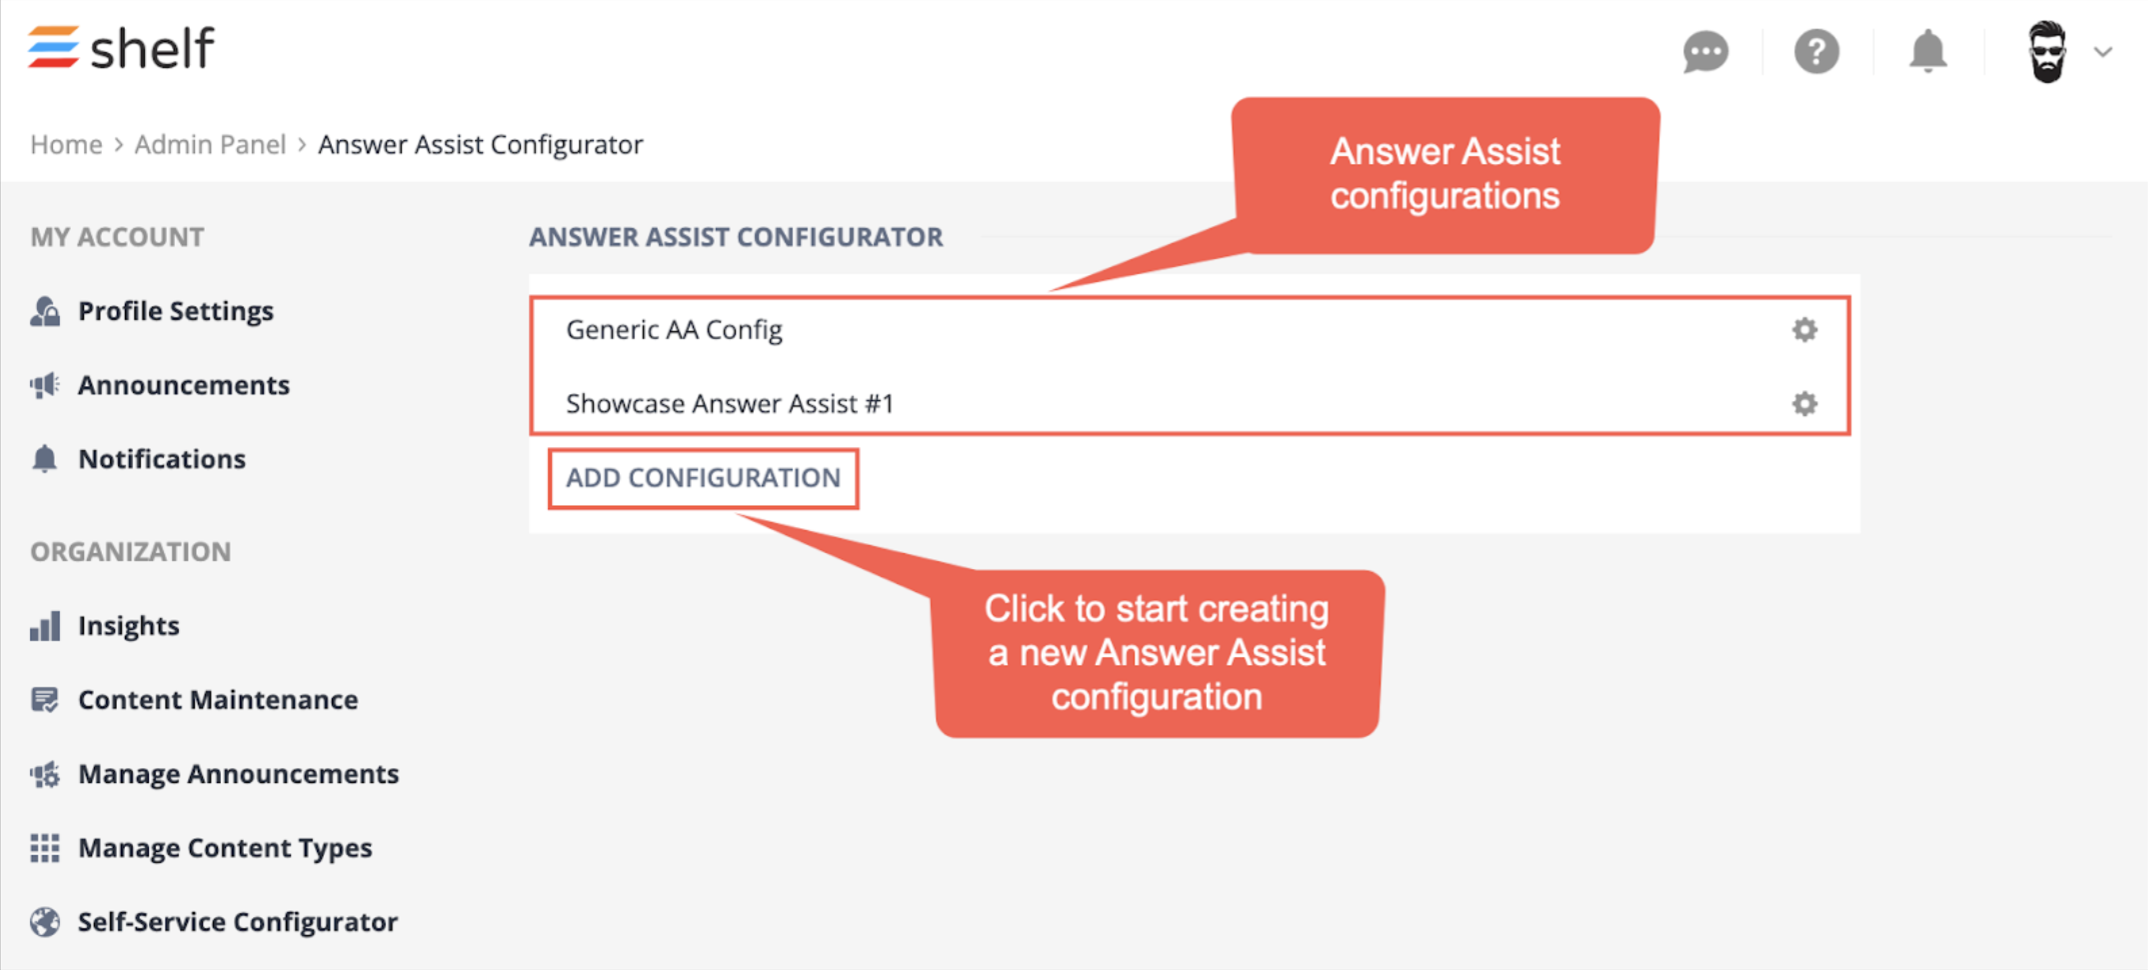
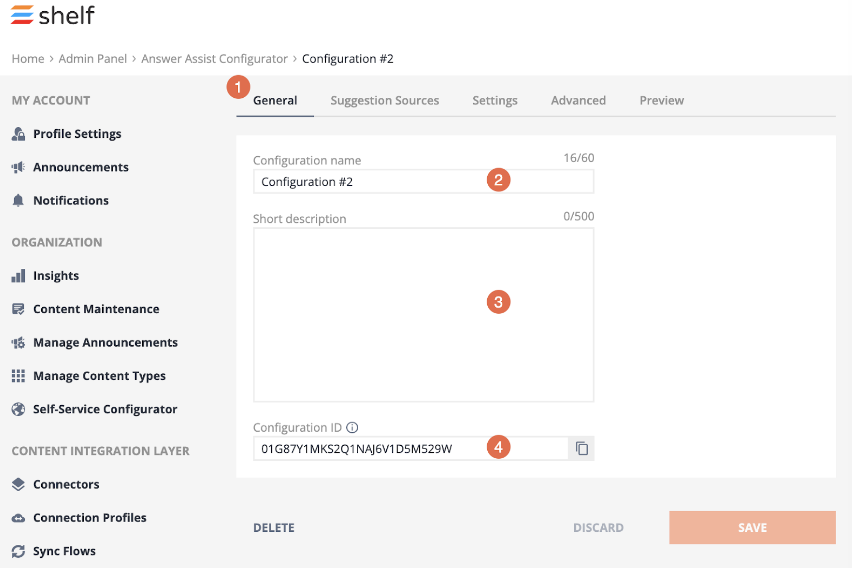
Figure 7. Starting the Answer Assist configuration procedure
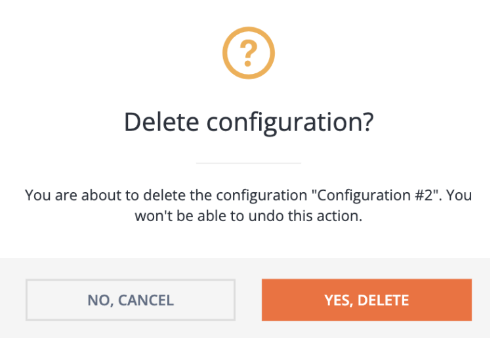
Figure 8. Confirming the Answer Assist configuration deletion
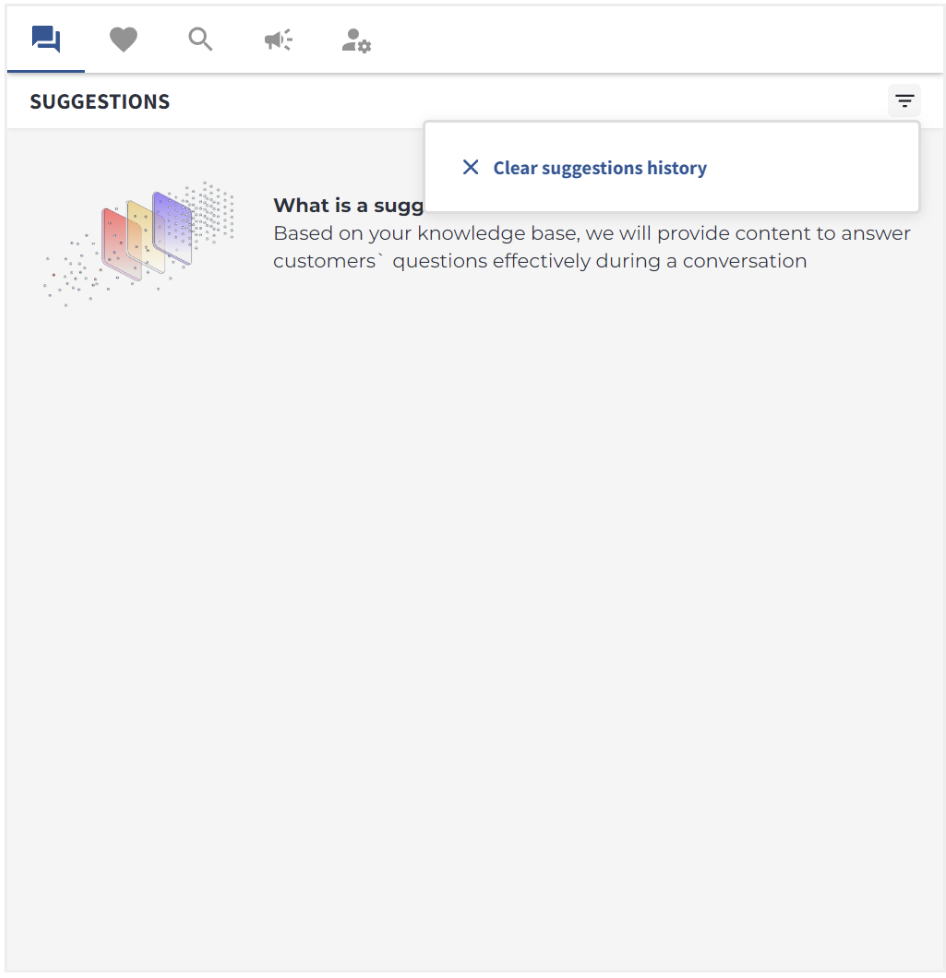
Enabling and Disabling Suggestion Sources for Answer Assist
| 📢 | Please be informed about an important change regarding one of our product features. After careful consideration and evaluation, we have decided to remove the AI Suggestions feature from our functionality. We understand that this may impact your workflow. However, we have introduced a new feature - Real-Time Suggestions - that leverages our advanced search and AI capabilities to assist agents in handling interactions with high efficiency. Read more details about enabling, configuring, and using this feature in the respective sections below. |
Enabling Features and Tabs for Answer Assist
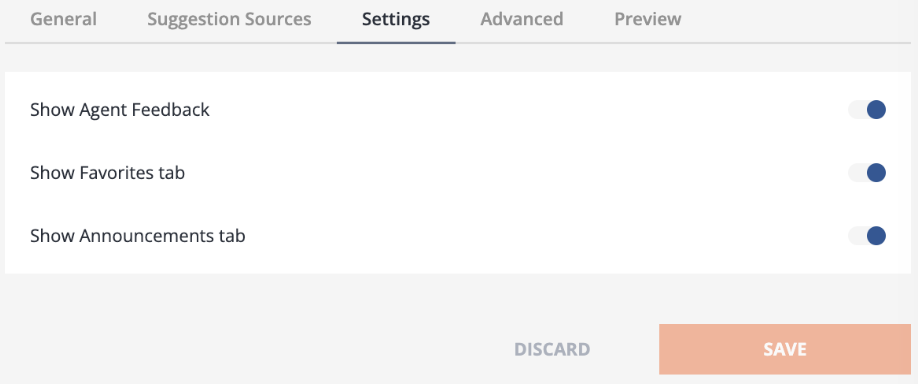
Figure 11. Enabling the Feedback feature and the Announcements and Favorites tabs for Answer Assist
All these settings are performed by means of JSON code inserted into the Code Editor field.
Setting and changing the order of the Answer Assist widget tabs
{
"tabs": {
"order": [
"suggestions" ,
"favorites" ,
"search" ,
"gem" ,
"announcements" ,
"links" ,
]
}
}

Figure 12. JSON code for the default order of tabs in Answer Assist
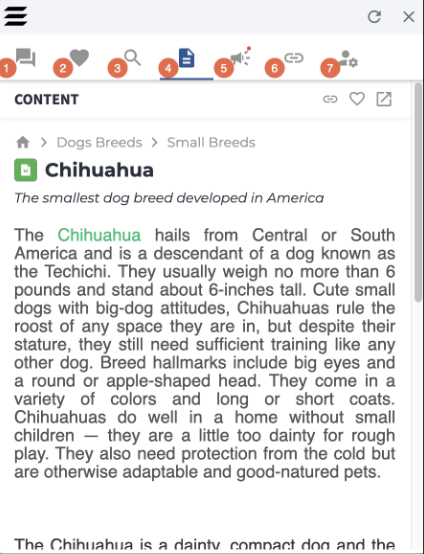
Figure 13. Viewing the default order of tabs in the Answer Assist widget
- - Suggestions tab
- - Favorites tab
- - Search tab
- - Gem tab
- - Announcements tab
- - Links tab
- - Personal settings tab
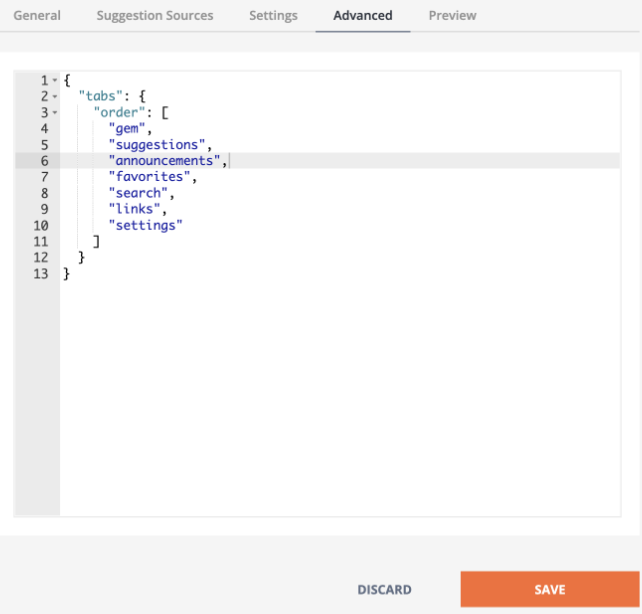
Figure 14. Changing the order of tabs in the Answer Assist widget
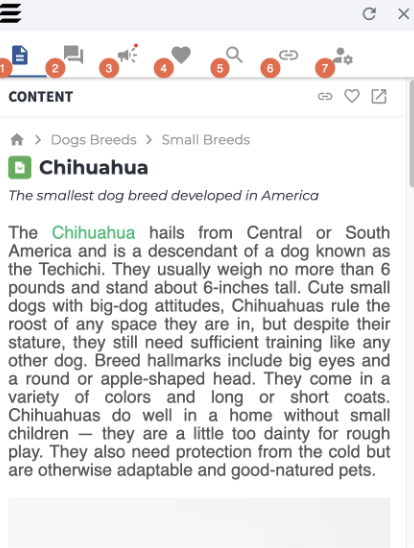
Figure 15. Verifying the changed order of tabs in the Answer Assist widget
- - Gem tab
- - Suggestions tab
- - Announcements tab
- - Favorites tab
- - Search tab
- - Links tab
- - Personal settings tab
Setting the default opening Answer Assist widget tab
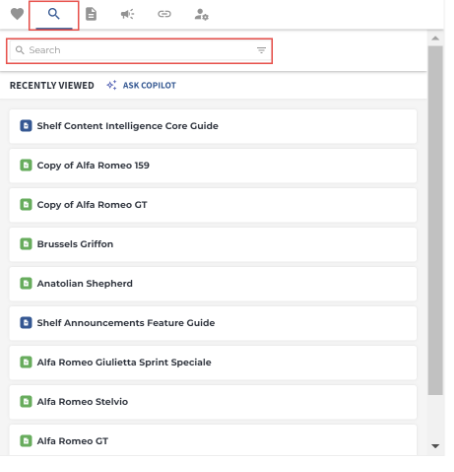
Figure 16. Search as the default opening tab in the Answer Assist widget
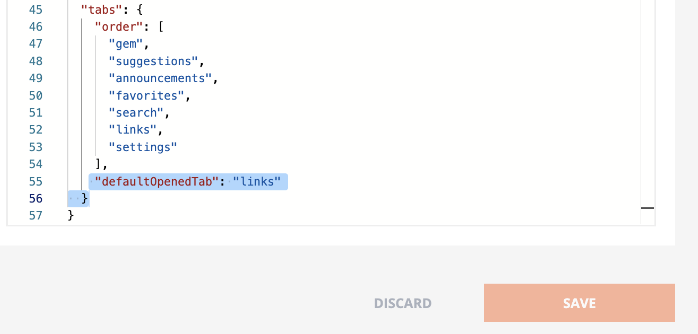
Figure 17. Changing the default opening tab in the Answer Assist widget
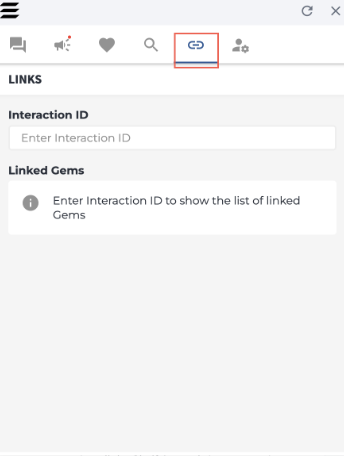
Figure 18. Links as the default opening tab in the Answer Assist widget
Enabling the Gem Linking (Links) feature
"contentLinking": {
"enabled": true
}
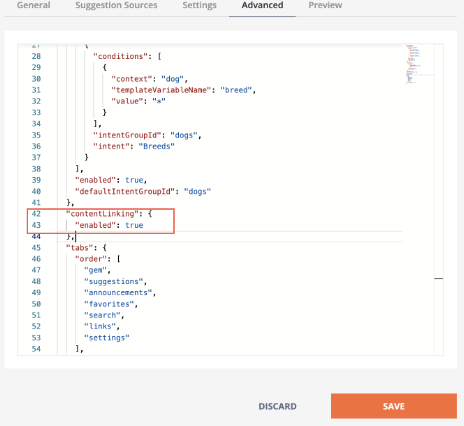
Figure 19. Enabling the Links feature for the Answer Assist widget
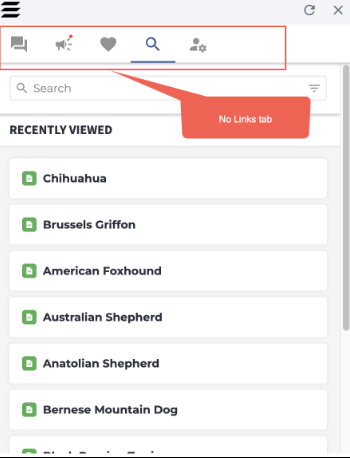
Figure 20. Viewing the Answer Assist widget without Links tab
Enabling and Disabling opening Answer Assist widget’s Search Results and Gems in Shelf
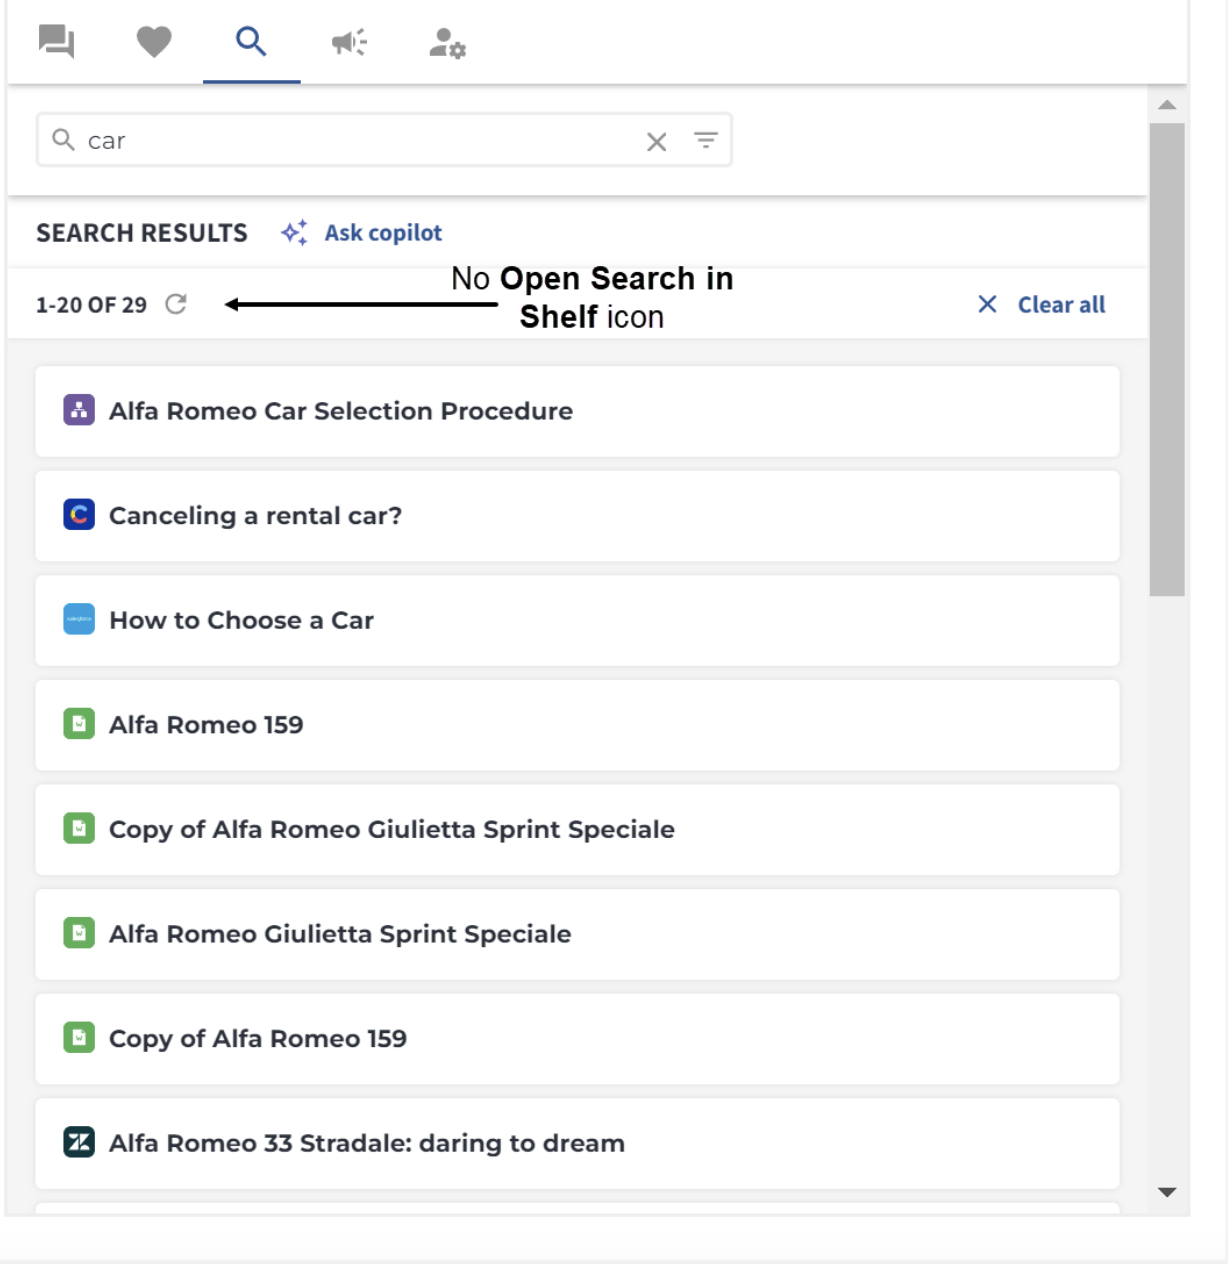
By default, when you work in the Answer Assist widget, you can look up for anything in the Search tab and then open, both the Search Results and the individual content items (Gems) as a result of such a search, in Shelf KMS.
For example, we have searched and found content items by the car keyword. The results are displayed in the tab, and we can open this entire search in Shelf KMS, by clicking the Open Search in Shelf icon as shown in the figure below.
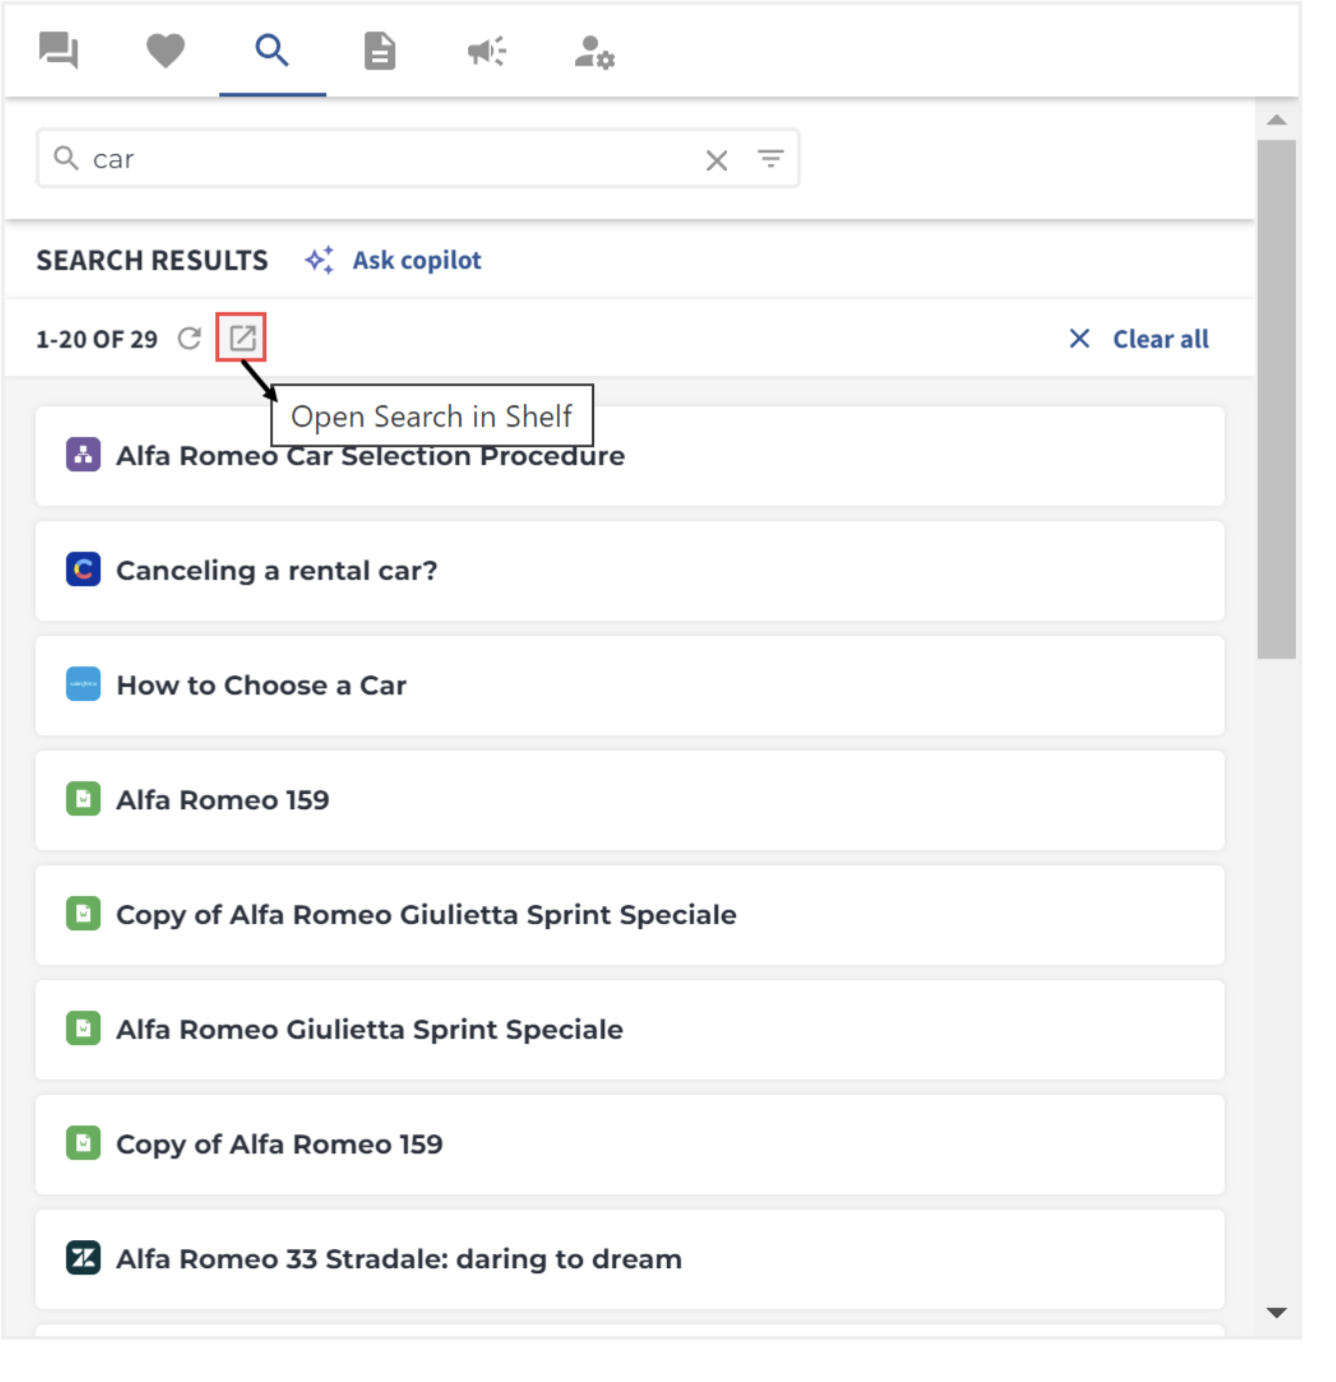 Figure 21. Running a search in Answer Assist widget and then opening it in Shelf KMS
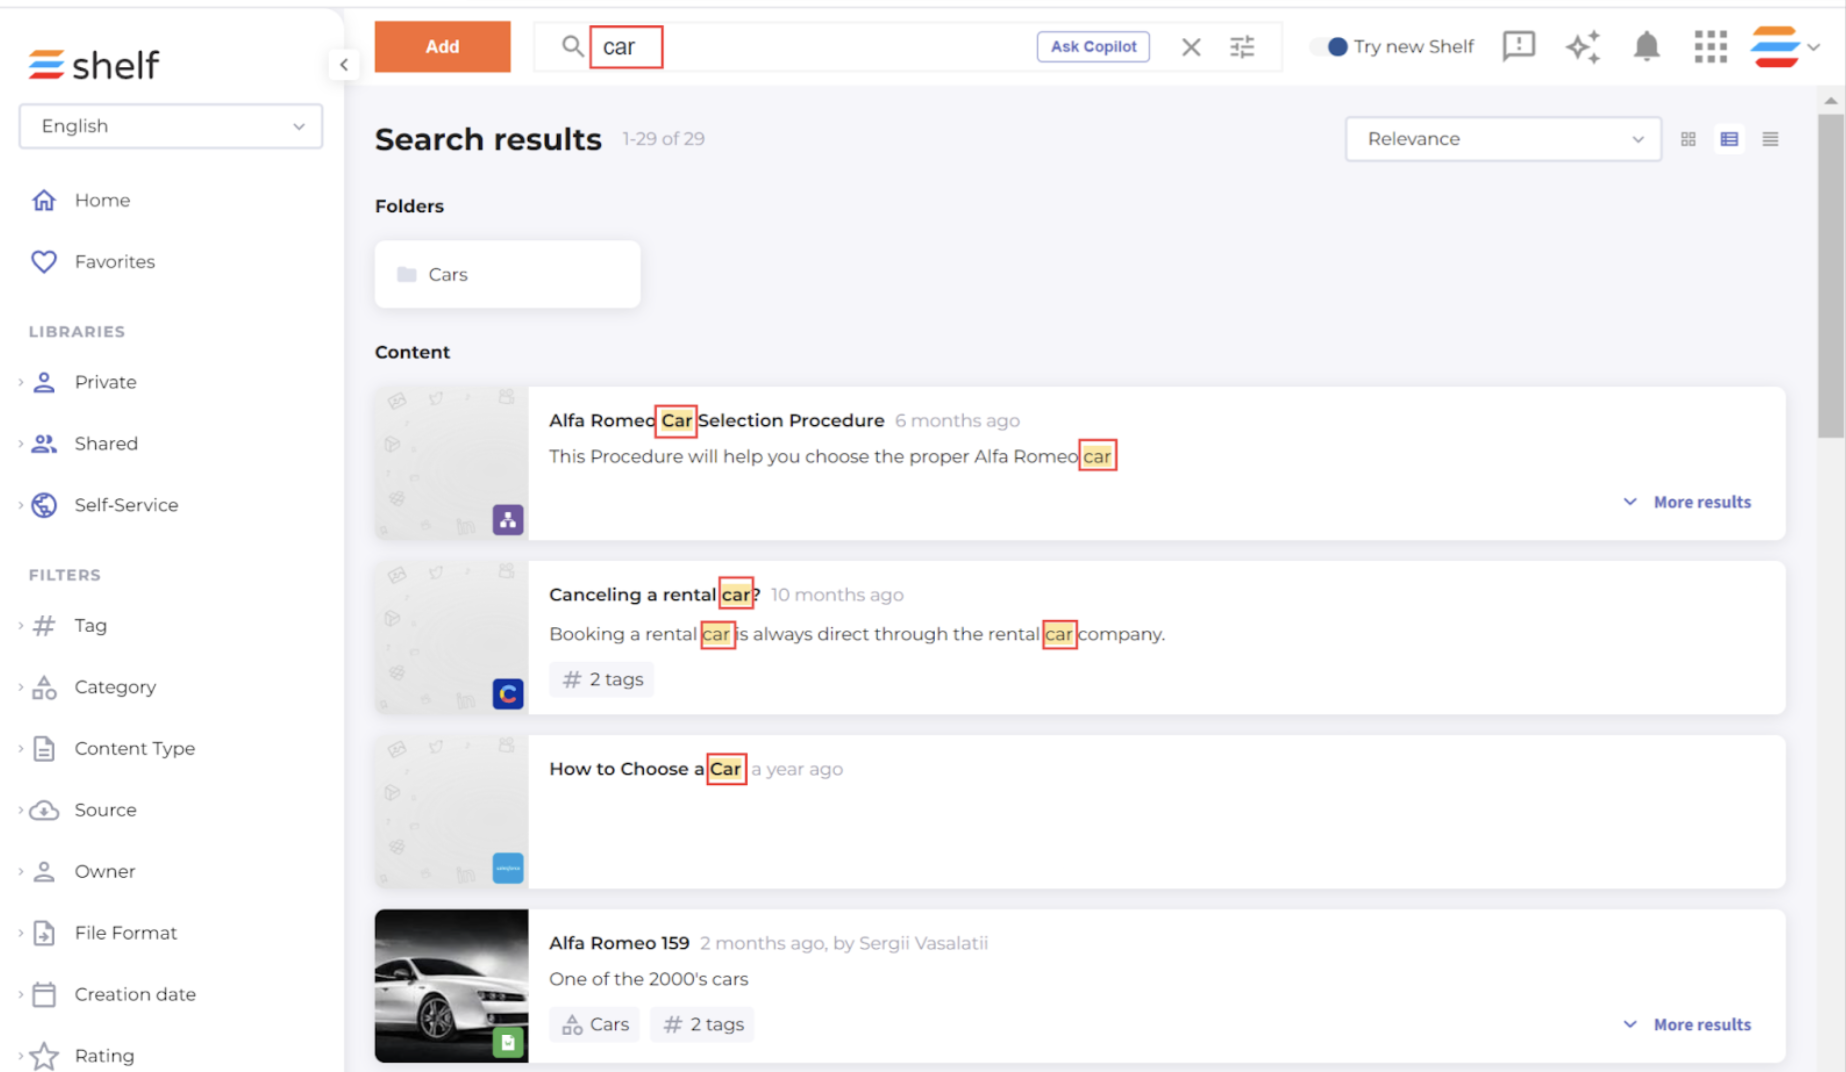
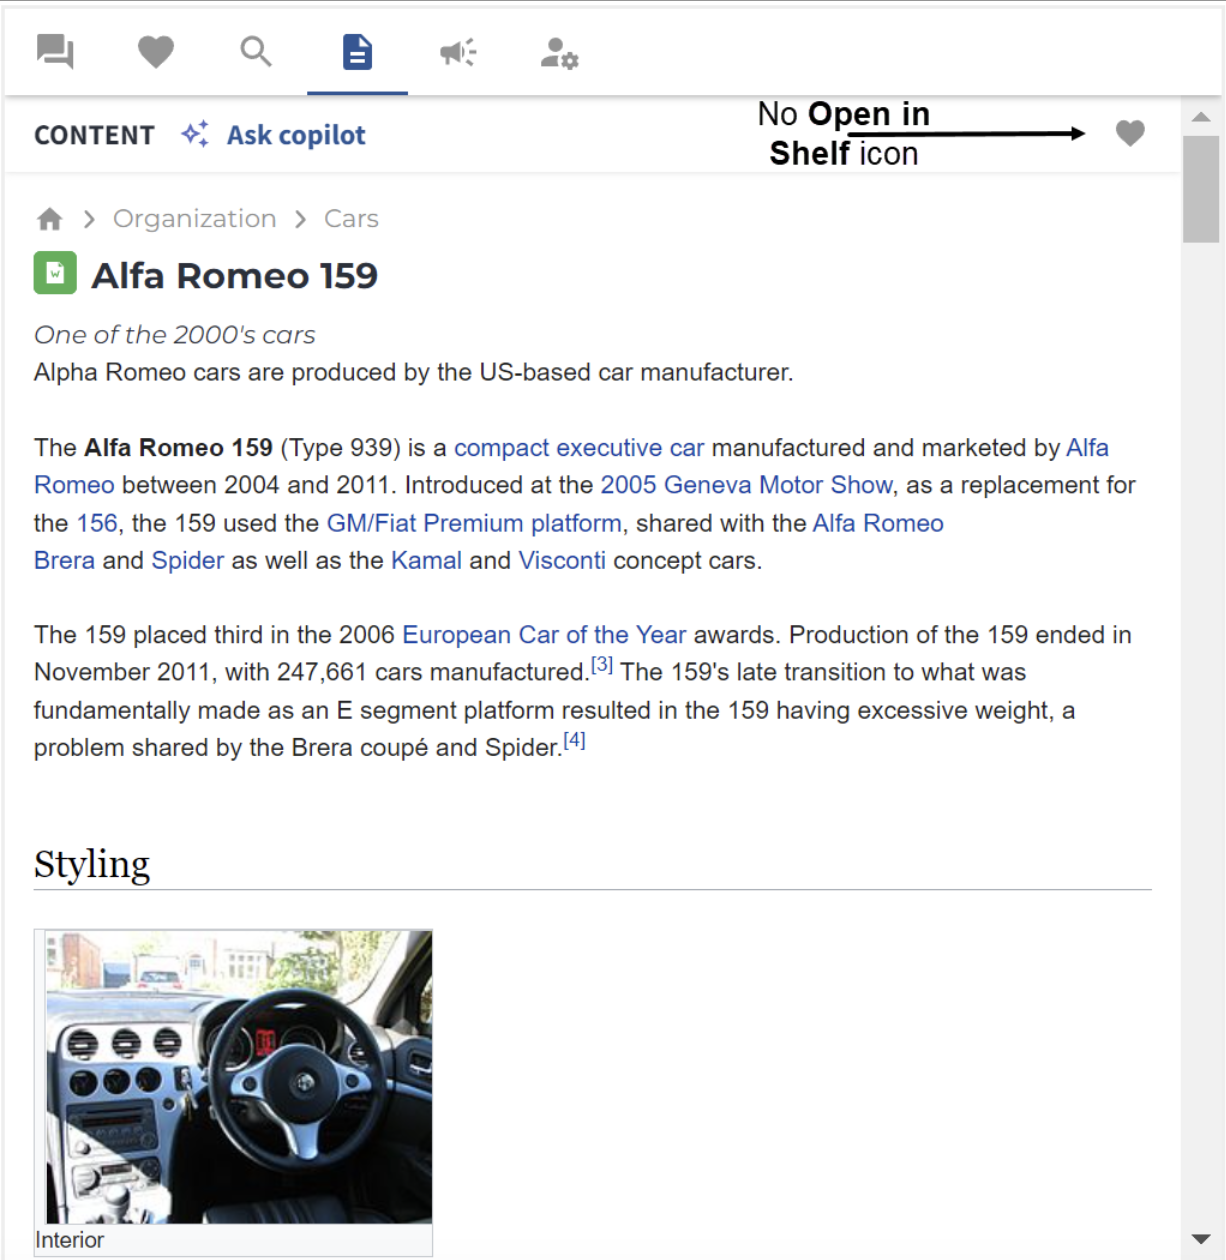
Figure 22. Viewing AA-run Search in Shelf KMS
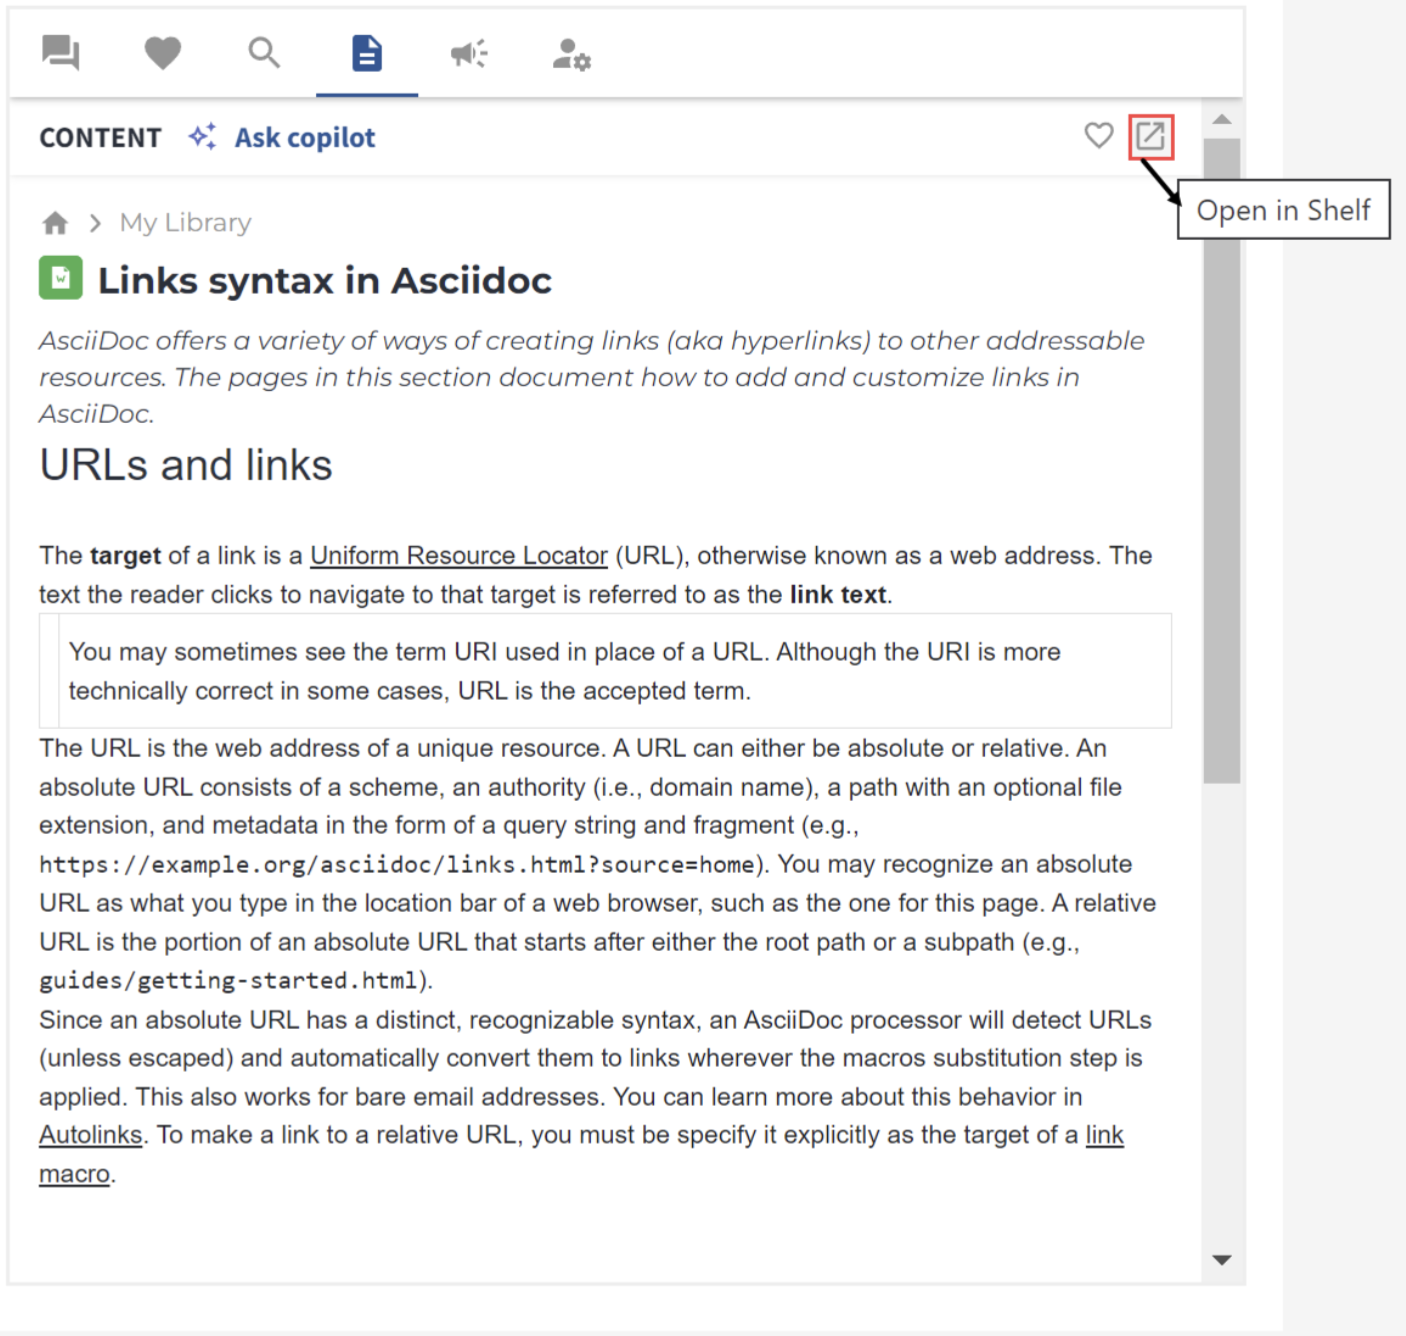
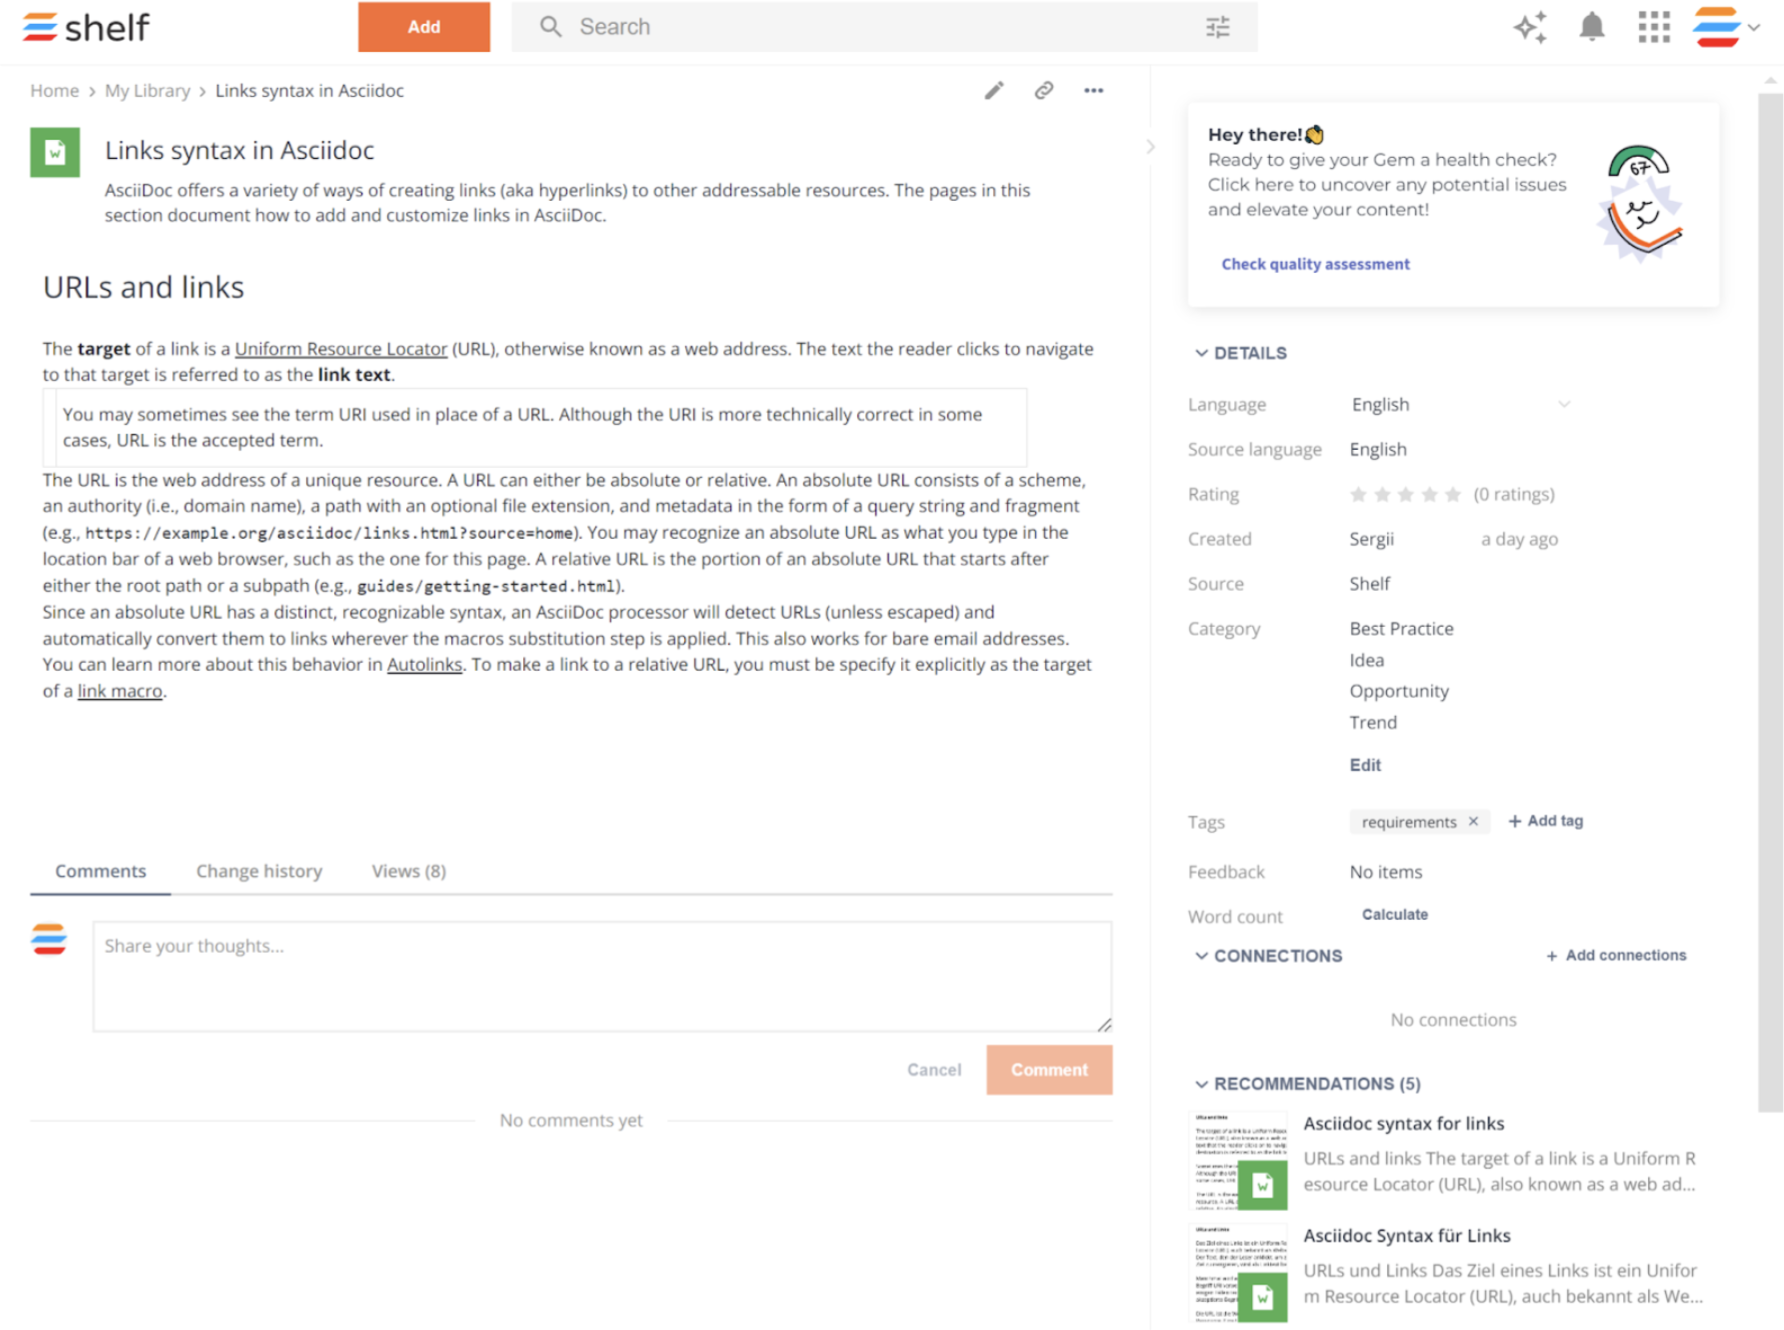
Figure 24. Viewing Gem, found or suggested in Answer Assist widget, in Shelf KMS
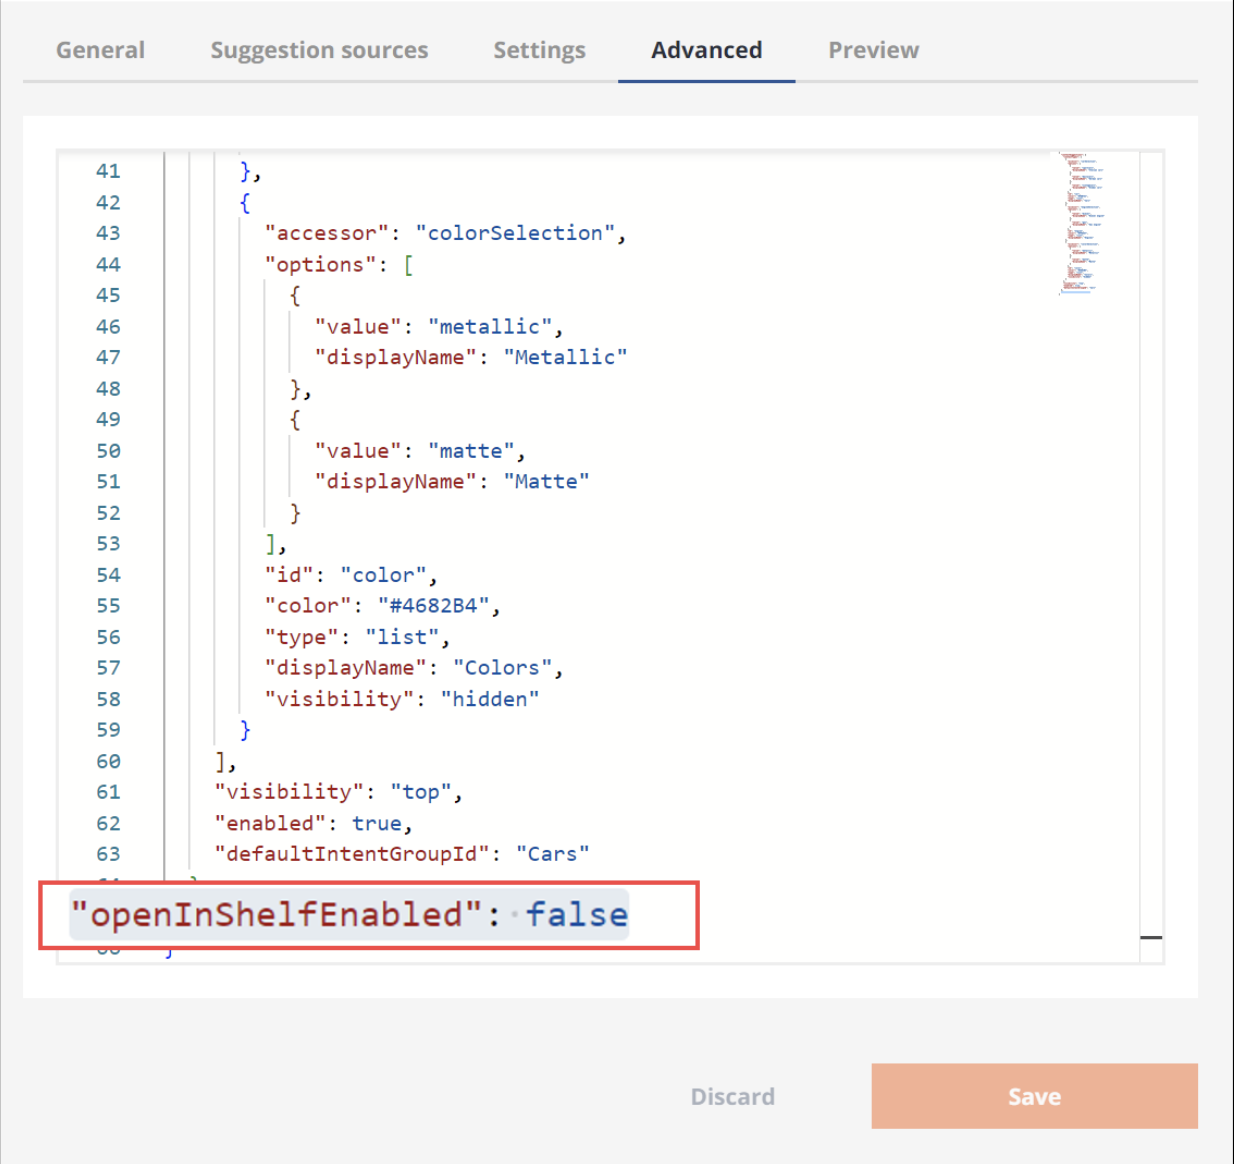
However, there can be situations when occasional clicks can occur during the agents’ conversations with customers and as a result, the important information can be closed or disappear from the agents’ screens. To mitigate this risk and to enhance agents’ focus on their current interactions with and questions from customers, Shelf has implemented the capability that allows disabling the ability to open Search Results and individual Gems in Shelf KMS from Answer Assist.
This capability is enabled via adding a dedicated parameter and its value to the JSON in the Advanced tab for the needed Answer Assist configuration.
The parameter and its value are as follows:

Enabling and Configuring Real-Time Suggestions
By default, the Real-Time Suggestions feature is disabled in the Shelf Answer Assist and needs to be enabled manually. To do so, go to the Shelf Admin Panel, navigate to the Answer Assist Configurator by selecting this option in the sidebar panel, open your Answer Assist configuration by selecting it from the list of available configurations, and then open the Suggestion Sources tab. Once in this tab, switch the Shelf Real-Time Suggestions toggle on and confirm your choice by clicking the SAVE button. The Any option is the default value, which includes all available libraries, but you can narrow down the filter to the appropriate library(-ies). Multichoice is supported and you can select up to 100 libraries.
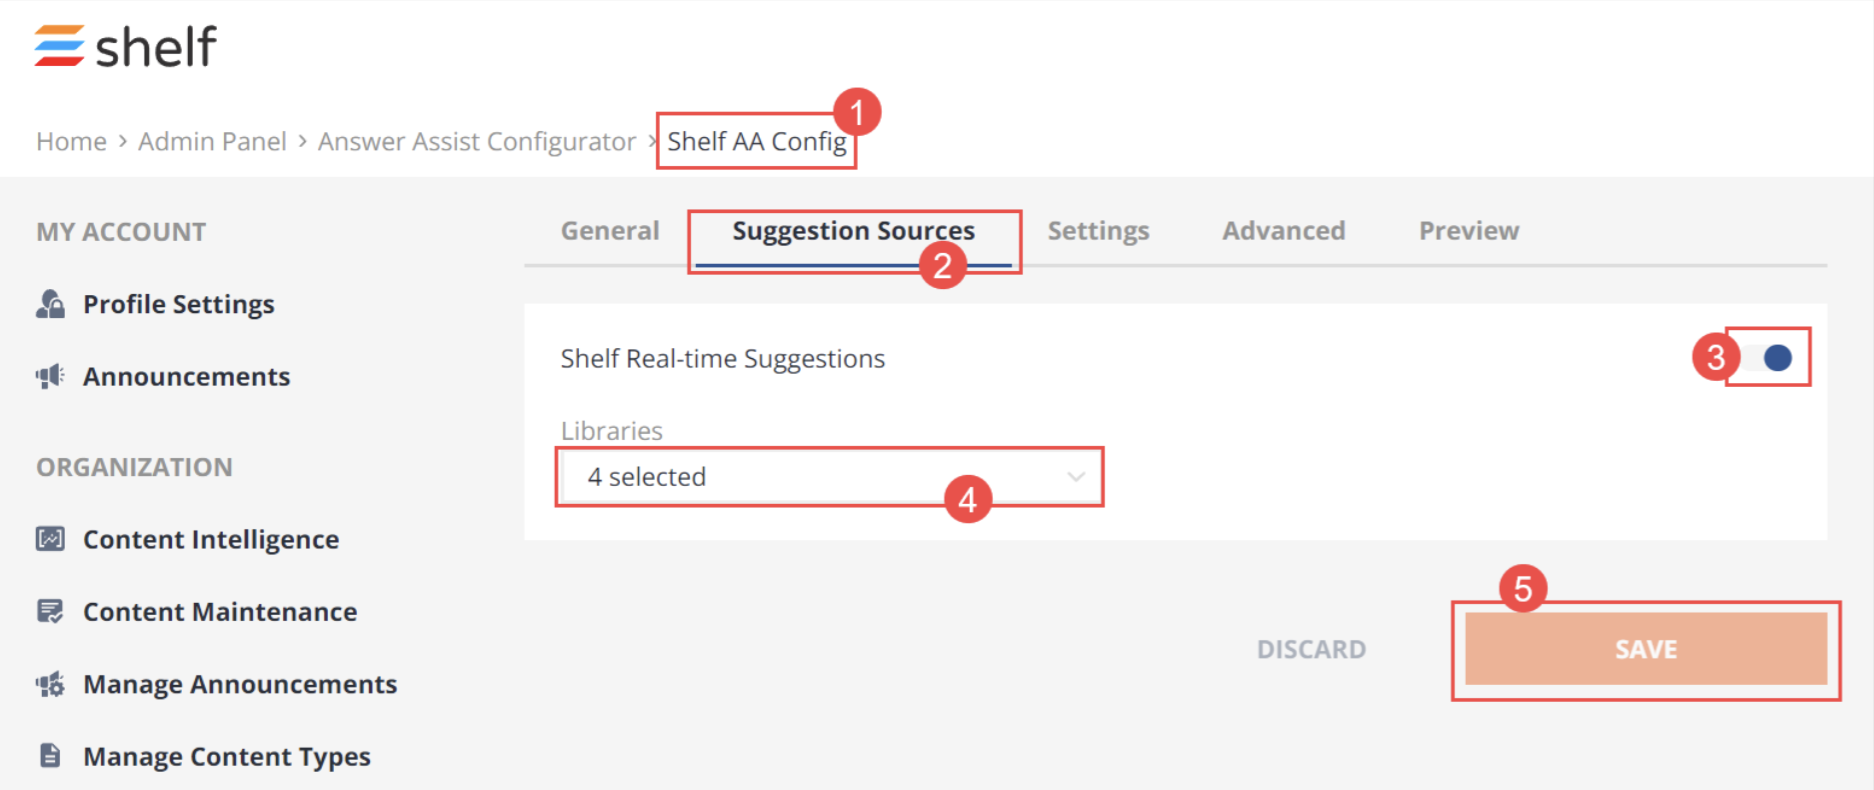
Figure 28. Enabling the Real-Time Suggestions feature for Answer Assist
Now, if you need to enable additional settings for real-time suggestions to be generated and displayed, go to the Advanced tab and make the relevant changes to the JSON code there.
In particular, you can tell your Shelf instance and Answer Assist what other settings need to be accounted for by real-time suggestions.
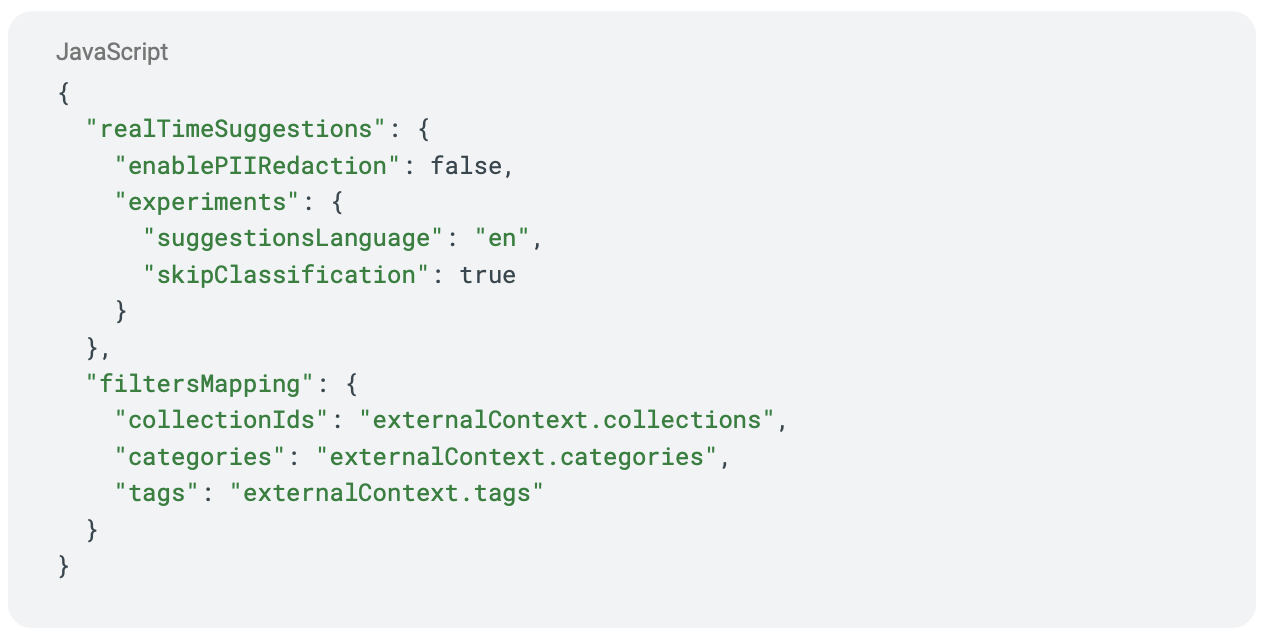
realTimeSuggestions | This is the parameter that enables additional settings for Real-Time Suggestions. It requires no further values. |
enablePIIRedaction | A subordinate optional parameter that can attain true or false value; by default, if enabled, it has true value, which means that personal or sensitive information, such as social security numbers, bank cards, phone numbers, home addresses and alike, is redacted in accordance with the Shelf PII handling policy. If customers want to use their own PIIRedaction methods for their transcripts, they need to set this parameter to false. |
experiments | This optional parameter is subordinate to realTimeSuggestions and opens a set of other parameters that let users configure suggestion language and message classification. |
suggestionsLanguage | The language of suggestions is defined automatically by default. However, using this parameter, customers can leverage what suggestions they are shown and narrow them down to the specific language only. |
skipClassification | Another optional parameter subordinate to experiments. It is false by default; if it's set to true, the messages are not classified by whether they should trigger suggestions or not. |
filtersMapping | This optional parameter opens a set of subordinate parameters which are used by both Real-Time Suggestions and Search Suggestions. Once enabled, it allows additional filters, such as collectionIds, categories, and tags to be passed from external services as context. |
collectionIds | This optional parameter is enabled by filtersMapping and is arbitrary or defined by the external system name of the field in the external context. |
categories | This optional parameter is enabled by filtersMapping and is arbitrary or defined by the external system name of the field in the external context. |
tags | This optional parameter is enabled by filtersMapping and is arbitrary or defined by the external system name of the field in the external context. |
Once you have enabled Real-Time Suggestions in the Suggestion Sources tab and, optionally, configured optional filtering and other parameters via JSON in the Advanced tab, you can expect to receive real-time suggestions in your widget’s Suggestions tab. More details on the actual operation of the feature in the Answer Assist widget can be found in the respective chapter—Receiving Real-Time Context-Mapped Suggestions—below.
Enabling and Configuring the Context-Mapped Suggestions
- Once logged in to your Shelf account with the Admin role credentials, go to the Admin Panel and access the Content Mappingsfeature and page, respectively, there.
 Figure 29. Accessing the Shelf Admin Panel
Figure 30. Accessing the Content Mappings feature in Shelf
- Once on the Content Mappings page, create new mappings for your content (Gems) either (1) manually by clicking the ADD MAPPING button and then populating the respective cells in the Content Mappings table grid, or (2) by uploading a prepared CSV file shown below via the UPLOAD CSV button.
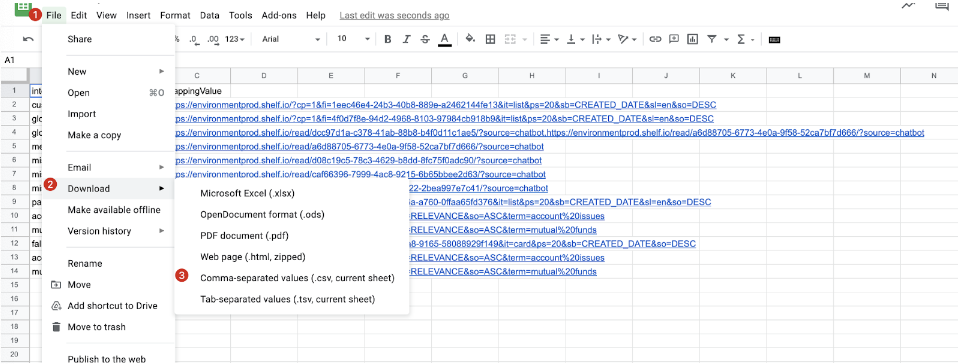
Figure 31. Preparing the CSV file for content mappings
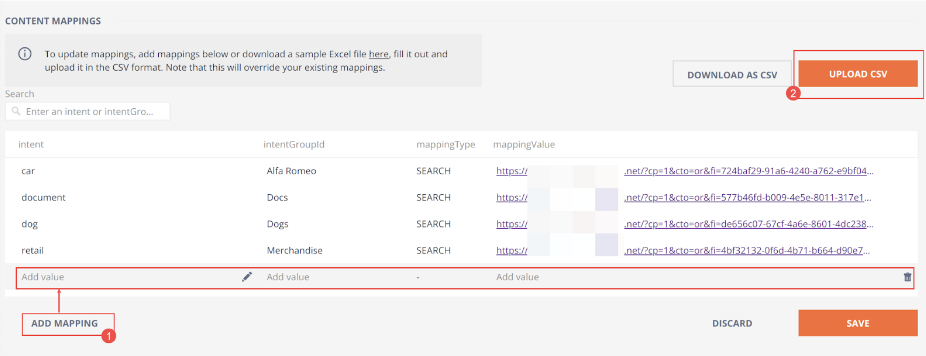
Figure 32. Adding new content mappings, manually or via CSV upload
When configuring content mappings for the Shelf Answer Assist’s context-mapped suggestions, make sure to properly enter correct mapping values, in accordance with the table below.
Table 1. Content mapping values in Shelf
Field | Type | Description | Example |
intent | string (required 1 - 256 characters) | Uniq code for the system combination of the intentGroupId and intent | Breeds |
intentGroupId | string (required 1 - 256 characters) | Useful to group several intents by some criteria (eg by market, specific topic, interaction channel etc.) | dogs |
mappingType | enum: CONTENT ITEM | SEARCH | Auto-populated based on the mappingValue | |
mappingValue | URL (string or array of strings split by ,) | URL of search results, single gem or list of gems for an Intent | https://domain.shelf.io/?cp=1&fi=identifier&it=card&ps=20&sb=CREATED_DATE&sl=en&so=DESC&tg={{breed}} (exemplary Search results link) |
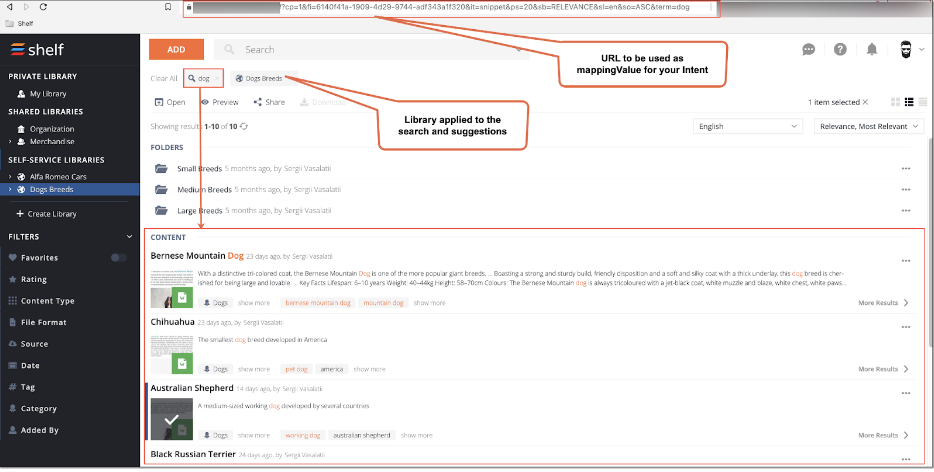
Figure 33. Shelf Search Results page explained

Figure 34. Viewing the filtered search for content in Shelf
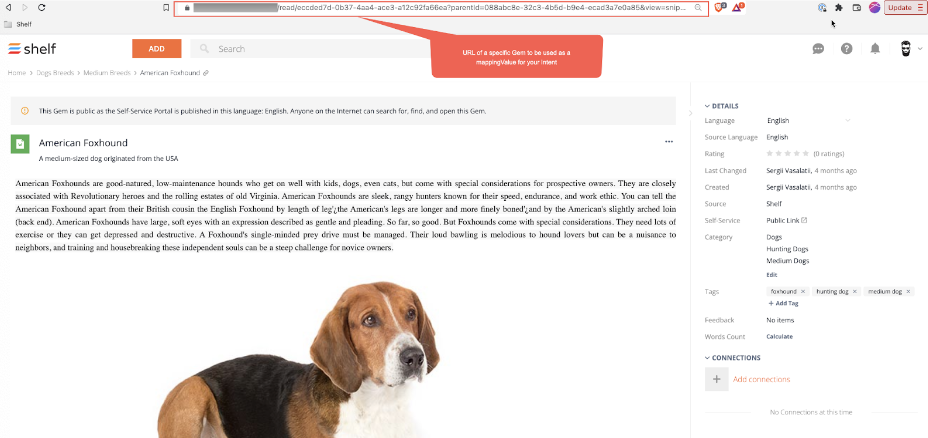
Figure 35. Viewing the Gem page to be used for the Intent
Figure 36. Saving the new content mapping
- Go to the Admin Panel and navigate to the Answer Assist Configurator feature.

Figure 37. Accessing the Answer Assist configurations
- In the Answer Assist Configurator window, open the needed Answer Assist configuration, navigate to the Advancedtab and add the JSON configuration for your context-mapped suggestions in Answer Assist integrated into your platform.

Figure 38. Accessing the Advanced tab in Answer Assist Configurator in Shelf
"contextSuggestions": {
"contextTypes": [
{
"accessor": "dogBreedStr",
"options": [
{
"value": "Large breeds",
"displayName": "Large breeds"
},
{
"value": "Medium breeds",
"displayName": "Medium breeds"
},
{
"value": "Small breeds",
"displayName": "Small breeds"
}
],
"id": "dog",
"color": "#f6b73c",
"type": "list",
"displayName": "Dog"
}
],
"enabled": true,
"defaultIntentGroupId": "dogs"
}
}
- accessor - the id of the conversation attribute that comes directly from the external integration and depends on the external system and configurations in it; more details can be found in integration-specific guides
- defaultIntentGroupId - comes from the Content Mappings configurations
- id - unique name of the context
- options - list of context to mapping configurations
- value - should match a context value set in an external system where Answer Assist is integrated; it is highly dependent on configurations implemented in such an external system
- intent - comes from Content Mappings
- color - a color of the context filter field in the hexadecimal format
- type - a required value that sets the type of the context filter field
- displayName - will be visible as the dropdown option for agents in the Shelf Answer Assist widget
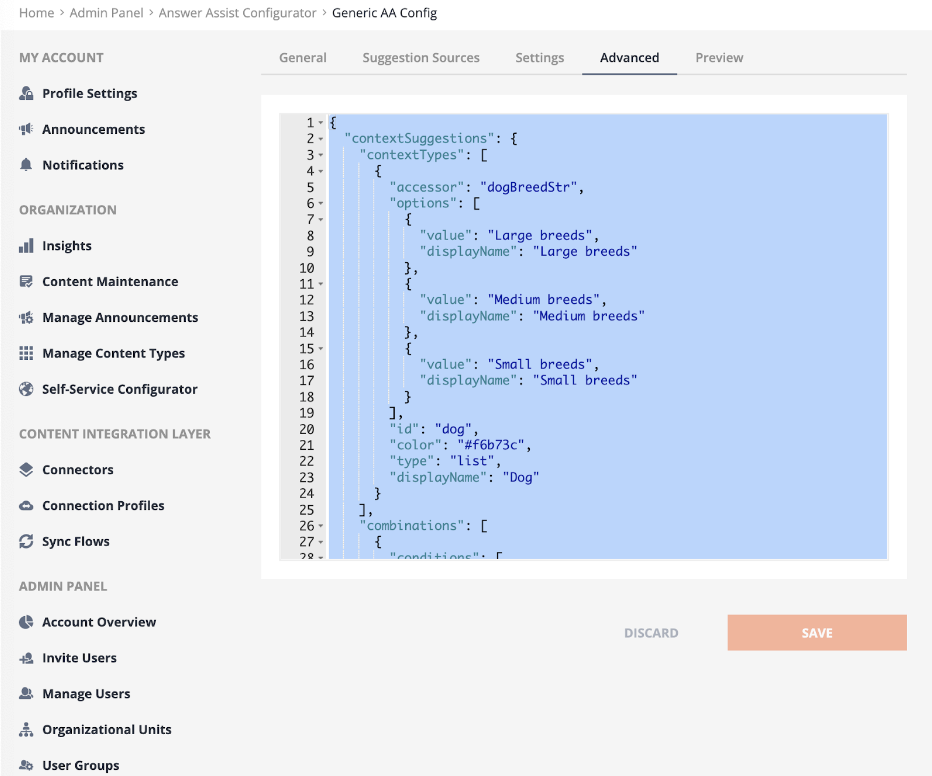
Figure 39. Adding the needed JSON in the Code Editor of the Advanced tab
Configuring IVR Support via the Answer Assist Context Mappings

Figure 40. Creating an IVR-specific context mapping in Shelf
- There is only one Gem offered to you in suggestions
- No suggestions have been triggered manually in the Answer Assist widget
- No other suggestions have been displayed before that Gem.
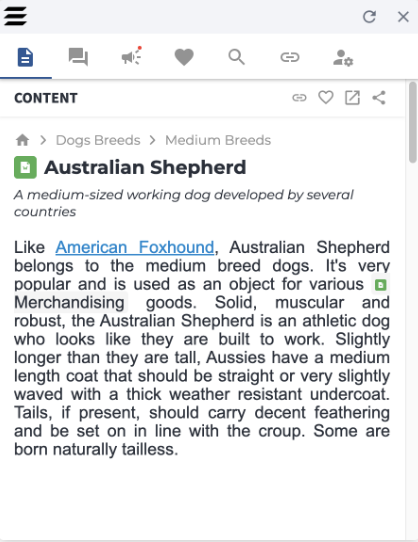
Figure 41. Viewing the single suggestion in the Gem tab
Configuring Multifield Support in the Answer Assist Context-Mapped Suggestions

"contextTypes": [
{
"accessor": "dogBreedStr",
"options": [
{
"value": "Large breeds",
"displayName": "Large breeds"
},
{
"value": "Medium breeds",
"displayName": "Medium breeds"
},
{
"value": "Small breeds",
"displayName": "Small breeds"
}
],
"id": "dog",
"color": "#f6b73c",
"type": "list",
"displayName": "Dog Breeds"
},
{
"options": [
{
"value": "hunting dog",
"displayName": "Hunting dogs"
},
{
"value": "mountain dog",
"displayName": "Mountain dogs"
},
{
"value": "soviet dog",
"displayName": "Soviet dogs"
},
{
"value": "pet dog",
"displayName": "Pet dogs"
},
{
"value": "working dog",
"displayName": "Working dogs"
}
],
"id": "dog type",
"color": "#f6b73c",
"type": "list",
"displayName": "Dog Type"
},
{
"accessor": "dogBreedStr",
"options": [
{
"value": "Large Dogs",
"displayName": "Large dogs"
},
{
"value": "Working Dogs",
"displayName": "Working dogs"
}
],
"id": "Size",
"color": "#f6b73c",
"type": "list",
"displayName": "Dog Size"
}
],
"combinations": [
{
"conditions": [
{
"context": "dog",
"templateVariableName": "breed",
"value": "*"
},
{
"context": "dog type",
"templateVariableName": "dog type",
"value": "*"
},
{
"context": "Size",
"templateVariableName": "dog size",
"value": "*"
}
],
"intentGroupId": "dogs",
"intent": "Breeds"
}
],
"enabled": true,
"defaultIntentGroupId": "dogs"
{
"context": "dog",
"templateVariableName": "breed",
"value": "*"
},
{
"context": "dog type",
"templateVariableName": "dog type",
"value": "*"
},
{
"context": "Size",
"templateVariableName": "dog size",
"value": "*"
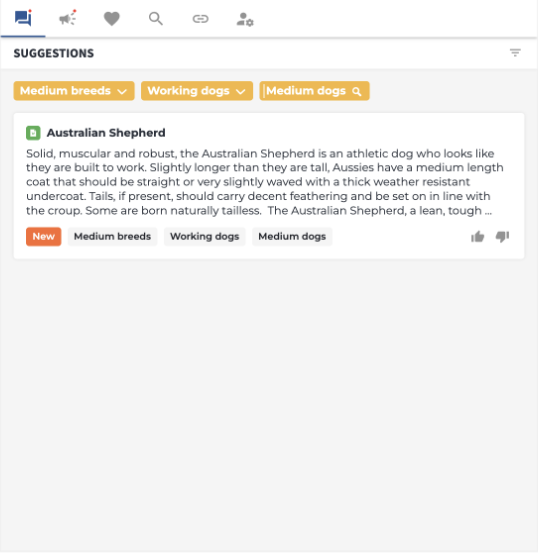
Figure 43. Viewing the content suggested with the multifield support feature and the AND logic
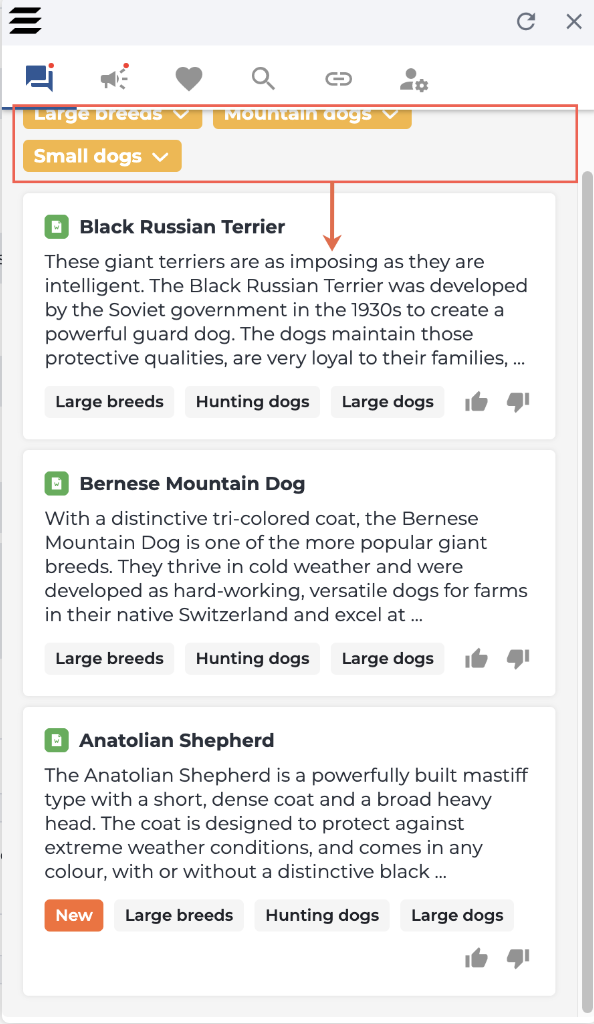
Figure 44. Viewing the content suggested with the multifield support feature and the OR logic
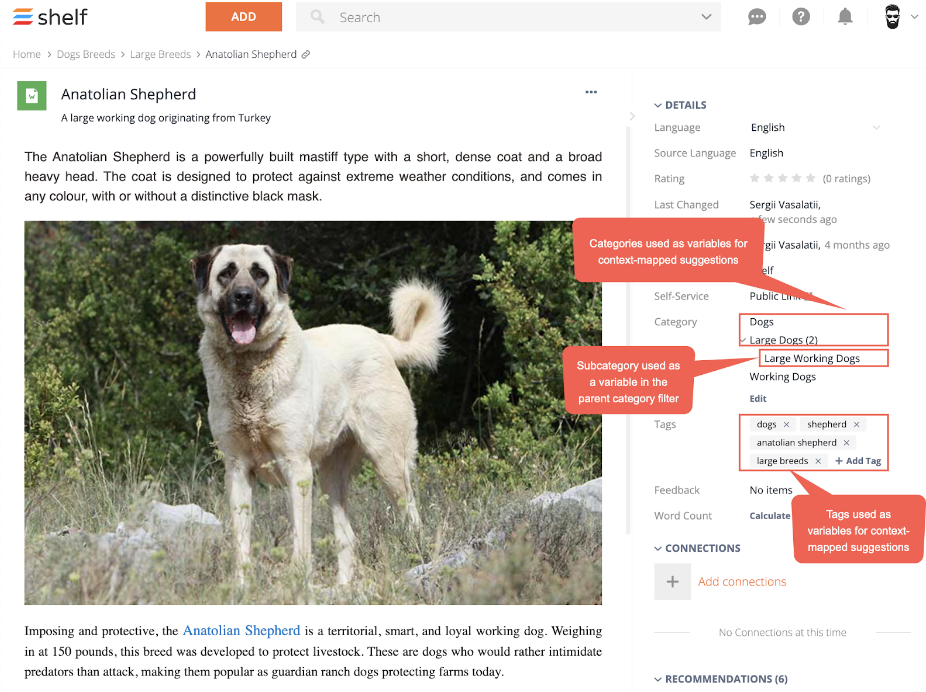
Figure 45. Viewing tags and categories assigned to a Gem in Shelf
If tgo=and is used in a content mapping, only the matching Gems that contain all of the assigned tags are returned in the Answer Assist suggestions.
Configuring Context Filter Fields in Answer Assist
By default, once enabled, the context suggestion filters are displayed on top in the Answer Assist widget as shown in the figure below.
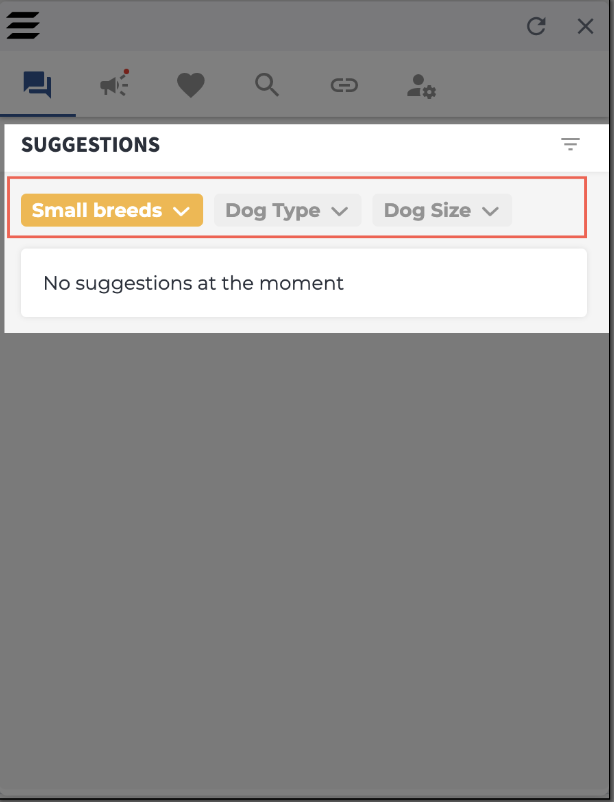
Figure 46. Viewing the default context suggestion filter fields in Answer Assist
"visibility": "hidden" | "menu" | "top"
}
In case the visibility is set to menu, you need to click the menu icon in the Suggestions tab to reveal and use the available filter fields.
If the visibility is set to hidden, no context filter dropdown fields are displayed and the suggestions are changed only when the new context is auto-detected.
Hiding Individual Content Mapping Fields in Answer Assist User Interface
In addition to hiding ALL filter fields in Answer Assist’s Suggestions tab, you can also hide individual content mapping fields there.
This can be done by adding the following code to your JSON in the Advanced tab of your Answer Assist configuration. Note that this parameter needs to be added to the specific content mapping field you want to hide.
"visibility": "hidden"
In the general JSON scheme, this parameter is placed together with the content mapping filter field it is supposed to hide from the Suggestions tab.
"contextSuggestions": {
"contextTypes": [
{
"color": "#4682B4",
"displayName": "Colors",
"visibility": "hidden",
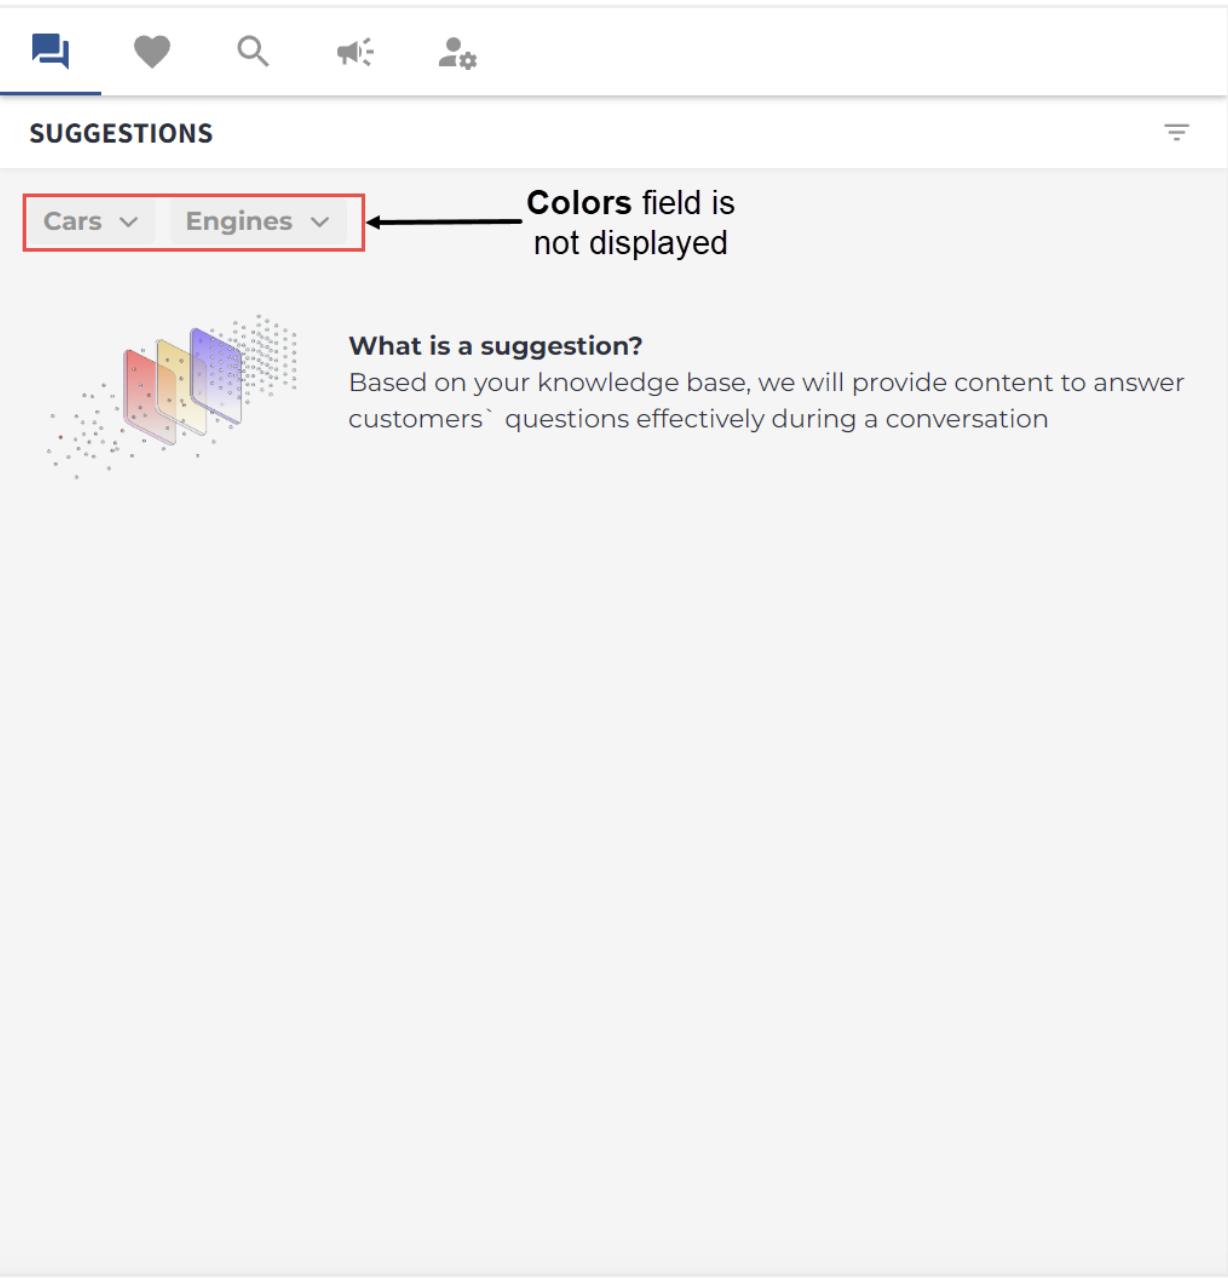
For example, we have originally three (3) content mapping filter fields displayed in the Suggestions tab in the Answer Assist widget - Cars, Engines, Colors. And we want to hide the Colors field because the dealership now has cars of only one color and, respectively, agents cannot refer to suggested documents where other colors are mentioned.
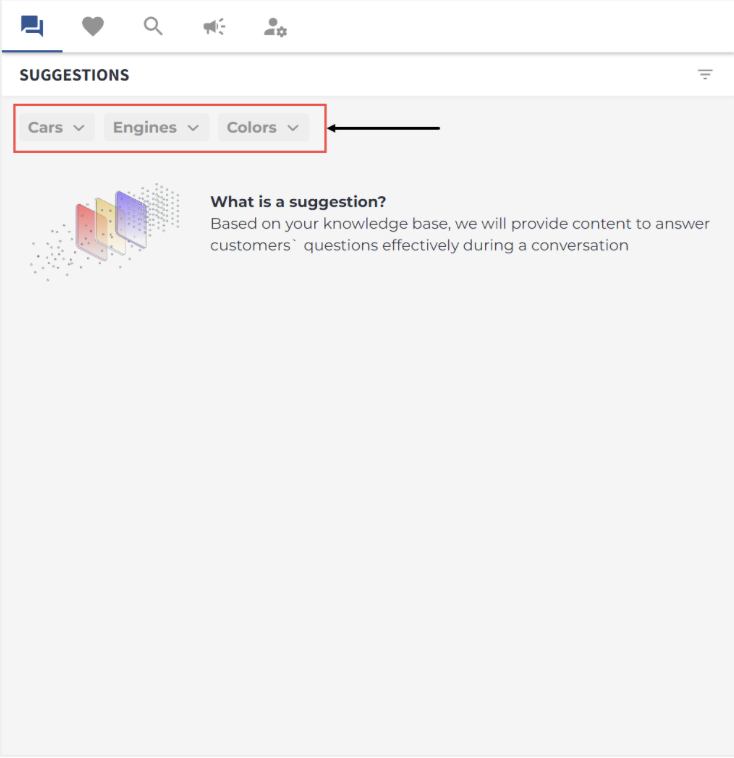

Figure 50. Hiding the Colors content mapping filter field via JSON
Once we save changes, we can go to the Answer Assist widget and check whether the Colors filter field is or is not displayed.
Configuring Suggestion Labels
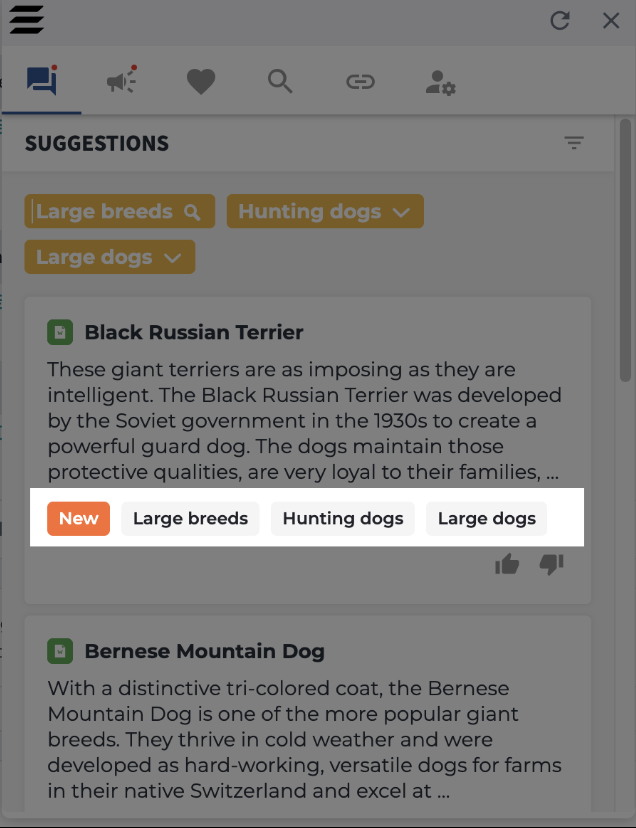 Figure 52. Viewing the context labels for the suggestion in Answer Assist
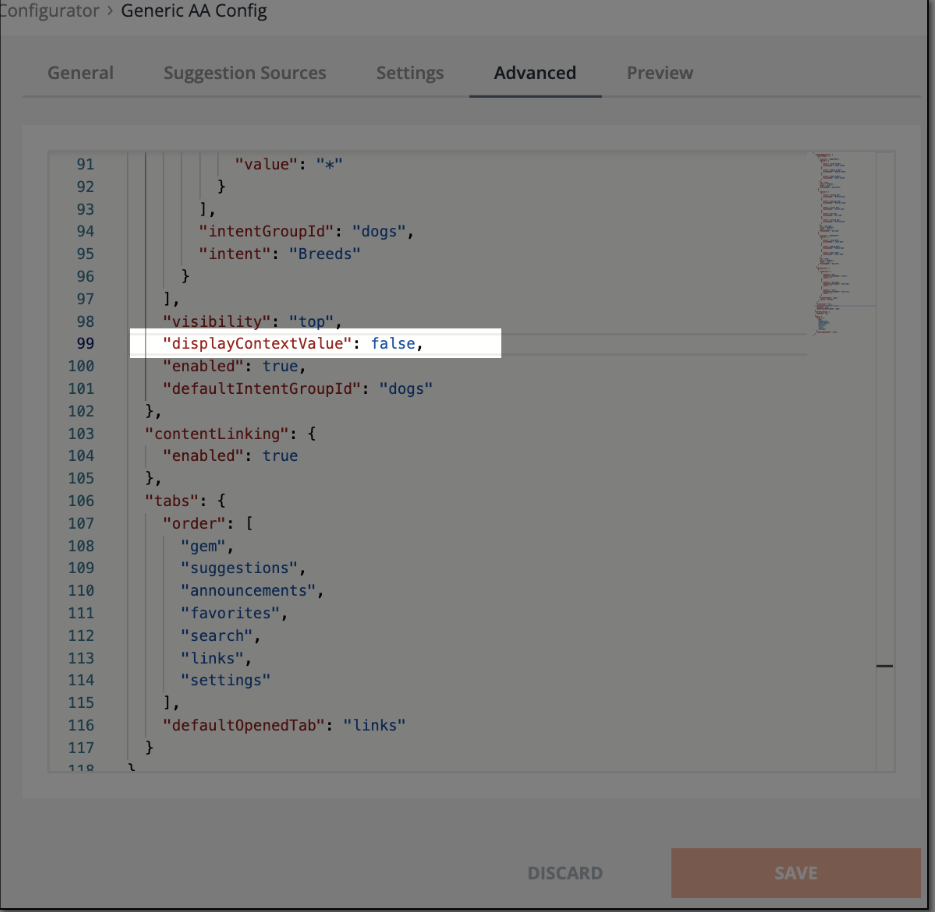
Figure 53. Disabling the display of context labels for suggestions in Answer Assist
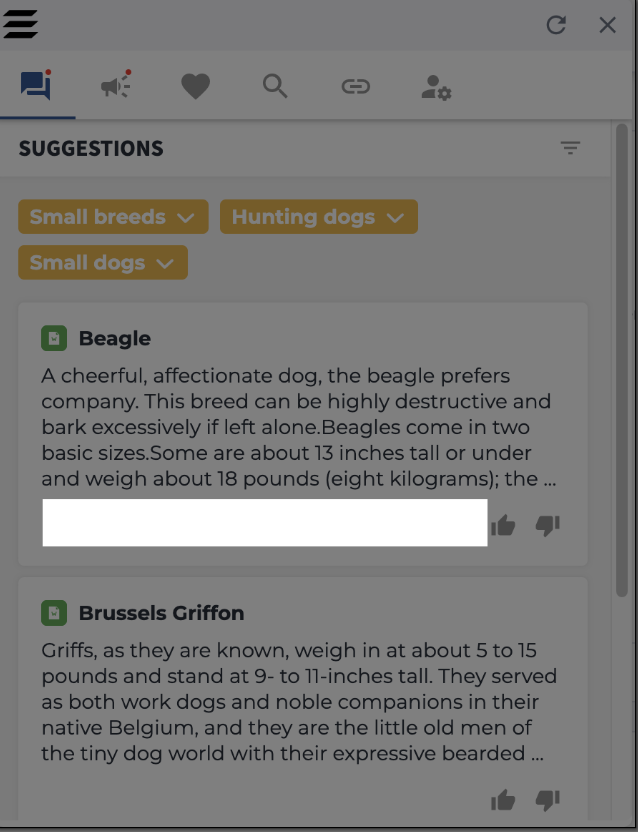
Figure 54. Viewing the suggestions in Answer Assist without context labels
Enabling and Configuring Search Suggestions for Answer Assist
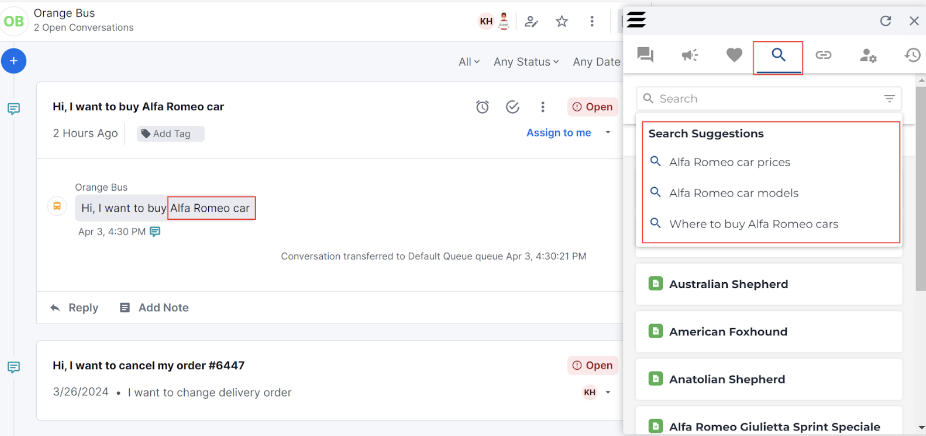 Figure 55. Viewing Search Suggestions in Shelf Answer Assist widget in Kustomer
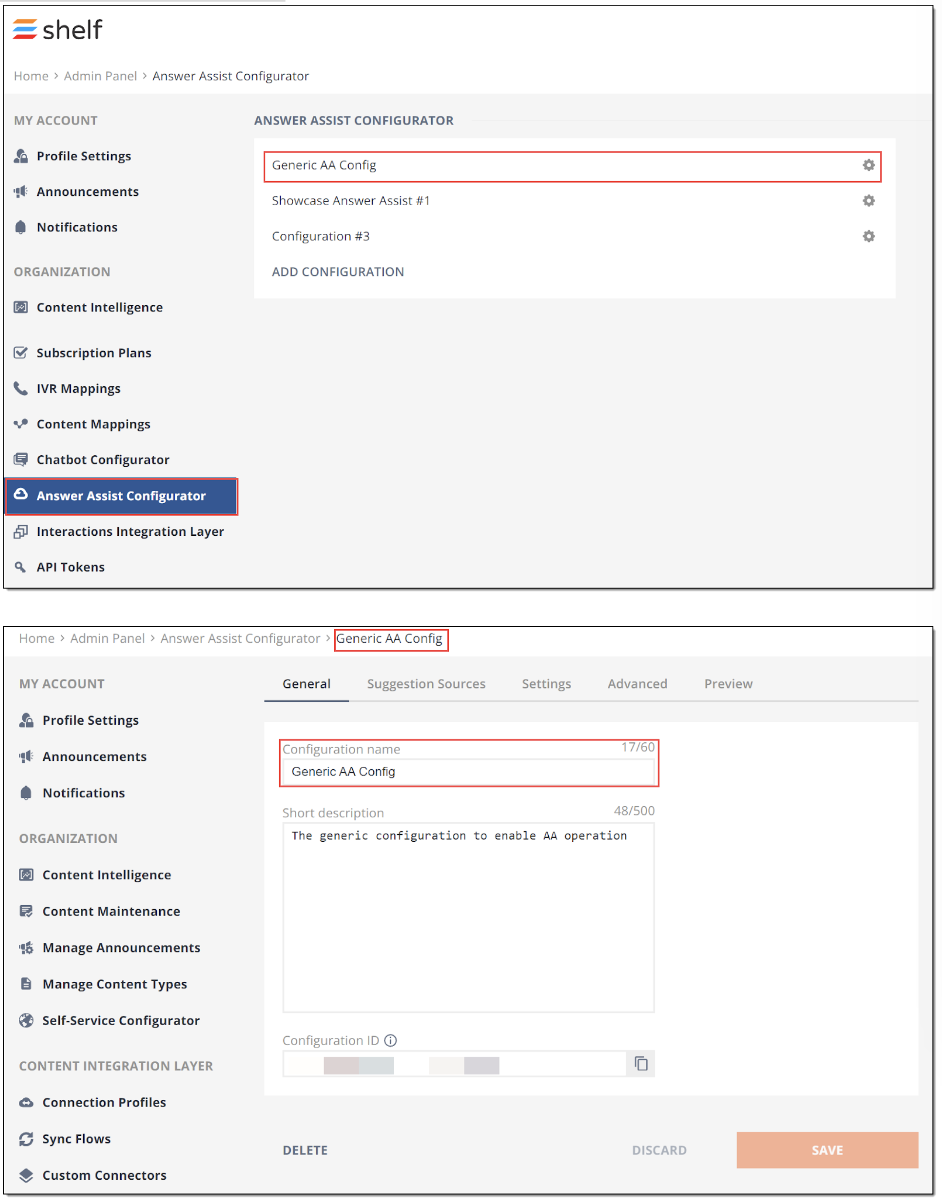
Figure 56. Accessing Answer Assist configuration in Shelf Admin Panel
"gptSearchSuggestions": {
"enabled": true
}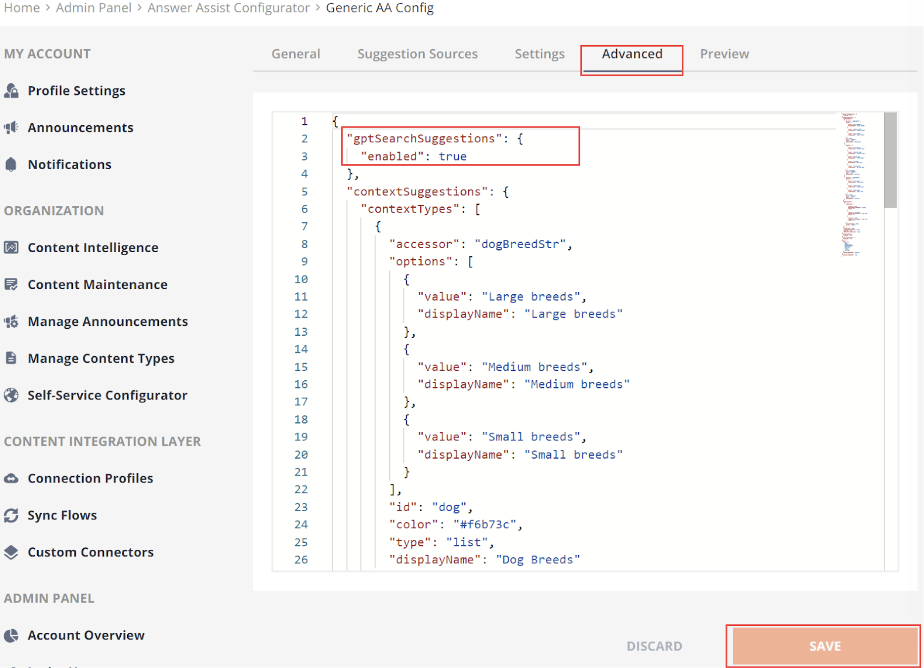
Figure 57. Enabling Search Suggestions for your Answer Assist configuration
Enabling and Configuring Interaction History
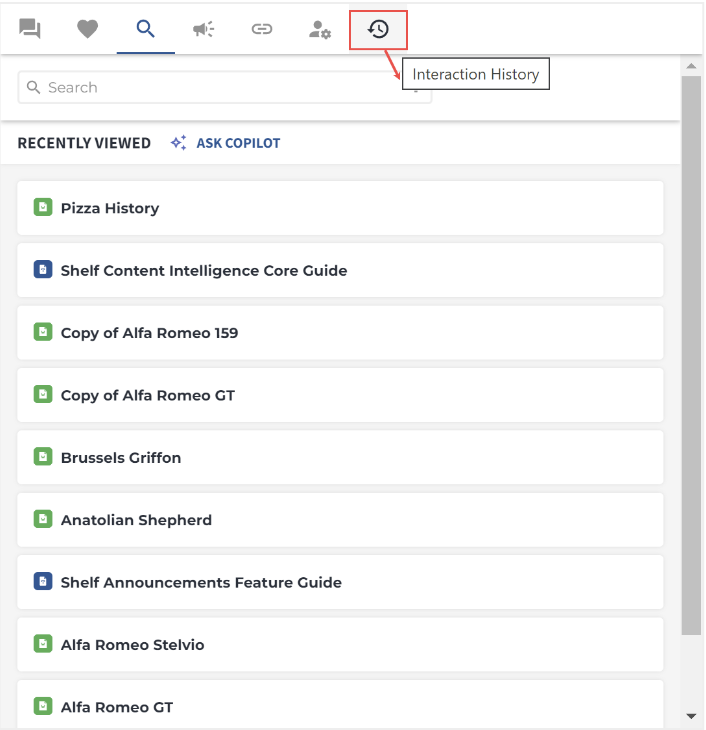
Figure 58. Accessing the Interaction History feature in AA
 Figure 59. Accessing Answer Assist configuration in Shelf Admin Panel
 "interactionHistory": {
"enabled": true
}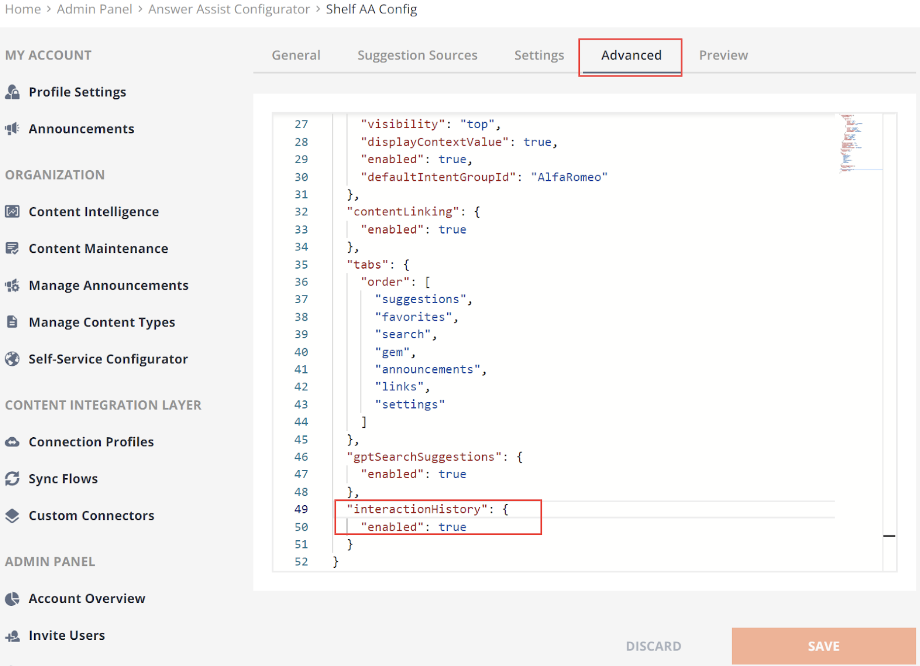
Figure 60. Enabling the Interaction History feature and tab for Answer Assist
Previewing the Answer Assist Widget in Shelf
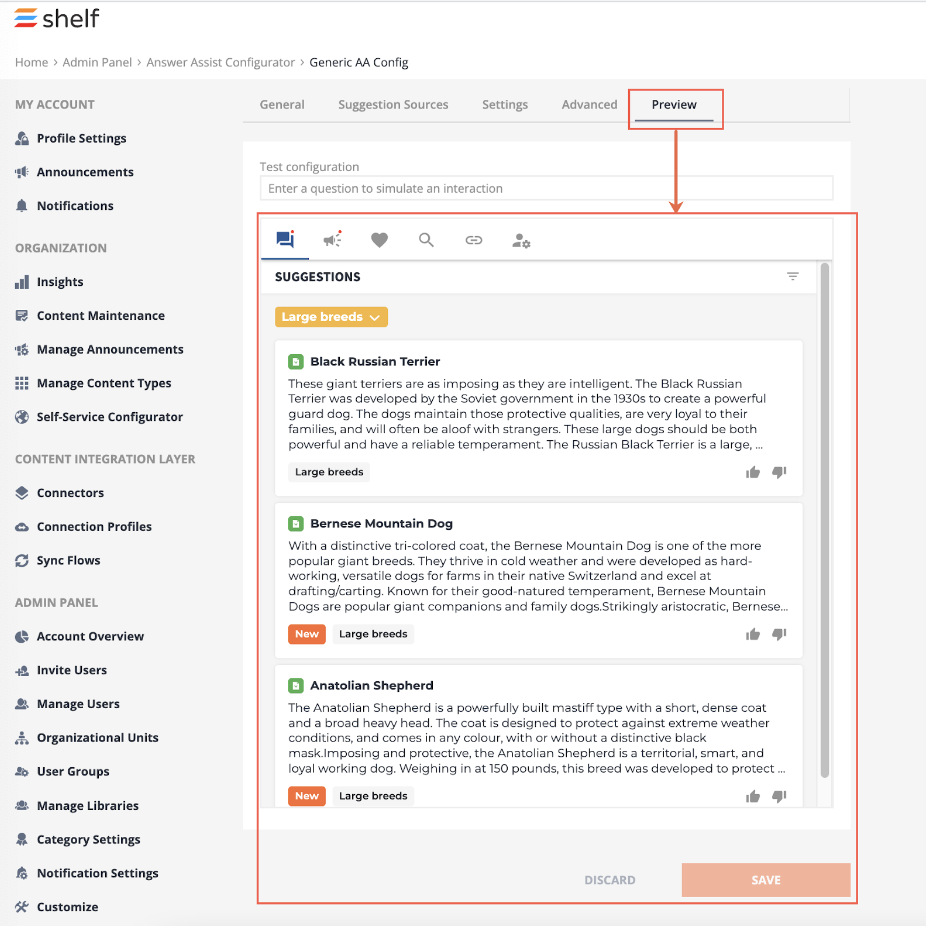
Figure 61. Using the Answer Assist Preview feature in the Answer Assist Configurator
Enabling the Public Share Feature for Answer Assist
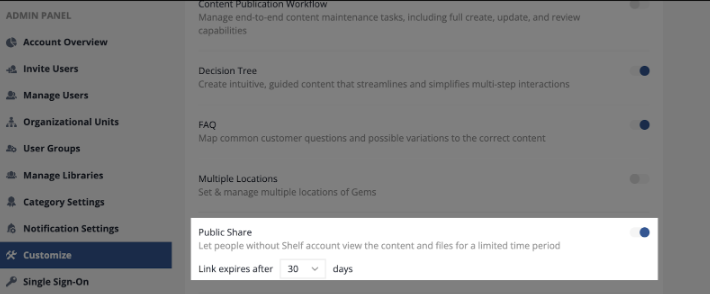
Figure 62. Enabling the Public Share feature in the Admin Panel
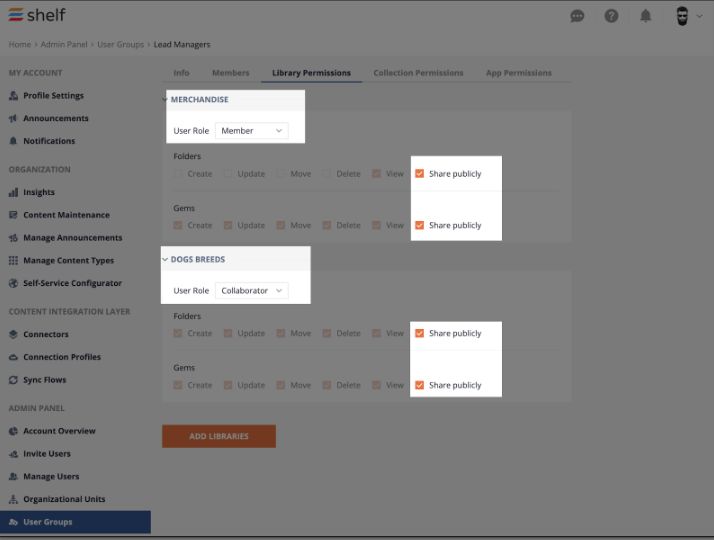
Figure 63. Granting the Public sharing permissions for users
Multiple Configurations Support in Answer Assist
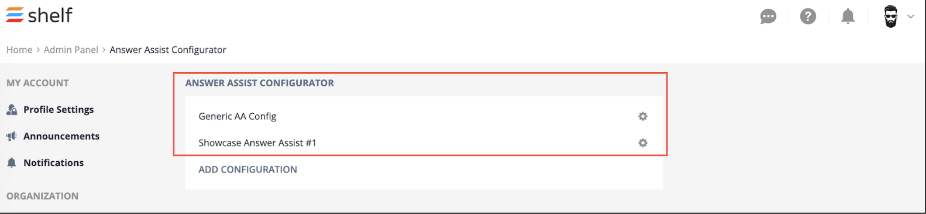
Figure 64. Viewing the list of available Answer Assist configurations in Shelf
3.2. Shelf Answer Assist Features Overview
- During an interaction with a customer, you start the Answer Assist widget and get the relevant Suggestions (both AI-matched and context-mapped suggestions)
- If no Suggestions are provided by Answer Assist, you use its Search feature to look up for the needed help articles (Gems)
- Before running a manual search to find content, you may use the Search Suggestions feature directly in the Search tab of the Answer Assist widget and receive the list of three most suitable suggestions based on your interaction with the customer
- Upon finding the suitable article, you view it in the Gem tab of the Shelf Answer Assist widget and can also link the article to the interaction from tooltips and open it in Shelf. You can also open any found article (Gem) not in Answer Assist’s Gem tab but in a new tab of your browser for a quick preview via the combination of Command (MacOS) or Control button on your keyboard and the left button of your mouse.
- After reviewing the article, you provide your feedback on it
- If you find the content in the article meaningful and helpful, you can share it with your customers or colleagues using the Public Share feature
- In addition to sharing the article, you can add it to Favorites for future reference; you can also remove other previously added article(s) from favorites
- Check the Announcements tab for any updates in the content sharing policy or the customer support regulations etc.
- Work with the Links tab in Answer Assist: check whether you have linked all the needed articles to the relevant interaction, unlink no longer needed articles etc.
3.2.1. Answer Assist Features Usage
Receiving and Working with Real-Time Suggestions
One of the Shelf Answer Assist’s features is to provide real-time content suggestions to your agents to allow them to address your customers’ questions in a quicker and more efficient fashion. The Real-Time Suggestions feature was developed to substitute the now-deprecated AI Suggestions feature and ensures a higher level of suggesting accuracy and speed.
Let us see how you, as an agent, or your organization’s agents can leverage this feature to pursue your business goals.
The real-time suggestions are generated and delivered to agents during both chat and voice conversations with customers.
Example 1. Generating and receiving real-time suggestions in Answer Assist chat on Kustomer

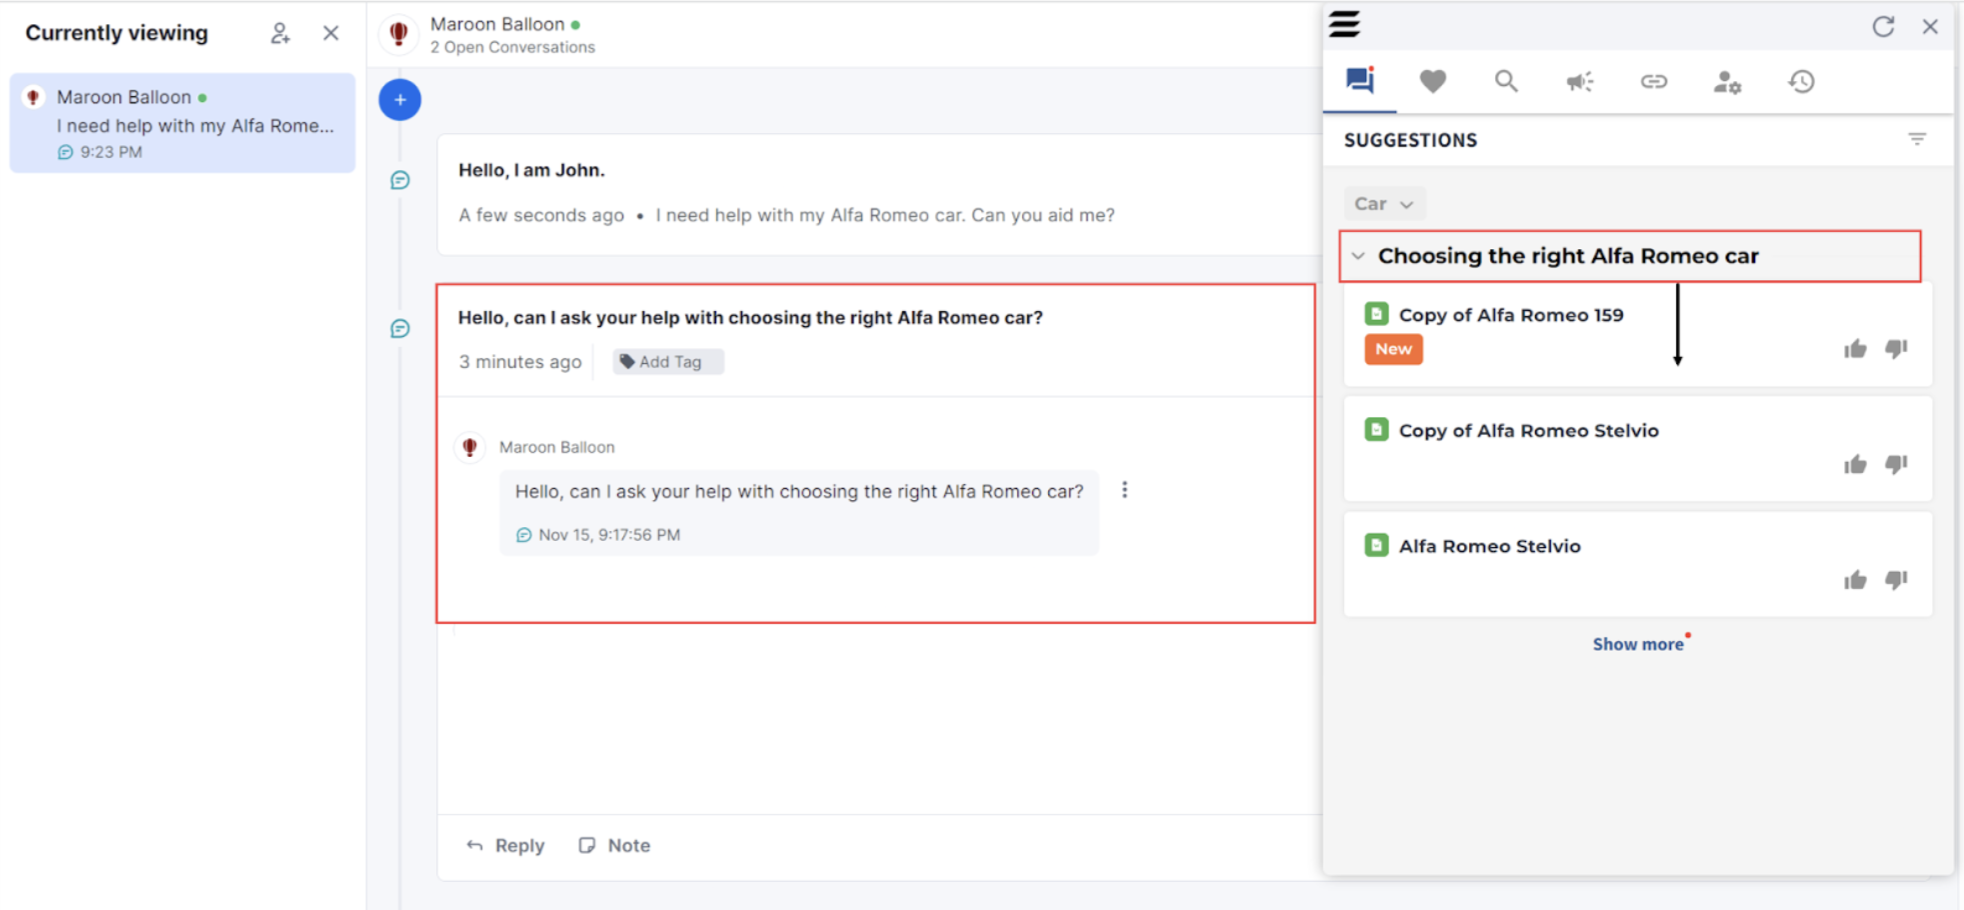
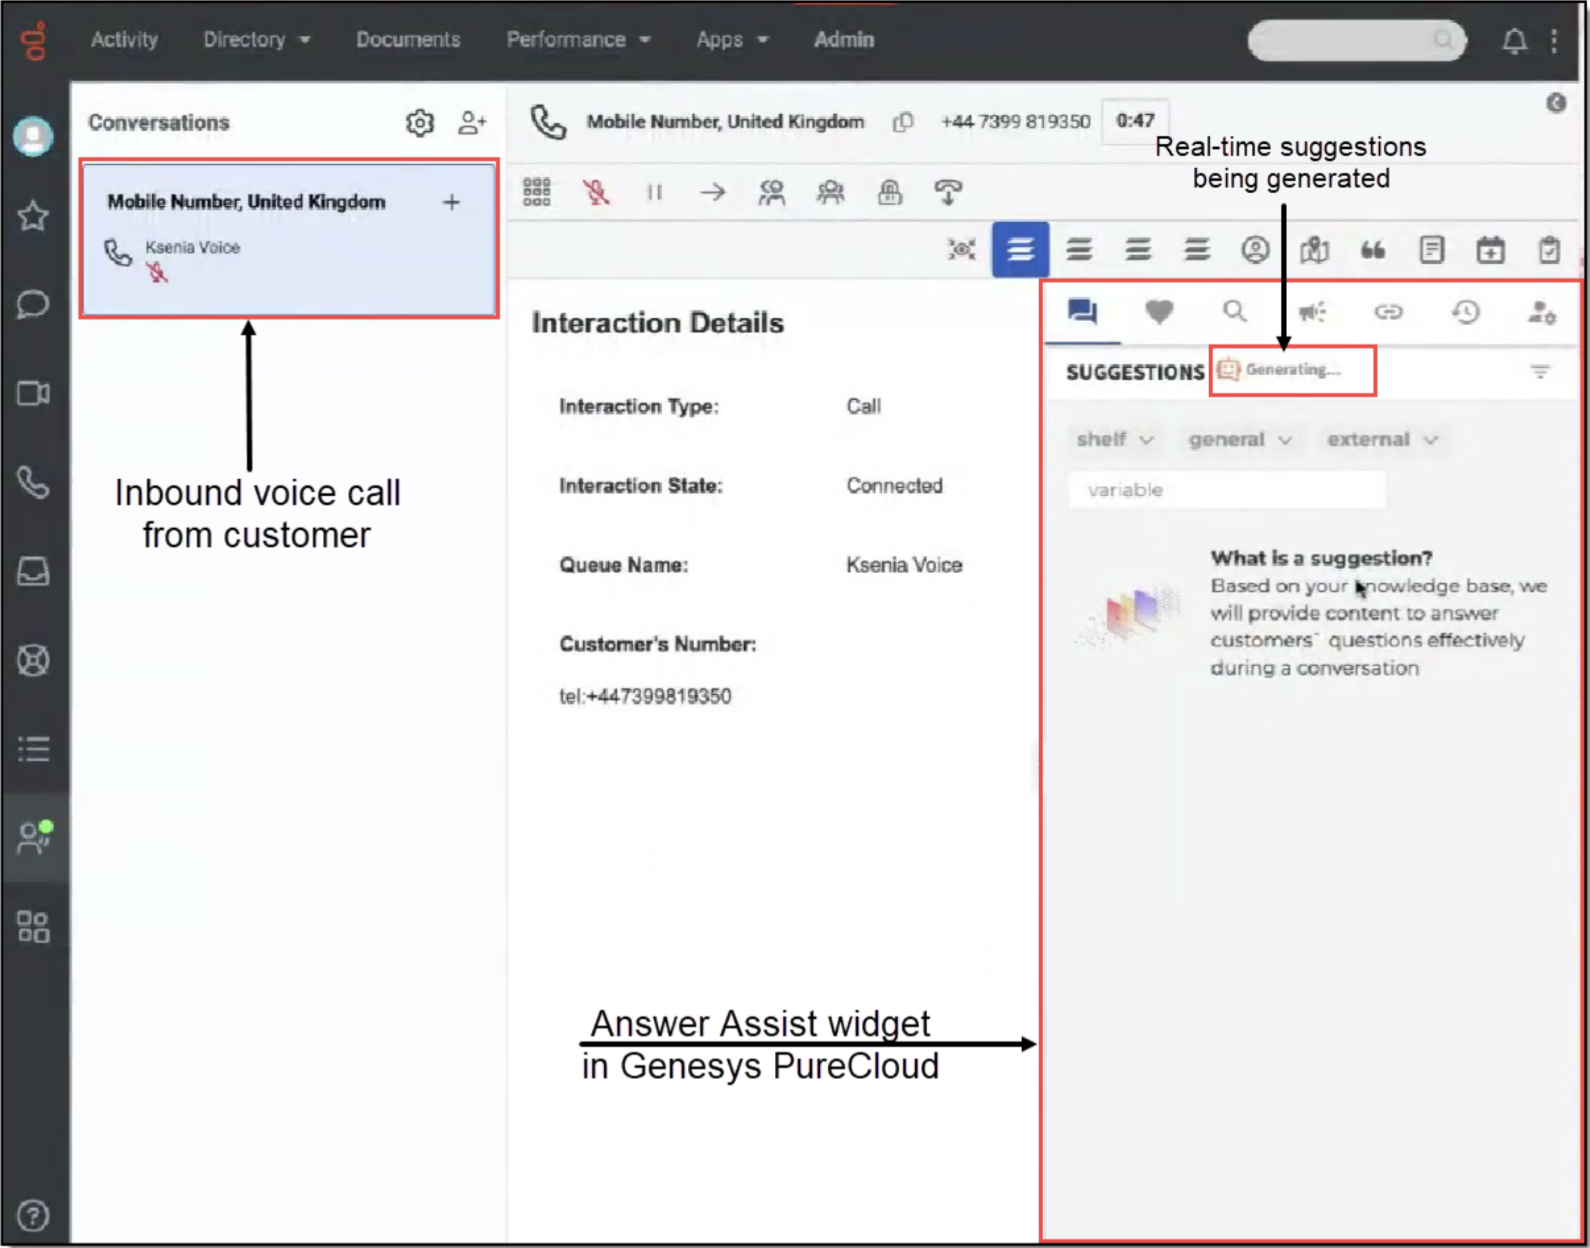
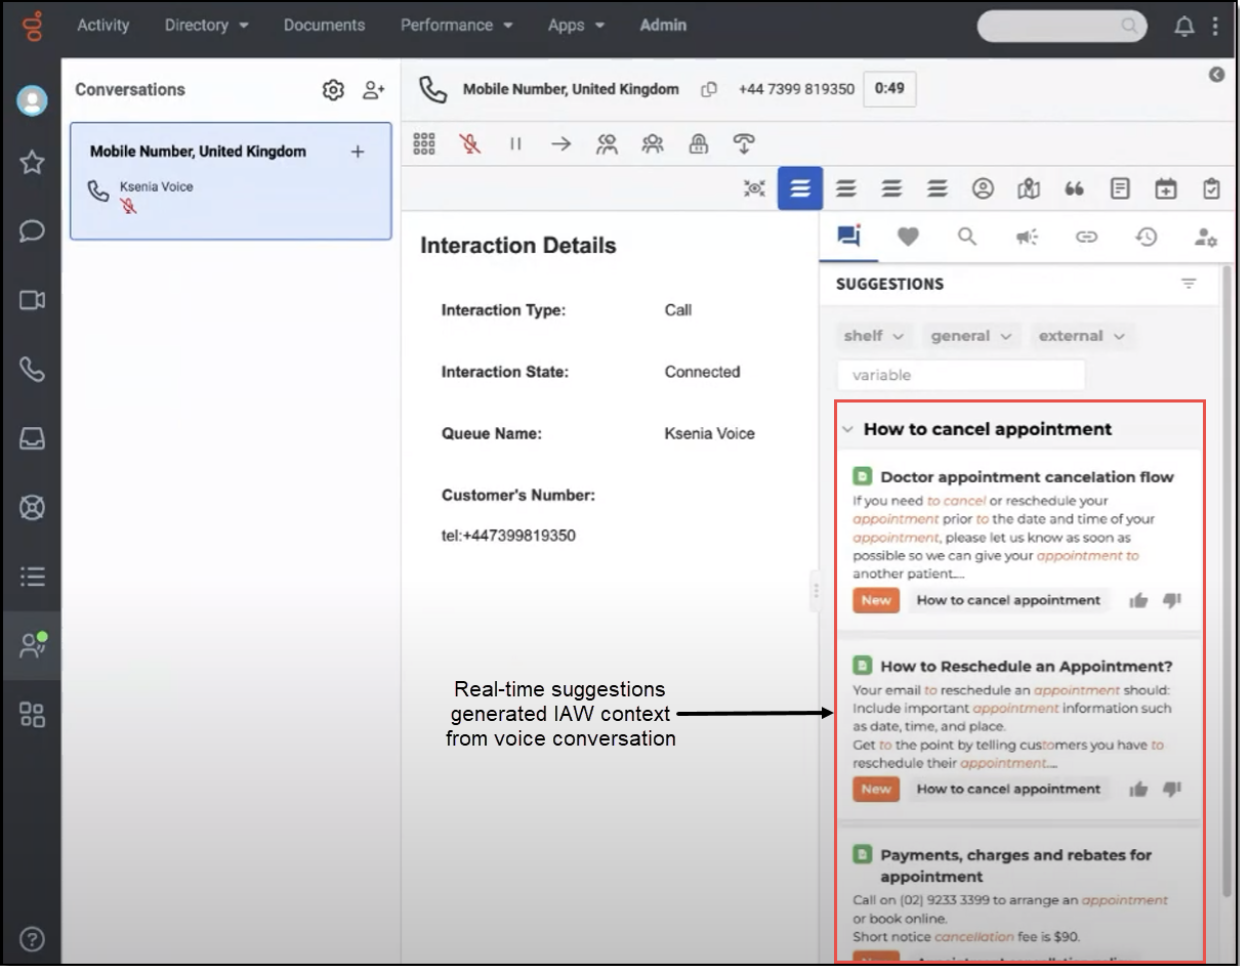
Figure 68. Viewing generated real-time suggestions in Answer Assist widget on Genesys
Speaking about real-time suggestions in Shelf Answer Assist during voice conversations on the Genesys PureCloud platform - it is a good example of applying dynamic filters to such suggestions.
These dynamic filters are defined by the following parameters and their values, which need to be added to the JSON code in the Advanced tab of Shelf Answer Assist Configurator menu, as described in the Enabling and Configuring Real-Time Suggestions section.
{
"filtersMapping": {
"collectionIds": "Genesys.collectionids",
"categories": "Genesys.categories",
"tags": "Genesys.tags}
}
These parameters set mappings between Shelf and Genesys, defining what Shelf parameter corresponds to what Genesys parameter.
When you access your Genesys PureCloud instance and create the inbound voice call flow, you define these parameters there as well. See the following figure for details.
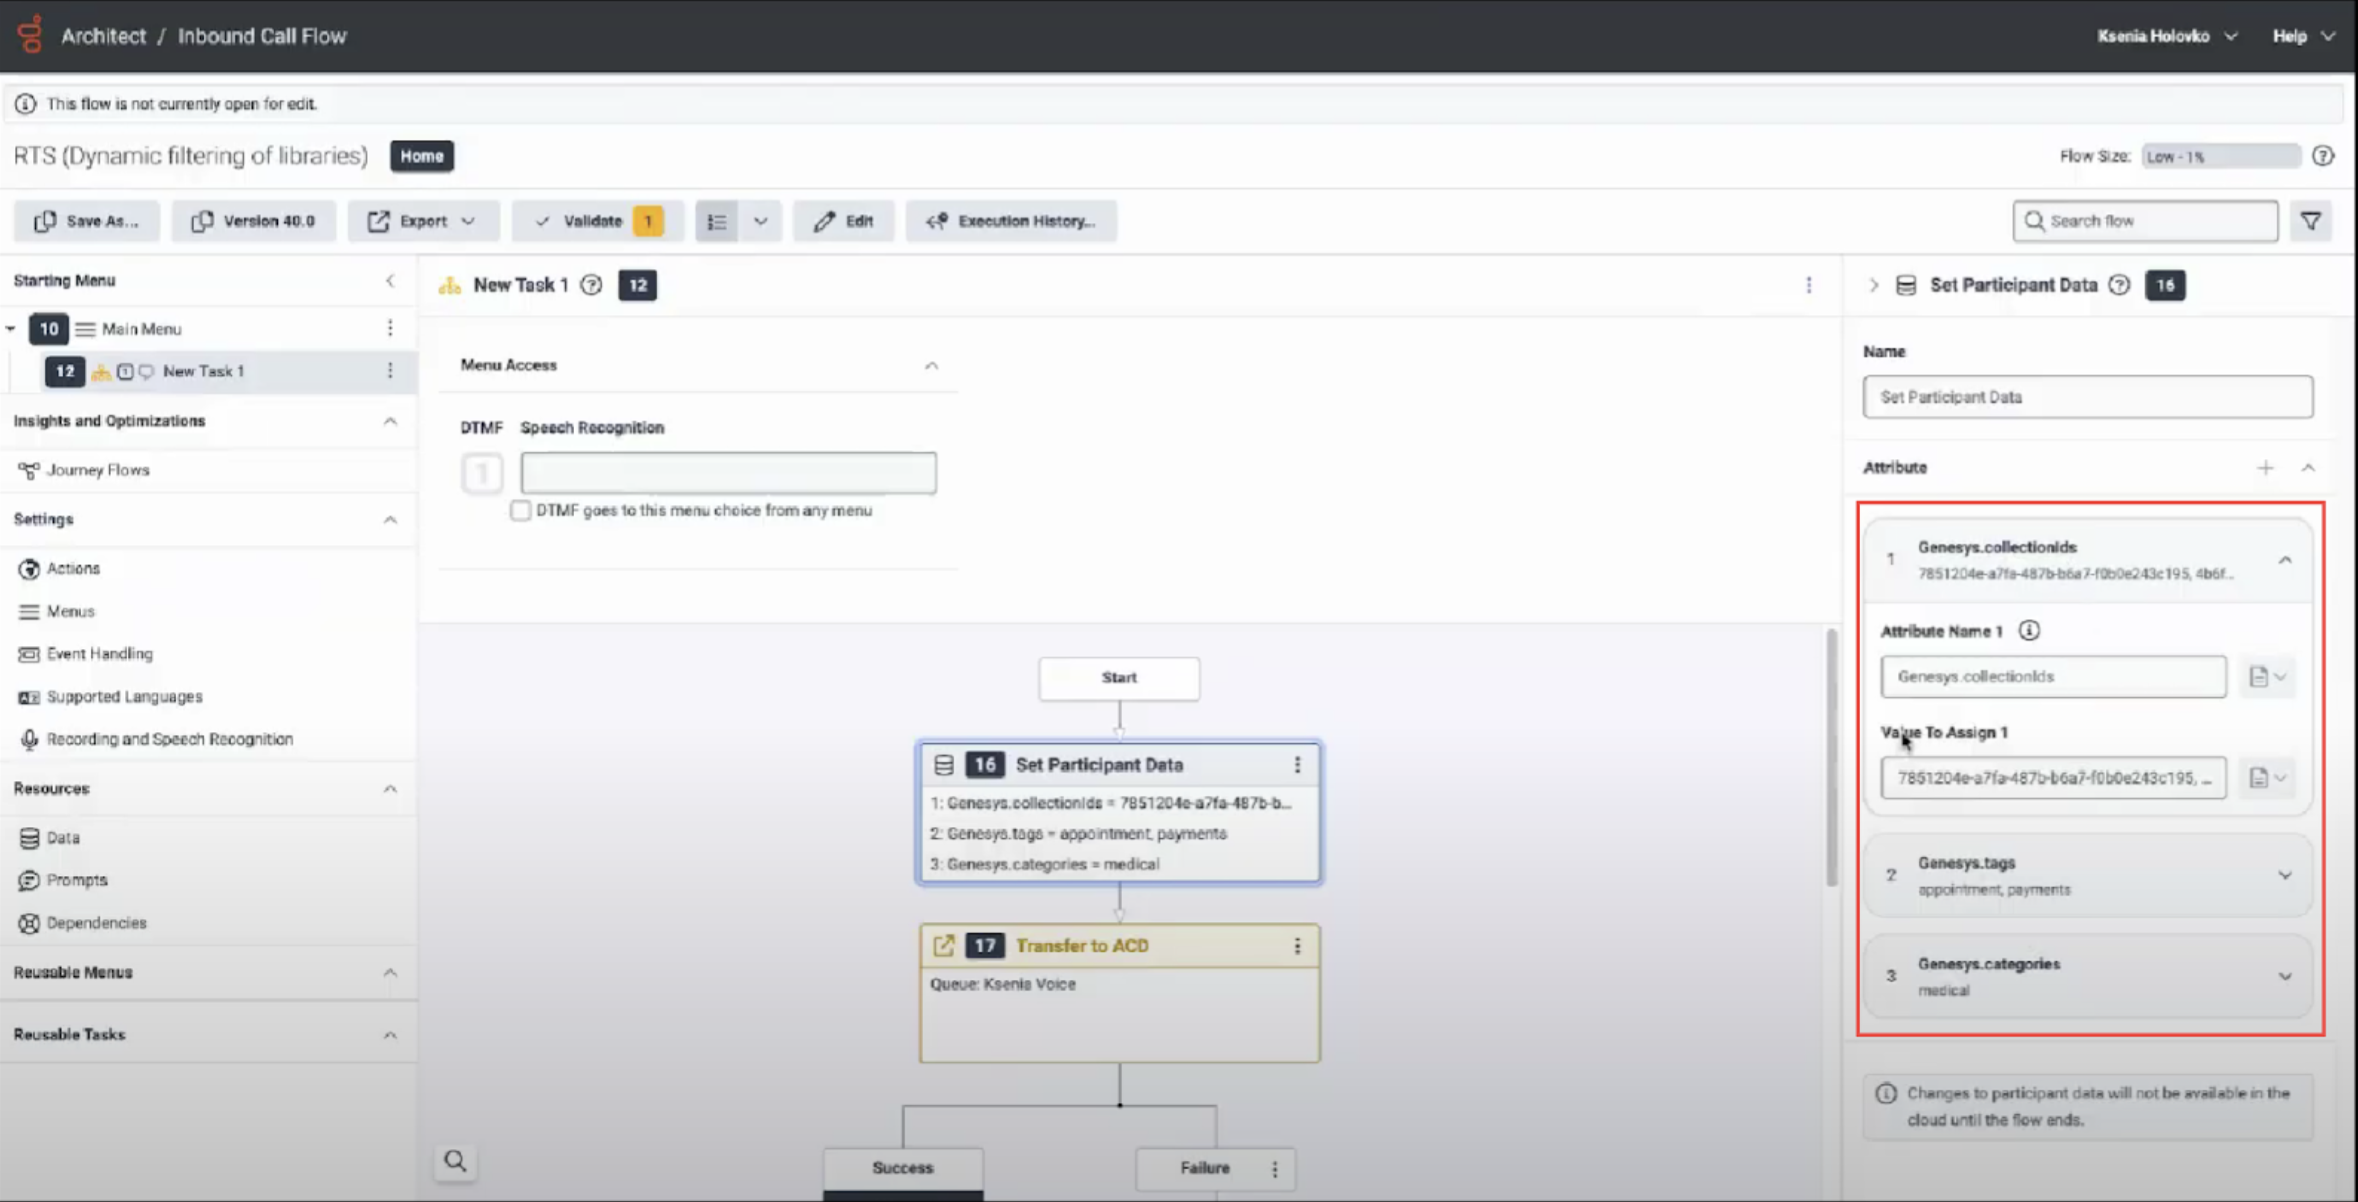
Figure 69. Configuring CollectionIds, categories, tags parameters on Genesys
Once these parameters are set and defined, Answer Assist will filter real-time suggestions based on the relevant content.
Regardless of the flow—chat or voice conversation—of receiving real-time suggestions in Shelf Answer Assist, you can work with them as follows:
Initially view 3 (three) most suitable suggestions (1) and the customer question they are generated for (2)
View which of the displayed suggestions are new and which are not (3)
Access the Gem tab for receiving more detailed information on the issue (4)
Expand (5) the suggestions card and view up to 5 (five) suggestions in total (6)

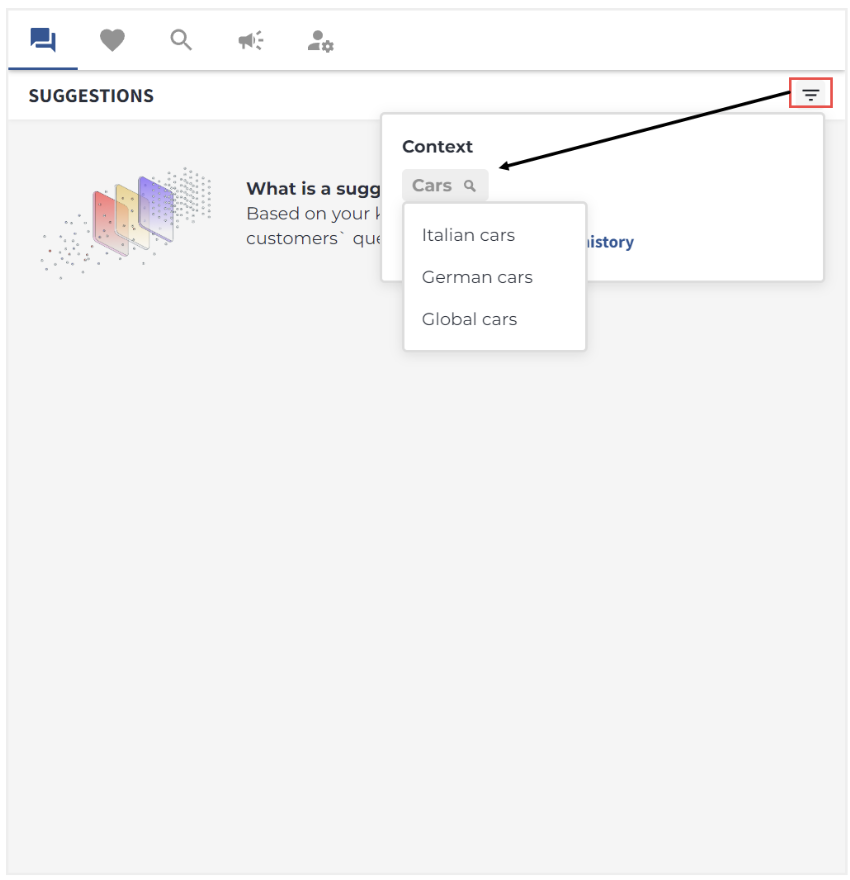
Working with the Context-Mapped Suggestions in Answer Assist
Figure 71. Checking the context-mapped suggestions in Answer Assist in Kustomer
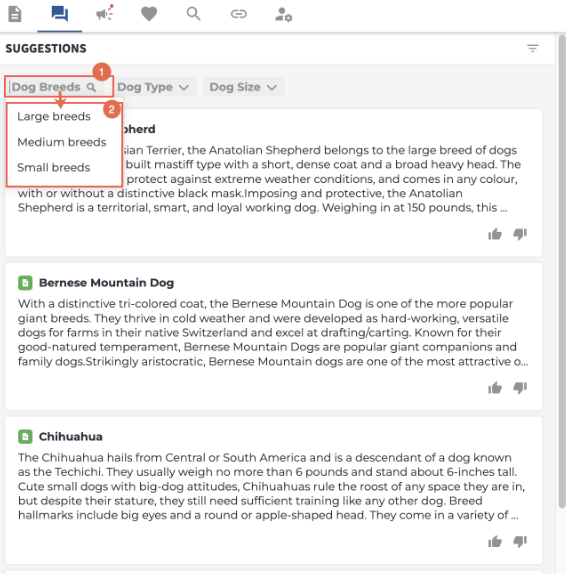
Figure 72. Using the context filtering options in Answer Assist
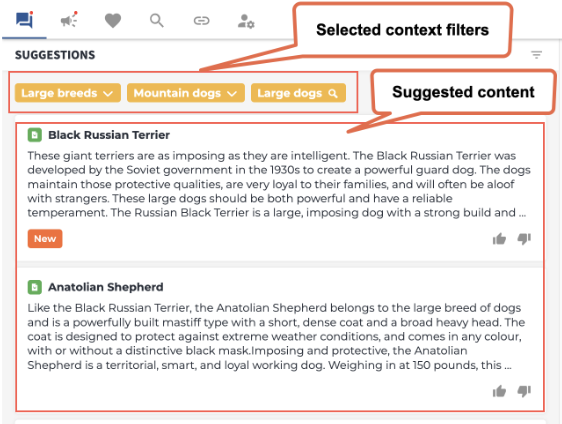
Figure 73. Viewing the filtered context-mapped content suggestions in Answer Assist
Using Search Suggestions to Obtain Relevant Content Recommendations
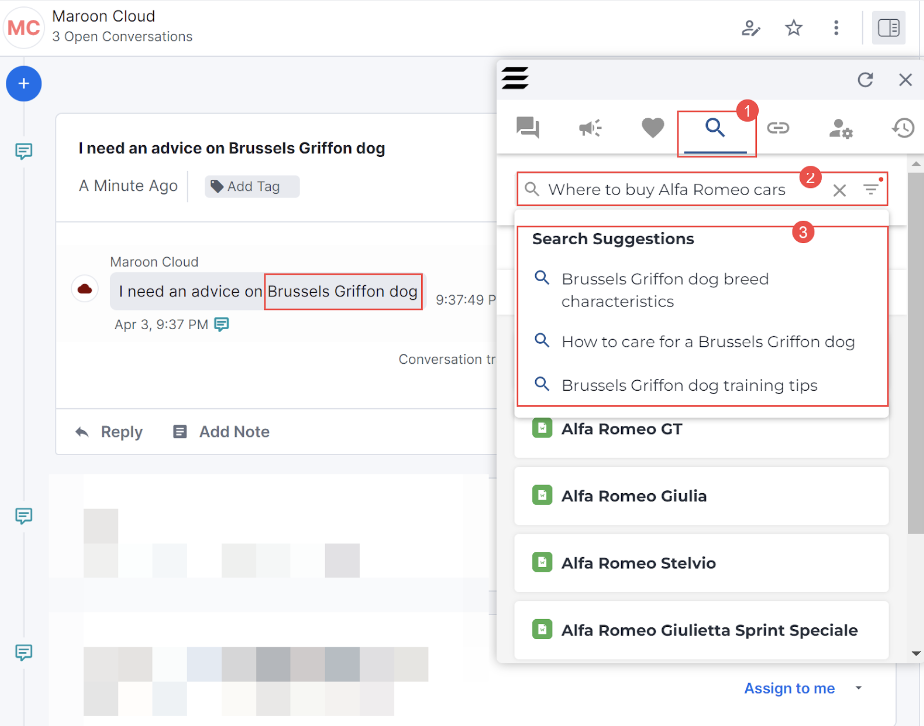
Figure 74. Viewing system-generated search suggestions in Shelf Answer Assist
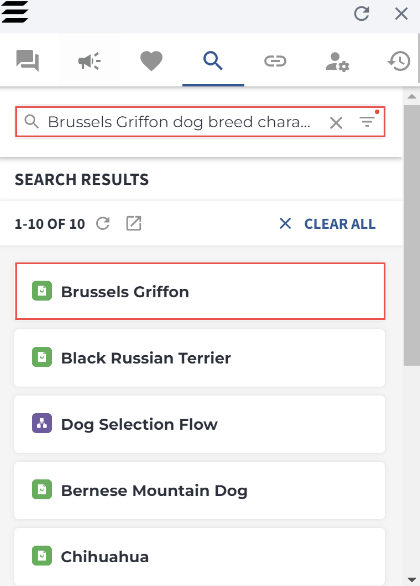
Figure 75. Viewing content items relevant to the selected search suggestion
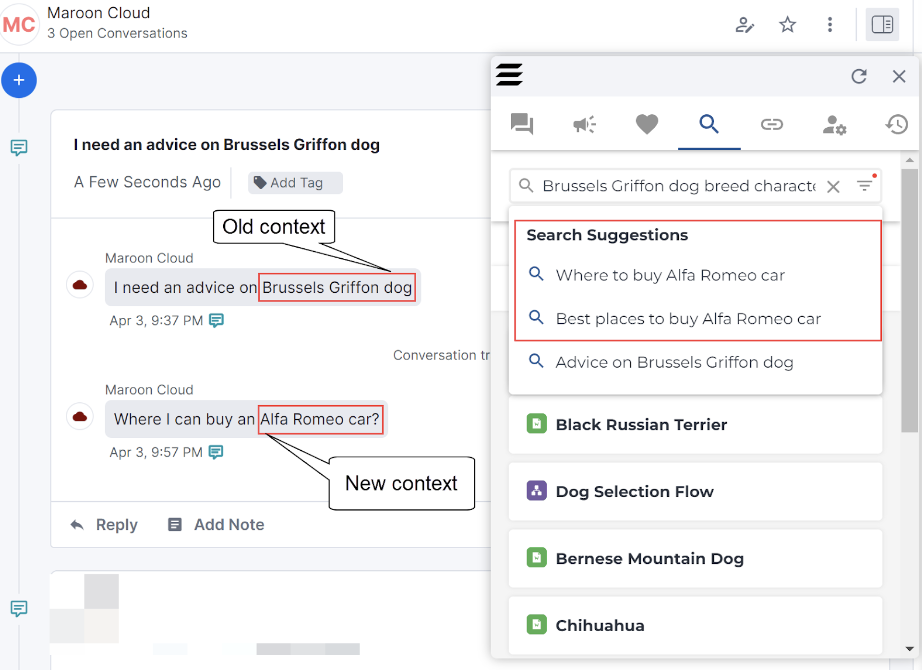
Figure 76. Viewing search suggestions for a changed conversation context in Shelf Answer Assist
Looking for Content using the Search Feature and Search Tab
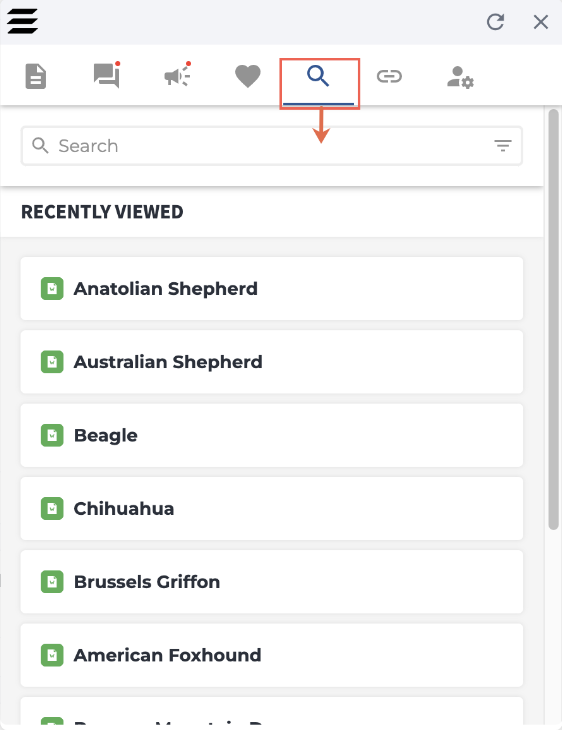
Figure 77. Viewing the Search tab in Answer Assist
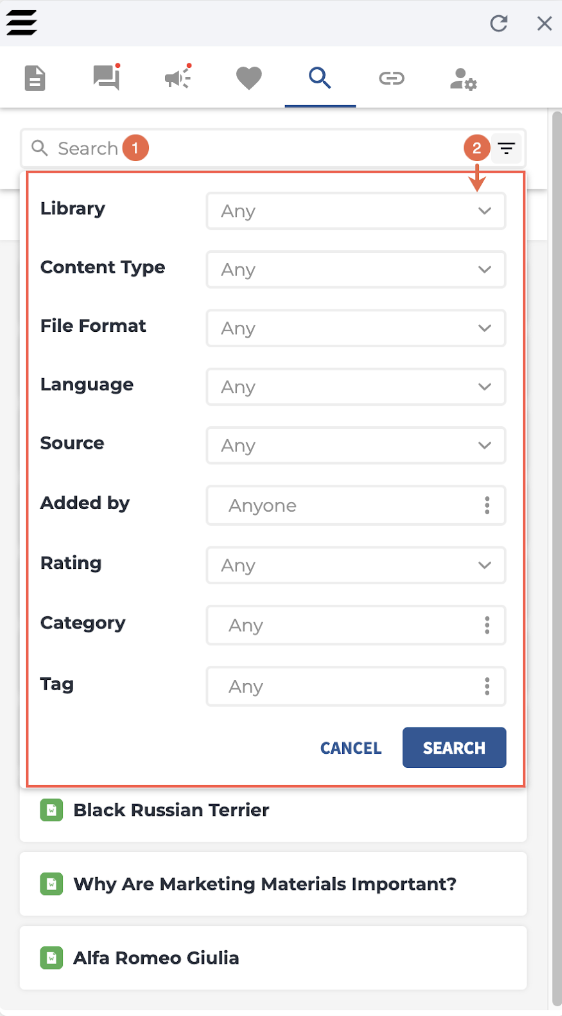 Figure 78. Using advanced search options in Answer Assist
- Library
You can limit the search by some specific library only. For this purpose, click the field and select the needed library from the dropdown list. If the Federated Search feature is enabled for your Answer Assist instance, you can select multiple libraries.
Figure 79. Selecting the needed library(s) to search in
- Content Type
You can select which type of content you want to look for. For this purpose, click the field and select the needed option(s) from the dropdown list.
Figure 80. Selecting the type of the searched content
- File Format
You can also select what type the content you look for needs to be. To do so, click the field and select the checkbox(es) next to the needed file type option(s).
Figure 81. Selecting the file format for your searched content
- Language
If, like in the case of the similar filter in the Suggestionstab, multilanguage support is enabled for Answer Assist on the Shelf end, you may look for content in some certain language only. For this purpose, click the field and select the needed option from the dropdown list that appears.
Figure 82. Selecting the language of the search content
- Source
You can indicate the source of the content you are looking for. It can be either Shelf or some third-party or external platform, or any. Click the field and select the needed option from the dropdown list. Figure 83. Selecting the content source
 - Added by
If you know who has added the content you are looking for, you can indicate this user in your search to narrow it. For this purpose, click the menu icon in this field. In the field that appears next, look for the needed user(s) in the search bar. The search-as-you-type feature is supported and yields the suggested user names under the search bar. Once the needed user(s) has/have been found, select them and click the SEARCH button to trigger the content search or the Backicon to go back to the advanced search settings.You can select as many as 20 users to your search, using comma as a separator. You can also see how many content items have been added by each of the users. The count is shown next to the user’s name. Use the up and down arrows to sort the users in alphabetic order from A to Z or from Z to A, or sort them by the number of gems they have added, in ascending or descending order.
Figure 84. Selecting users who added the content to refine the search
- Rating
You may refine your search by indicating the rating you want the content to be. For this purpose, click the field and select the needed option from the dropdown list.
Figure 85. Selecting rating of the search content
- Category
It is also possible to look for content of a certain category only. The category in this case is one of the categories assigned to Gems on the Shelf side. To select the needed category(ies), click the menu icon and, in the window that appears next, search for the needed one(s). The search-as-you-type feature is supported, and the results are displayed below the search bar. All the available categories are also displayed under the search bar. Select the needed category(ies) and click the SEARCH button to trigger the content search or the Backicon to go back to the advanced search settings.
Figure 86. Searching for content from the specified categories
- Tag
Finally, you can look for content that has only some specific tag(s). The tag in this case is one of the tags assigned to Gems on the Shelf side. To select the needed tag(s), click the menu icon and, in the window that appears next, search for the needed one(s). The search-as-you-type feature is supported, and the results are displayed below the search bar. All the available tags are also displayed under the search bar. Select the needed tag(s) and click the SEARCH button to trigger the content search or the Backicon to go back to the advanced search settings.
Figure 87. Searching for content with the specified tags only
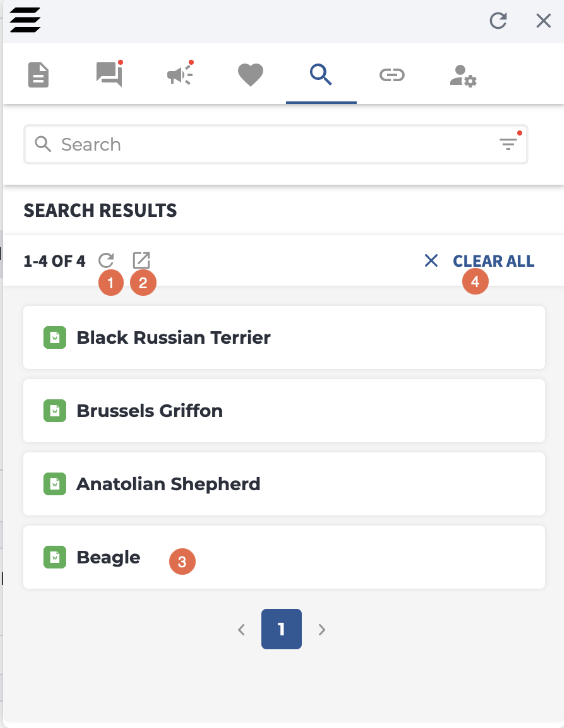
Figure 88. Viewing the content search results
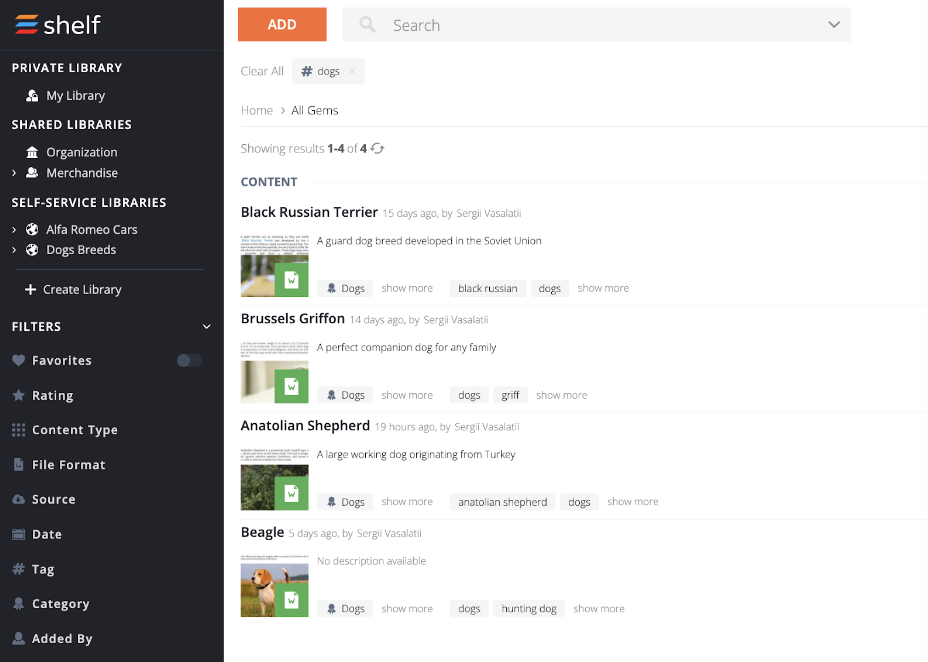 Figure 89. Viewing the AA search results in Shelf
 Working with Content in the Gem Tab
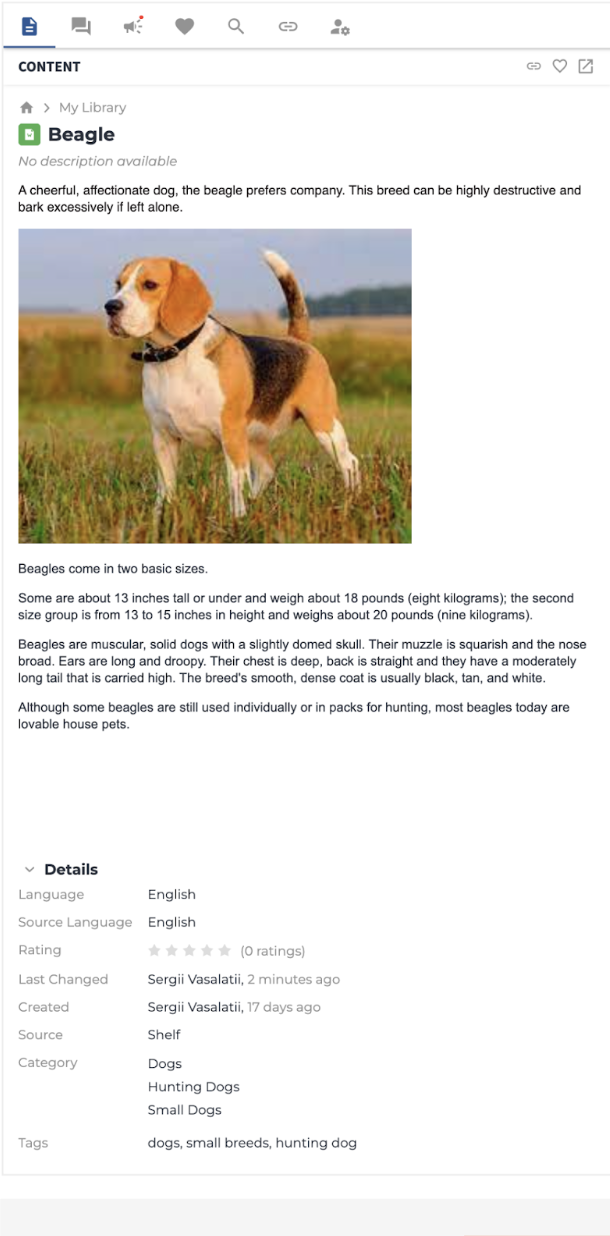
Figure 90. Viewing the Gem tab in Answer Assist
- Actions panel
- Breadcrumbs
- Gem title, description, and content block
- Connections
- Gem details (Gem metadata)
- Feedback tools (if the Feedback feature is enabled for your Answer Assist configuration)
Using the Actions Panel
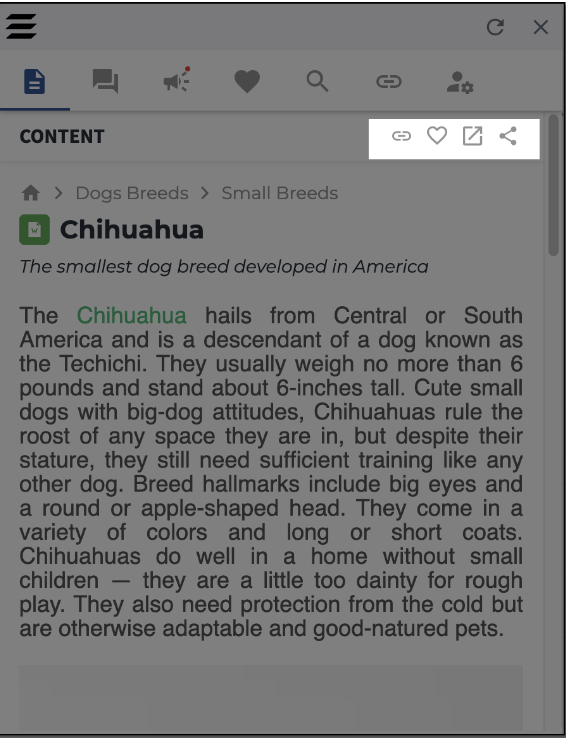
Figure 91. Viewing the Actions Panel in the Gem tab in Answer Assist
Linking/Unlinking Gems to/from Interactions
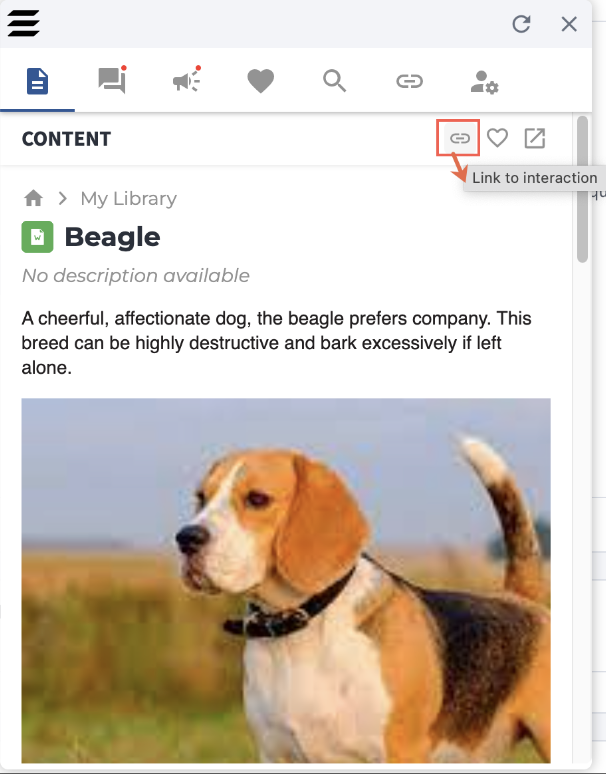
Figure 92. Linking a Gem to an interaction in the Gem tab
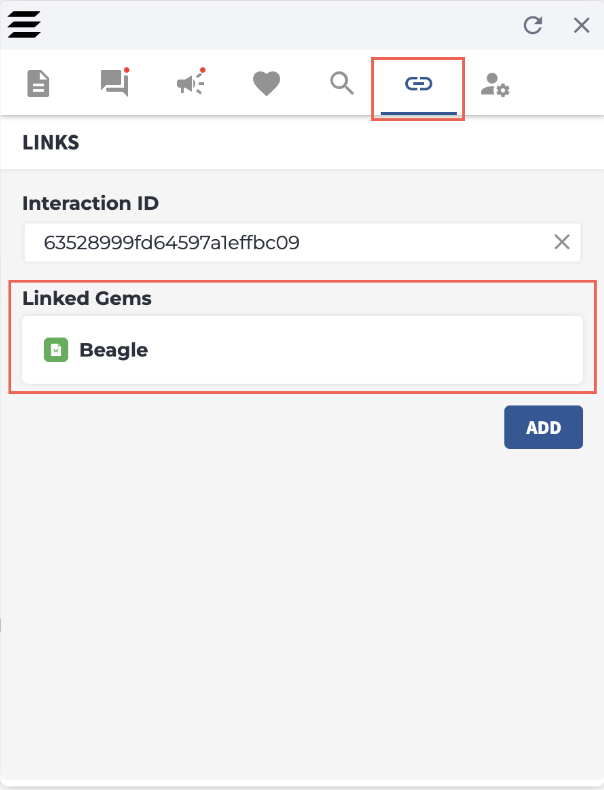
Figure 93. Verifying the Gem linking to the interaction in Answer Assist
- Enter the needed Interaction ID in the respective field. The ADD button becomes enabled.
- Enter an ID or URL address of the needed Gem in the respective field that appears on the screen and click the LINKbutton. You can find both the Gem URL and ID in the address bar once you are viewing the needed Gem on Shelf. See the figure below for details.

Figure 94. Finding Gem URL and/or ID on Shelf
- Once you have found and entered either the Gem URL or ID, click the LINKbutton.

Figure 95. Linking a Gem to an interaction in Answer Assist
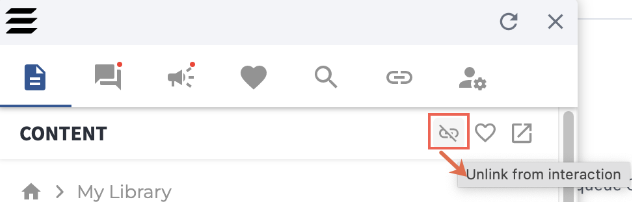
Figure 96. Unlinking the Gem from the Interaction
- Hover over this Gem to reveal the Unlink icon next to it.
- Click the Unlink icon to remove the Gem from the list of Gems linked to the interaction. When the Gem becomes unlinked, you will see the respective notification.
- You can also revert the Gem unlinking by clicking the UNDO button in the above notification. Note that you can revert the Gem unlinking only during 5 seconds after you have unlinked the gem. This is how long the Gem is unlinked notification remains on the screen before disappearing.
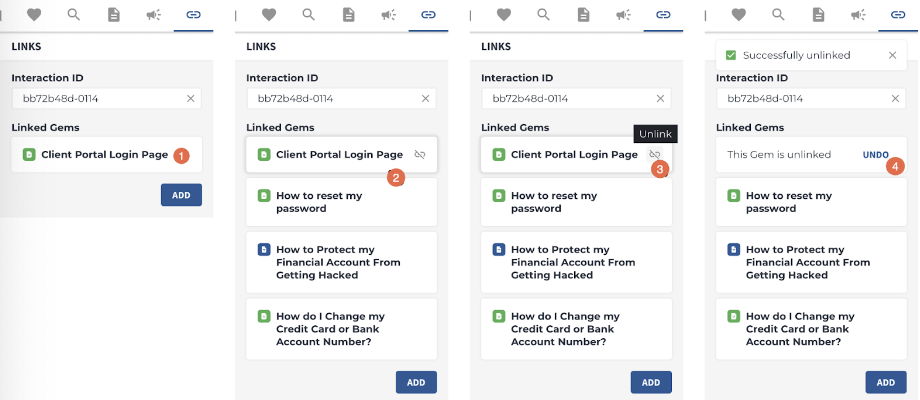
Figure 97. Unlinking a Gem from an Interaction in Answer Assist
Adding/Removing Gems to/from Favorites
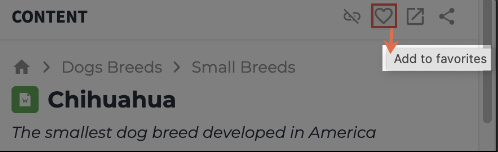
Figure 98. Adding the Gem to Favorites in Answer Assist

Figure 99. Verifying the Gem addition to Favorites
Opening Gems in Shelf
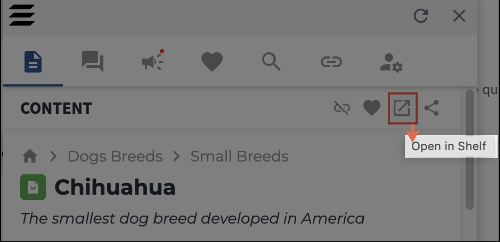
Figure 100. Opening the Gem in Shelf
A new tab/window will open in your browser where the selected Gem is displayed in Shelf.
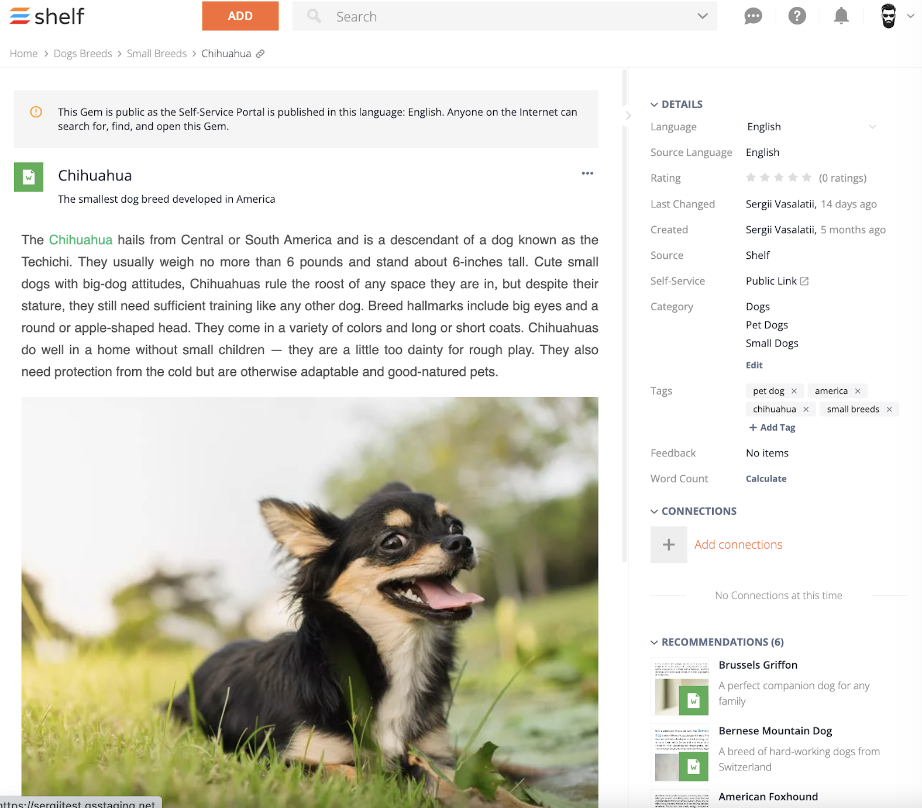
Figure 101. Viewing the Gem in Shelf
Sharing Gems to Public
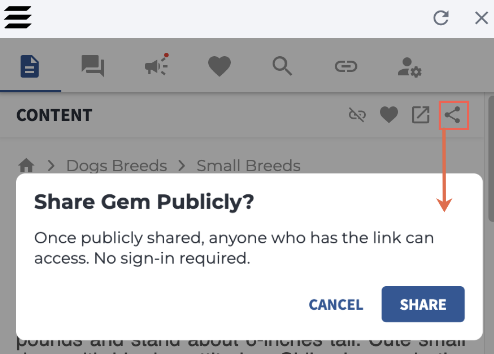
Figure 102. Sharing the Gem publicly
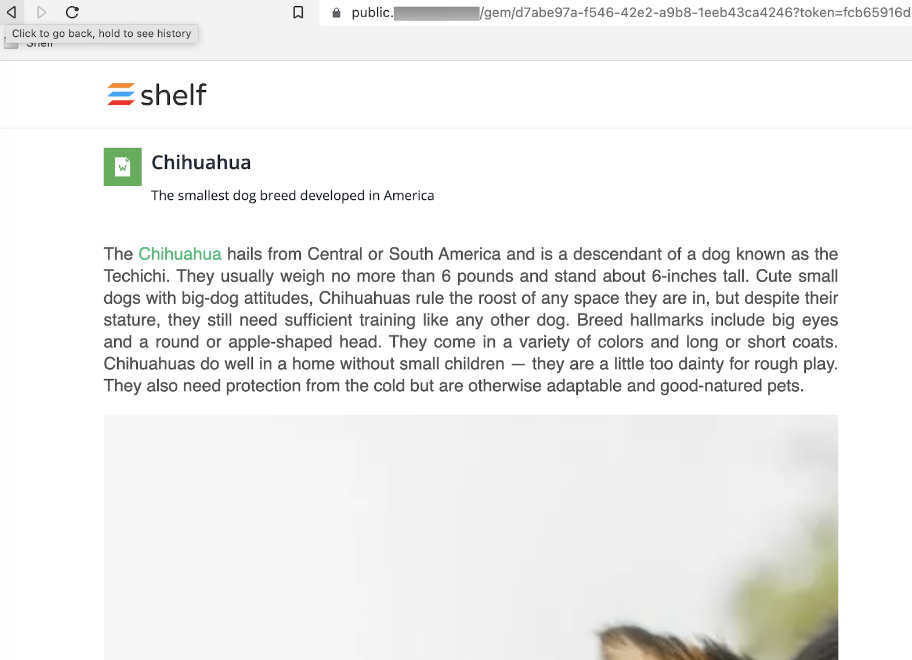
Figure 103. Viewing the publicly shared Gem
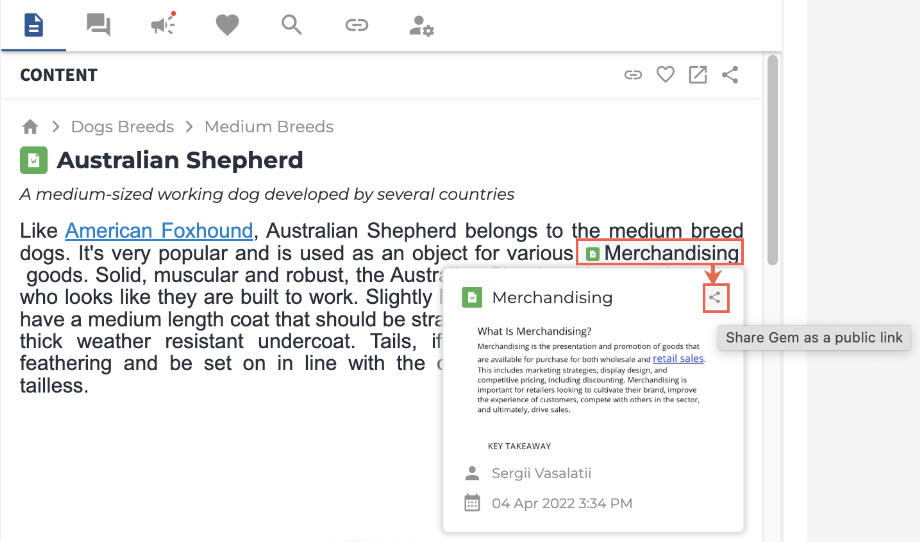
Figure 104. Publicly sharing the Gem linked to the currently opened Gem
Using Breadcrumbs
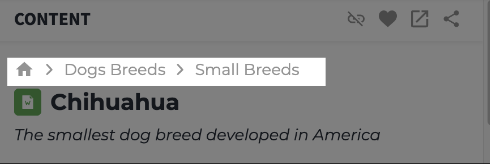
Figure 105. Viewing the breadcrumbs in the Gem tab in Answer Assist
Using the Gem Block
Viewing Gems and their Content
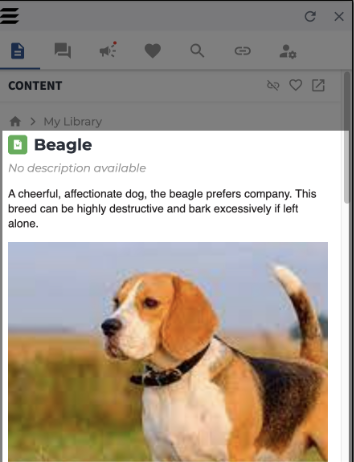
Figure 106. Viewing the Gem and its content in Answer Assist
Copying/Sending Gem’s Content
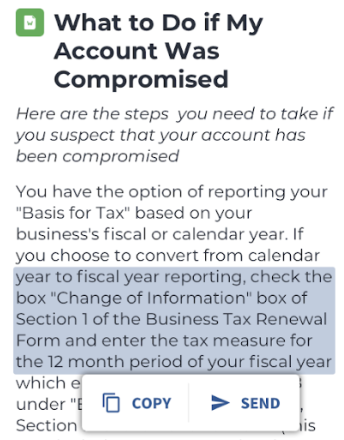
Figure 107. Copying or sending the Gem content
Providing Feedback on Gems
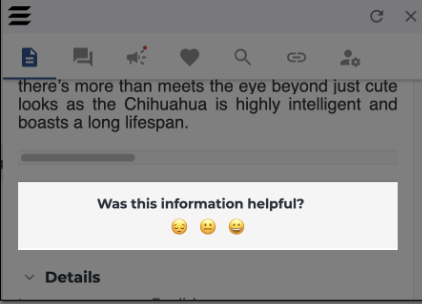
Figure 108. Leaving the feedback on the Gem in Answer Assist
Using the Connections in the Gem Tab
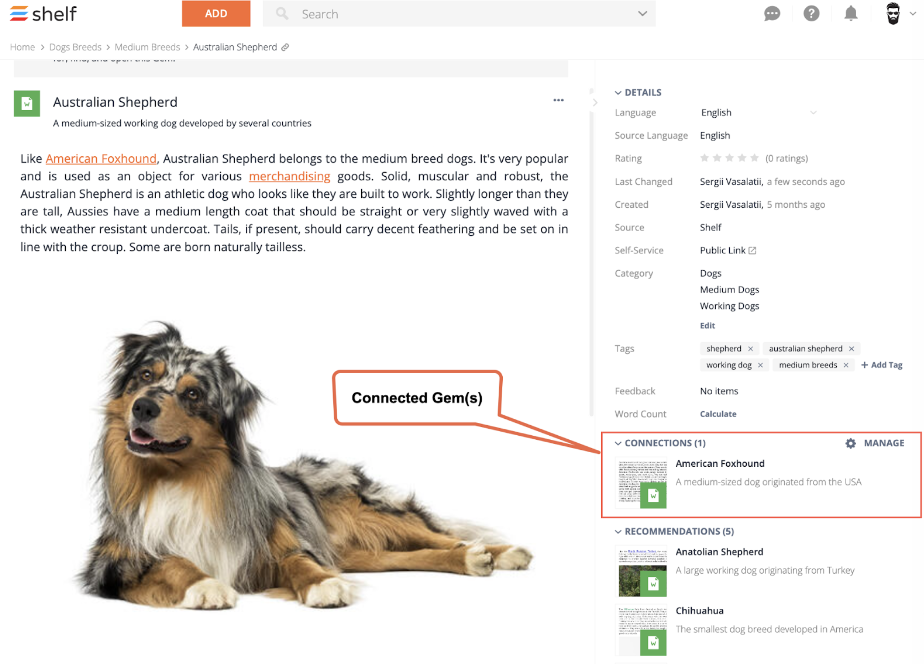
Figure 109. Viewing Gem’s connections in Shelf
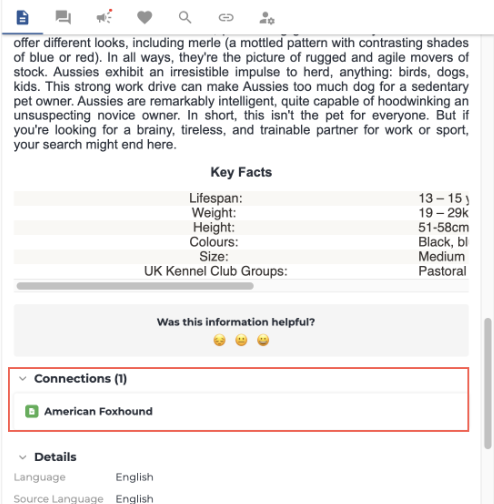
Figure 110. Using the Connections block in Answer Assist’s Gem tab
Using the Gem Details in the Gem Tab
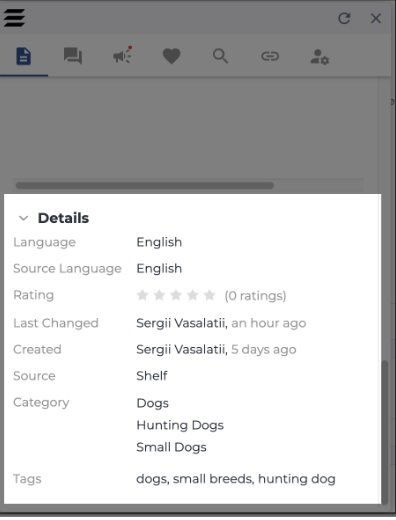
Figure 111. Viewing the Gem details in the Gem tab of Answer Assist
Using the Personal Settings Tab in Answer Assist
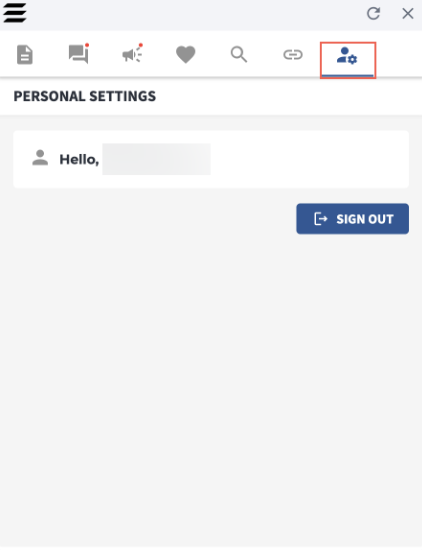 Figure 112. Viewing the Personal Settings tab and signing out of Answer Assist
Using the Announcements Feature in Answer Assist
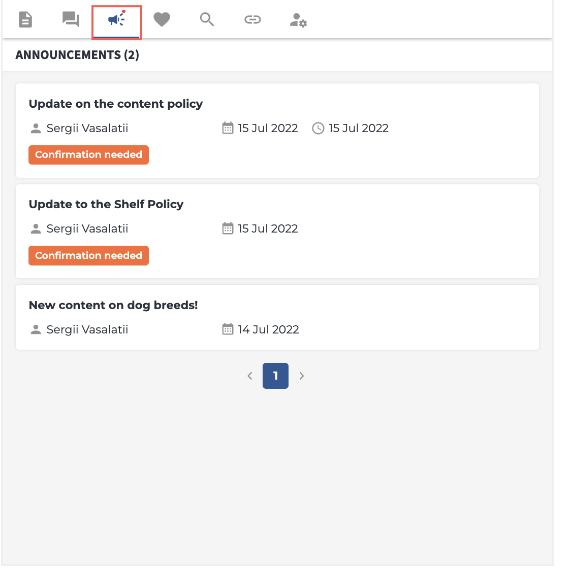
Figure 113. Viewing the Announcements tab contents

Figure 114. Viewing the announcement that require confirmation
Using the Interaction History Feature in Answer Assist
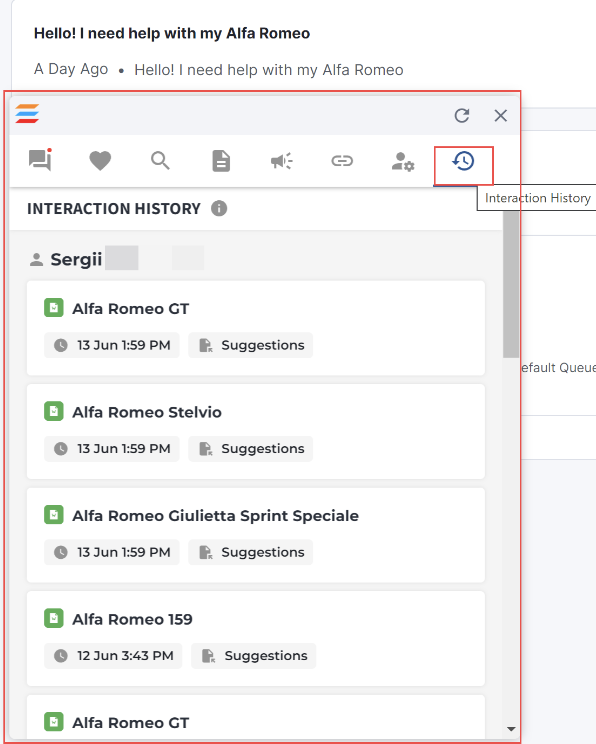
Figure 115. Opening and viewing the Interaction History tab in the Answer Assist widget
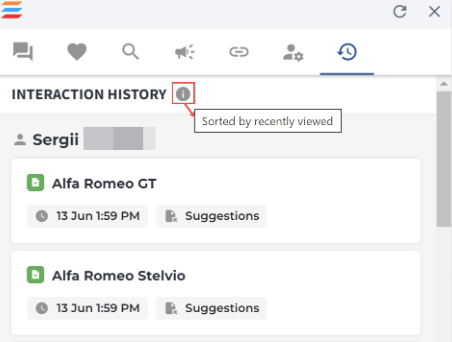
Figure 116. Viewing the content sorting tooltip in the Interaction History tab
- location from which a relevant Gem has been opened
- date and time when this Gem has been opened from and the time when it happened will be indicated by corresponding labels and tooltips with more detailed explanations
- user(s) who opened the Gem(s), as all the Gems in the Interaction History tab are sorted under their viewer names.
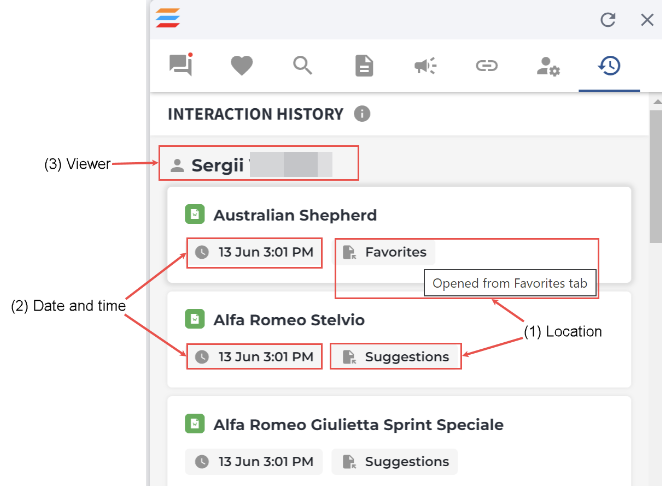
Figure 117. Interaction History data explained
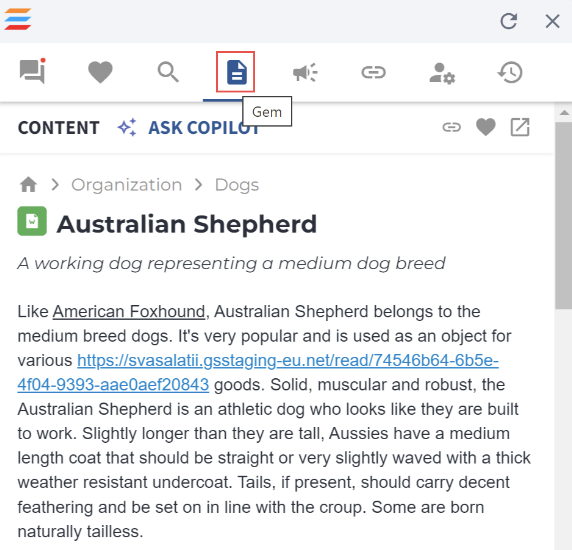
Figure 118. Opening and viewing Gem from the Interaction History tab in the Gem tab
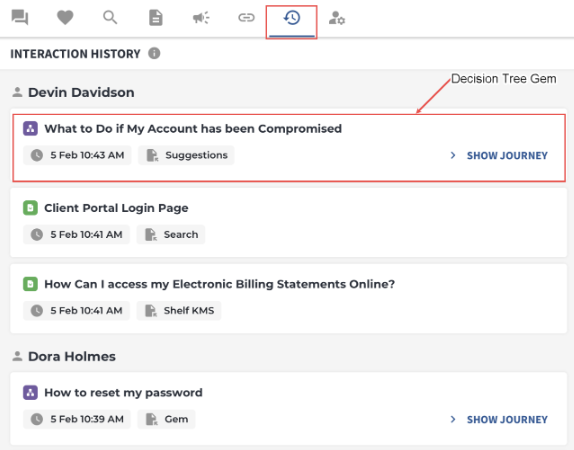
Figure 119. Viewing DT Gem with the collapsed steps in the Interaction History tab
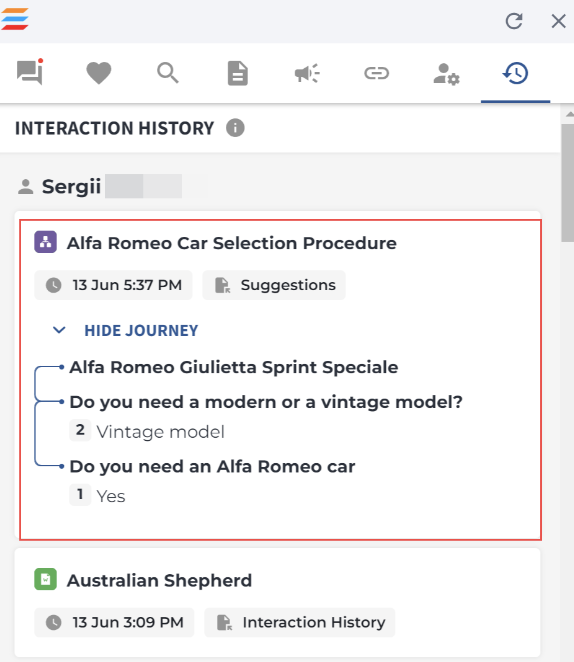
Figure 120. Viewing DT Gem with the expanded steps in the Interaction History tab

Figure 121. Viewing DT Gem on the last opened step in the Gem tab
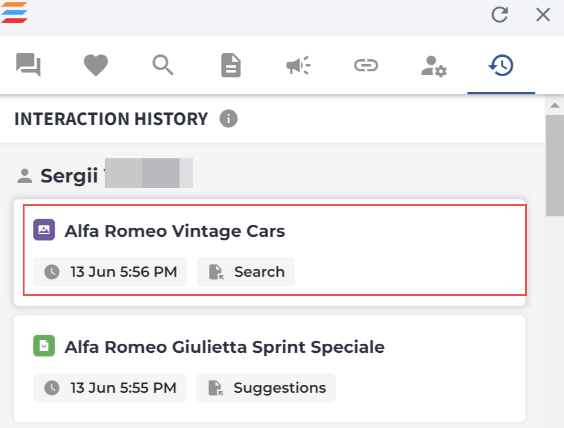
Figure 122. Viewing the existing Gem in the Interaction History tab
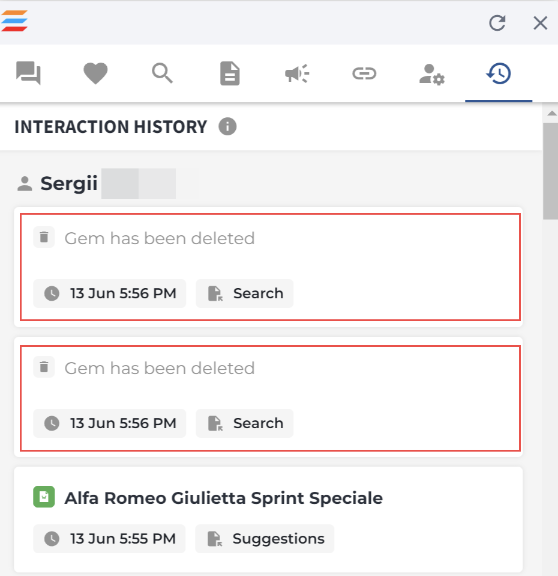
Figure 123. Viewing the deleted Gem in the Interaction History tab
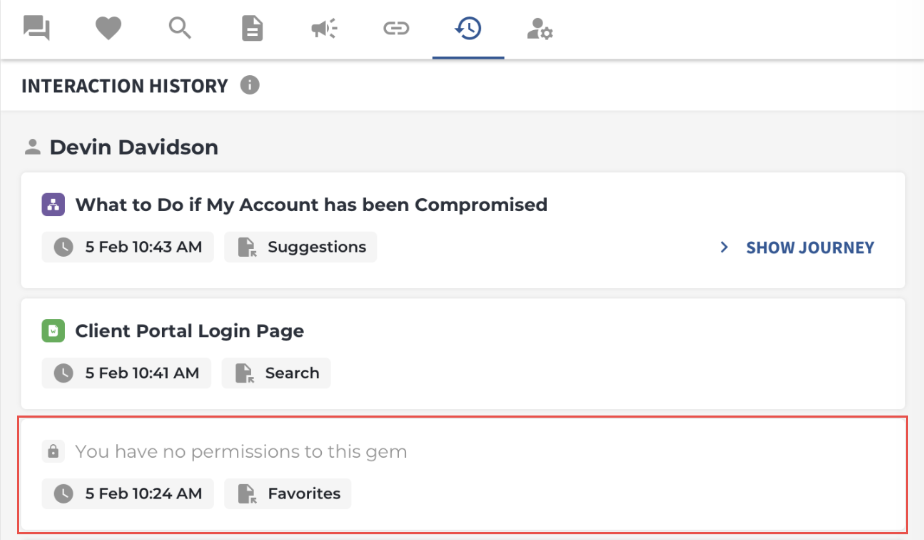
Figure 124. Display of the Gem with no permissions to view
4. Conclusion
Thank you for reading this End-to-End Guide. We tried to cover as much as possible in terms of the Answer Assist product features and capabilities. We hope that you now are able to enable, configure and use all of it in an efficient manner, fully knowing what each of such features and capabilities is meant for.