
Gathering Historic Data: Overview and Enabling Procedure
Document Version History
Version number | Modified by | Modifications made | Date modified | Status |
1.0 | Shelf | Initial release of the document. | 2 August 2022 | Active |
Document Purpose
This document has been developed for admins of various organizations that use Shelf’s Answer Insights solution embedded into portals built on the Genesys Cloud and Kustomer platforms. This document’s goal is to answer the following questions:
What is Historic Data?
How is Historic Data used by Shelf?
How is Historic Data collected by Shelf?
What needs to be done to enable the Historic Data collection?
As part of answering the last question, the document also details the steps necessary to create an API key that will allow Shelf to gather historical transcript data from Genesys Cloud and Kustomer.
What is Historic Data?
Historic Data mentioned in this document is transcripts of the conversations conducted by and between agents and customers via Genesys Cloud or Kustomer platforms plus the associated metadata.
How is Historic Data used by Shelf?
A Company is deploying Shelf Answer Insights inside of Genesys Cloud or Kustomer to increase efficiency of its agents. Shelf Answer Insights utilizes Artificial Intelligence to offer suggestions on appropriate content based on the context of the Agent’s Interaction. Historical transcripts and wrap-codes are used to train Shelf AI models before a deployment to increase the accuracy of the initial suggestions offered to agents. This is essential for improving the Shelf service quality and calibrating AI that will assist in all areas of knowledge automation for the clients.
How is Historic Data collected by Shelf?
Shelf’s engineers have built an automated service that is expected to pull transcripts from the Company’s Genesys Cloud or Kustomer instances. This service requires an API key from Genesys Cloud or Kustomer with the appropriate permission applied. Details on how to use the API for gathering Historic Data from Genesys and from Kustomer can be found in the respective sections below.
Required Data
Genesys Cloud for chat Scenario
Using the API
Required Permissions
- agentConversationDetail > View
- conversationDetail > View
- conversationAggregate View
- Recording > View
- RecordingSegment View
- Queue > View
- Routing > Wrap-up Code > View (link)
- Conversation > Communication > View

Figure 1. Viewing the list of permissions for API key
Useful Links
Enabling the Historic Data Collection
- Open Genesys Cloud Admin Panel and search for Roles there.

Figure 2. Searching for Roles/Permissions in Genesys Cloud Admin Panel
- Click the Roles / Permissionslink button and then hit the Add Role button as shown in the figure below.

Figure 3. Starting the new role addition
- In the respective fields, enter some title and description for the new role you are adding.

Figure 4. Adding the name and description for the role
- Once done, go to the Permissions tab and in its window, select the All Permissionscheckbox.

Figure 5. Selecting the needed permission type
- Using the search bar in the Permissions tab window, find and add all permissions from the list below one by one:
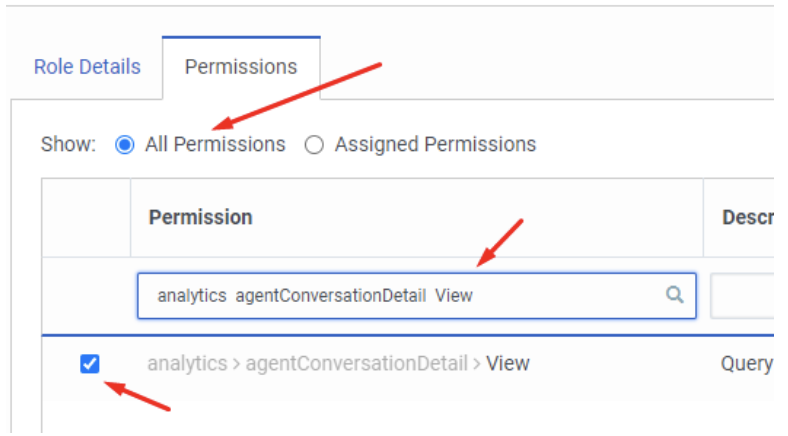
Figure 6. Adding the permission

Figure 7. Viewing the list of added permissions

Figure 8. Saving the added permissions

Figure 9. Adding your user to a role
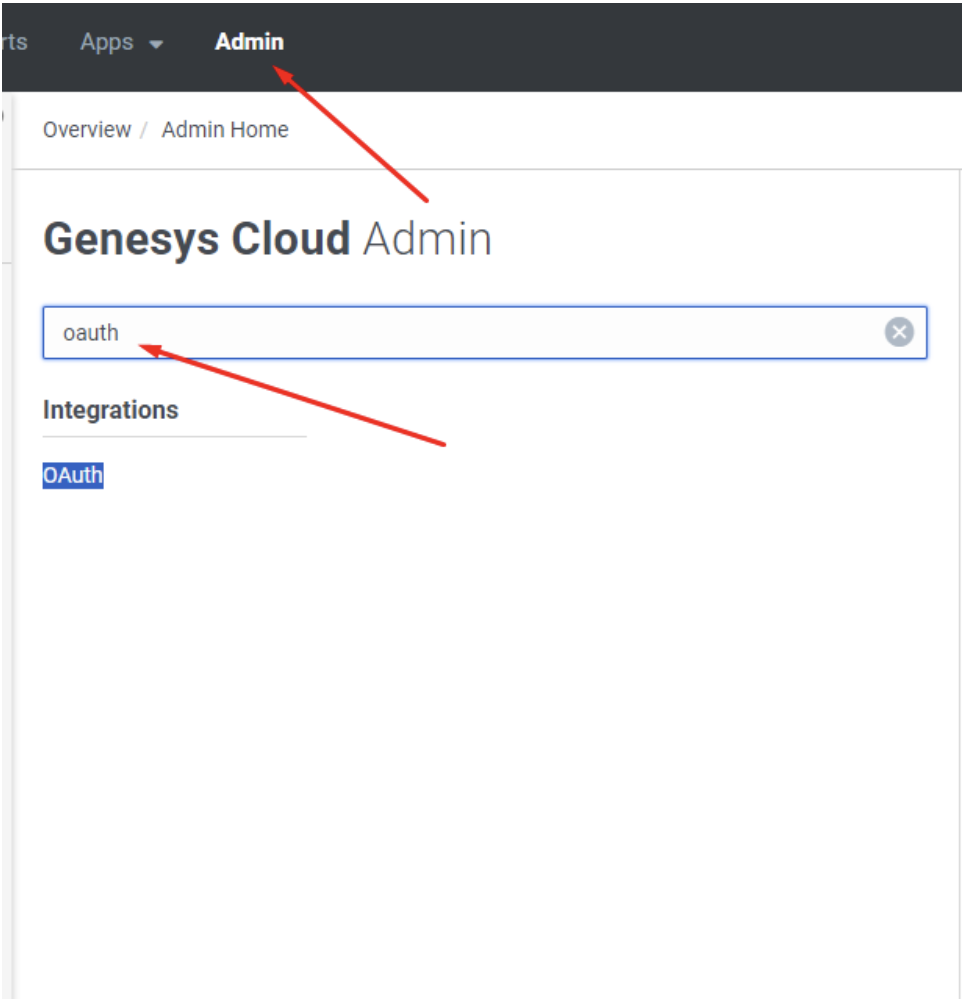
Figure 10. Searching for the OAuth feature in Genesys
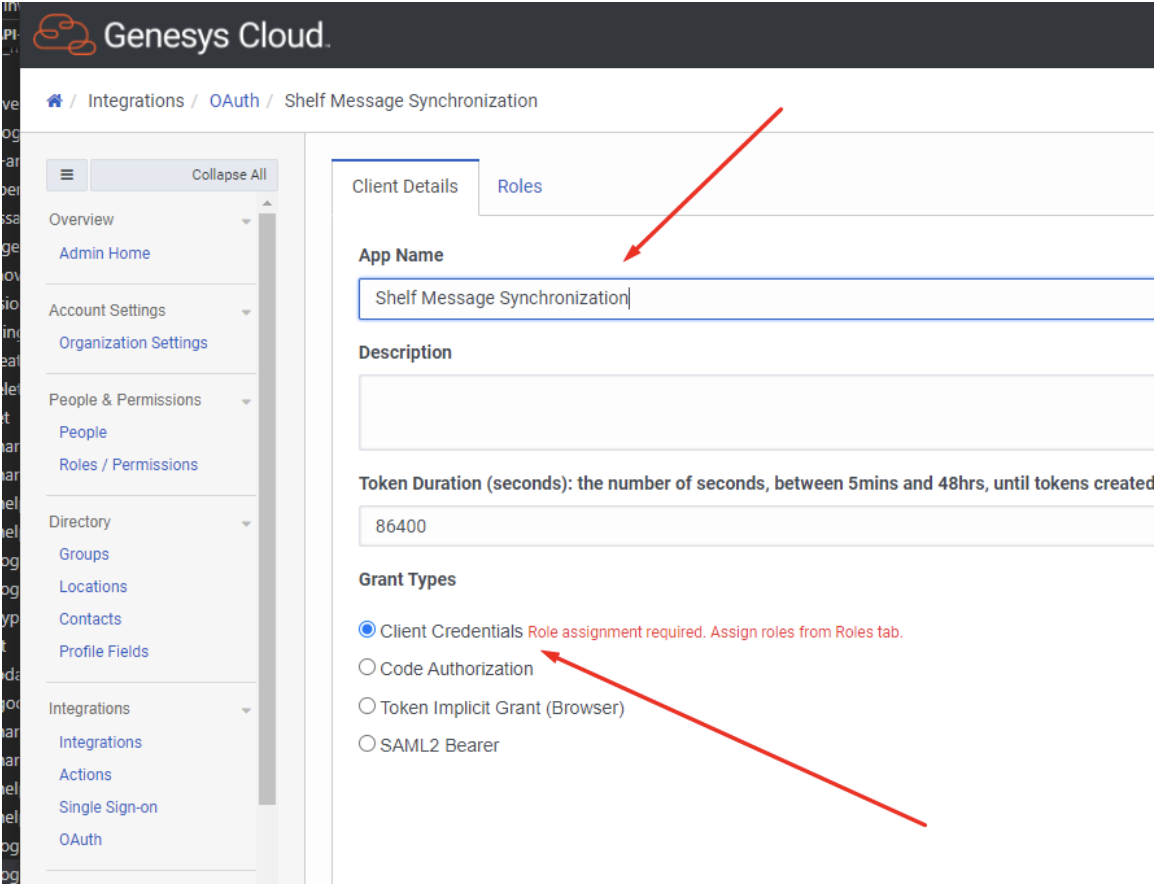
Figure 11. Indicating the type of credentials being created
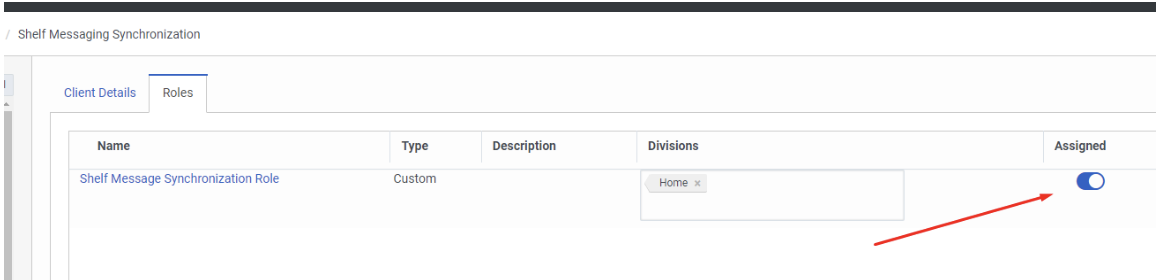
Figure 12. Assigning a role
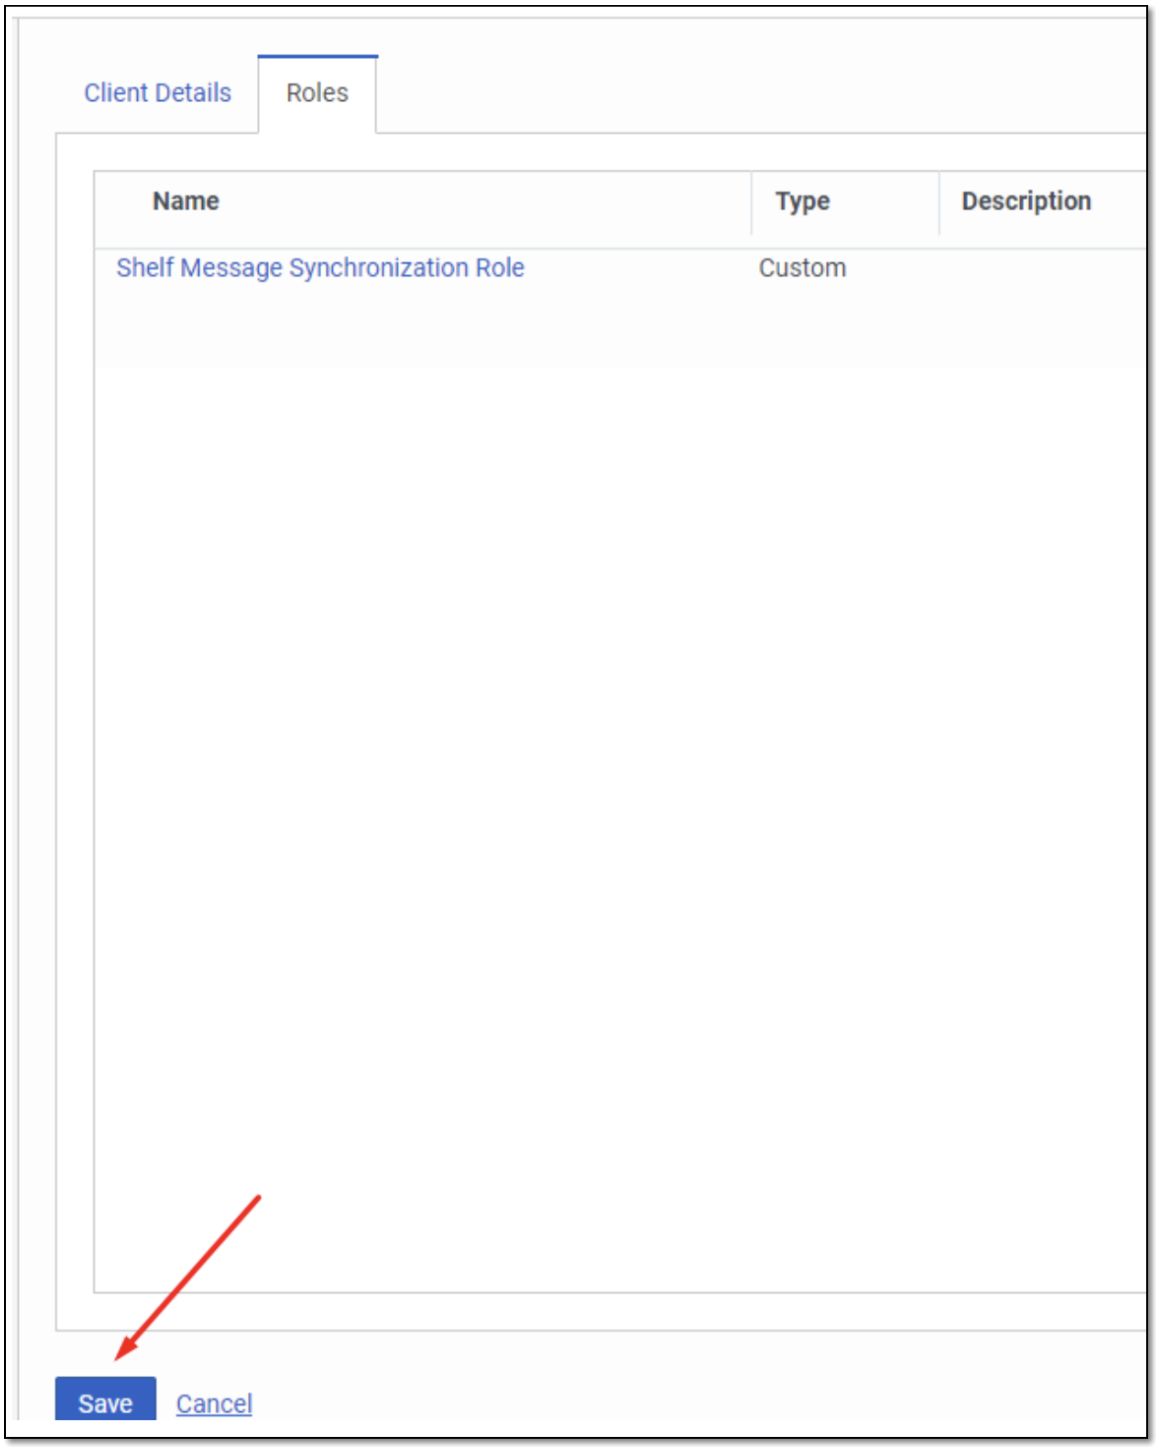
Figure 13. Saving the created and assigned role in Genesys
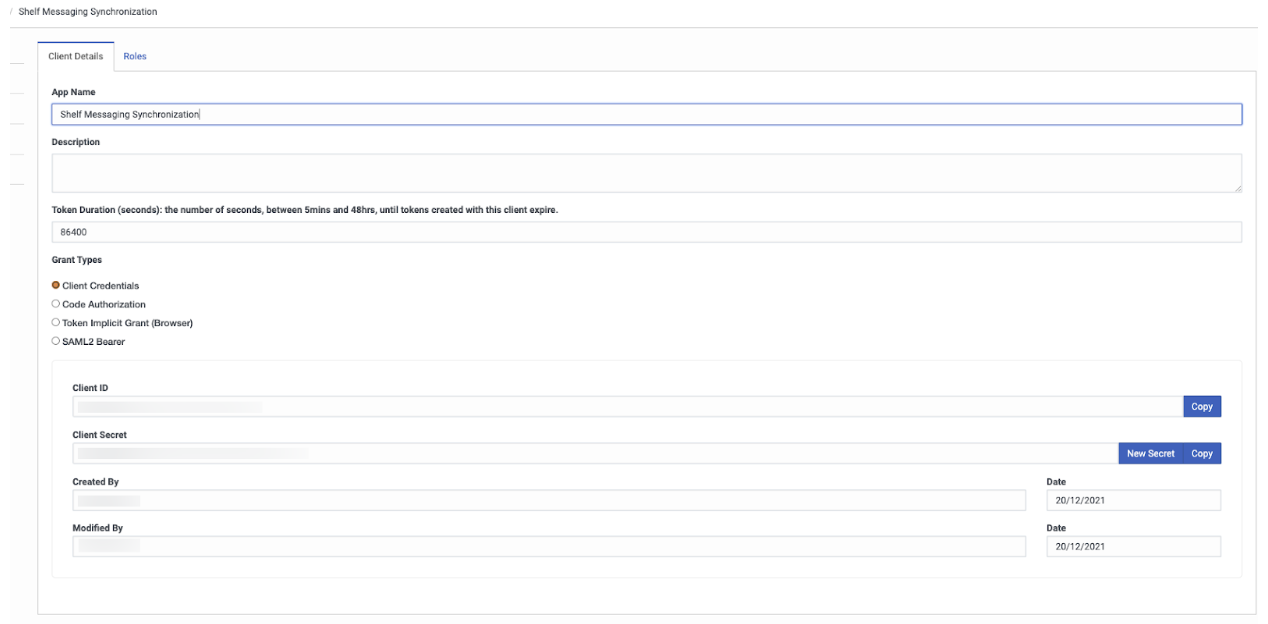
Figure 14. Viewing data required for syncing the messages from Genesys Cloud
Genesys Cloud for voice Scenario
Final list of required items
- OAuth tokens to process the data. In general, you would want to have 1 per 2-3 queues that you want to process.
- List of queue ID’s that you would like to gather information from
Enabled voice transcription for the selected queues
Refer to this guide if you did not previously enable it:
How to enable voice transcriptions?
Required Permissions for tokens
- agentConversationDetail > View
- conversationDetail > View
- conversationAggregate View
- Recording > View
- RecordingSegment View
- Queue > View
- Routing > Wrap-up Code > View (link)
- Conversation > Communication > View
Useful Links
Enabling the Historic Data Collection
- Open Genesys Cloud Admin Panel and search for Roles there.

Figure 2. Searching for Roles/Permissions in Genesys Cloud Admin Panel
- Click the Roles / Permissionslink button and then hit the Add Role button as shown in the figure below.

Figure 3. Starting the new role addition
- In the respective fields, enter some title and description for the new role you are adding.

Figure 4. Adding the name and description for the role
- Once done, go to the Permissions tab and in its window, select the All Permissionscheckbox.

Figure 5. Selecting the needed permission type
- Using the search bar in the Permissions tab window, find and add all permissions from the list below one by one:
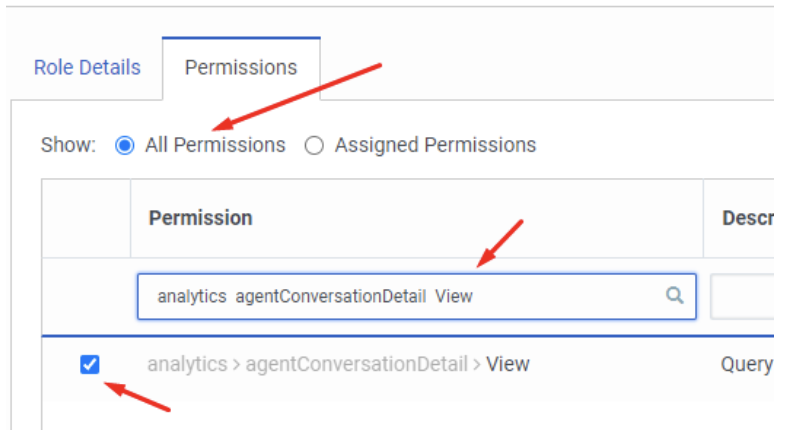
Figure 6. Adding the permission
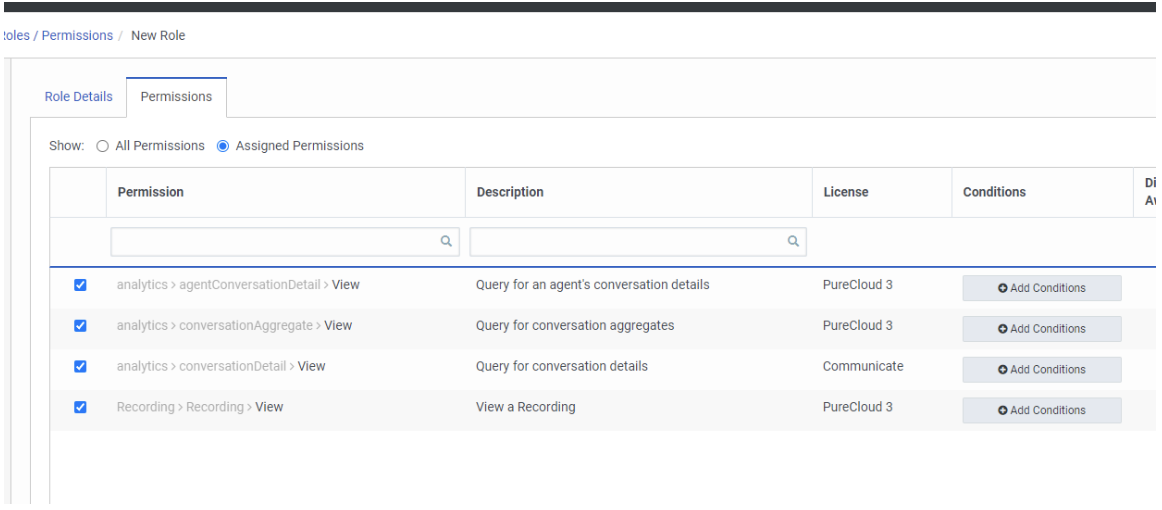
Figure 7. Viewing the list of added permissions
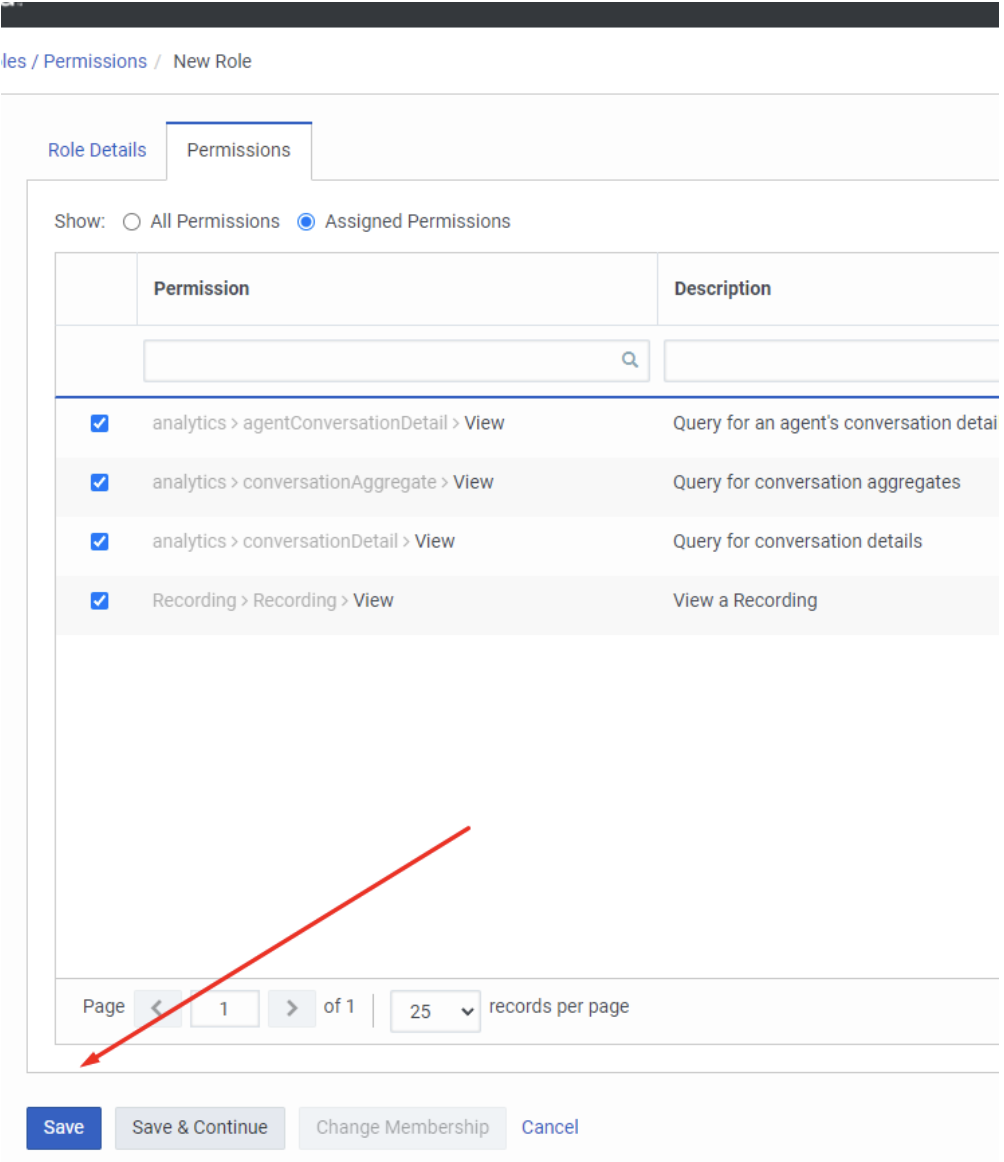
Figure 8. Saving the added permissions

Figure 9. Adding your user to a role
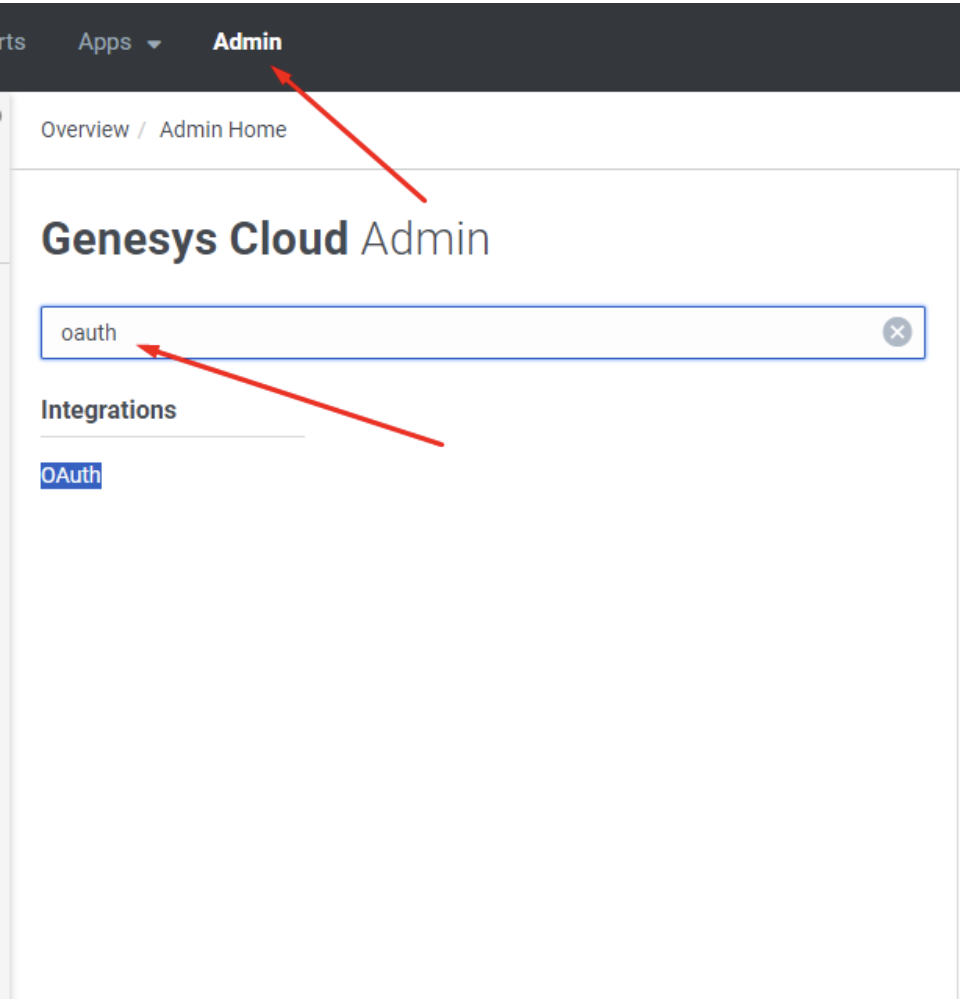
Figure 10. Searching for the OAuth feature in Genesys
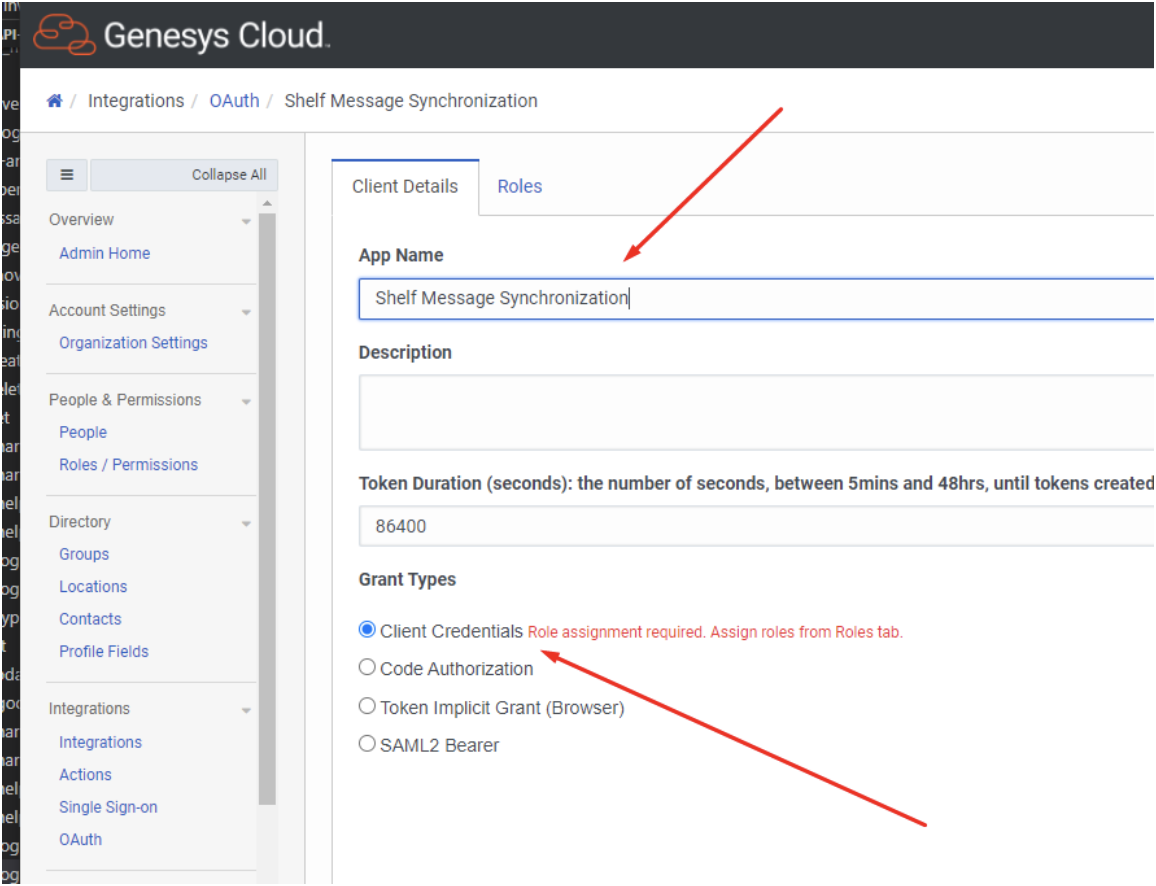
Figure 11. Indicating the type of credentials being created
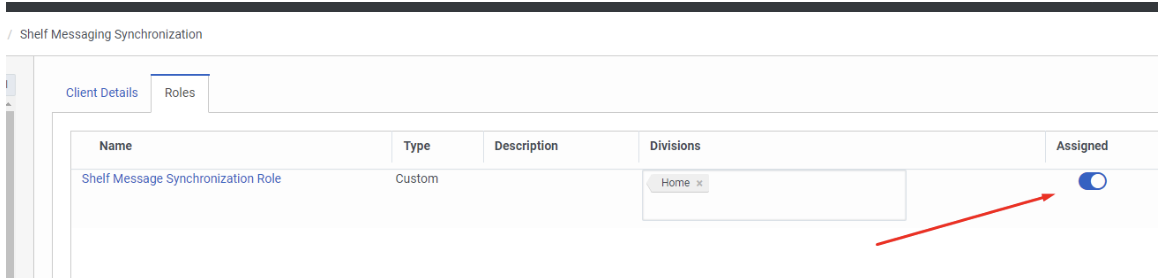
Figure 12. Assigning a role
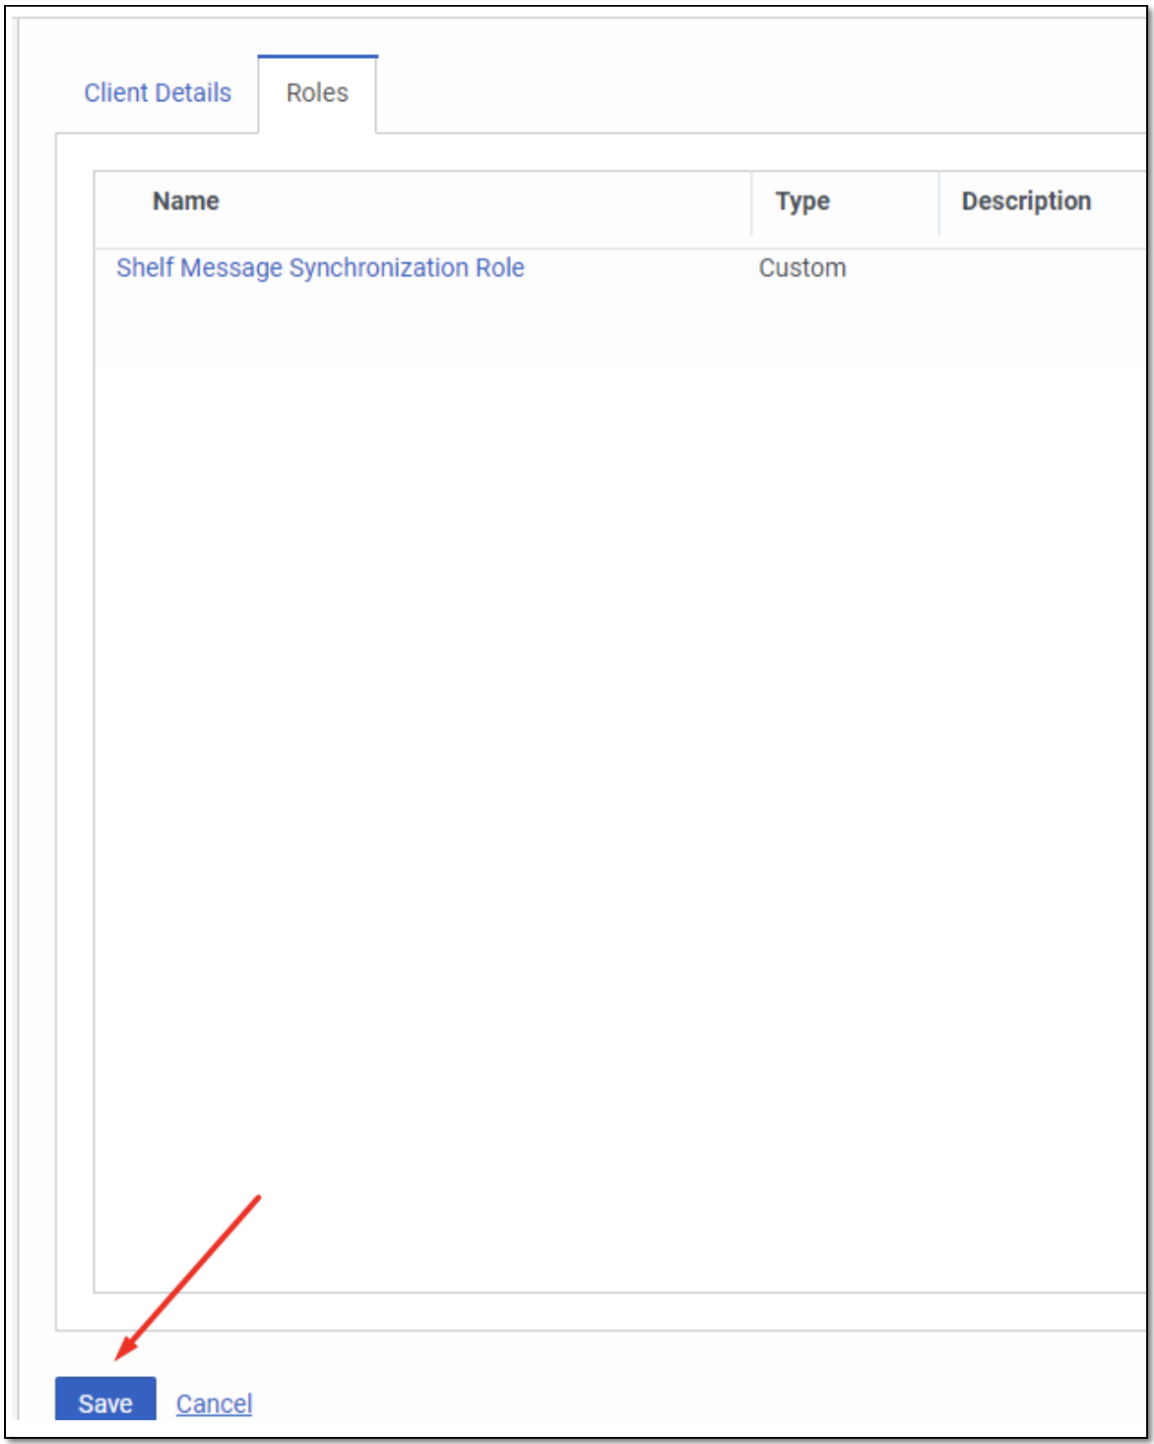
Figure 13. Saving the created and assigned role in Genesys

Figure 14. Viewing data required for syncing the messages from Genesys Cloud
Kustomer Scenario
Using the API
The script for gathering Historic Data from Kustomer, which is expected to leverage the Kustomer APIs, is currently under development and is expected to be provided once completed.
Required Permissions
- org.user.conversation.read
- org.user.message.read
Creating API Key for Historic Data Collection
- Once logged in to the Kustomer platform under admin credentials, go to the Admin Panel and navigate to the Security section of the sidebar panel there. Click the expand icon and then select the API Keysoption from the expanded list.

Figure 15. Accessing the API Keys window on Kustomer
- In the API Keys window that appears, find and click the Add API Key button in the upper right part of the window as shown in the figure above.
- In the form that is displayed on the screen, fill in the required fields as shown in the figure below.

Figure 16. Adding the new API Key on Kustomer
The Add API Key Form Fields and Their Details:
- Name: Enter any desired or needed name for your new Kustomer API Key.
- Roles: Enter the required roles to read conversations and their messages on Kustomer. Make sure to comply with the Required Permissions section above.
- Expires (in days): Select the needed duration of your new Kustomer API Key using the dropdown field. Recommended value is 90 days.
- CIDR IP Restriction: In this field, enter the set of IP addresses that are permitted to use your new Kustomer API Key.