Document version history
Version number | Modified by | Modifications made | Date modified | Status |
1.0 | Shelf | Initial release of the document. | 05 Oct 2023 | Expired |
1.1 | Shelf | The document has been updated to include the description of providing Read access to specific collections on SharePoint. New imagery and text descriptions have been added. The existing figure numbering has been updated. | 23 Aug 2024 | Expired |
1.2 | Shelf | The document has been updated to reflect the change in the configuration flow on the side of Microsoft (Azure and SharePoint) as well as the introduction of the new option - PEM Certificate - on the Shelf side. | 18 Mar 2024 | Expired |
1.3 | Shelf | The document has been completely reworked to reflect the change in configurations on the Microsoft side. | 21 Mar 2025 | Expired |
1.4 | Shelf | The document has been updated with explanations on the role of the Manage Permissions app and about the operation of certain permissions in the Manage Permissions app and in the Connector app. | 15 Aug 2025 | Expired |
1.5 | Shelf | The document has been updated with the detailed section on the filters users can apply when configuring sync flows. The updated version also includes an explanatory chapter on the correlation between SharePoint’s and Shelf’s content entities. | 10 Nov 2025 | Expired |
1.6 | Shelf | The document has been updated to help readers understand how SharePoint custom columns and their types translate into Shelf’s CIL and CI custom fields. | 18 Dec 2025 | Expired |
1.7 | Shelf | The document has been updated to include the description of Shelf’s support of Microsoft SharePoint’s Pages entities in the Shelf SharePoint Connector. | 20 Feb 2026 | Active |
Document purpose
This document has been developed for those customers’ end users who are using Shelf Knowledge Management System (Shelf KMS) with the Content Integration Layer feature to manage and handle various content both stored in Shelf KMS and in external platforms integrated via CIL. The document’s goal is to answer the following questions:
What is the Shelf Content Integration Layer?
What purposes does this feature serve?
- What is a Microsoft SharePoint Connector?
How is it configured?
- How is it used in practice?
If you require further assistance, feel free to contact us at support@shelf.io or from the in-app chat support within the Shelf platform.
- Glossary
- Mapping SharePoint content entities to Shelf
- Content Integration Layer and its purpose
- Configurations on the Microsoft SharePoint side
- Configurations on Shelf side
- Viewing SharePoint resources in Shelf
- Using SharePoint metadata in Content Intelligence
- Processing and display of SharePoint Pages in Content Intelligence
Glossary
Prior to starting to learn about the SharePoint connector and its configuration and usage, you need to learn the terminology used by Shelf.
Shelf KMS (Next Generation Knowledge Management System) is a knowledge management platform that employs AI capabilities to create, edit, process, store, export/import, and otherwise handle various content. The platform sports multiple AI-enabled features such as Search Copilot, Analytics Copilot, Semantic Search, Content Intelligence etc., all of which are intended to optimize and centralize customer organizations’ knowledge and provide fast, accurate, and consistent answers.
A connector is an entity that defines which external Content Management System Shelf KMS needs to connect to via Content Integration Layer (e.g. the SharePoint connector is a set of API parameters to define how to connect Shelf to Microsoft SharePoint). Shelf KMS has a set of preconfigured connectors (SharePoint, Contentful, Zendesk, Confluence connectors, etc.) but also allows for creating the custom ones.
A Pull connector is a connector that uses a prebuilt set of API parameters (for connecting with external CMSs and content storages like Google Drive, Notion, SharePoint, Zendesk, etc.) to pull content from a specific external platform into Shelf's CIL. All Shelf’s prebuilt connectors, including the SharePoint connector, are of the Pull type.
A connection profile is a feature that allows users to establish a connection to various external applications or sources. It enables seamless integration and collaboration between Shelf KMS and other platforms such as external content repositories. Using Shelf’s connection profiles, users can import and synchronize various content and generally streamline workflows between Shelf KMS and external systems. This feature enhances the overall efficiency and effectiveness of knowledge management processes by enabling easy access to relevant information from different sources within the Shelf platform.
A sync flow is a feature that is responsible for the synchronization of content from external sources to Shelf KMS. Shelf’s sync flows can work on schedule or on demand, making it a versatile tool for content synchronization and prompt knowledge delivery.
A PEM file is a file format used to store cryptographic information. PEM stands for "Privacy-Enhanced Mail," though its usage has extended far beyond email security. These files are widely used in security contexts, such as managing certificates and keys.
PEM files typically contain:
Certificates: Such as X.509 certificates.
Public or private keys: Used for encryption or decryption.
Certificate signing requests (CSRs): Requests for certificates to be issued by a certificate authority.
Prerequisites
For proper operation of your SharePoint connector and successful synchronization of your content from the Microsoft SharePoint platform into Shelf KMS, the following preconditions must be met:
OpenSSL should be installed to perform CLI operations
Azure Portal Access should be granted to the user under which you are going to perform configurations
Azure Active Directory Administrator (or Azure Global Administrator) permissions should be granted to the user under which you are going to perform configurations; this level is required for registering applications and granting API permissions in Azure Active Directory
Admin panel must be accessible on your Shelf KMS account
Content items (articles, documents, etc.) must be available on your SharePoint account.
Constraints and restrictions
Before proceeding to learn how you can configure and use the Shelf integration with your SharePoint resources, you need to be aware of the following content-related constraint(s) coming from the Microsoft side.
When syncing content items from your SharePoint site to Shelf, the sync job may fail with the display of the error message shown on the figure below:
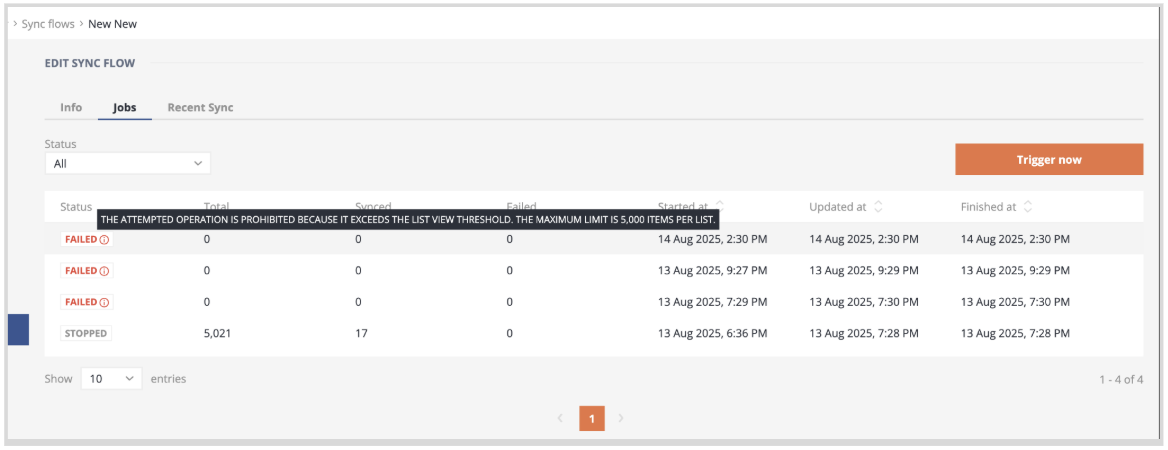
This failure to sync your content occurs when the number of items in your SharePoint library or list exceeds 5,000. Shelf Content Integration Layer and its connectors are not in control of this limitation, which is caused by Microsoft’s List View Threshold (LVT) threshold that is in place to help get consistent performance across all users with queries to the back-end database.
You can read more about the LVT limit and possible solution methods in the dedicated articles created by Microsoft:
If you need additional information or support on this matter, feel free to contact Shelf Support.
Mapping SharePoint content entities to Shelf
Before you proceed to read about the Shelf Content Integration Layer, Shelf's SharePoint Connector, connector-specific configurations on the SharePoint side, and configurations on the Shelf side, you need to understand how content entities at various levels correspond between SharePoint and Shelf. This mapping clarifies which SharePoint "top-level" items appear as Shelf Collections and how their internal structure and items are represented.
At a glance: entity mapping
SharePoint Site → SP's Site is mapped to Shelf's Instance URL value in Connection profile > Runtime Settings.
SharePoint Page (Site Page) → Shelf Gem (one Gem per published page)
SharePoint Document library → Shelf Collection
SharePoint List → Shelf Collection
SharePoint Folder (including nested folders) → Shelf Folder
SharePoint Content item (file in a document library, or item in a list) → Shelf Gem
SharePoint Images and Documents libraries → Each file is synced as a separate, standalone Gem.
SharePoint Pages sync
Shelf CIL supports syncing content from SharePoint Pages (Site Pages). Each published Page is extracted, converted to structured HTML, and stored as a searchable Gem in Shelf — bringing page-based knowledge (onboarding guides, announcements, process docs, etc.) into your Shelf library alongside files and list items.
How Pages map to Shelf
SharePoint | Shelf |
|---|---|
Published Page | One Gem containing extracted page content (title, text, images, links) |
File embedded on a Page (via "File and Media" or "Hero" web part) | A link within the page Gem (not a copy of the file) |
File in the Images & Documents library | A separate standalone Gem (independently searchable) |
 | Embedded files appear in two places by design. A PDF referenced on a Page shows up as a link inside the page Gem and as its own standalone Gem from the library sync. This preserves context on the page while keeping the file independently searchable — it is not a duplicate. |
Supported web parts
Web part | What Shelf captures |
|---|---|
Title Area | Page title as primary heading (H1) |
Banner | Banner title and author info as secondary heading (H2) |
Text | Rich-text content (paragraphs, headings, bold/italic) with formatting preserved |
Image | Image reference with source URL and alt text |
Hero | Links to referenced documents/images (visual tile layout is not replicated) |
File and Media | Link to the original file in SharePoint |
Requirements and constraints
Published Pages only — Draft and checked-out pages are excluded from sync.
Standard layouts only — Single-column, two-column, three-column, one-third/two-thirds split, and full-width layouts are supported. Content in "Flexible" layout sections is skipped entirely.
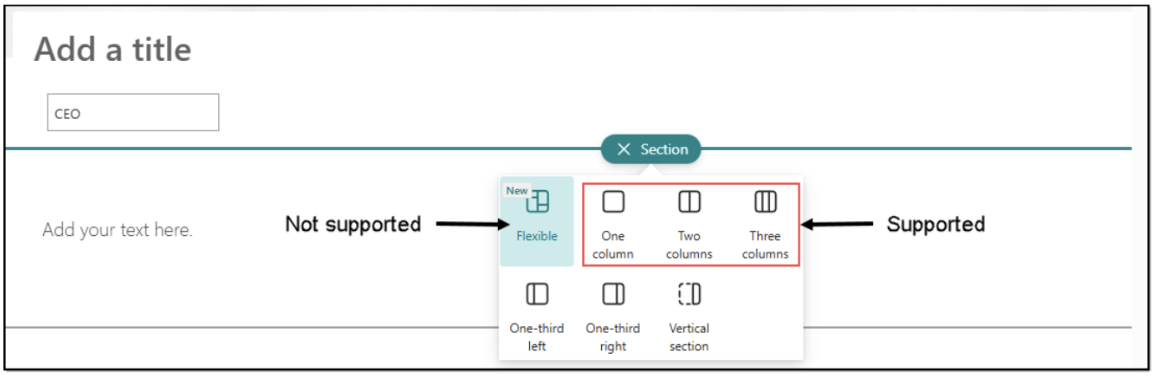
Structure preserved, styling not — Section/column structure and content hierarchy are maintained. Visual styling (colors, fonts, backgrounds, spacing) is not replicated.
SharePoint content entities hierarchy
What "top-level" means
SharePoint Site, being the root of Document libraries, Lists, and Pages, is the container of the highest level and is indirectly mapped at the stage of configuring SharePoint connection profile in Shelf (the Instance URL parameter/value in the RUNTIME SETTINGS block).
In SharePoint, the top-level containers that hold content are Document libraries, Lists, and Site Pages.
In Shelf, the top-level container is a Collection. Each connected SharePoint Document library or List appears as a Collection in Shelf. SharePoint Pages are synced as individual Gems (one Gem per published page).
How hierarchy is preserved
Folders: Any folder structure inside a connected library (and inside a List where folders are enabled) is preserved as nested Folders within the corresponding Shelf Collection. This includes folders at any depth.
- Content Items:
- Files stored in a Document library become Gems inside the corresponding Shelf Collection (and within its folders, if applicable).
Content Items stored in a SharePoint List become Gems inside the corresponding Shelf Collection for that List.
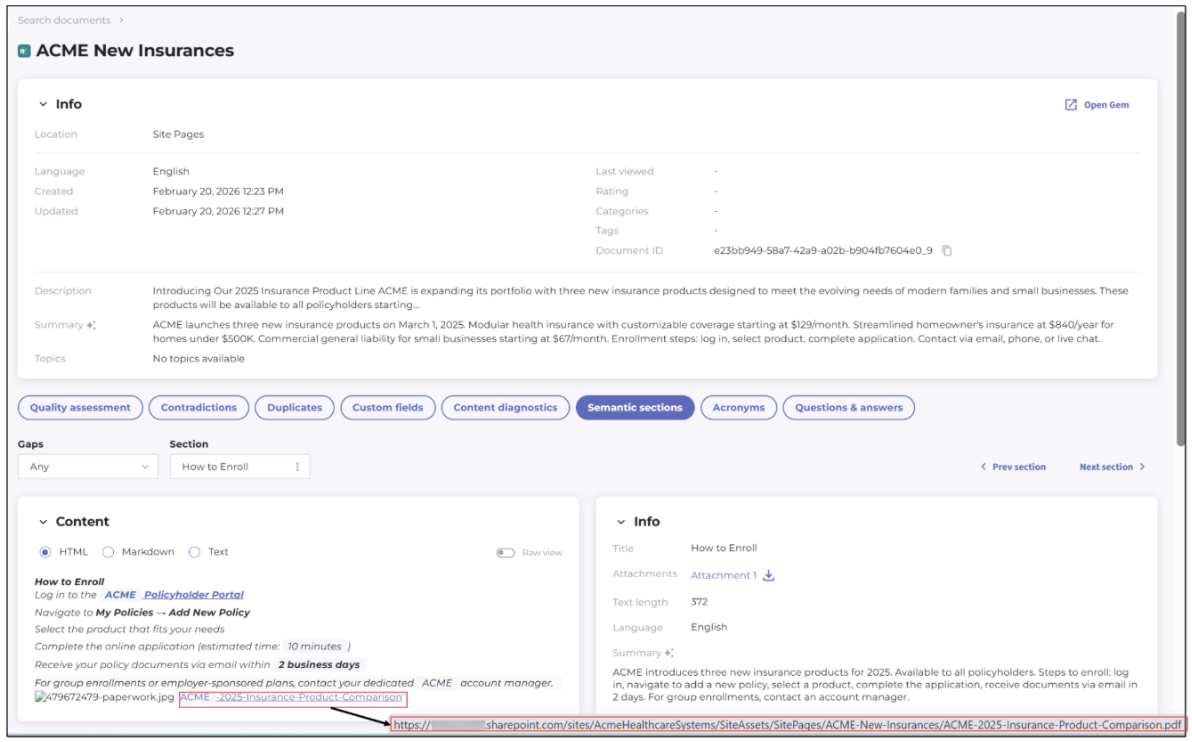
- Pages: SharePoint Pages are stored in the Site Pages library on each SharePoint site. Each published Page becomes an individual Gem. Pages do not follow the Collection → Folder → Gem hierarchy. Files referenced on Pages appear as links within the Gem; the underlying files are synced separately as standalone Gems from the Images & Documents libraries.
 | To work with synced Pages in KMS and for Content Intelligence to process them, you must grant permissions to the Site Pages collection in User Groups > [your user group] > Collection permissions.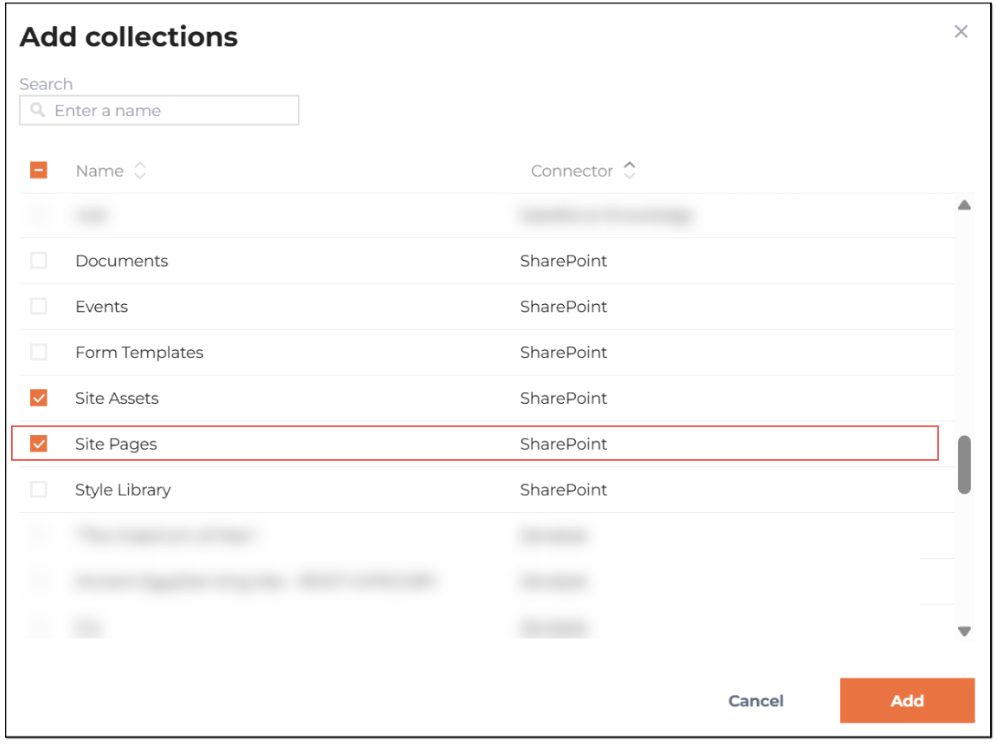 |
Practical examples
Document library example
SharePoint: Site A / "Policies" (Document library) / HR / 2024 / Code-of-Conduct.pdf
Shelf: Collection "Policies" → Folder "HR" → "2024" → Gem "Code-of-Conduct.pdf"
List example
SharePoint: Site A / "FAQs" (List) with an item "How do I reset my password?"
Shelf: Collection "FAQs" → Gem "How do I reset my password?"
Page example
SharePoint: Site A / Site Pages / "Company Holiday Policy" (published Page with text, a banner, and an embedded PDF)
Shelf: Gem "Company Holiday Policy" (extracted page content with a link to the PDF) + Gem "Holiday-Calendar-2025.pdf" (synced separately from the Images & Documents library)
Notes for setup and configuration
Selection scope: Each library and each list you select in the SharePoint Connector is created as a separate Collection in Shelf.
Folder depth: Nested folders in SharePoint remain nested folders in Shelf without changes to depth.
Content parity: Each SharePoint file or list item maps to a single Gem in Shelf, placed according to the original SharePoint hierarchy (Collection → Folder(s) → Gem).
Naming: Shelf Collections typically mirror the names of their source libraries/lists. Folder names and item titles/file names are also preserved.
Pages — published only: Only Pages in the "Published" state are synced. Draft or checked-out Pages are excluded.
Pages — web part coverage: 6 web part types are currently supported (see the supported web parts table above). Unsupported types appear as blank areas. Additional web part types will be supported in future updates.
Pages — embedded files as links: Files on a Page appear as links in the page Gem. The files themselves are synced separately from the Images & Documents library. This is by design.
Pages — Flexible layouts excluded: Content in "Flexible" section layouts is not synced. Use standard layouts to ensure content is captured.
Microsoft references
SharePoint Document library:
https://support.microsoft.com/en-us/office/create-a-document-library-in-sharepoint-306728fe-0325-4b28-b60d-f902e1d75939
SharePoint Folder (in a Document library):
https://support.microsoft.com/en-us/office/create-a-folder-in-a-document-library-3d6a8c11-2490-4d6b-8837-f25649a69c56
SharePoint List:
https://support.microsoft.com/en-us/office/create-a-list-0d397414-d95f-41eb-addd-5e6eff41b083
SharePoint Pages (Site Pages):
https://support.microsoft.com/en-us/office/create-and-use-modern-pages-on-a-sharepoint-site-b3d46deb-27a6-4b1e-87b8-df851e503dec
Understanding this mapping up front makes configuration choices and the downstream behavior of the Shelf Content Integration Layer more predictable when integrating with SharePoint.
Content Integration Layer and its purpose
The Content Integration Layer feature makes it possible to integrate various content types and formats into a single platform, Shelf KMS, from where users can further derive useful information to deliver accurate and relevant answers to their clients.
The Content Integration Layer ensures that content is indexed, tagged, and categorized appropriately, making it easily searchable and accessible to users within the knowledge management system. It provides capabilities for content mapping, transformation, and synchronization, enabling the consolidation and synchronization of data from multiple sources.
CIL also ensures that the latest version of content is always available to users and facilitates efficient content updating and maintenance.
Overall, the Content Integration Layer plays a crucial role in providing a centralized repository of relevant and up-to-date information, making it easier for users to find and access the knowledge they need.
The detailed information about the CIL feature can be found in the relevant chapters of the Shelf Content Integration Layer Feature User Guide available upon request.
Understanding the Content Integration Layer workflow
In-depth configurations and use cases of the Shelf Content Integration Layer are described in the dedicated Shelf Content Integration Layer Feature User Guide mentioned above, but the short example of the CIL workflow is as follows:
You access the Content Integration Layer feature in your Shelf KMS (Admin panel).
You select one of Shelf-preconfigured connectors or create your custom one (based on the external content repository from which you need to sync content)
You create a connection profile that uses the selected or created connector, and configure it: indicate credentials (username/password/API key/token/etc.) to access your external repository. All these credentials and access details can be taken from that external platform, and in the respective section below we will show you how to get them on Microsoft SharePoint.
You create a sync flow that uses the created connection profile and configure this sync flow to run either on some specific schedule or on demand. It is here where you can apply filters to tell CIL which exactly content needs to be synced.
You run the created sync flow manually (if set to run on demand) or wait for the scheduled run, and get your content from the needed external source right in Shelf KMS.
For the proper operation of the SharePoint connector to sync your content from Microsoft SharePoint into Shelf KMS, you need to do certain actions in Microsoft SharePoint, Azure and in Shelf. Read the chapters below to learn what exactly you need to do.
Configurations on the Microsoft SharePoint side
Specifically for the Shelf SharePoint connector and for bypassing the existing limitations of Microsoft SharePoint UI (certain features can be used only via API), the two-app setup has been implemented:
(1) The Connector app for extracting content, and
(2) The Manage Permissions app for infrastructure and ad-hoc configuration.
The Connector app shares its credentials with Shelf to enable content extraction. The Manage Permissions app is used to configure the Connector app with granular permissions for specific SharePoint sites, and does not share any credentials or other sensitive information with Shelf.
 | Before you start configuring your integration on the Microsoft SharePoint end, you need to understand the following:
|
 Figure 1. Verifying SharePoint Admin permissions
Generating self-signed certificate
Before proceeding to creating the dedicated apps on Azure, you first need to generate a self-signed certificate that is needed to authorize your Azure apps to access Shelf and vice versa.
To generate your certificate, complete the following steps.
Make sure you have OpenSSL of the latest released version installed on your computer. To do so, open a terminal or a command prompt utility and run the following command
Shell
openssl versionIf OpenSSL is installed on your computer, the command will return the version of the installed OpenSSL.
Shell
C:\Windows\system32>openssl version
OpenSSL 3.4.1 11 Feb 2025 (Library: OpenSSL 3.4.1 11 Feb 2025)Run the following command in your OS-specific terminal
Shell
openssl req -x509 -newkey rsa:2048 -keyout private.key -out cert.crt -days 365 -nodes -subj "/CN=ShelfConnectors"
Legend
Parameter | Explanation |
-x509 | Generates a self-signed certificate. |
-newkey rsa:2048 | Creates a 2048-bit RSA private key. |
-keyout private.key | Saves the private key to private.key. |
-out cert.crt | Saves the certificate to cert.crt. |
-days 365 | Sets the certificate validity period to 365 days. |
-nodes | Ensures the private key is not encrypted with a passphrase. |
-subj "/CN=ShelfConnectors" | Specifies the subject name. |
As a result, this command shall generate two files for you:
private.key, which is the private key for the certificate
cert.crt, the self-signed certificate itself.
Location to which these files are saved depends on your platform. For example, on Windows OS computers, they are saved to C:\Windows\System32
Creating certificate’s PEM file
At this step, you need to create a single PEM file by combining the previously generated self-signed certificate and its private key. To do that, run the following command in your terminal
| Shell cat cert.crt private.key > azure-cert.pem |
The output should be a file named azure-cert.pem that contains both the certificate and private key. The PEM file, logically, is saved to the same location where the certificate and private key are stored.
Creating Connector app in Azure
At this stage of configurations, you need to create the Connector app in Azure. To do so, follow the below steps.
Log in to your account on Azure Portal using the Admin credentials.
In the search field on top of the page look for and navigate to App registrations.
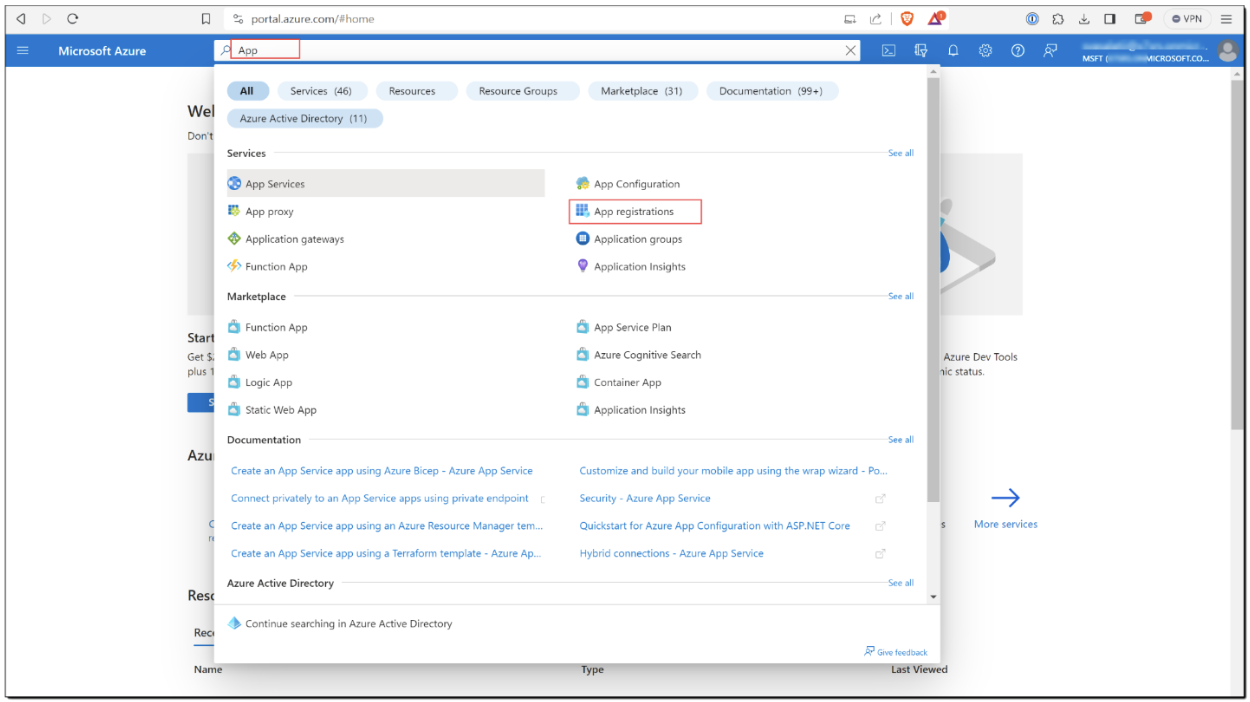 Figure 2. Finding and selecting the App registrations menu in Azure
- On the App registrations page, find and select + New registration.
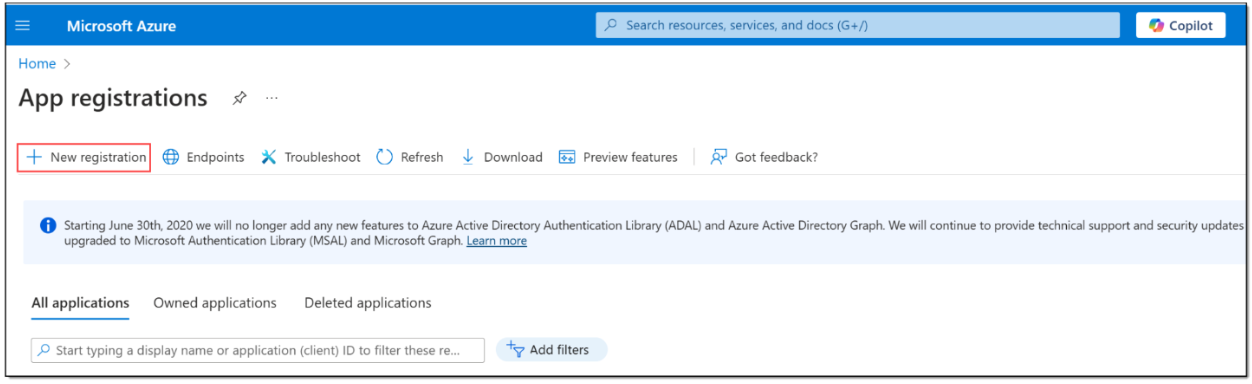 Figure 3. Initiating new registration on Azure
 In the form that appears, enter the name for the new app registration - Connector app, and click Register. No other selections/configurations are needed in this form.
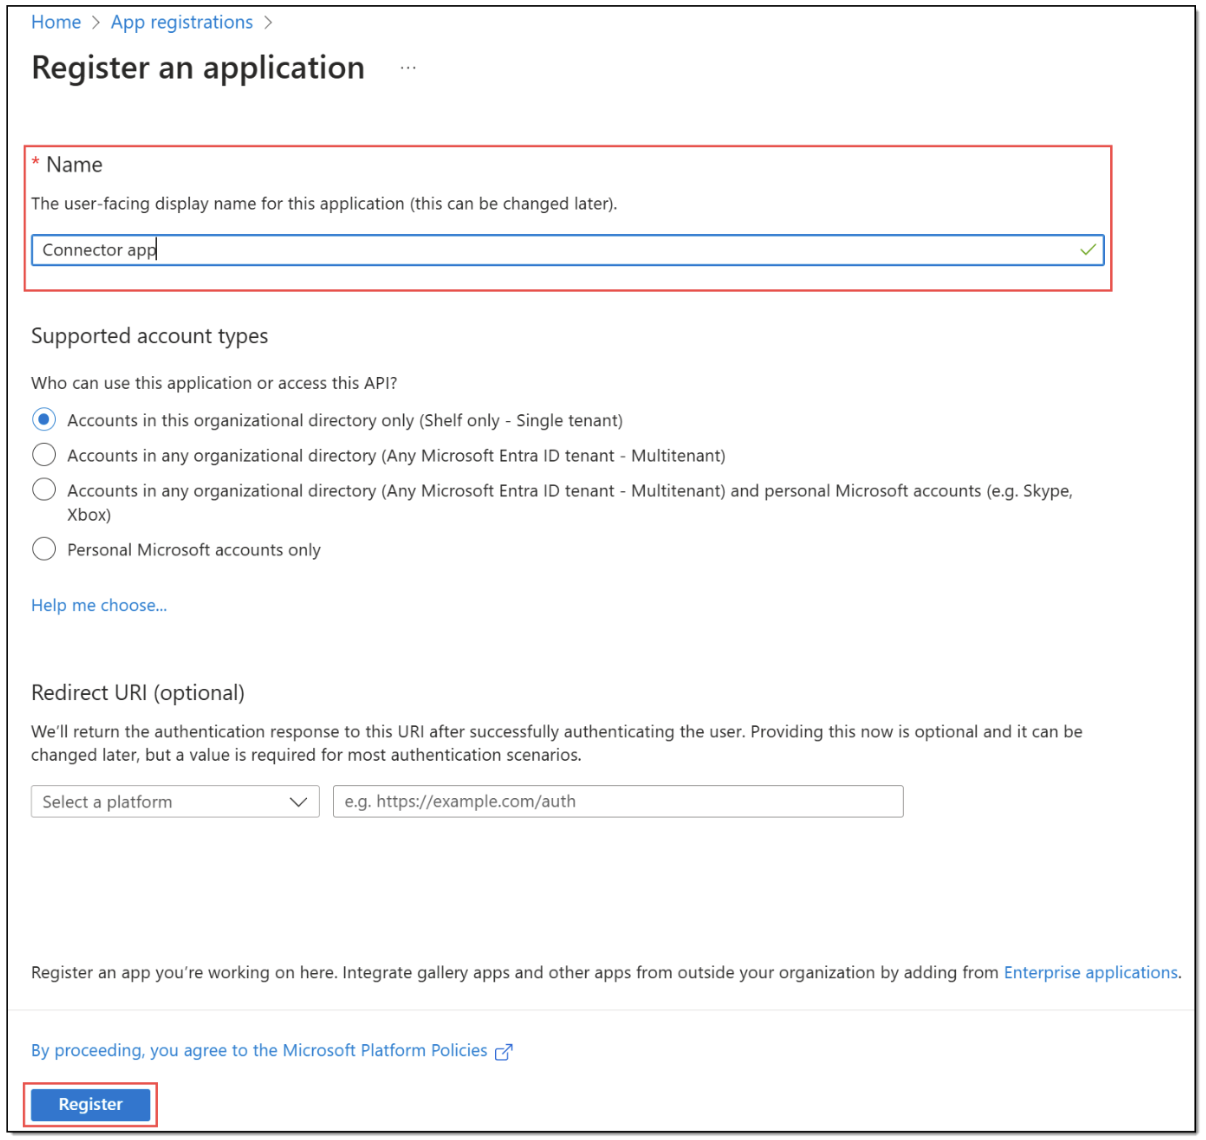 Figure 4. Registering Connector app on Azure
Once Connector app is registered, you are redirected to its page.
Uploading certificate
When on the Connector app page, under the Manage menu (1) in the navigation panel, find and select the Certificates & secrets option (2).
Then select the Certificates tab (3) and press Upload certificate (4).
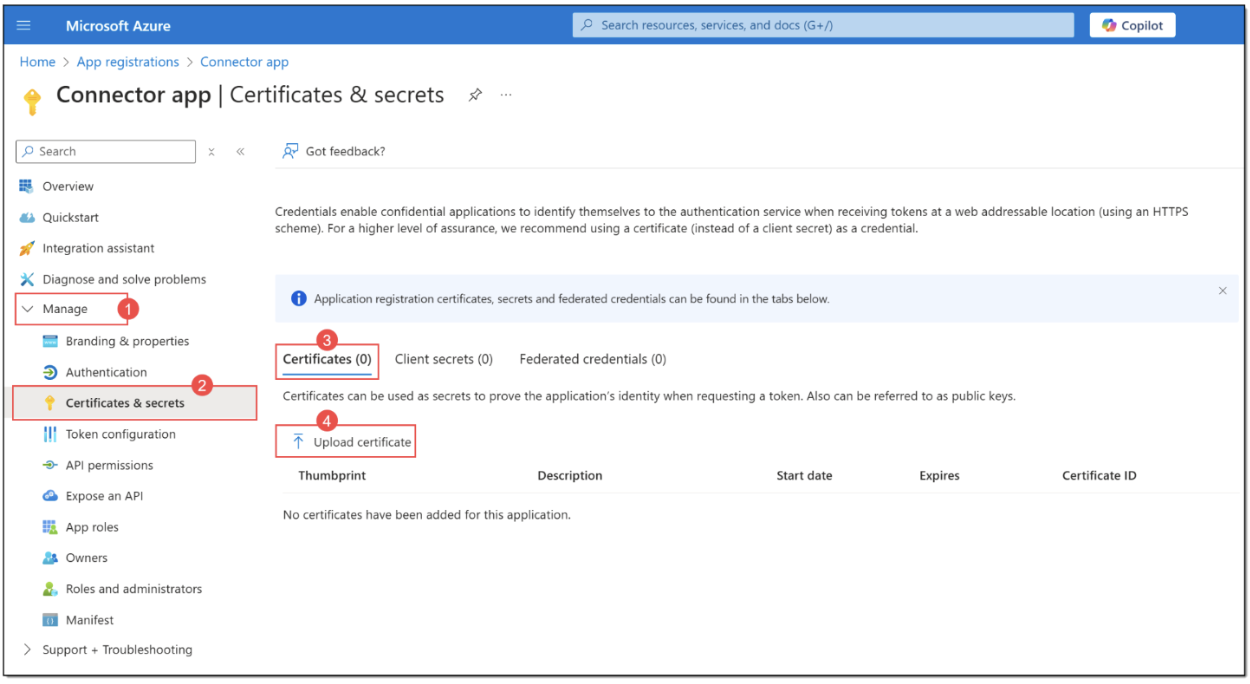 Figure 5. Accessing Connector app’s certificates and secrets menu and initiating certificate upload
In the panel that opens in the right part of the page, upload the previously generated cert.crt file and add some description for it. Press Add once done.
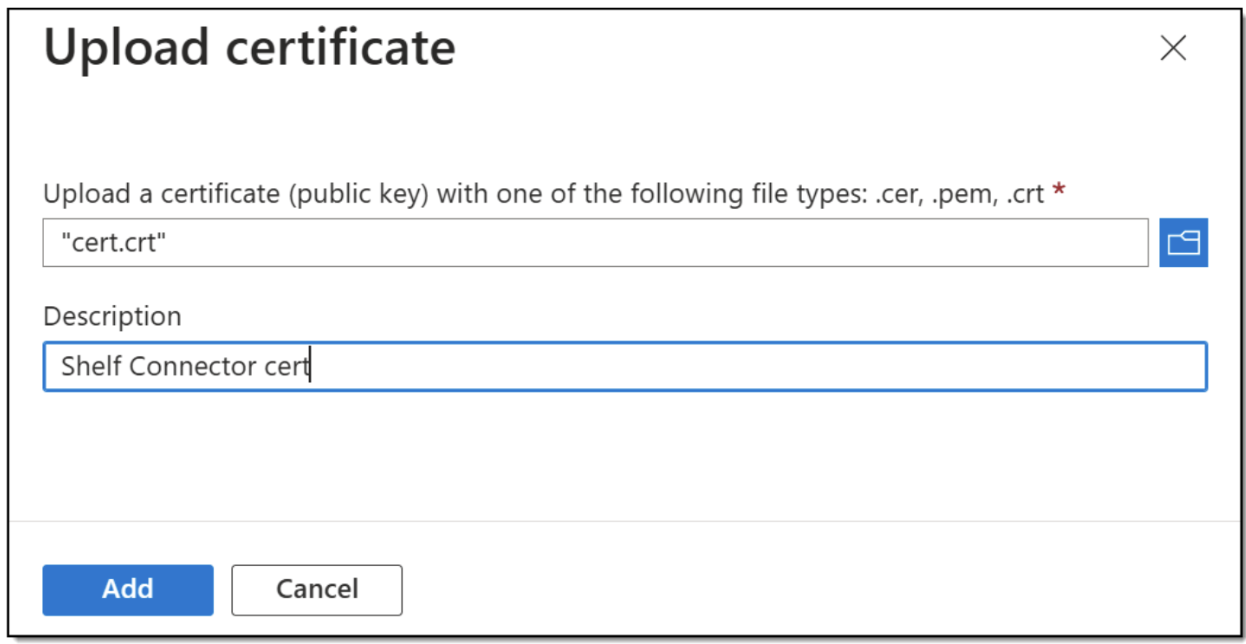
 Figure 6. Uploading certificate
Granting API permissions to Connector app
Granting SharePoint permissions
After the certificate is added to Connector app, open the API permissions option (1) in the menu, and on the Connector app’s permissions page, select + Add a permission (2).
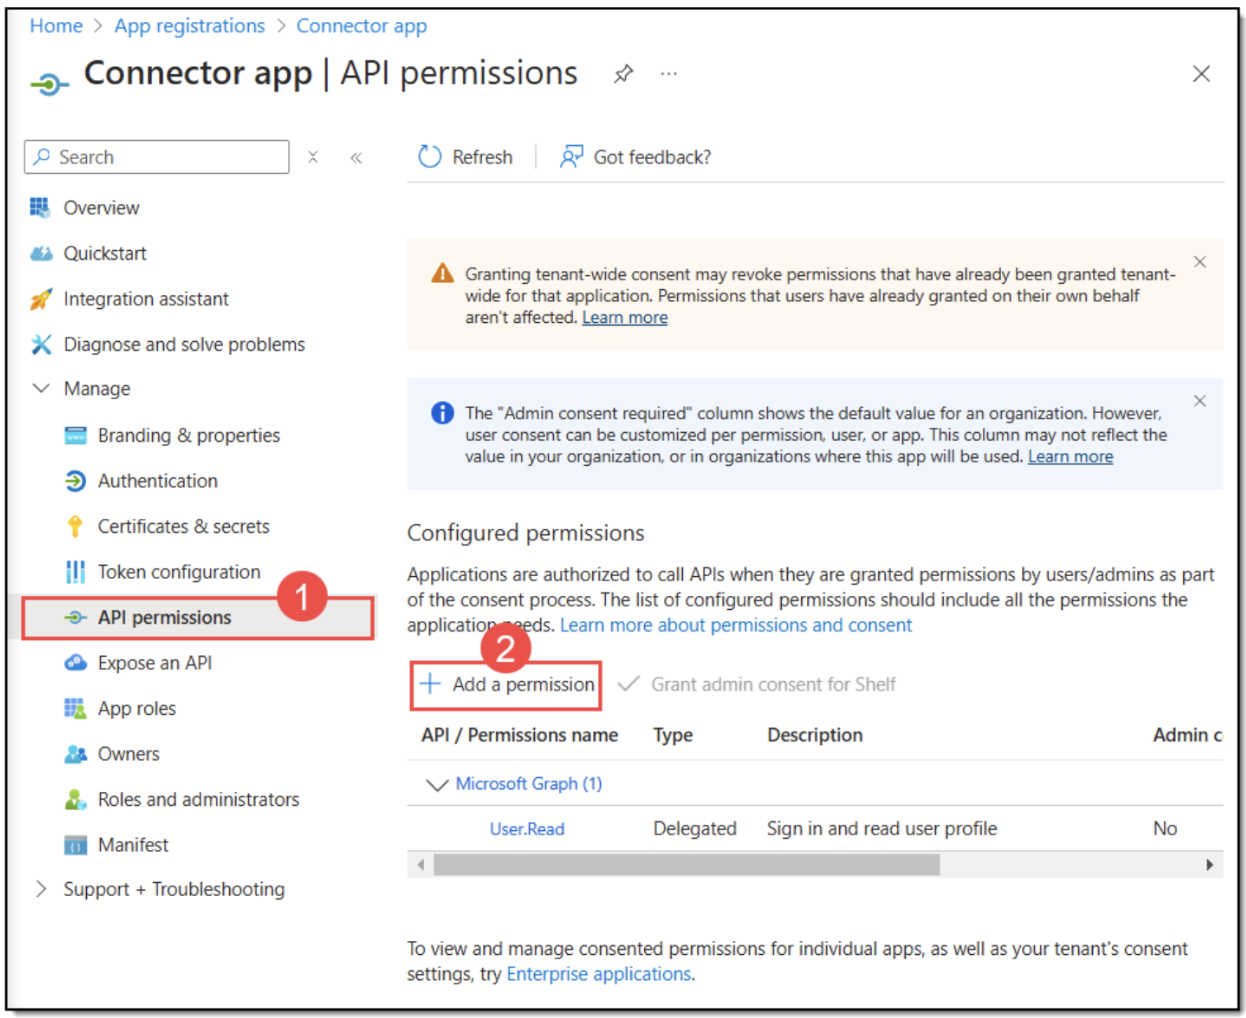 Figure 7. Accessing Connector app’s API permissions settings
- In the pane that appears, select the SharePoint option (3).
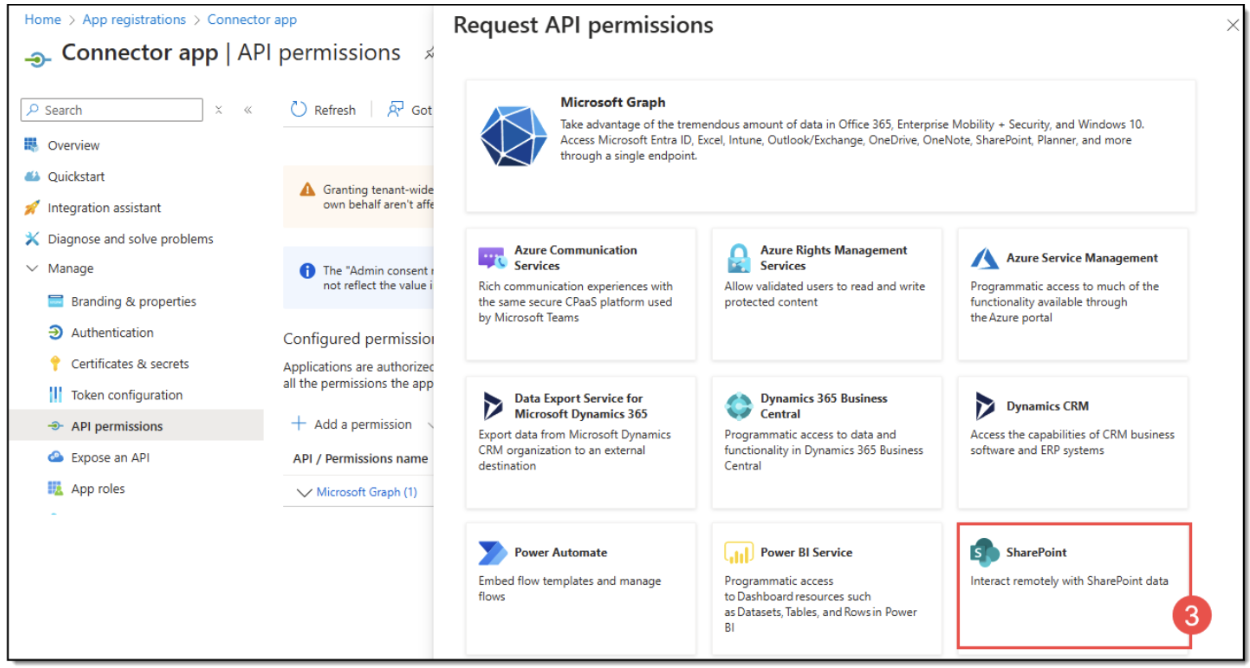
Figure 8. Selecting SharePoint for Connector app’s API permissions
In the window that appears in the right pane, select the Application permissions option (4) and then select the Sites.Selected checkbox (5). Click Add permissions (6) to save changes.
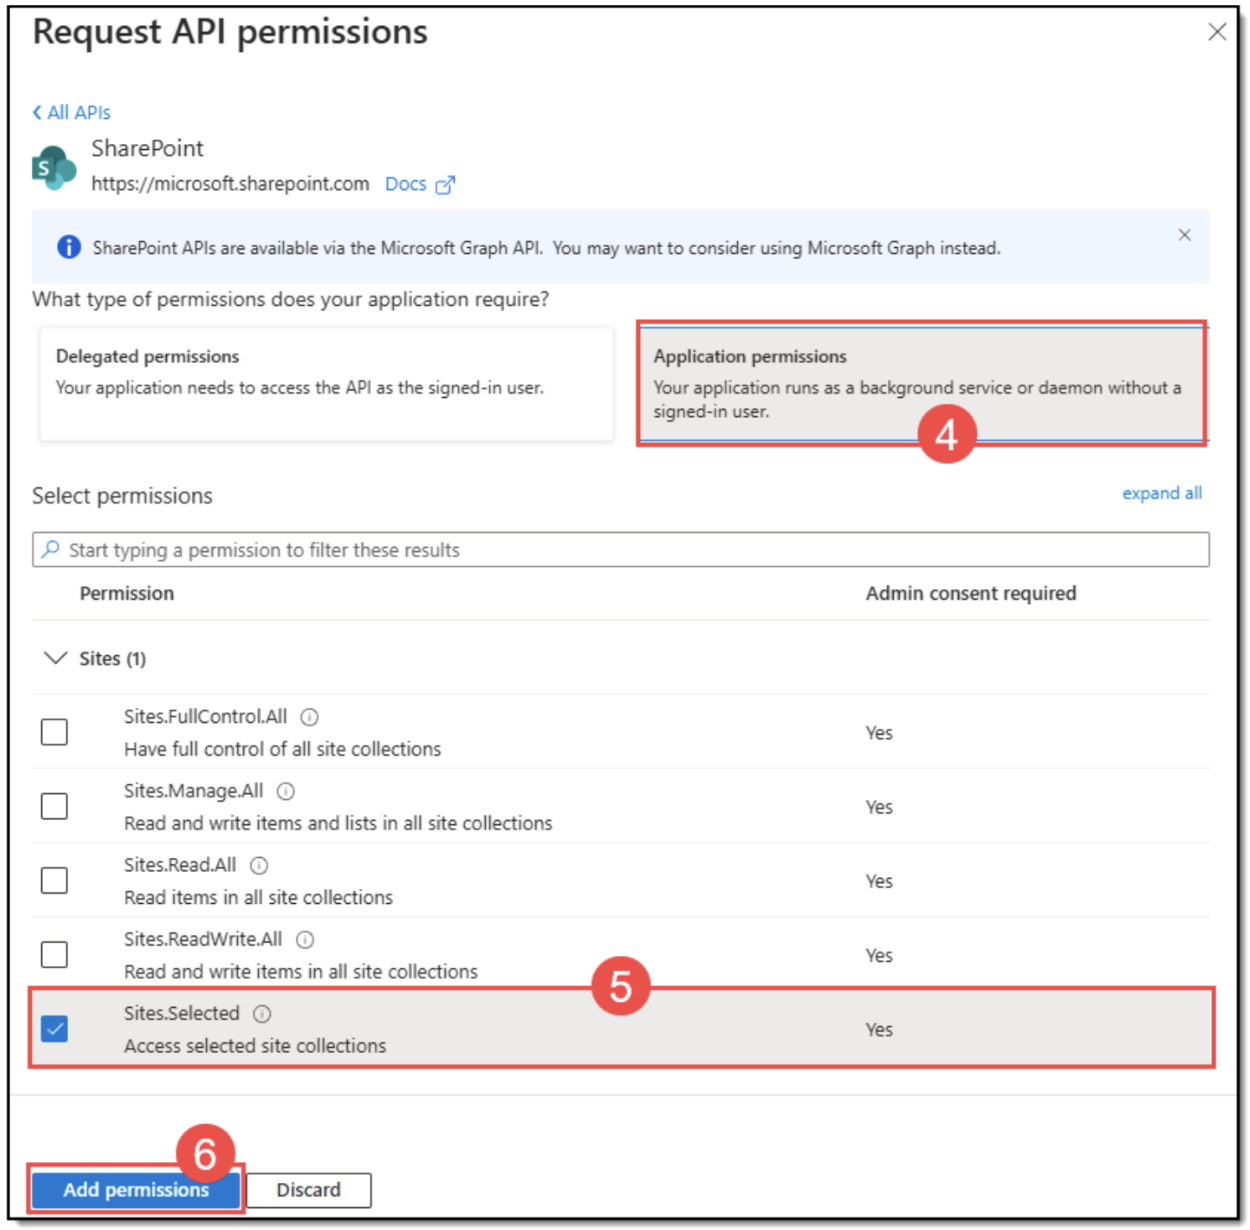 Figure 9. Adding Sharepoint Sites.Selected permissions to Connector app
Permission
Description
Sites.Selected
This permission is used specifically to assign a specific SharePoint site in the next step via API (using the Manage Permissions app). It neither provides access to ALL your SharePoints sites nor grants any other permissions to the apps.
- Now you need to get admin consent for Your Tenant on these permissions. If you have the admin level, you can do it yourself by clicking the respective button as shown below. Otherwise, contact your organization’s Azure admin and ask them to do that.
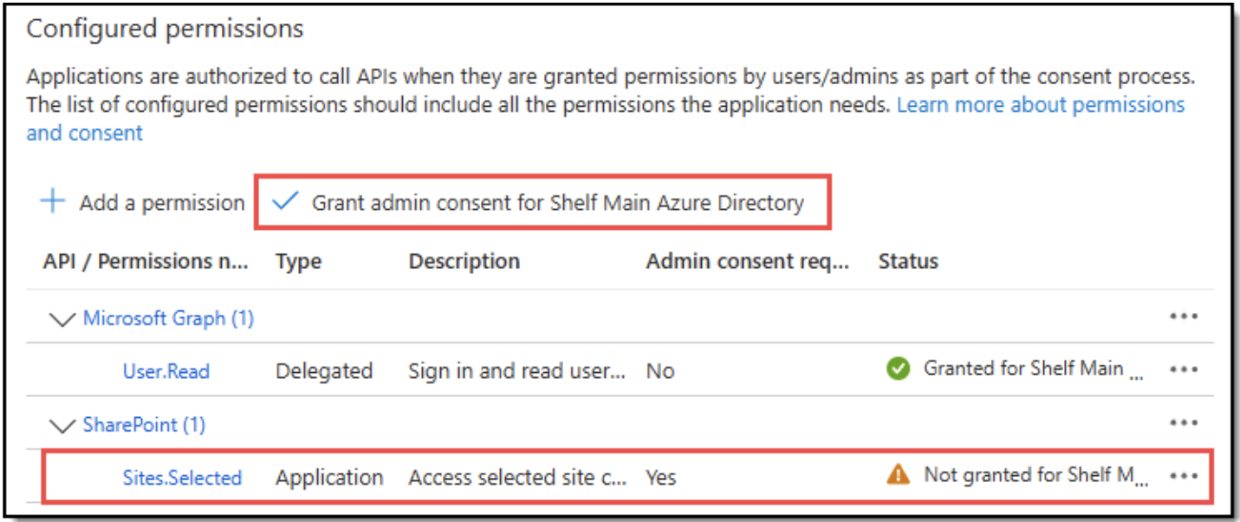

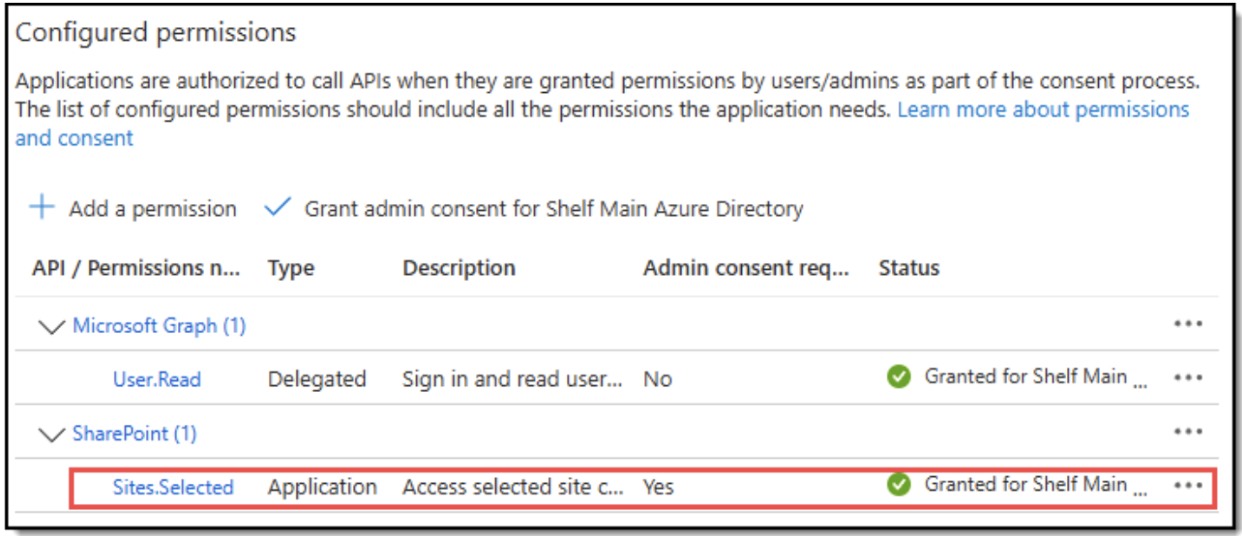 Figure 10. Granting admin consent for Your Tenant
Granting Microsoft Graph permissions
Repeat Step 1 from the procedure above.
In the pane that appears, select the Microsoft Graph option (2)\
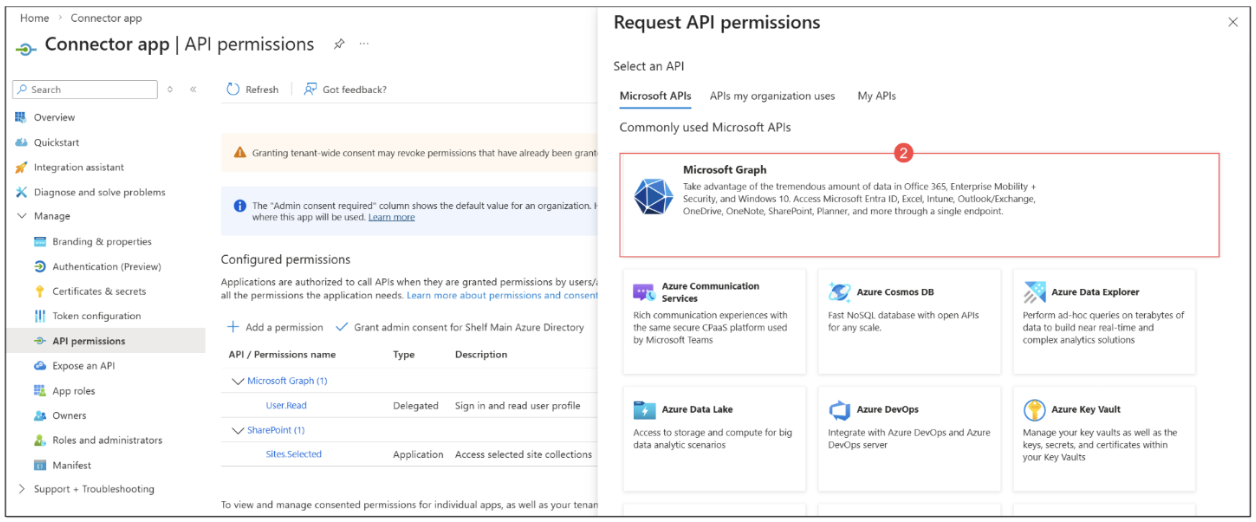 Figure 11. Selecting Microsoft Graph for Connector app’s API permissions3. In the window that appears in the right pane, select the Application permissions option (3), in the search field (4) below look for Sites.Selected, and then expand the Sites section (5) and select the Sites.Selected checkbox (6). Click Add permissions (7) to save changes.
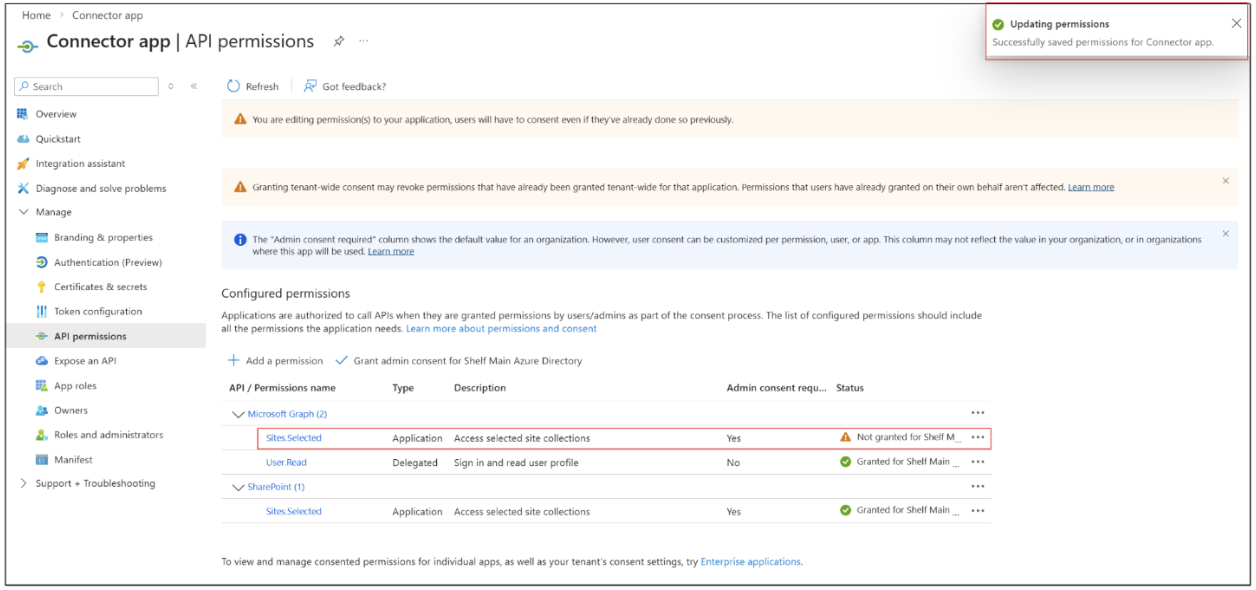 Figure 12. Viewing added Microsoft Graph permission for Connector app
Now you need to get admin consent for Your Tenant on these permissions. If you have the admin level, you can do it yourself by clicking the respective button as shown below. Otherwise, contact your organization’s Azure admin and ask them to do that.
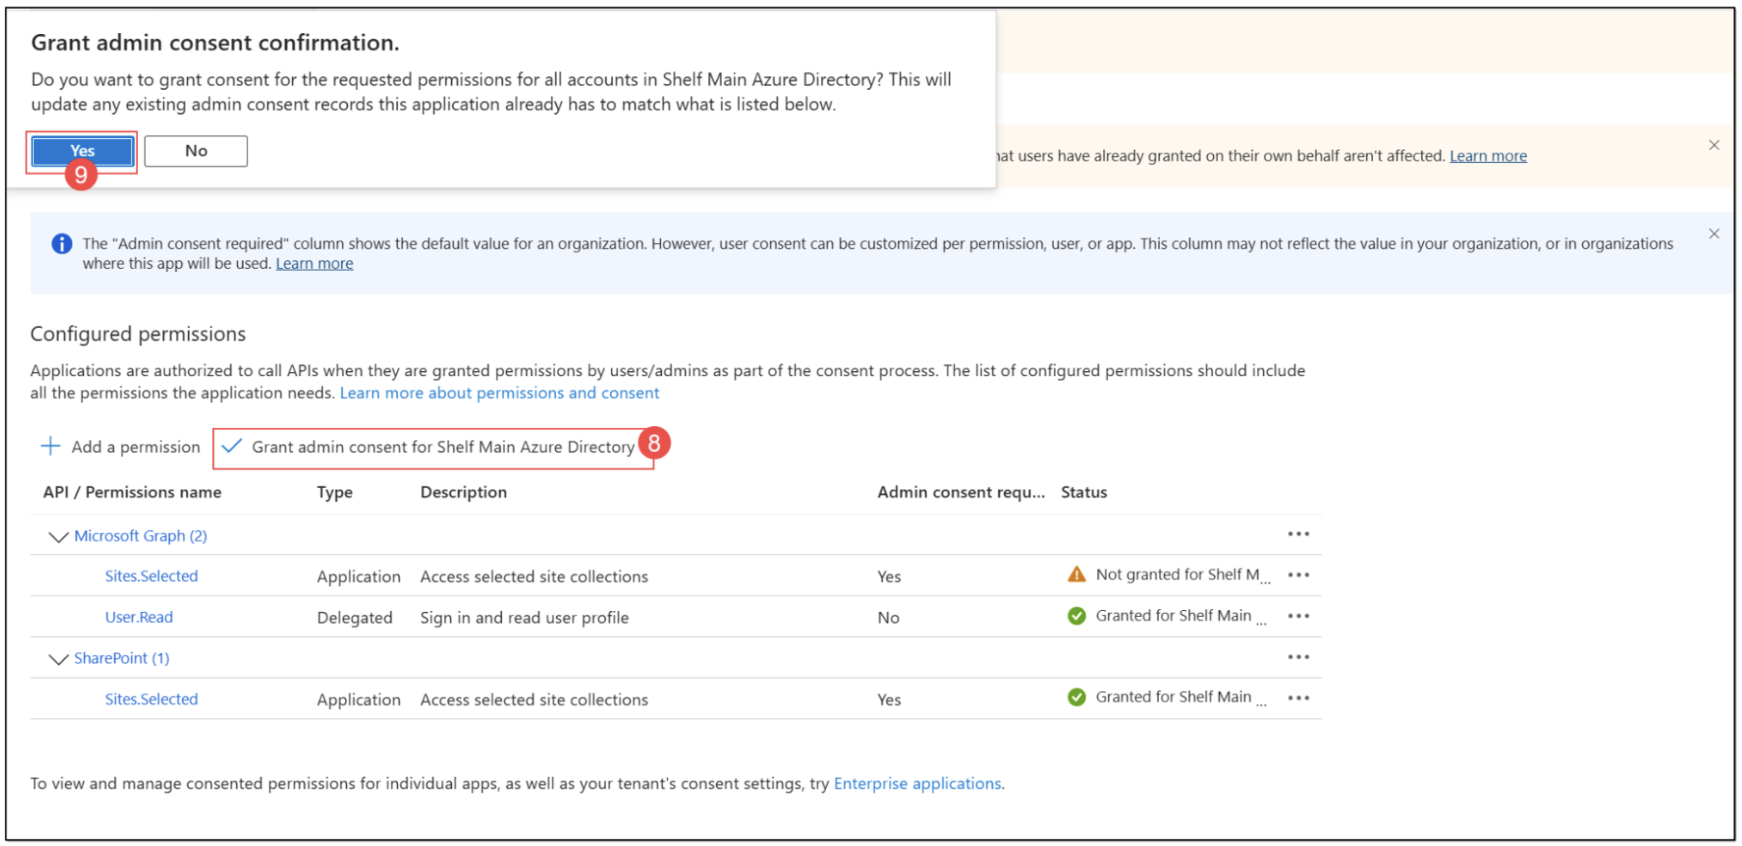
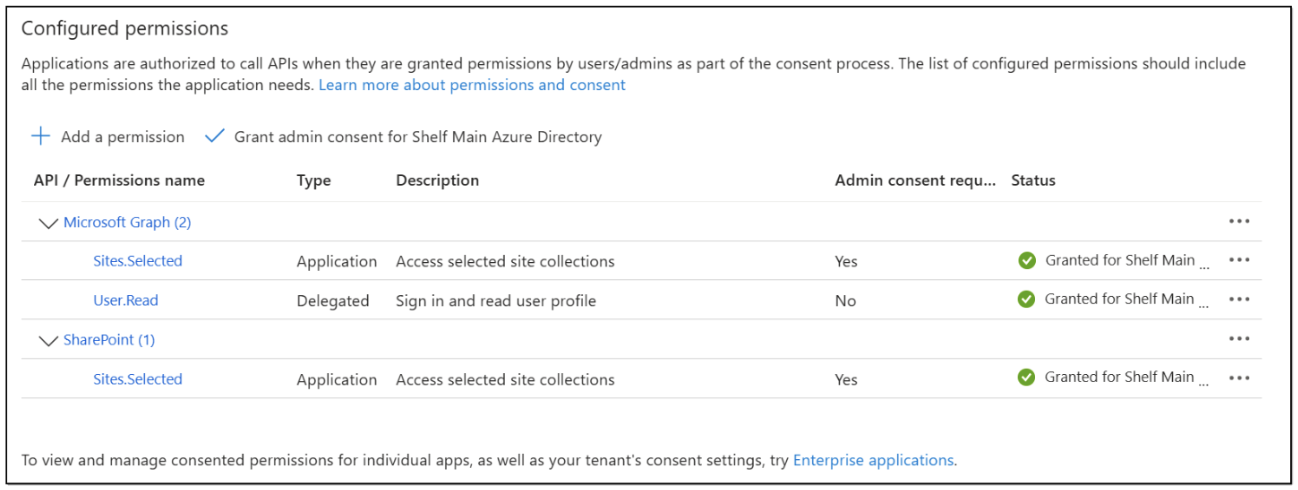 Figure 13. Granting admin consent for Your Tenant for Microsoft Graph permission
Creating Manage Permissions app
 | The Manage Permissions app you are about to create does not share any credentials you may enter here with Shelf. The Manage Permissions app is simply sharing the connector that will be created. See more in Configurations on Microsoft SharePoint side section |
On Azure Portal, navigate again to App registrations and add a new registration as shown in Figures 2 and 3 above.
In the new app registration form, enter the needed name - Manage Permissions app - and click Register. Leave other fields and checkboxes unchanged.
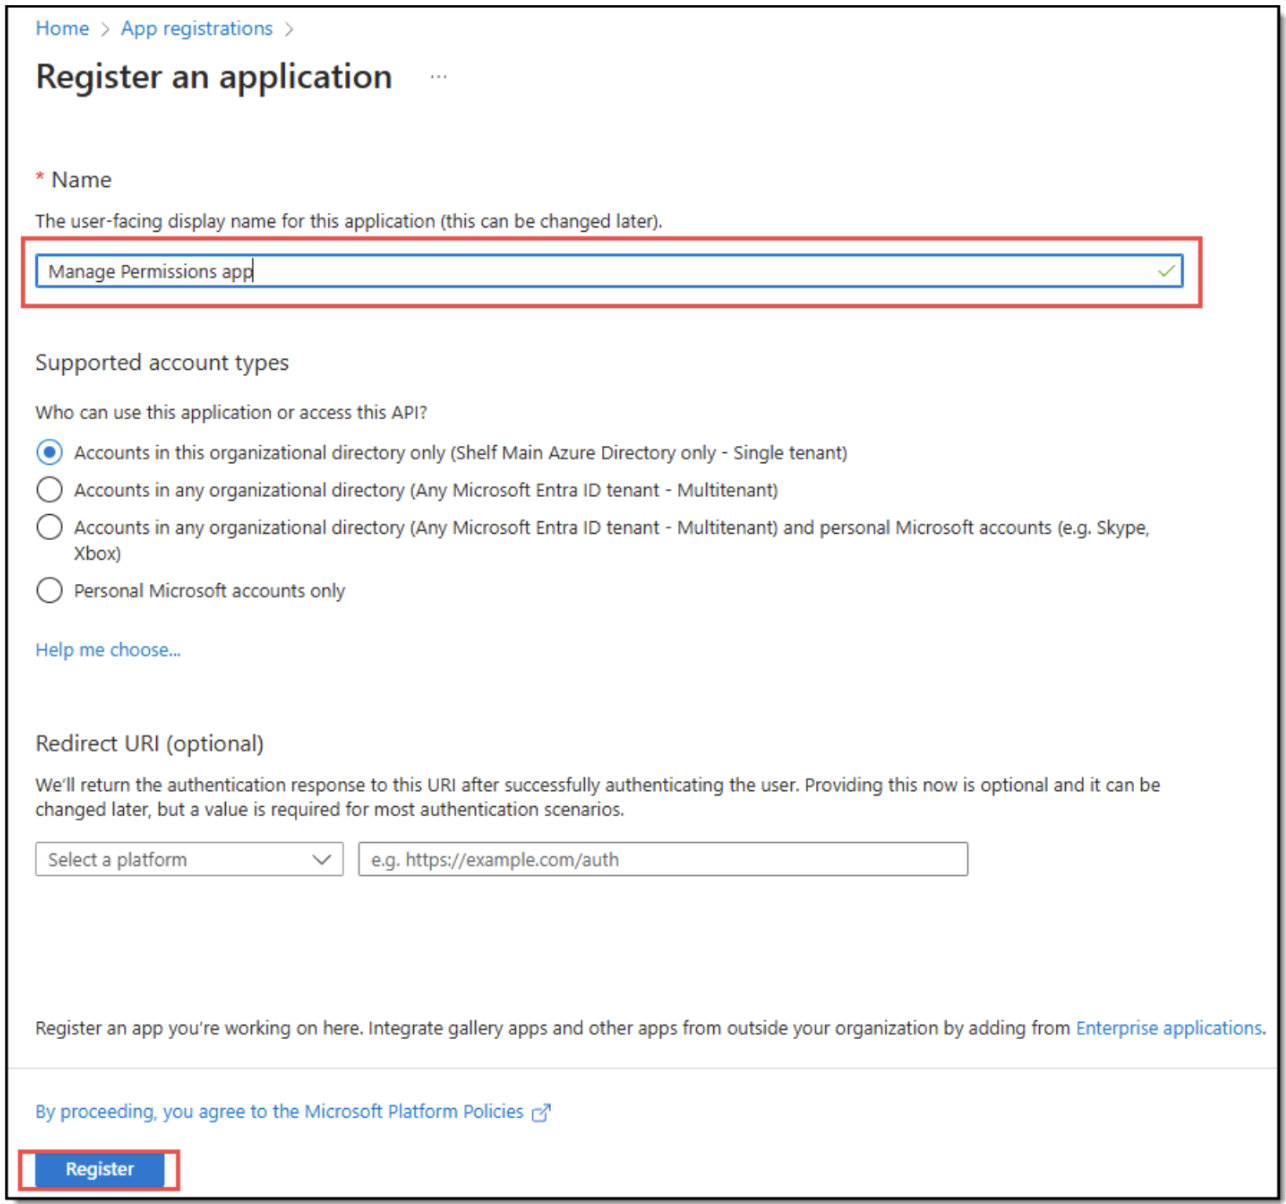 Figure 14. Initiating Manage Permissions app registration
Once the app is registered, you are redirected to its page and see the respective notification on top of the page.
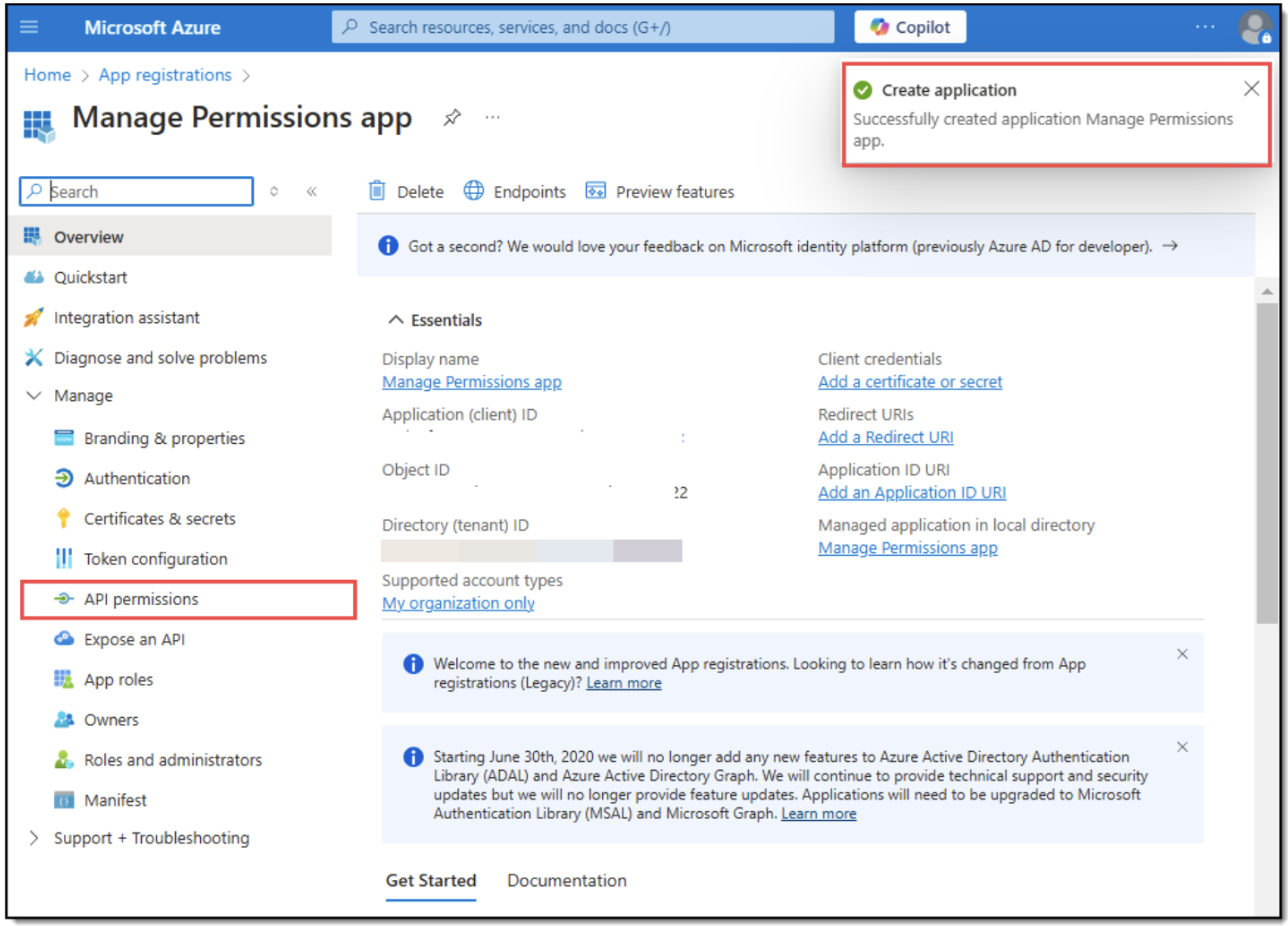 Figure 15. Viewing Manage Permissions app page
Granting permissions to Manage Permissions app
Now, you need to add specific permissions to the app you have just registered, and then grant admin consent for Your Tenant for it. Follow the below steps.
When on the Manage Permissions app page, find and select the API permissions option in the navigation panel as shown in Figure 15 above.
On the page that opens, find and select + Add a permission.
Figure 16. Initiating permissions granting to Manage Permissions app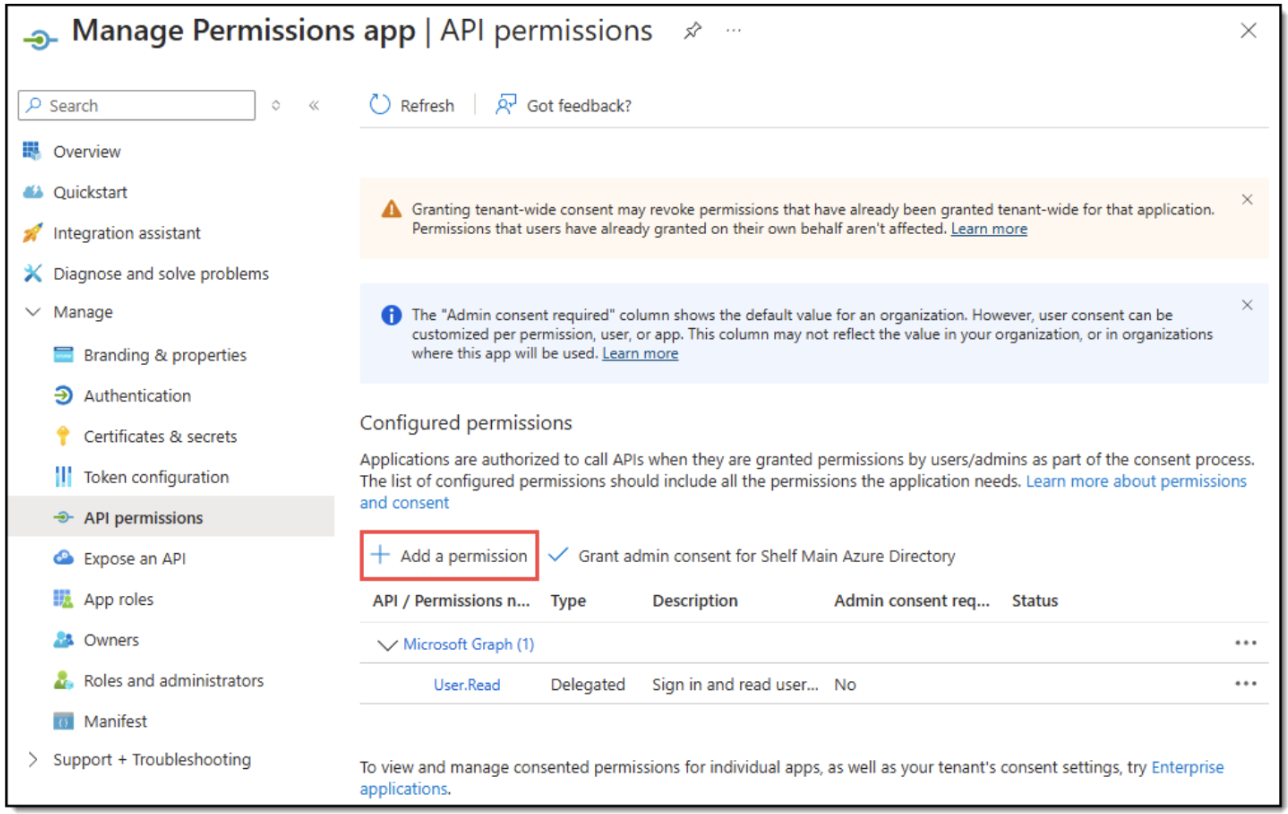
- In the pane that appears, select the Microsoft Graph option and then select the Application permissionoption.
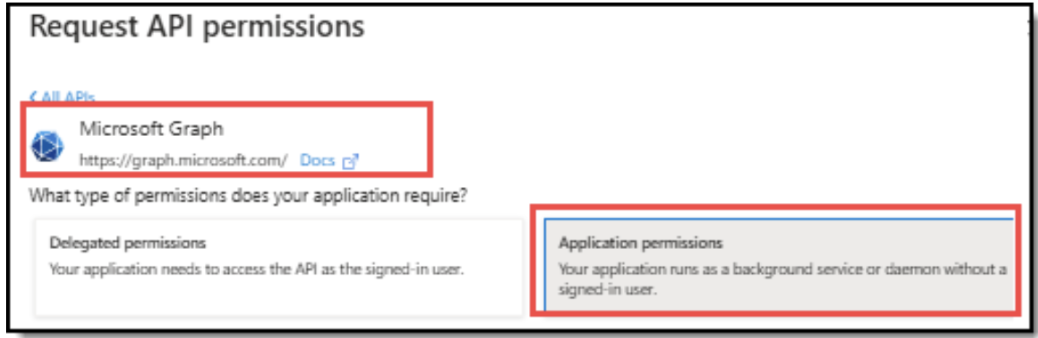 Figure 17. Selecting Microsoft Graph
 In the permissions list that expands below, find and select the following permissions by checking the relevant boxes as listed below. Then confirm changes by clicking Add permissions.
Application:
Application.Read.All
AppRoleAssignment
AppRoleAssignment.ReadWrite.All
Sites
Sites.FullControl.All
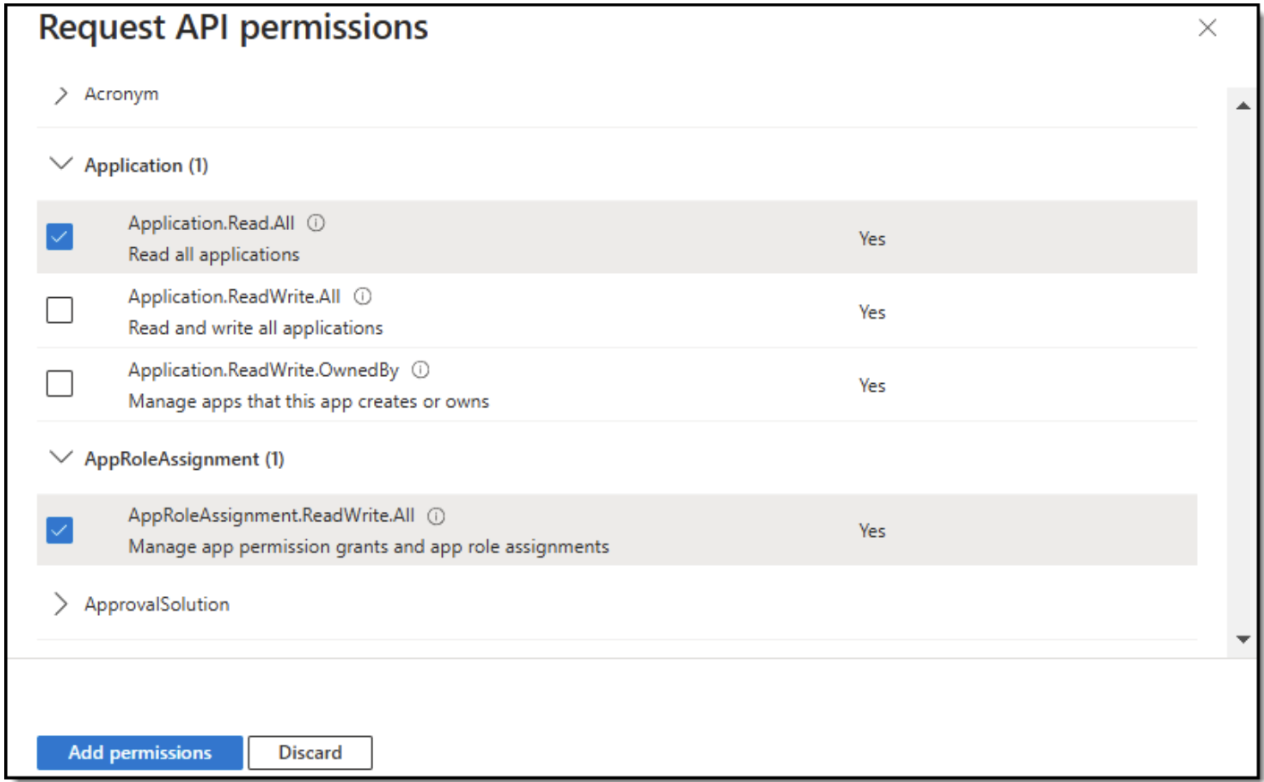
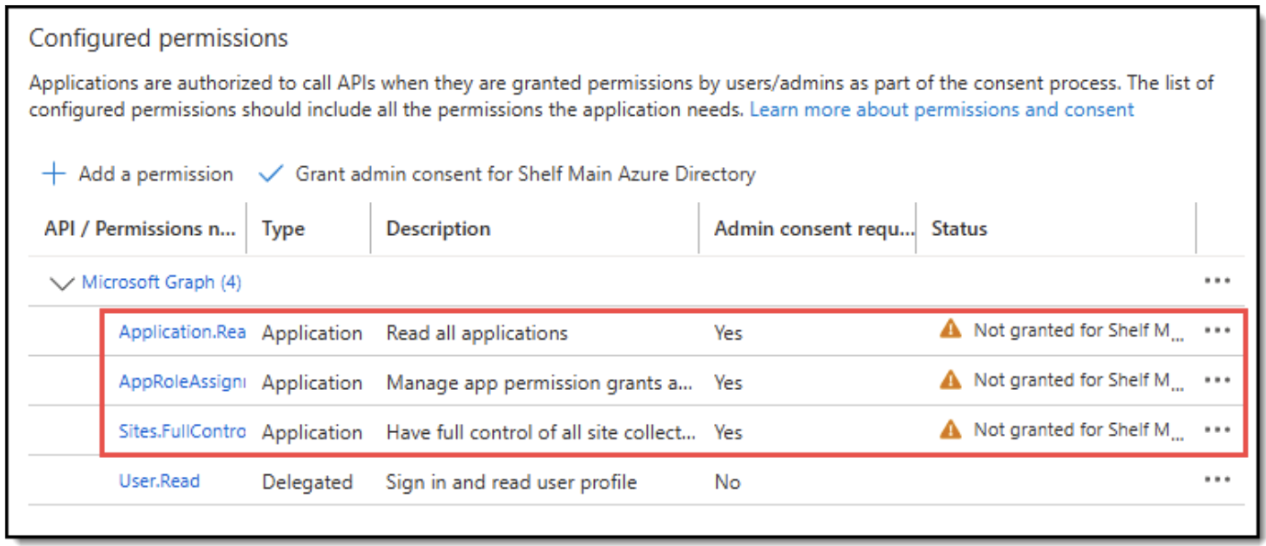 Figure 18. Granting Microsoft Graph permissions
Explaining permissions
Permission | Description |
Application.Read.All | This permission is required because the Manage Permissions app must be able to read other applications, in our case the Connector app, for providing granular permissions to SharePoint site(s). |
AppRoleAssignment.ReadWrite.All | This permission is specifically required to assign new roles/access to other applications, such as the Connector app. |
Sites.FullControl.All | This permission is necessary because the Manage Permissions app must have control over sites to assign a selected site to a specific app (in our case the Connector app). |
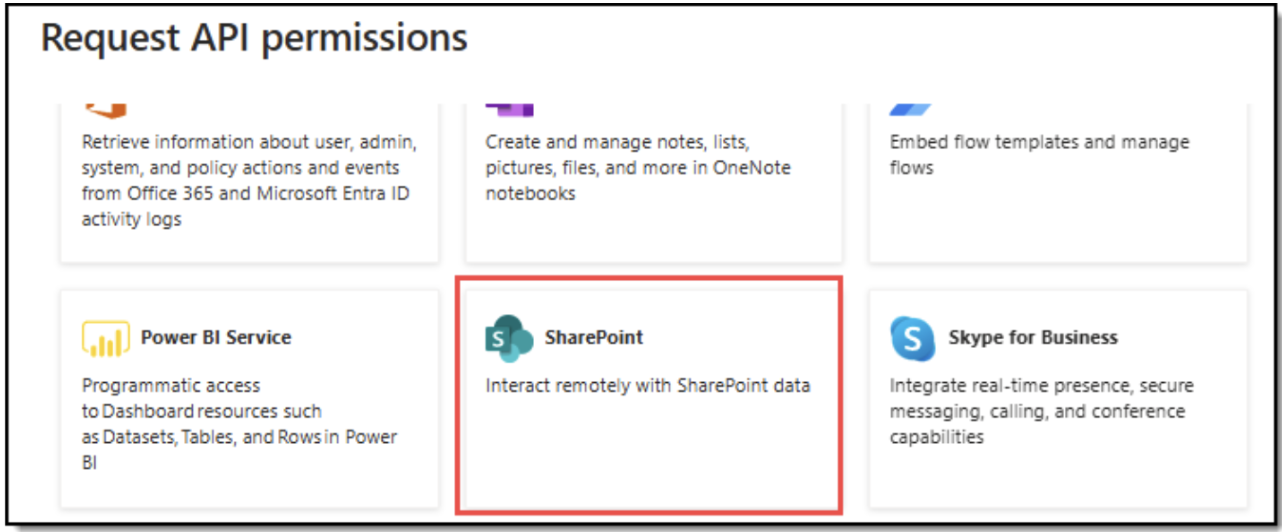 Figure 19. Selecting SharePoint for granting permissions for Manage Permissions app
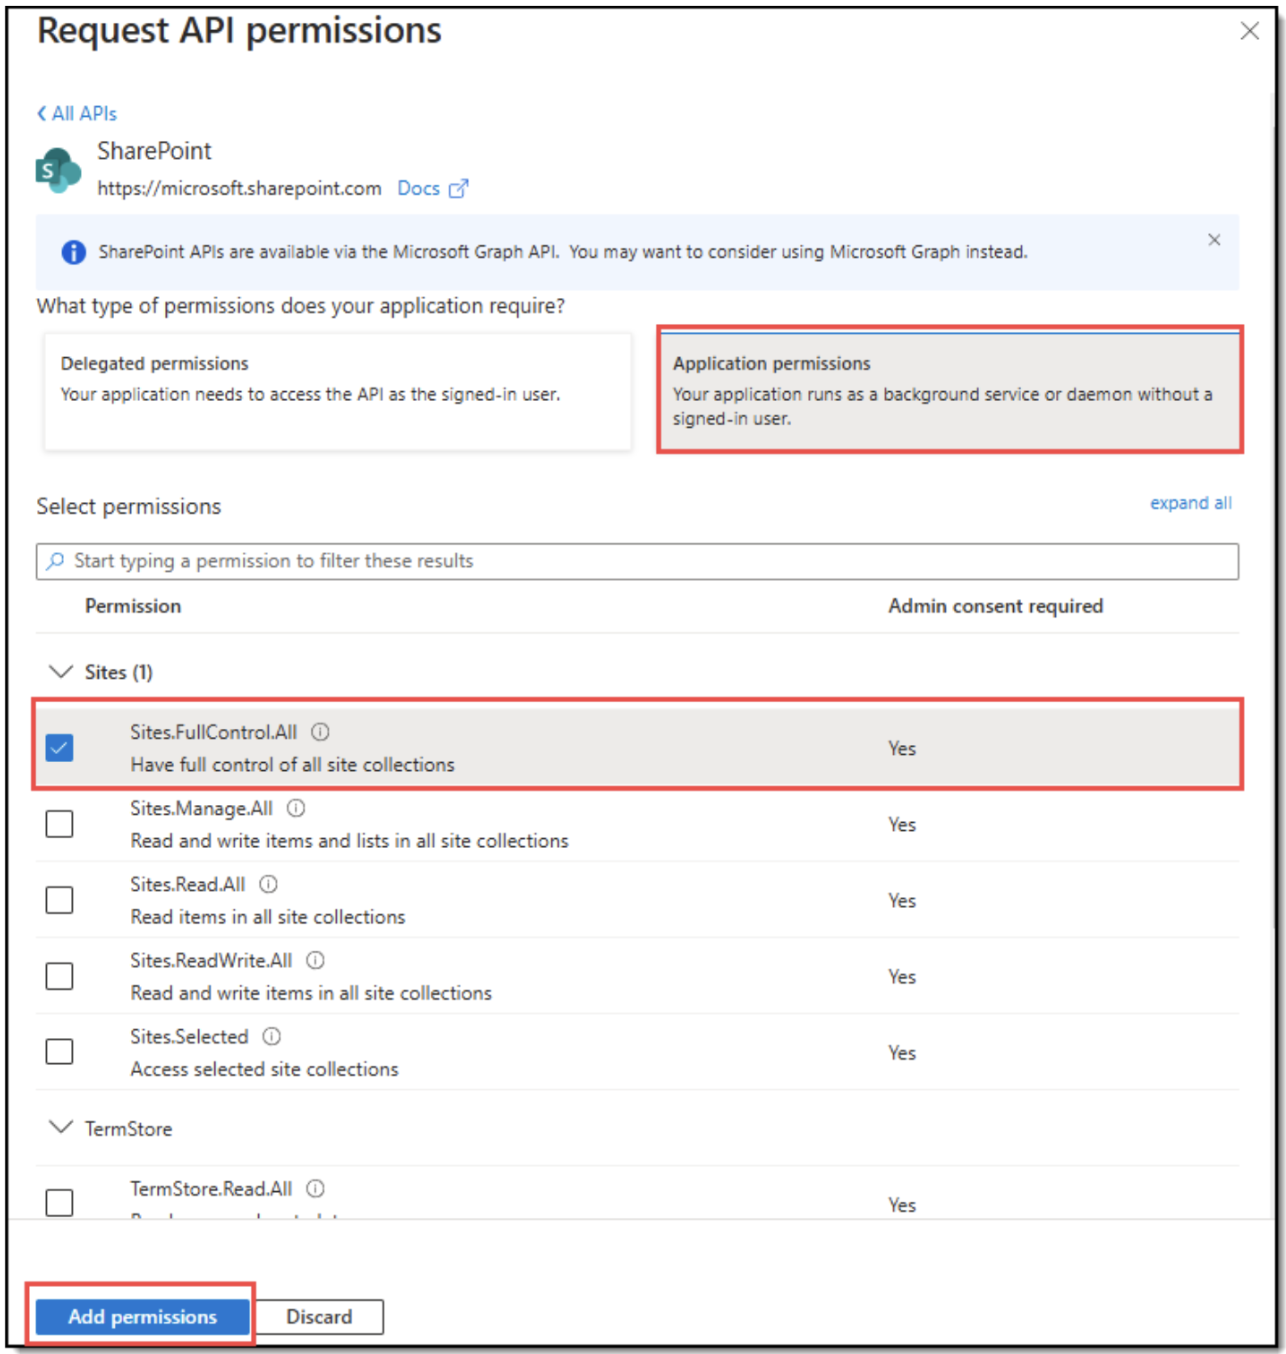 Figure 20. Adding specific SharePoint permissions 7. Once done, all the selected permissions are added. However, to allow Manage Permissions app to make use of them, you need to grant admin consent on these permissions for Your Tenant. If you have the admin level, you can do it yourself by clicking the respective button as shown below. Otherwise, contact your organization’s Azure admin and ask them to do that.
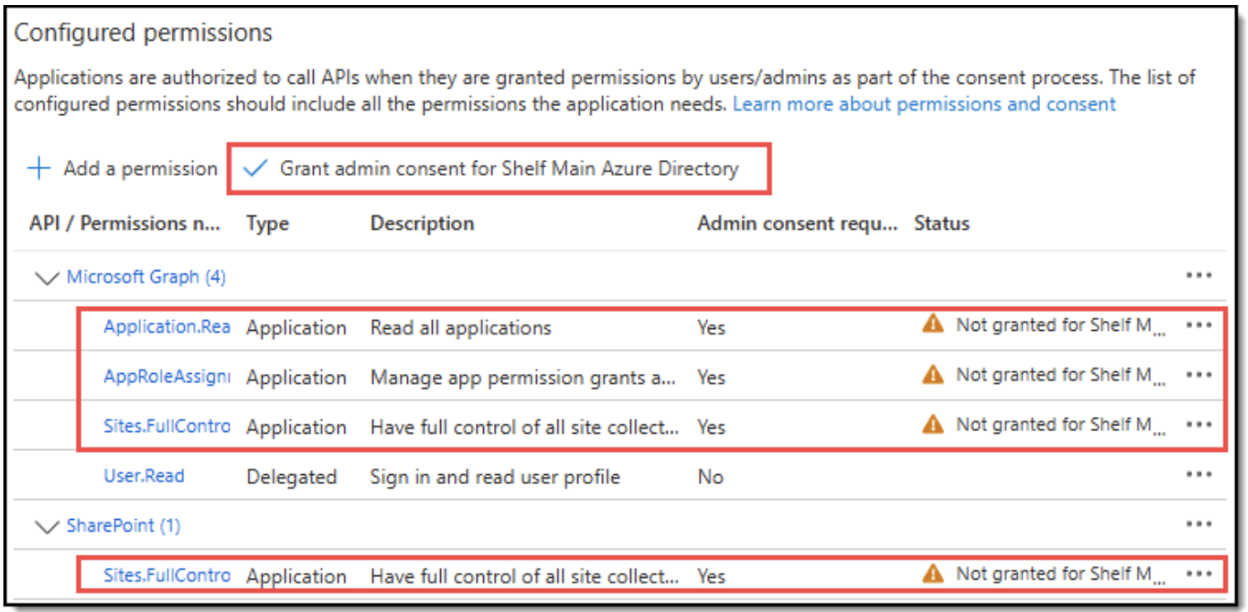

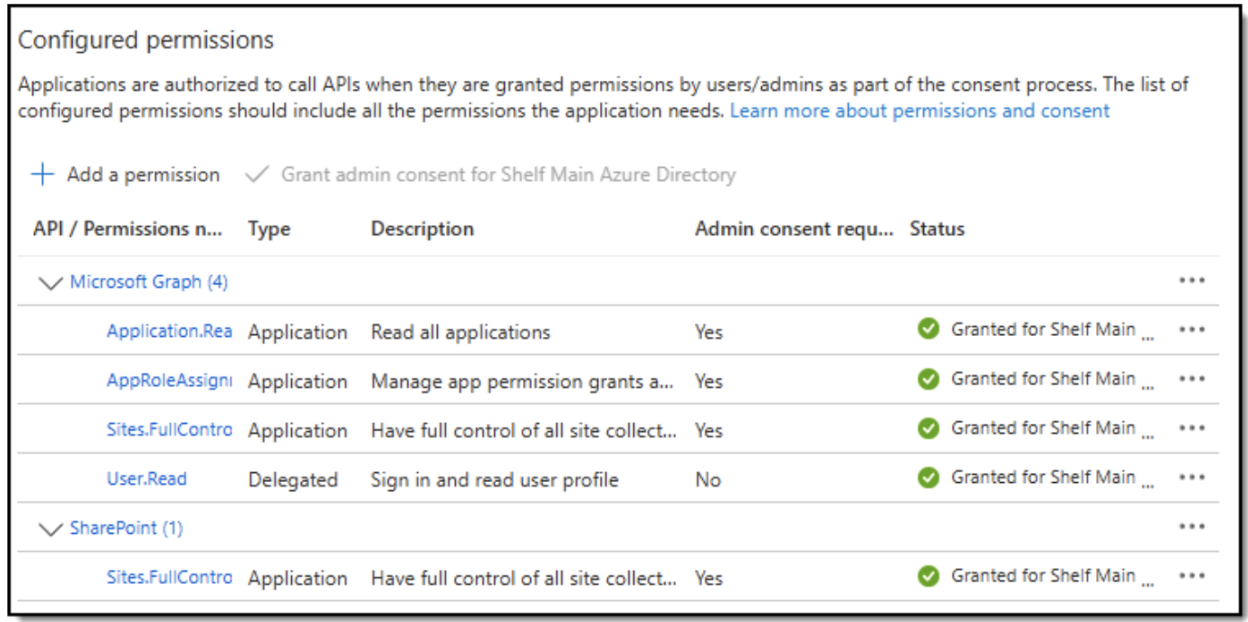 Figure 21. Viewing added permissions and adding admin consent on them for Your Tenant
Creating client secret
Once you have created Manage Permissions app and granted all the permissions mentioned above, you need to create a client secret. Follow the below steps to do that.
1. When on the Manage Permissions app page, open the Certificates & secrets menu from the navigation panel.
2. Under the Client secrets tab, find and select the + New client secret button. 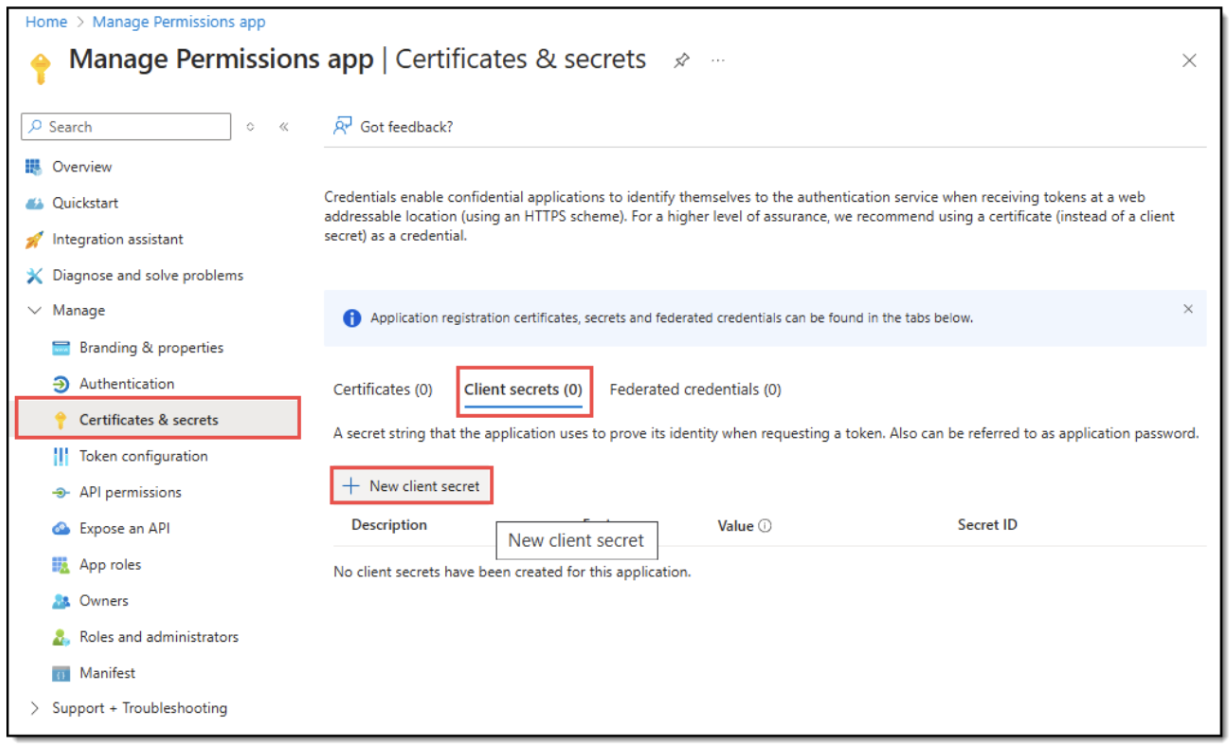
Figure 22. Initiating client secret creation for Manage Permissions app
3. In the pane that opens, enter some characteristic description for your client secret and select its duration period from the dropdown menu. Click Add to save changes.
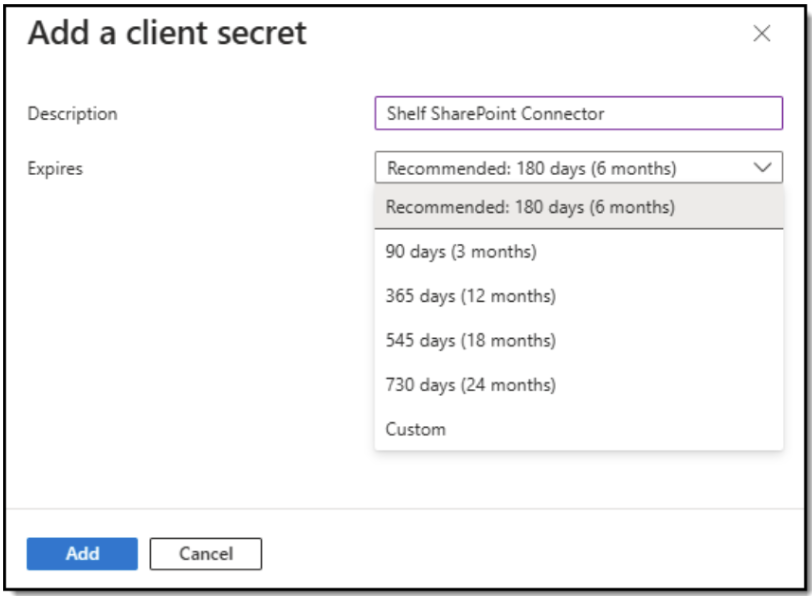 Figure 23. Setting client secret values
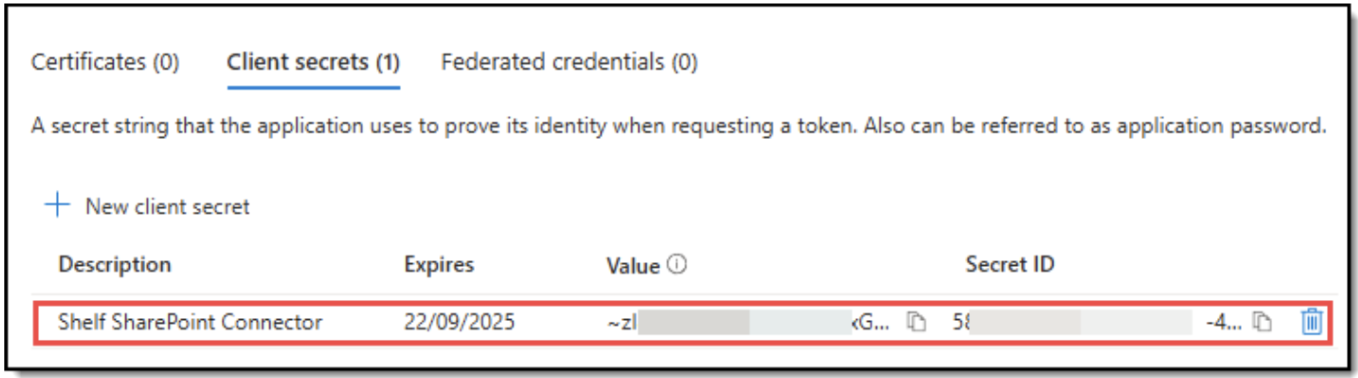 Figure 24. Viewing created client secret
Granting access permissions to SharePoint specific site
 | The token you retrieve as described below has an expiration period of 15 minutes. In this relation, the dedicated Sync Flow for syncing content from SharePoint to Shelf must be run as soon after all the permissions are granted as possible. Otherwise, you can expect authentication issues. |
Obtaining Manage Permissions app token
For obtaining the needed token, you first need to find and copy
Manage Permissions app’s Client ID
Manage Permissions app’s Tenant ID
Manage Permissions app’s Client Secret
To get these parameters, perform the following steps.
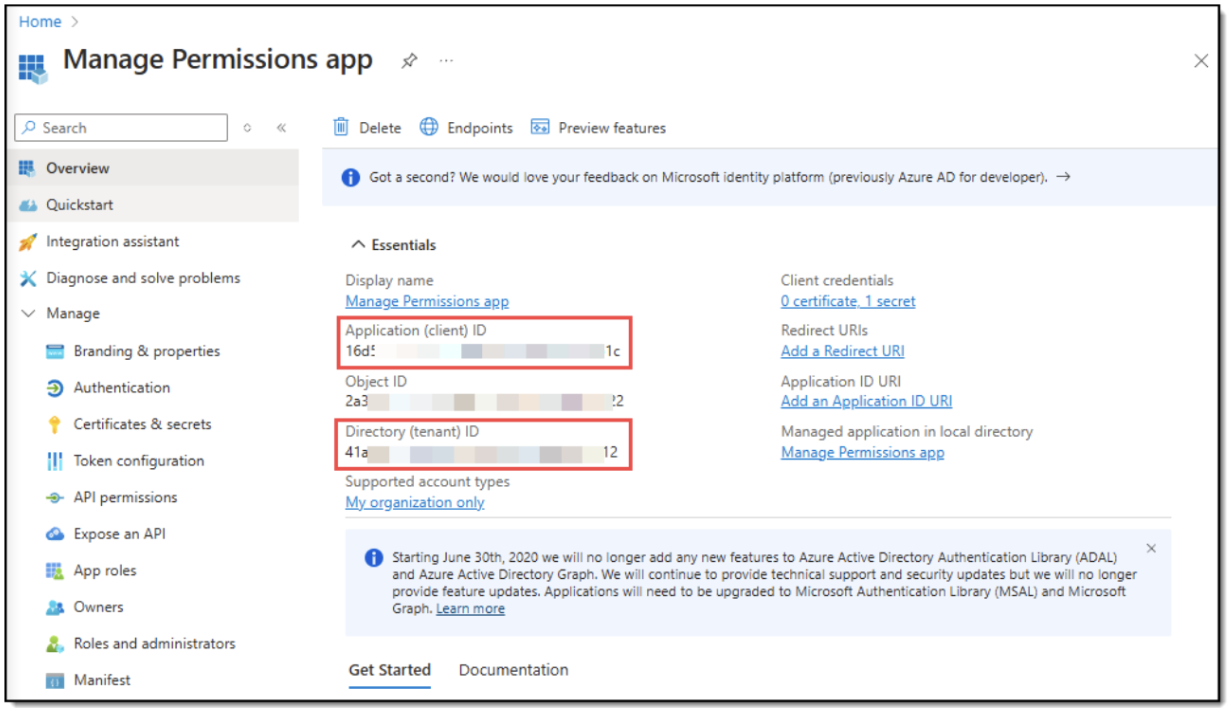 Figure 25. Finding and saving Client ID and Tenant ID for Manage Permissions app
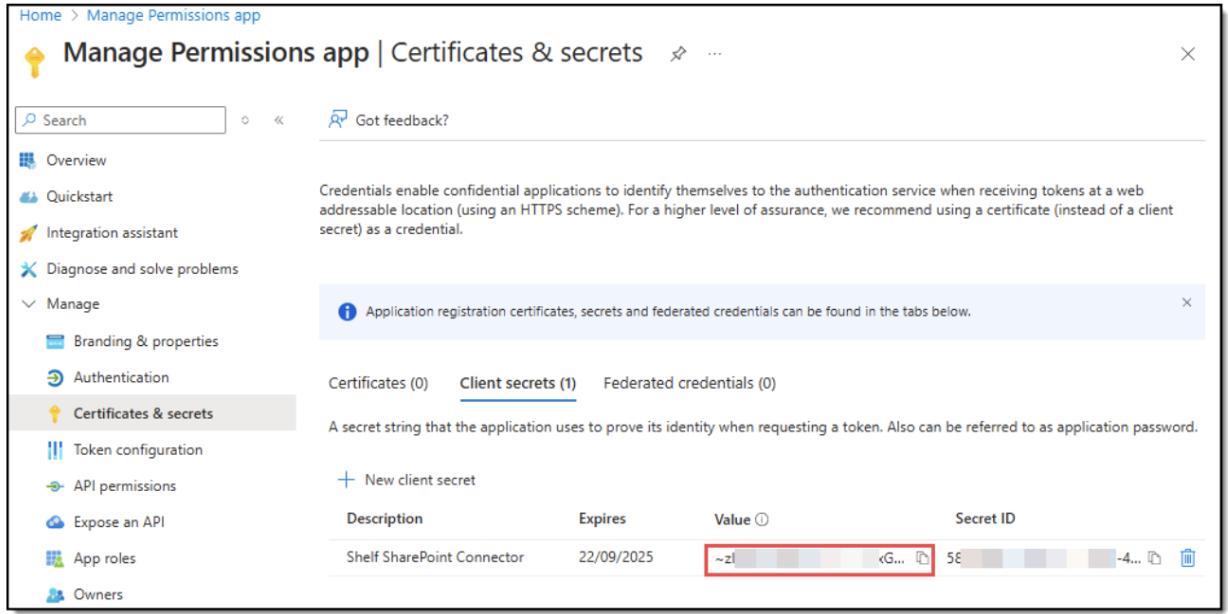 Figure 26. Finding and saving Client Secret for Manage Permissions app
Once all the needed parameters are found and copied, save them to some local file for further use.
Now, you have everything needed to get the Manage Permissions app’s token. To obtain it, complete the below steps.
- Open a Command Line Interface tool of your choice on your computer.
Check whether your CLI tool supports executing curl commands. For this purpose, run the command curl --version. If this type of commands is supported, the CLI tool must return the version information as shown below.
NoneC:\Users\sergi>curl --version
curl 8.9.1 (Windows) libcurl/8.9.1 Schannel zlib/1.3 WinIDN
Release-Date: 2024-07-31
Protocols: dict file ftp ftps http https imap imaps ipfs ipns mqtt pop3 pop3s smb smbs smtp smtps telnet tftp
Features: alt-svc AsynchDNS HSTS HTTPS-proxy IDN IPv6 Kerberos Largefile libz NTLM SPNEGO SSL SSPI threadsafe Unicode UnixSockets
If you see this information, you can execute curl commands in your CLI tool; otherwise, contact your organization’s system administrators to resolve this issue.
If everything is good with the curl commands support, run the following curl command in your CLI tool:
None curl --location --request POST 'https://login.microsoftonline.com/{TENANT ID}/oauth2/v2.0/token' \
--header 'Content-Type: application/x-www-form-urlencoded' \
--header 'Cookie: fpc=Ajcx95KUJqhNiW5ym17ySk-gTwiQAgAAAEHYT98OAAAABvcRIAEAAAAs20_fDgAAAA; stsservicecookie=estsfd; x-ms-gateway-slice=estsfd' \
--data-urlencode 'client_id={MANAGE APP CLIENT ID} ' \
--data-urlencode 'scope=https://graph.microsoft.com/.default' \
--data-urlencode 'client_secret={MANAGE APP CLIENT SECRET}' \
--data-urlencode 'grant_type=client_credentials'
Make sure to replace the placeholders {TENANT ID}, {MANAGE APP CLIENT ID}, and {MANAGE APP CLIENT SECRET} with the proper values you have found and saved in the procedure above.
If you have entered the correct parameters and the syntax is correct as well, you can expect to get the following response:
None
{"token_type":"Bearer","expires_in":3599,"ext_expires_in":3599,"access_token":"MANAGE PERMISSIONS APP TOKEN"}where MANAGE PERMISSIONS APP TOKEN will be the token you need. Save it to the local file where you have previously saved other parameters. Remember about the 15-minute expiration period.
| None POST https://login.microsoftonline.com/{TENANT ID}/oauth2/v2.0/token Host: login.microsoftonline.com Content-Type: application/x-www-form-urlencoded client_id={MANAGE APP CLIENT ID} &scope=https%3A%2F%2Fgraph.microsoft.com%2F.default &client_secret={MANAGE APP CLIENT SECRET} &grant_type=client_credentials |
Granting permission to Sharepoint site
Once you have obtained and saved the Manage Permissions app’s token, you can proceed to granting permissions to your specific SharePoint site. Follow the below steps to do it. In this case, we would recommend using Postman or other API request processing tool/service, as the response in this case will have a better formatting and it will be easier for you to find the needed site details.
Scenario 1: SharePoint site URL address is known
If you know the URL address of your SharePoint site to which you want to grant permissions, open Postman API platform portal or similar platform portal and enter the following command in the New request field. Hit Send request:
| None GET https://graph.microsoft.com/v1.0/sites/{hostname}:/sites/{specific-site-name} |
Remember to replace {hostname} with your real company’s host, and {specific-site-name} with your relevant SharePoint site name.
| None curl -X GET \ "https://graph.microsoft.com/v1.0/sites/mycompany.sharepoint.com:/sites/my-sharepoint-site" \ -H "Content-Type: application/json" \ -H "Authorization: Bearer MANAGE PERMISSIONS APP TOKEN |
| JSON { "@odata.context": "https://graph.microsoft.com/v1.0/$metadata#sites/$entity", "createdDateTime": "2025-01-30T10:25:26.15Z", "description": "my-sharepoint-site", "id": "mycompany.sharepoint.com,00000001-0a01-0a00-010a-01b0101a0101,111a11b1-1ab1-11b1-1111-11a11bc1c111", "lastModifiedDateTime": "2025-07-17T17:36:09Z", "name": "my-sharepoint-site", "webUrl": "https://mycompany.sharepoint.com/sites/my-sharepoint-site", "displayName": "my-sharepoint-site", "root": {}, "siteCollection": { "hostname": "mycompany.sharepoint.com" } } |
where
| None "mycompany.sharepoint.com,00000001-0a01-0a00-010a-01b0101a0101,111a11b1-1ab1-11b1-1111-11a11bc1c111" |
Now, having the ID of your SharePoint site, you can proceed to granting permissions to access this site. See Steps 3 and 4 in Scenario 2 below for details.
Scenario 2: SharePoint Site URL is unknown
However, it may occur that you don’t remember the URL address of your SharePoint site you want to grant permissions to. In this case, follow the below instructions.
1. Open Postman API platform portal or similar platform portal and enter the following command in the New request field. Hit Send request:
| None curl --location --request GET 'https://graph.microsoft.com/v1.0/sites' ^ --header 'Content-Type: application/json' ^ --header 'Authorization: Bearer MANAGE PERMISSIONS APP TOKEN' |
Make sure to replace MANAGE PERMISSIONS APP TOKEN with the real token you have obtained as described in the procedure above.
2. If everything is entered correctly and if no errors occur during the request/processing, you can expect to receive the following response:
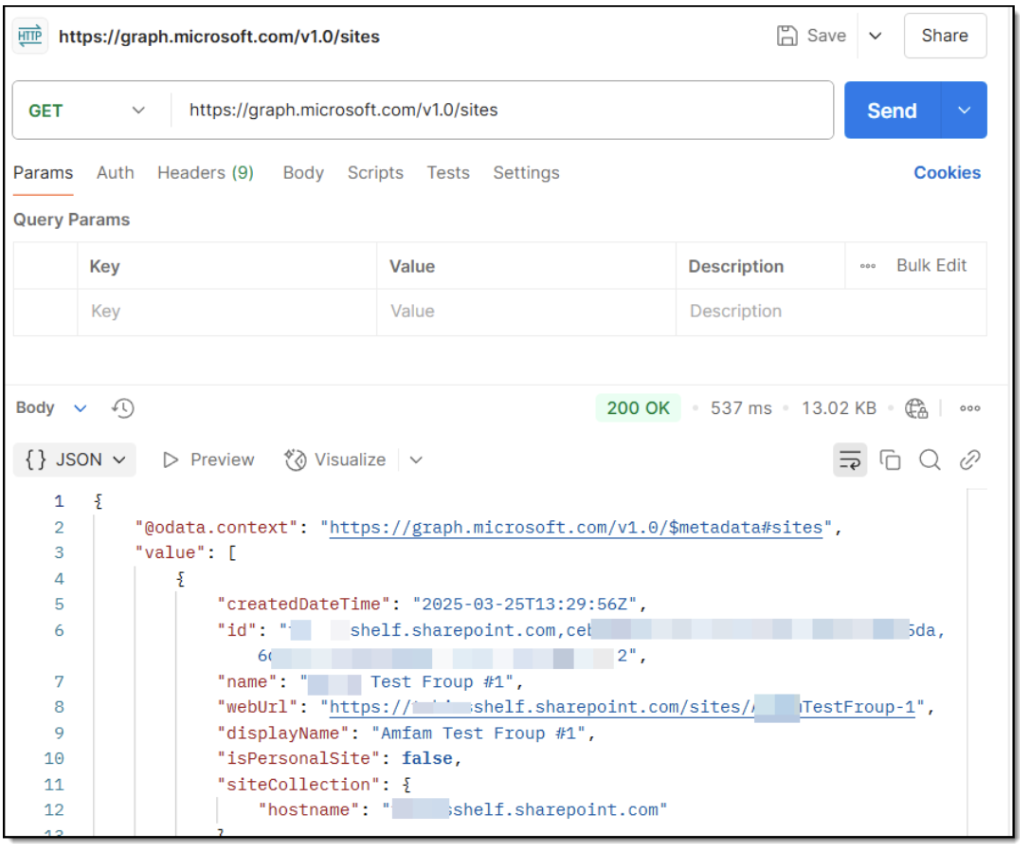 Figure 27. Viewing API request response for specific SharePoint site ID retrieval
If you look closer at the response’s JSON, you will see it contains the list of parameters and values, grouped for each particular SharePoint site. What you further need to do, is to find that specific site you need and copy its ID, which is under "value" > "id".
| None { "@odata.context": "https://graph.microsoft.com/v1.0/$metadata#sites", "value": [ { "createdDateTime": "2025-01-21T18:07:39Z", "id": "shelf.sharepoint.com,yyyyyyyyyyyyyyy,yyyyyyyyyyy", "name": "Acme Finance Group Green", "webUrl": "https://shelf.sharepoint.com/sites/AFG_Green", "displayName": "Acme Finance Group Green", "isPersonalSite": false, "siteCollection": { "hostname": "shelf.sharepoint.com" }, "root": {} }, { "createdDateTime": "2024-11-12T18:07:42Z", "id": "shelf.sharepoint.com,zzzzzzzzzzzzzzz,zzzzzzzzzzz", "name": "Acme Finance Group Info", "webUrl": "https://shelf.sharepoint.com/sites/AFG", "displayName": "Acme Finance Group Info", "isPersonalSite": false, "siteCollection": { "hostname": "shelf.sharepoint.com" }, "root": {} }, { "createdDateTime": "2024-10-10T15:00:44Z", "id": "shelf.sharepoint.com,wwwwwwwwwwwwww,wwwwwwwwwww", "name": "adventures", "webUrl": "https://shelf.sharepoint.com/sites/adventures", "displayName": "adventures", "isPersonalSite": false, "siteCollection": { "hostname": "shelf.sharepoint.com" }, "root": {} } ] } |
For example, you want to grant access to the content stored on Acme Finance Group Green site of SharePoint. So you find it in the list and then find and copy this site’s ID, which is "id": "shelf.sharepoint.com,zzzzzzzzzzzzzzz,zzzzzzzzzzz". Once copied, save it to the local file for further use.
| None POST https://graph.microsoft.com/v1.0/sites/{SITE ID}/permissions Content-Type: application/json Authorization: Bearer {MANAGE PERMISSIONS APP TOKEN} { "roles": ["read"], "grantedTo": { "application": { "id": "{SHELF CONNECTOR APP ID}", "displayName": "{ANY DESIRED NAME}" } } } |
Make sure to substitute {SITE ID} with the real site ID you have obtained above. Also, remember to replace {MANAGE PERMISSIONS APP TOKEN} with your Manage Permissions app’s token you have obtained and saved. Finally, replace {SHELF CONNECTOR APP ID}
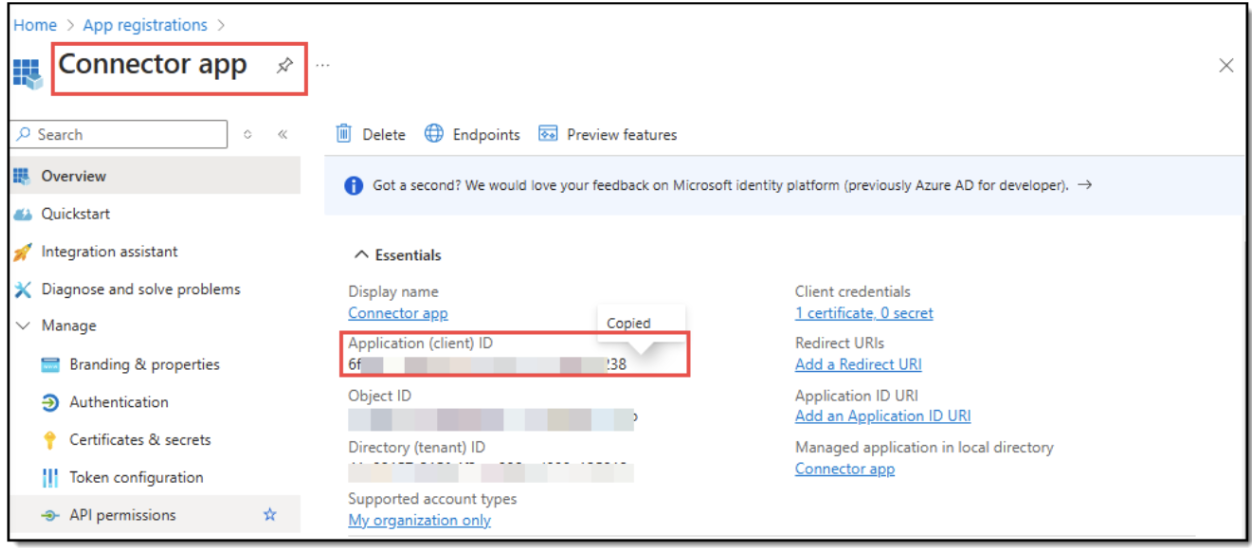 Figure 28. Finding and copying Connector app’s Client IDOnce the request is customized to your needs, enter it in the Postman’s New request field and hit Send.
4. If you have entered everything correctly, you should expect code 201 Created in the response. It means that the permissions to this specific site have been granted for your Connector app. 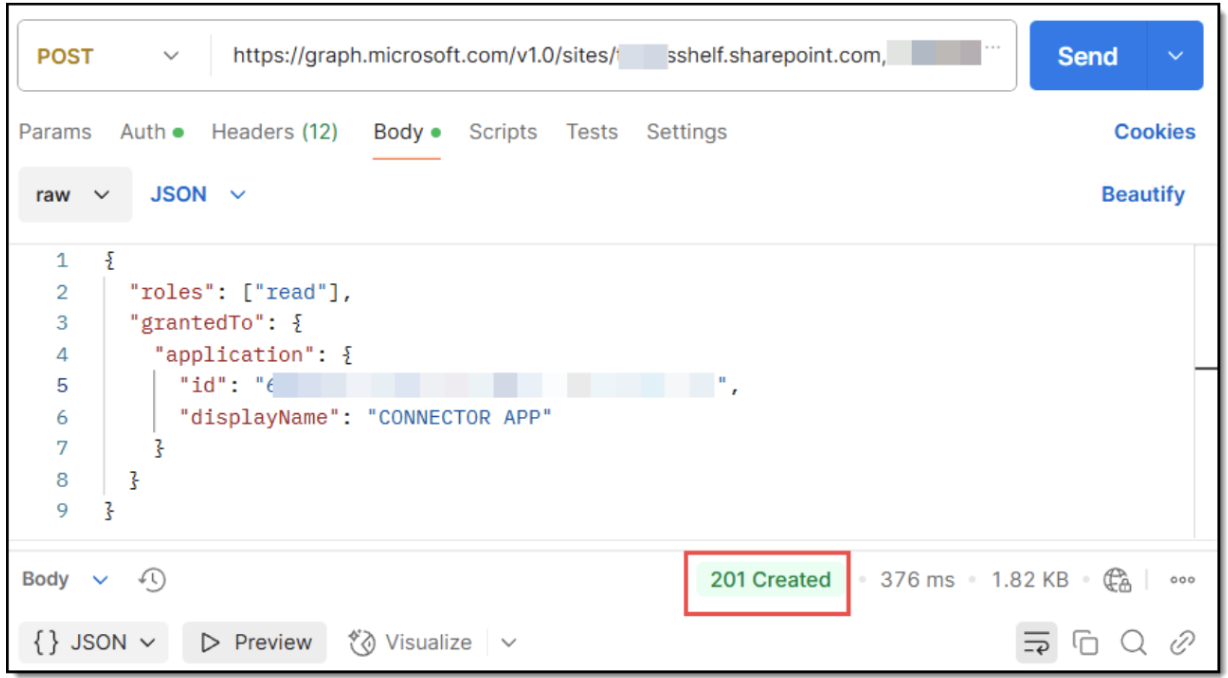 Figure 29. Viewing response to your POST request in Postman
| None { "@odata.context": "https://graph.microsoft.com/v1.0/$metadata#sites('someshelf.sharepoint.com%xxxxxyyyyyyxxxxxyyyyyxxxxxyyyy')/permissions/$entity", "id": "xxx222yyyy222zzzyyyy222yyy333zzzzyyyy1111", "roles": [ "read" ], "grantedToIdentitiesV2": [ { "application": { "displayName": "CONNECTOR APP", "id": "xxxyyyy2222xxxxyyyy2222" } } ], "grantedToIdentities": [ { "application": { "displayName": "CONNECTOR APP", "id": "xxxyyyy2222xxxxyyyy2222" } } ] } |
If the response shows other code, inspect the request for errors personally or ask your organization’s system admin(s) to help you with that.
Once this step is complete, it means that you have finished all the configurations on the Microsoft side and can proceed to the configurations on the Shelf side.
You can now use your SharePoint site as a source from which Shelf KMS can sync content. Make sure to add the needed content to the site
Configurations on Shelf side
Accessing Content Integration Layer
From the standard workflow described above you see that to start configuring and using your SharePoint connector you need to access the Content Integration Layer feature. To do so, perform the following steps:
1) Log into your Shelf KMS account using valid credentials.
2) Once logged in, go to the Admin panel by selecting the respective option in the dropdown menu.
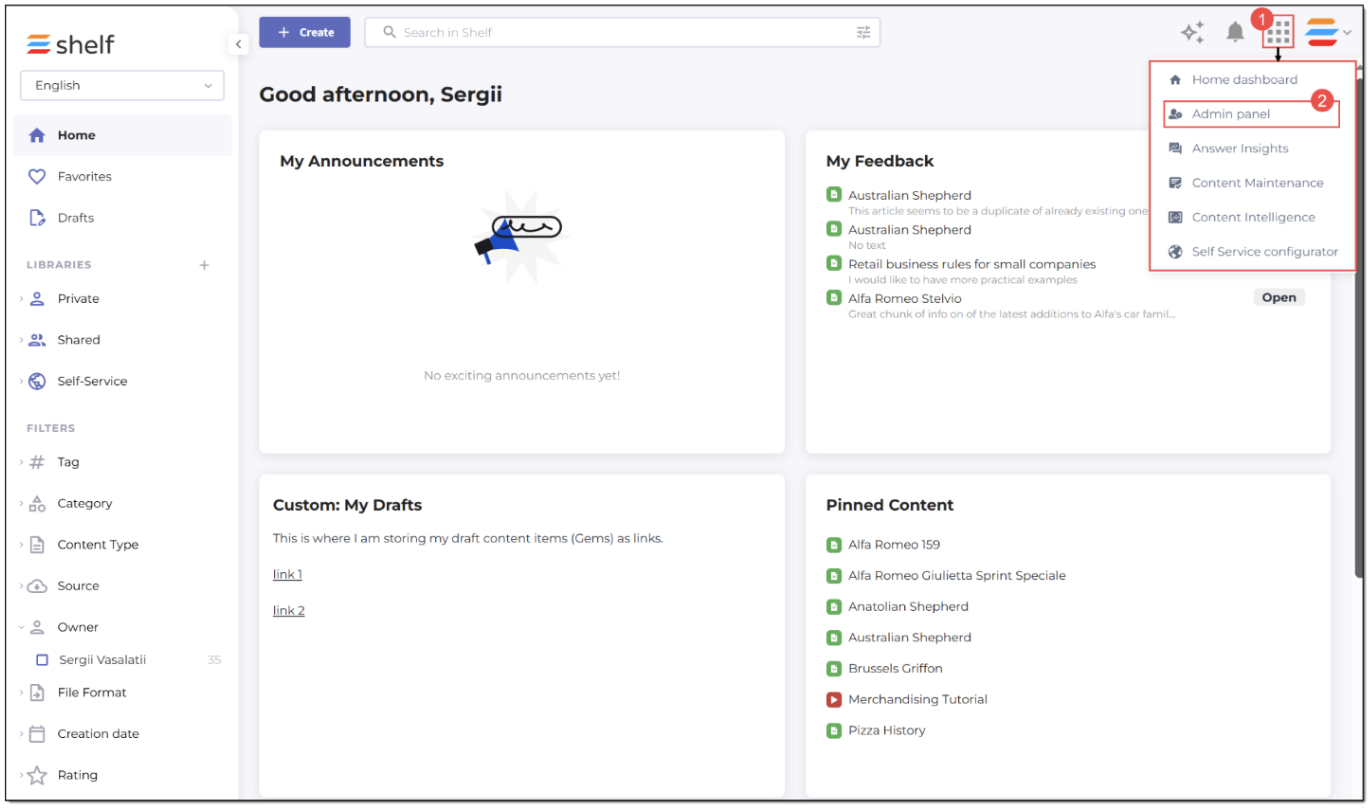 Figure 30. Accessing Admin panel in Shelf KMS
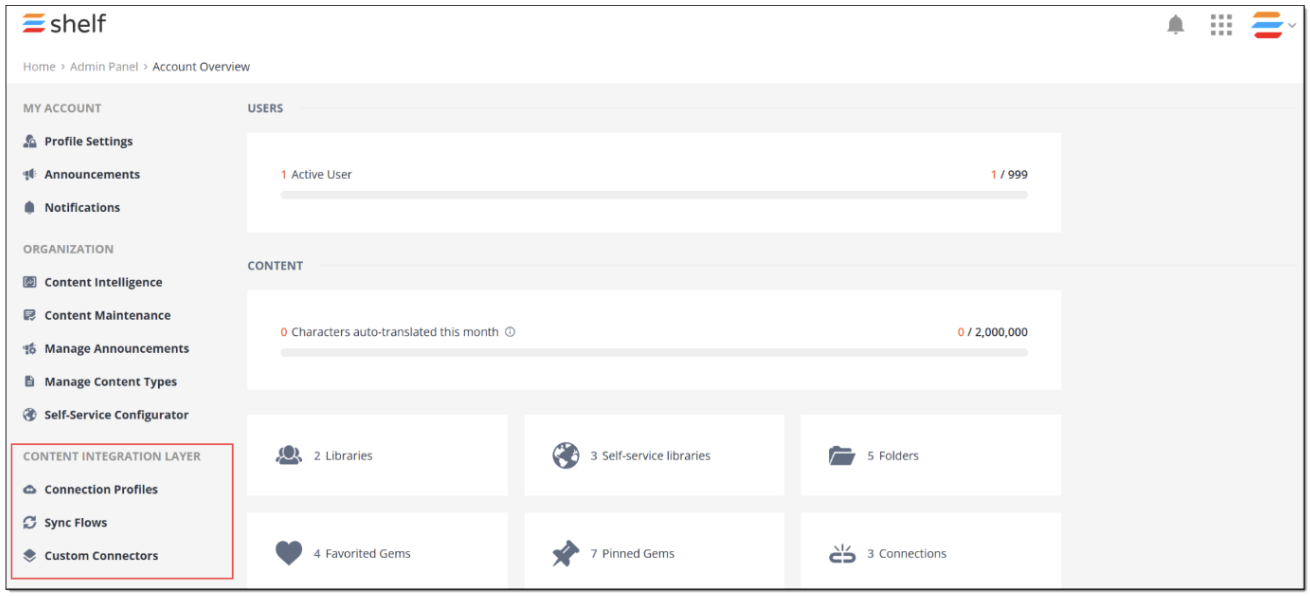 Figure 31. Accessing CIL modules in Admin panel
Configuring SharePoint connector
In fact, no configurations are needed for your SharePoint connector. It is prebuilt and preconfigured by Shelf. You can see it in the connector list that appears once you select the Custom Connectors option in the Content Integration Layer section and access the CUSTOM CONNECTORS page. The table grid there also shows that the SharePoint connector is of the Pull type, which means that it retrieves content from external sources into Shelf.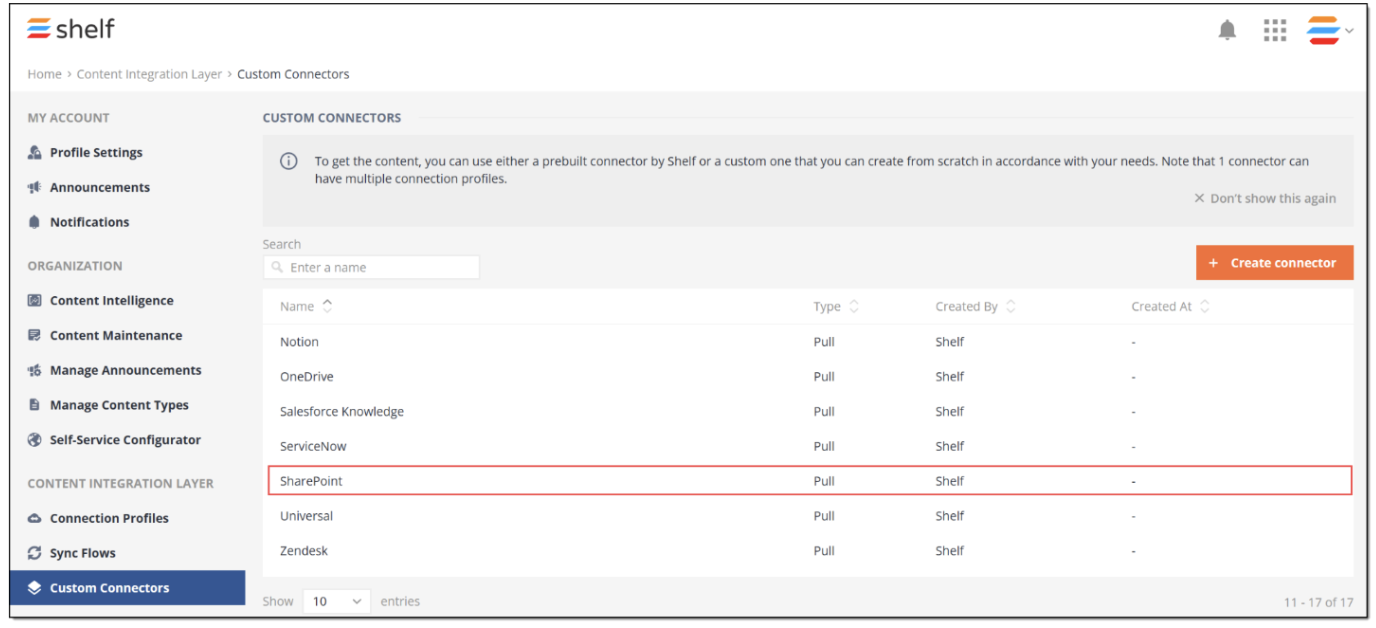 Figure 32. Viewing SharePoint connector in CIL
What you need to do next is to create and configure a connection profile dedicated to work with the external content source such as your Microsoft SharePoint instance.
Configuring custom fields schema for SharePoint connector
The SharePoint connector supports custom fields, allowing you to define a custom fields schema that maps SharePoint metadata (such as custom columns) to Shelf content fields. This enables richer content indexing and streamlined filter configuring in content segments and gap customization in Shelf Content Intelligence.
Custom fields are configured at the connector level. Once defined, the schema applies to all sync flows using this connector and ensures that the relevant SharePoint metadata is captured during synchronization.
To learn how to define and manage custom fields schemas, including supported field types and configuration examples, refer to the Custom Fields Essentials article on the Shelf Developer Portal.
Configuring SharePoint connection profile
The SharePoint connection profile is a feature that uses the prebuilt SharePoint connector and allows Shelf KMS to access, authenticate on Microsoft SharePoint, and communicate with it to find and sync content stored there. But to enable its proper operation, you need to create and configure it as described in the procedure below.
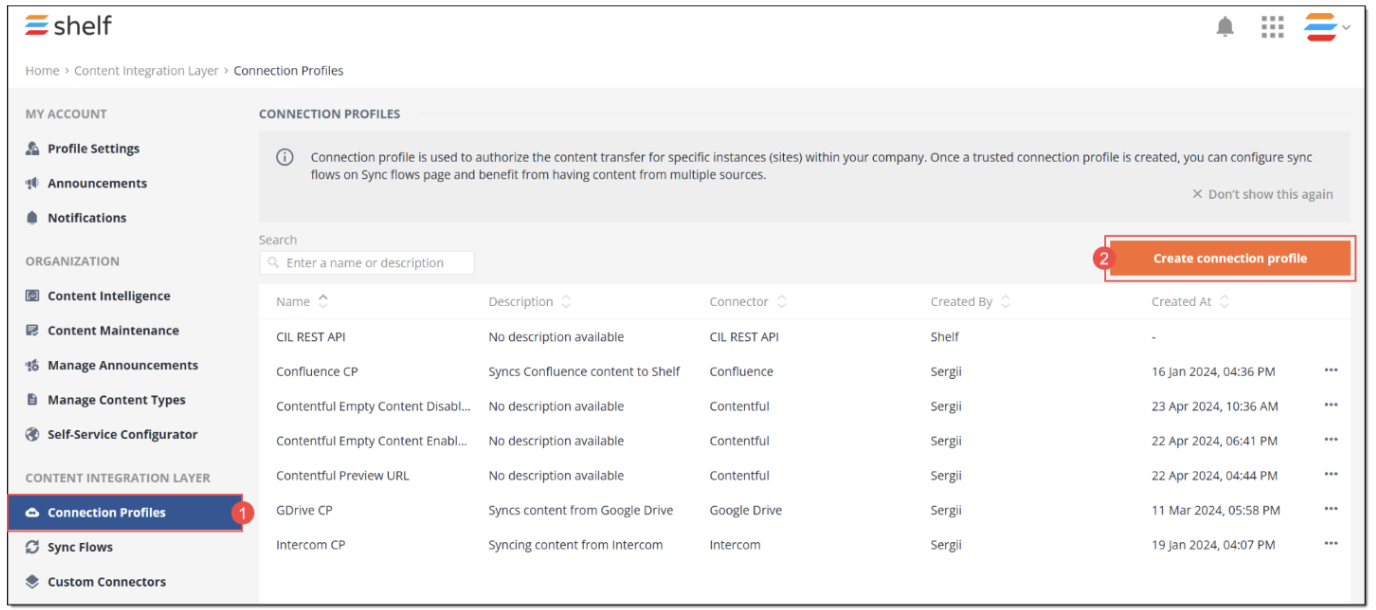
Figure 33. Accessing CIL connection profiles and starting creating new connection profile
 Figure 34. Configuring SharePoint connection profile in Shelf
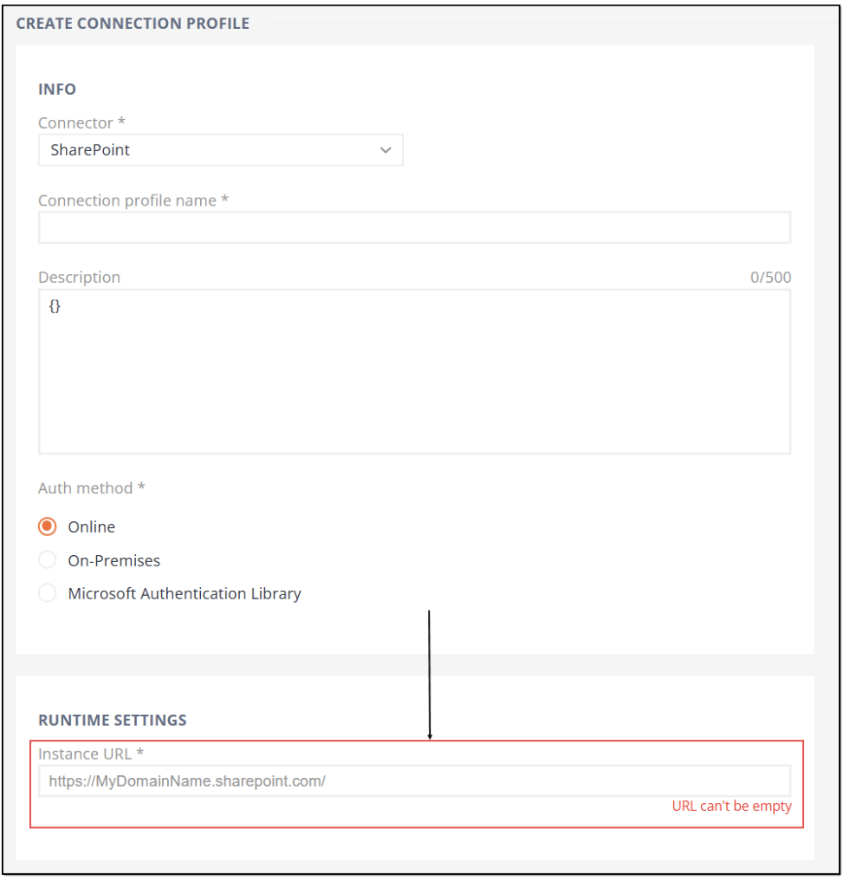
In the RUNTIME SETTINGS section, you need to enter your SharePoint Instance URL which is the address of your specific SharePoint site to which you have granted permissions as described in the above section.
The site address should look like
https://<your_domain>.sharepoint.com/sites/<your_site_name>.
In the CREDENTIALS section, there are 3 fields to be populated:
Client ID
PEM Private Key
Realm
All these details you already have on hand:
you have copied and saved the Client ID (1) and Tenant ID (2) values of your Connector app you created, registered, and configured on Azure.
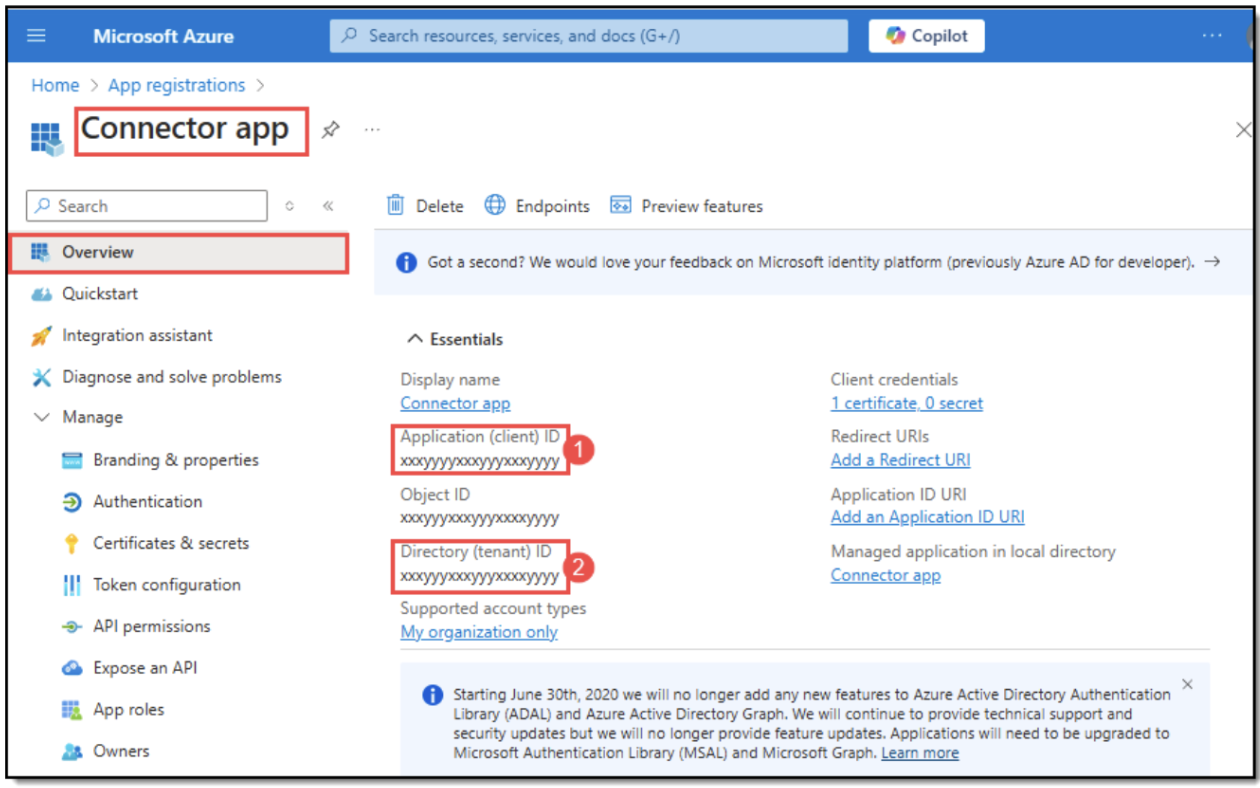
- you have generated the self-signed certificate and private key and combined them into the PEM file and saved that file to your local computer.
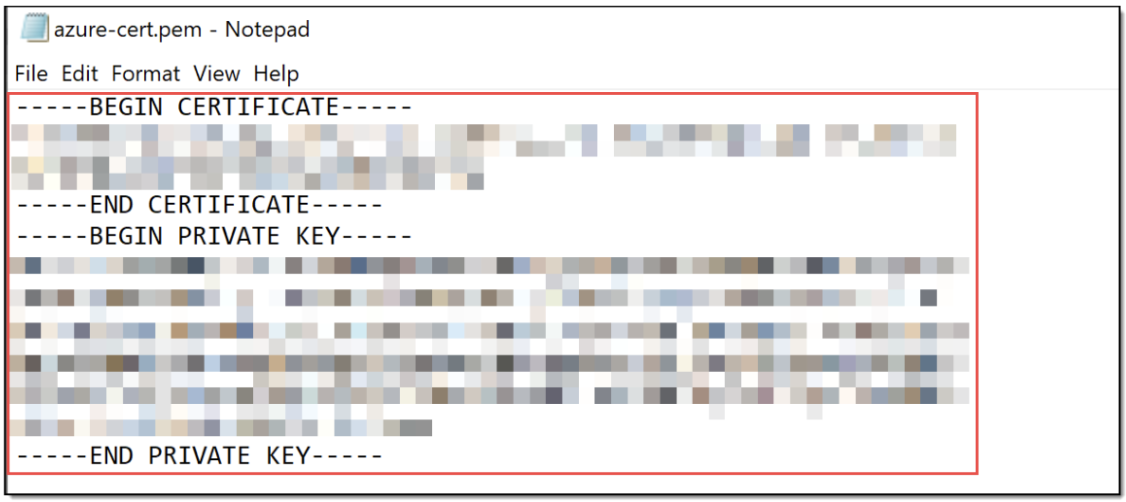
Paste the Application (client) ID value into the Client ID field, the Directory (tenant) ID value into the Realm field, and, finally, the PEM file contents, inclusive of the - - - - - BEGIN CERTIFICATE - - - - - and - - - - - END PRIVATE KEY - - - - - , into the PEM Private Key field.
| Fields with the asterisk symbol (*) are mandatory. If they are left blank, you are not able to save the connection profile you are creating. |
Configuring SharePoint sync flow
Now that you have configured the SharePoint connector and connection profile, you need to create and configure the SharePoint sync flow. Sync flows are basically sets of instructions telling Shelf KMS what content and when it needs to pull from external sources, in our case - SharePoint.
To create and configure the SharePoint sync flow, perform the following steps.
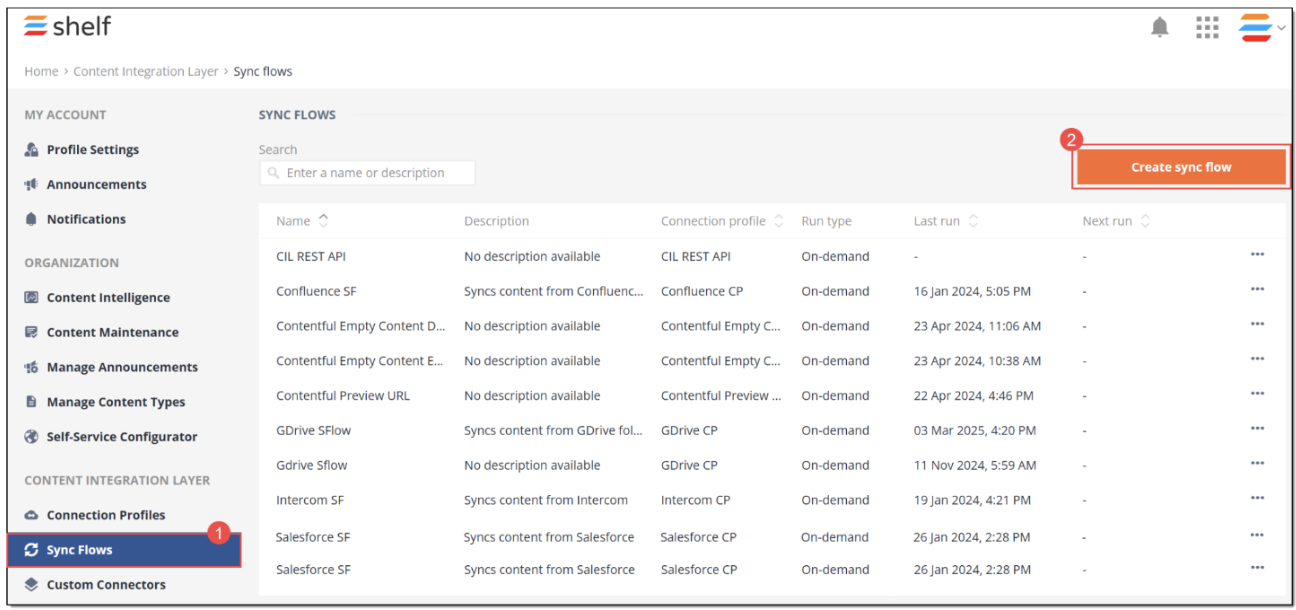 Figure 35. Starting creating SharePoint sync flow
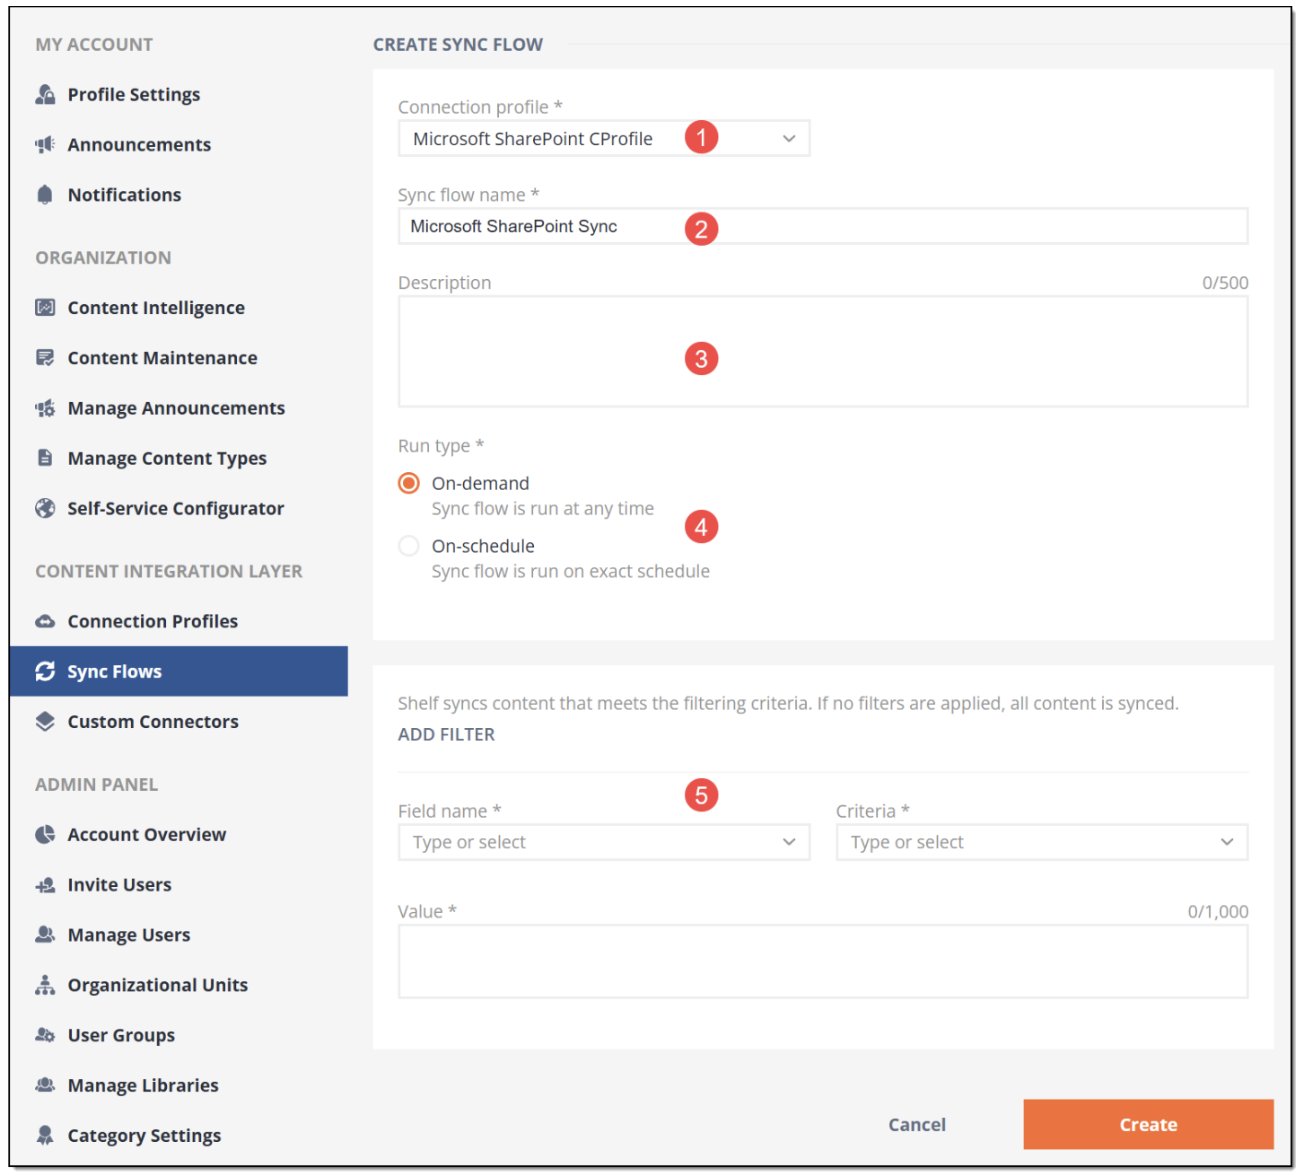
Figure 36. Configuring SharePoint sync flow
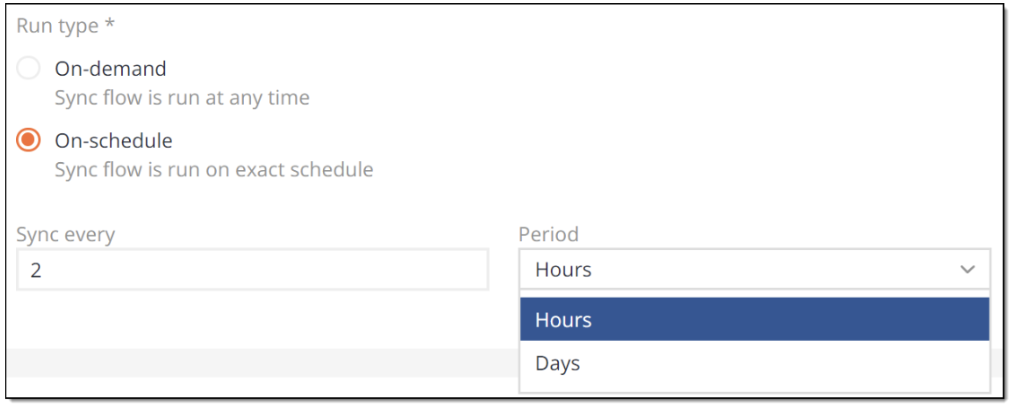 Figure 37. Configuring scheduled run of SharePoint sync flow
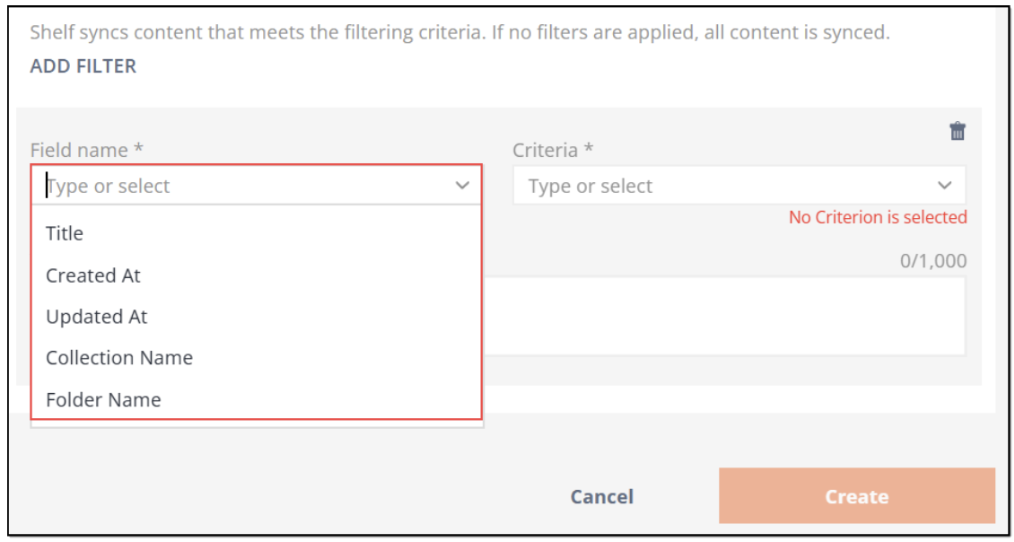
Figure 38. Applying filter to content sync from Microsoft SharePoint storage
Shelf CIL currently supports the following filters in relation to content stored on Microsoft SharePoint platform and synced into Shelf KMS:
Title: filters content items by their title; requires further streamlining through one of the available criteria: equal to (syncs only those content items which title(s) is(are) indicated in the Value field) or not equal to (syncs all content items which title(s) are other than that/those indicated in the Value field)
Created At: filters content items by the date/time when they were created; used with one of the available criteria: equal to (syncs content items created on a date indicated in the Value field), less than (syncs content items created before a date indicated in the Value field), and greater than (syncs content items created after a date indicated in the Value field)
Updated At: filters content items by the date/time when they were last updated; used with one of the available criteria: equal to (syncs content items last updated on a date indicated in the Value field), less than (syncs content items last updated before a date indicated in the Value field), and greater than (syncs content items last updated after a date indicated in the Value field)
Collection Name: filters content items by the name of collection they are stored in; can acquire one of the following available criteria: equal to (syncs only those content items that are stored in the collection(s) named in the Value field) or not equal to (syncs all content items that are stored in any collections other than those indicated in the Value field)
Folder Name: filters content items by the name of folder they are stored in; can acquire one of the following available criteria: equal to (syncs only those content items that are stored in the folder(s) named in the Value field) or not equal to (syncs all content items that are stored in any folders other than those indicated in the Value field).
For understanding the relationship between content-specific entities—collections, folders, content items etc., see the dedicated chapter above.
Once done, click the Create button to finish your SharePoint sync flow creation.
Running SharePoint sync job
Once you have created the SharePoint sync flow, you can either wait until it performs the content sync per schedule (if you have selected the On-schedule option for the sync flow run type), or start the sync manually at any time (if you have selected the On-demand option for the run type).
To manually start syncing your content from SharePoint into Shelf, follow the below steps.
1) Open the newly created SharePoint sync flow, find and go to the Jobs tab in its window.
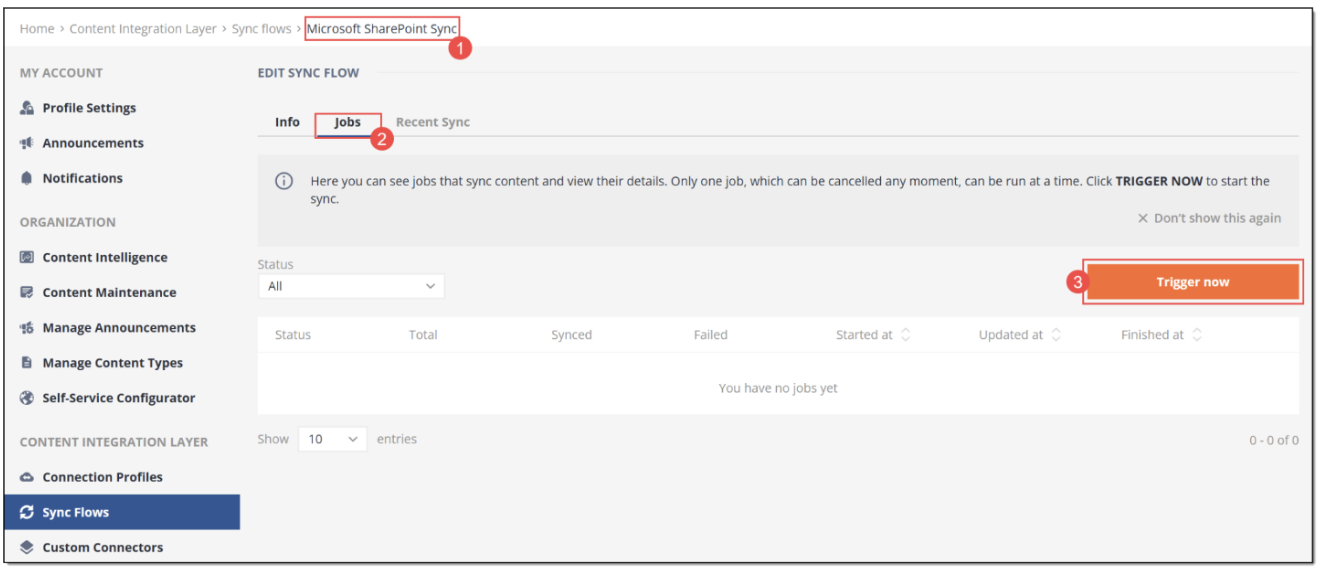
Figure 39. Manually running content syncing from SharePoint into Shelf
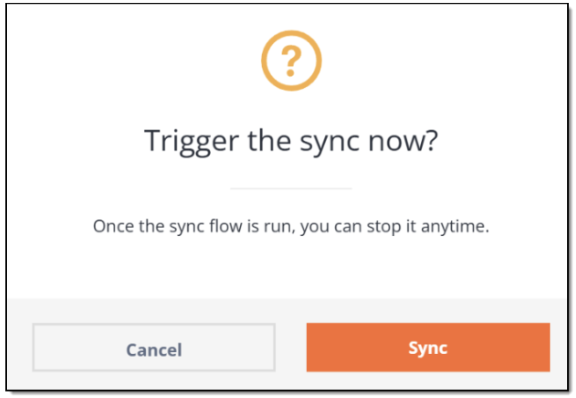 Figure 40. Confirming sync start
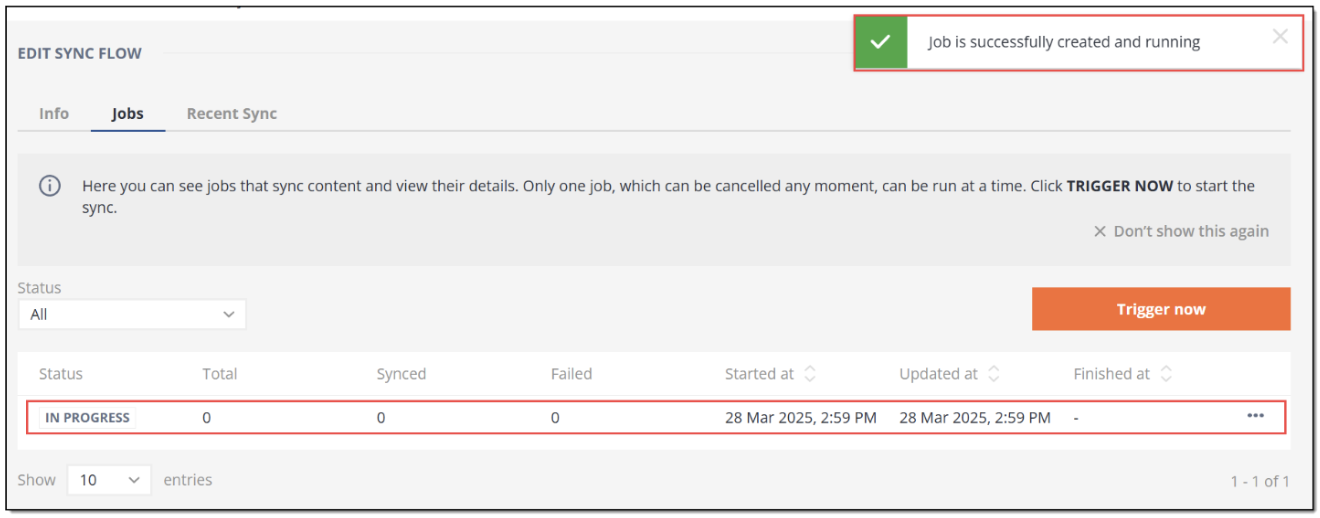 Figure 41. Viewing running SharePoint sync job
 | The sync job can be triggered manually both for the on-schedule and on-demand sync flows, unless there is a sync job running at that time. In the first case, the manually triggered job overrides the schedule set for the sync flow. At the same time, the sync flow execution will resume to occur per schedule after the manually triggered sync job is finished. If you manually trigger the sync flow job, it starts immediately. If there is a running sync job in this sync flow when you attempt to start a new job, this new job will not be created and, respectively, the content sync will not be started. In this case you will see the error message informing that the job is already running. If there are no other sync jobs running in this sync flow, the Jobs tab window refreshes, and a new job with the IN PROGRESS status appears in the table grid. |
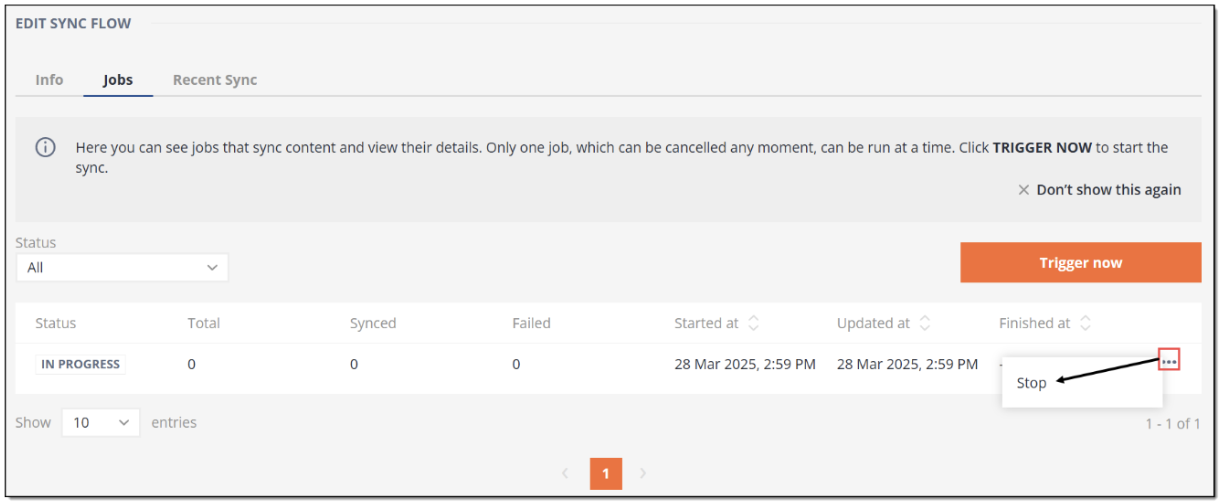 Figure 42. Stopping sync job
Checking syncing results
Once the sync job triggered manually or on schedule is finished, you will see it to change the status to SUCCESS (if the sync was successful) or FAILED (if some issues occurred during the sync). In the latter case, check your configurations in the SharePoint connection profile and sync flow and rerun the sync job. 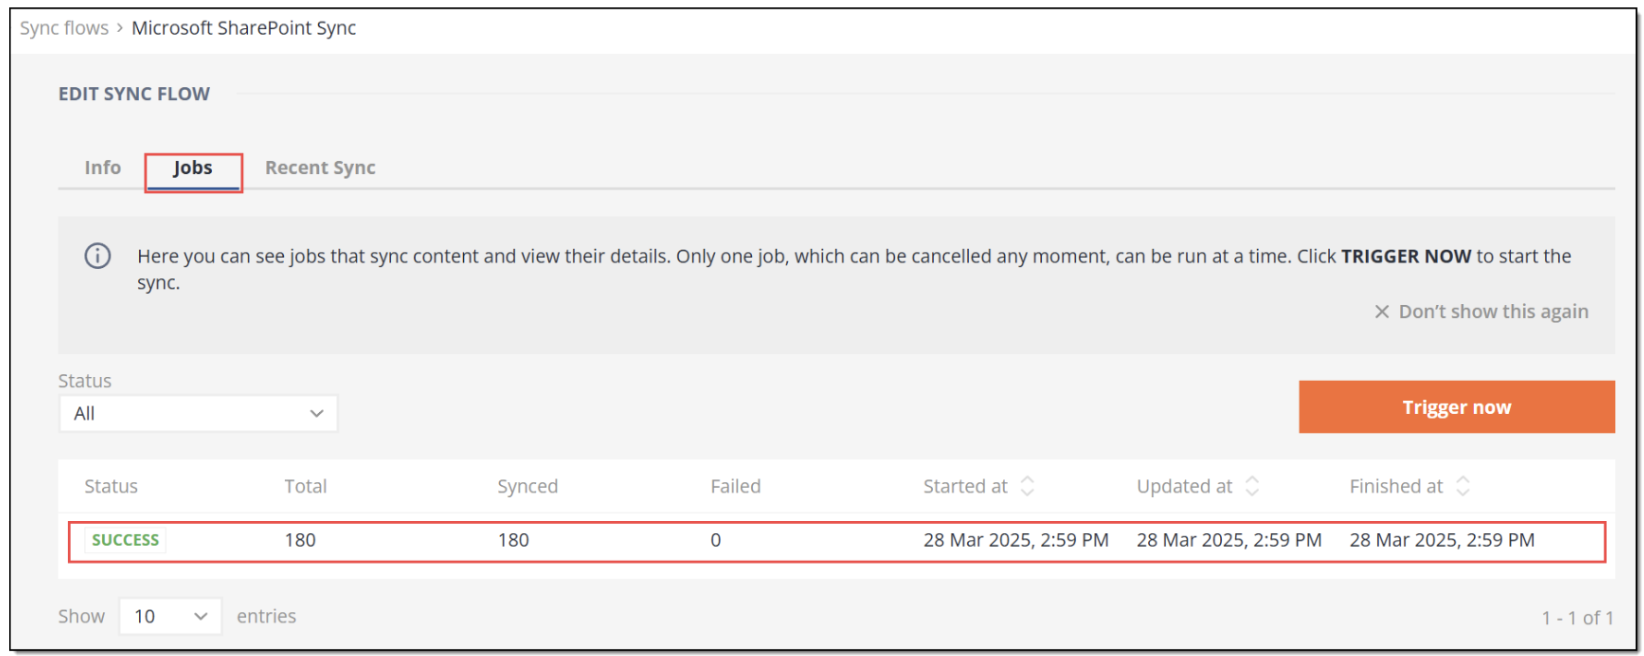 Figure 43. Viewing sync job status
If the sync was successful, you can see the recently synced content directly from this window. To do so, open the Recent Sync tab and check the content items synced from SharePoint into Shelf. 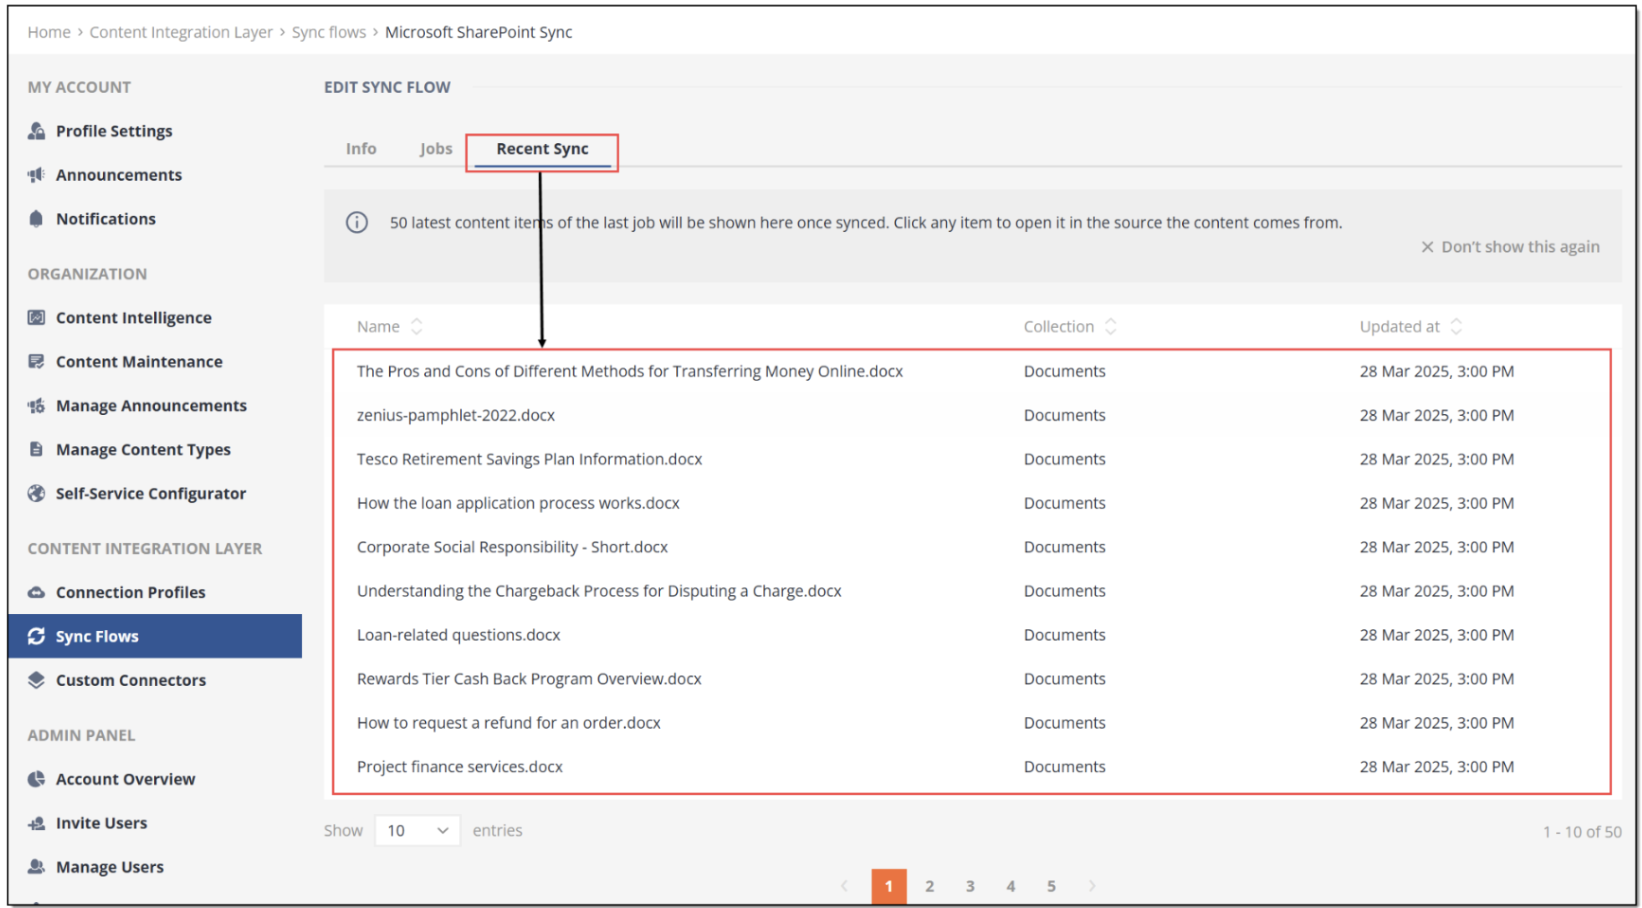 Figure 44. Viewing recently synced content from SharePoint
Configuring SharePoint permissions in User Groups
Even when you successfully configured the SharePoint connector, connection profile, sync flow, run the sync job and pulled the content from your SharePoint repository, you need to add SharePoint collections to the permitted sources via Shelf’s User Groups feature. Otherwise, you will not be able to search for the synced content and otherwise manage it in Shelf KMS.
To set the mentioned collection permissions, go back to the Admin panel where find and select the User Groups option in the left sidebar menu. Select the needed user group from the list to open it.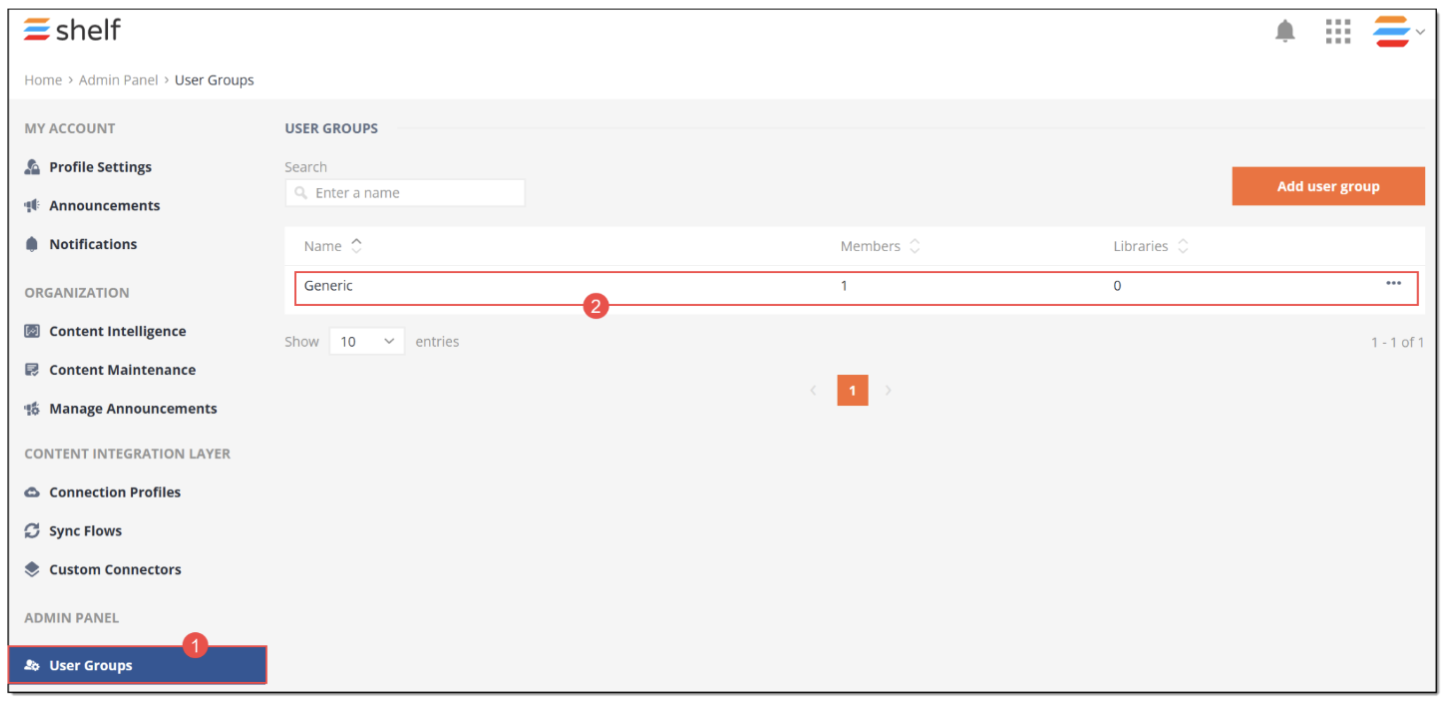 Figure 45. Accessing User Groups in Shelf
In the selected user group window that opens, navigate to the Collection permissions tab. Once it opens, click the Add collections button.
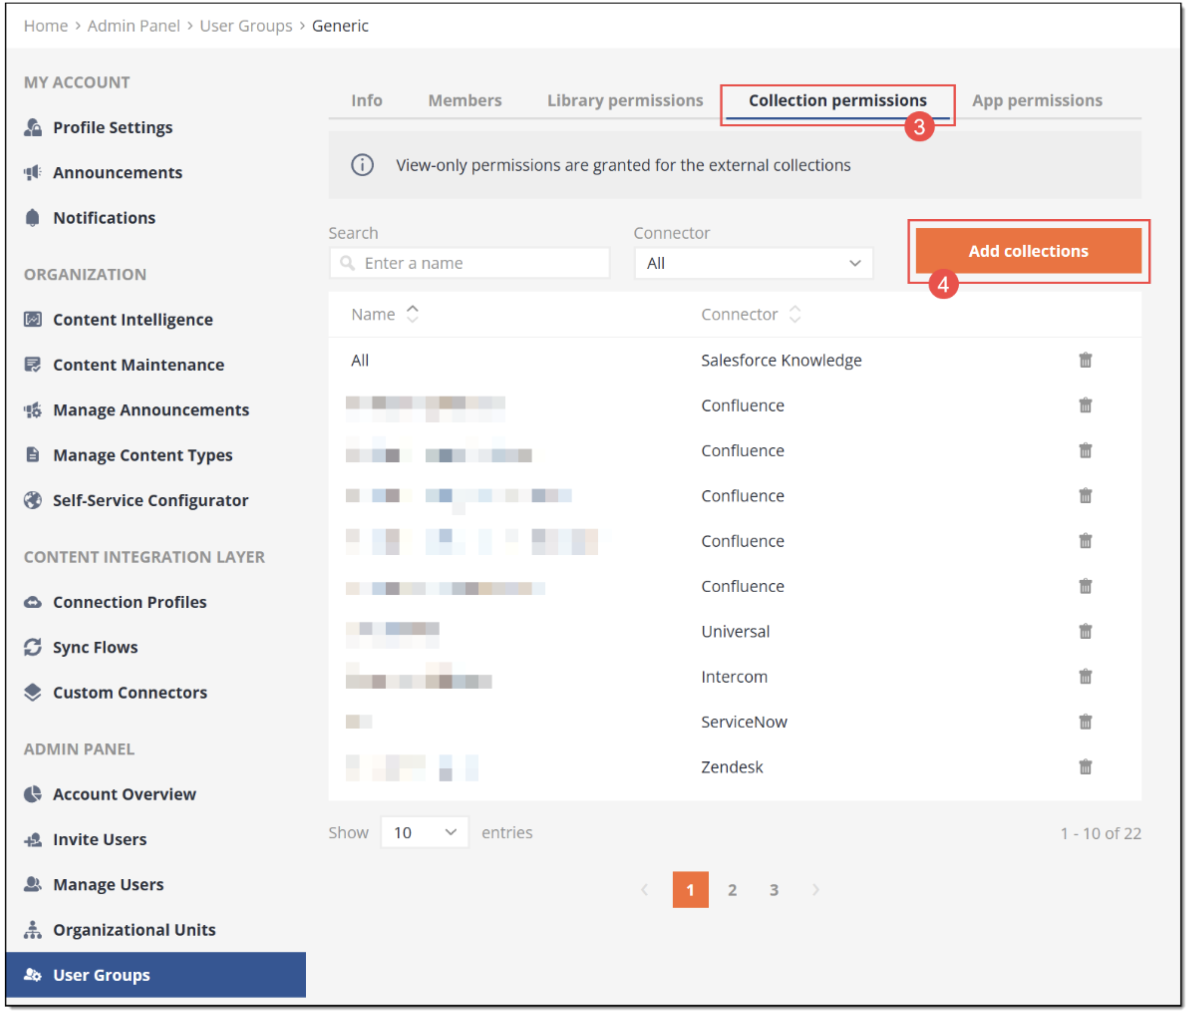 Figure 46. Starting to set SharePoint collection permissions in Shelf
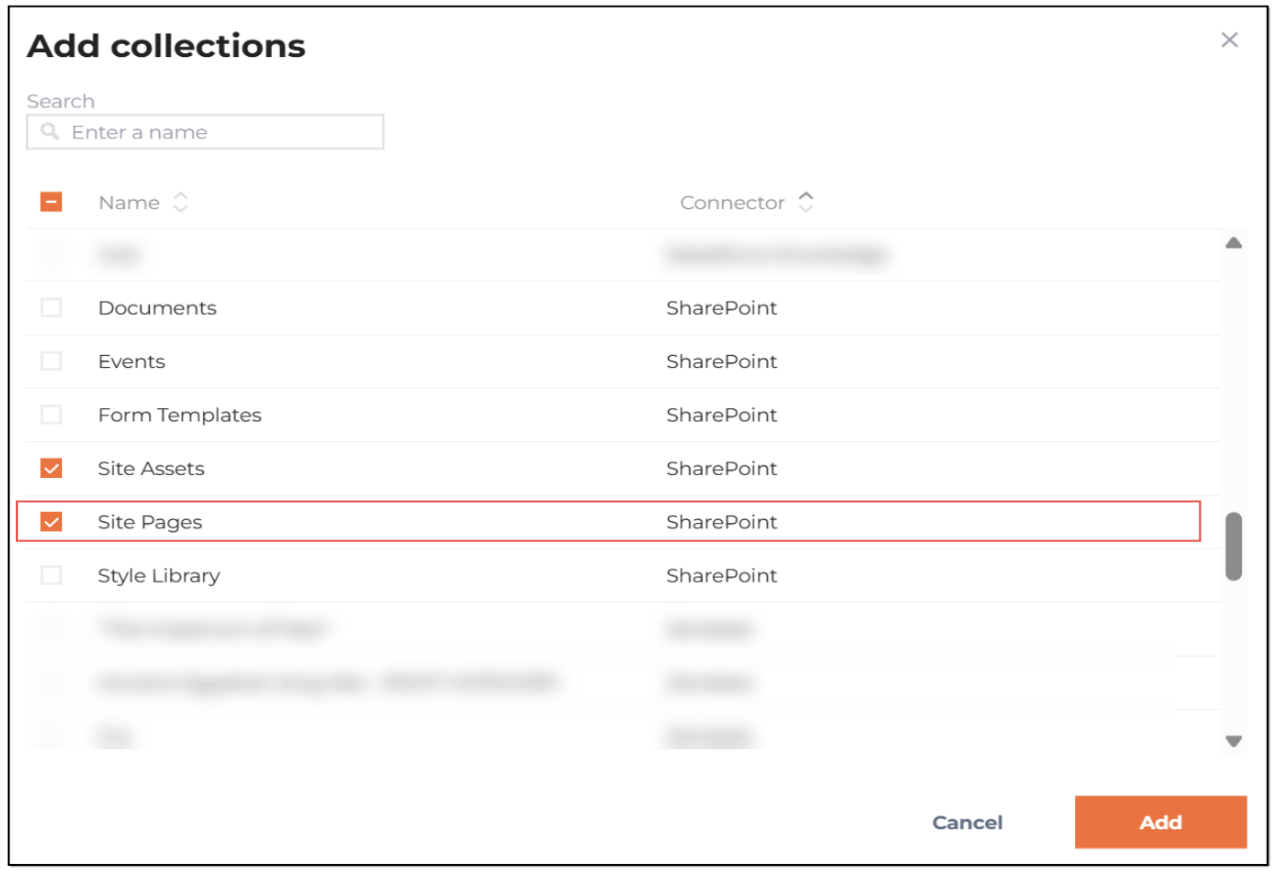
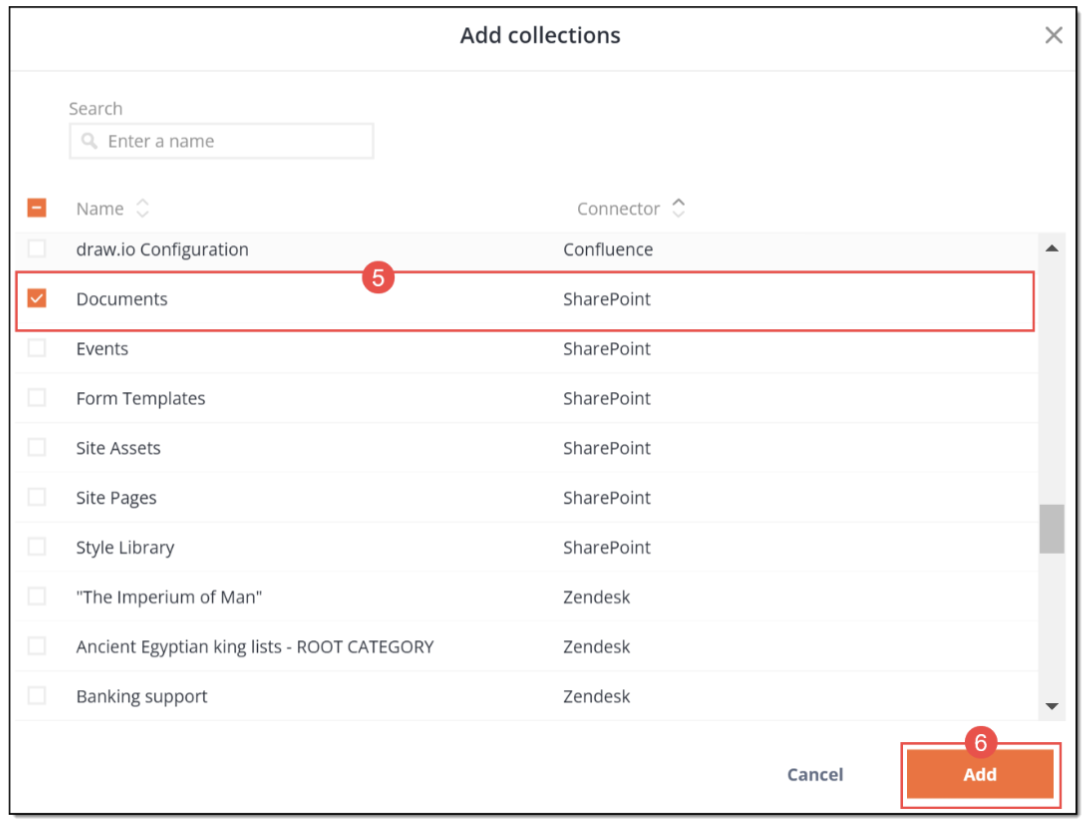 Figure 47. Selecting SharePoint collection(s)
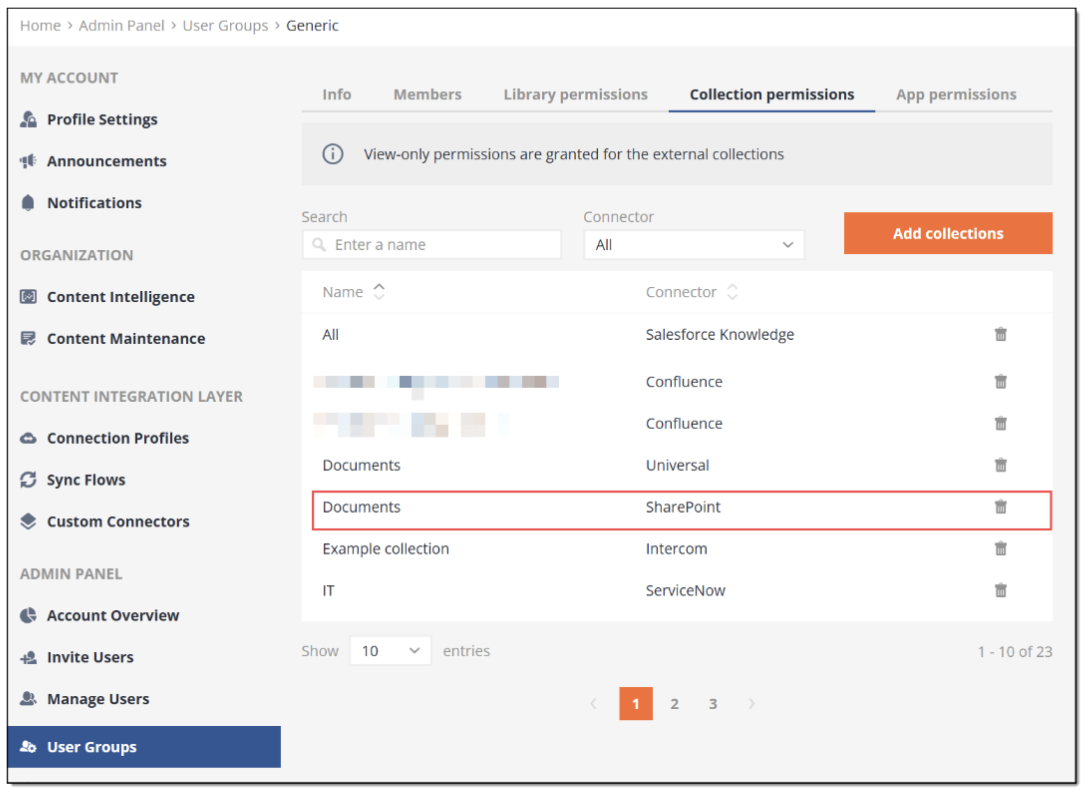 Figure 48. Viewing added SharePoint collection(s)
 | If you have synced any SharePoint Pages, make sure to add their library (which corresponds to Shelf’s Collection entity) - Site Pages - in User Groups > [your user group] > Collection permissions.
|
Viewing SharePoint resources in Shelf
Go back to Shelf KMS homepage and select SharePoint as the needed source in the navigation panel.
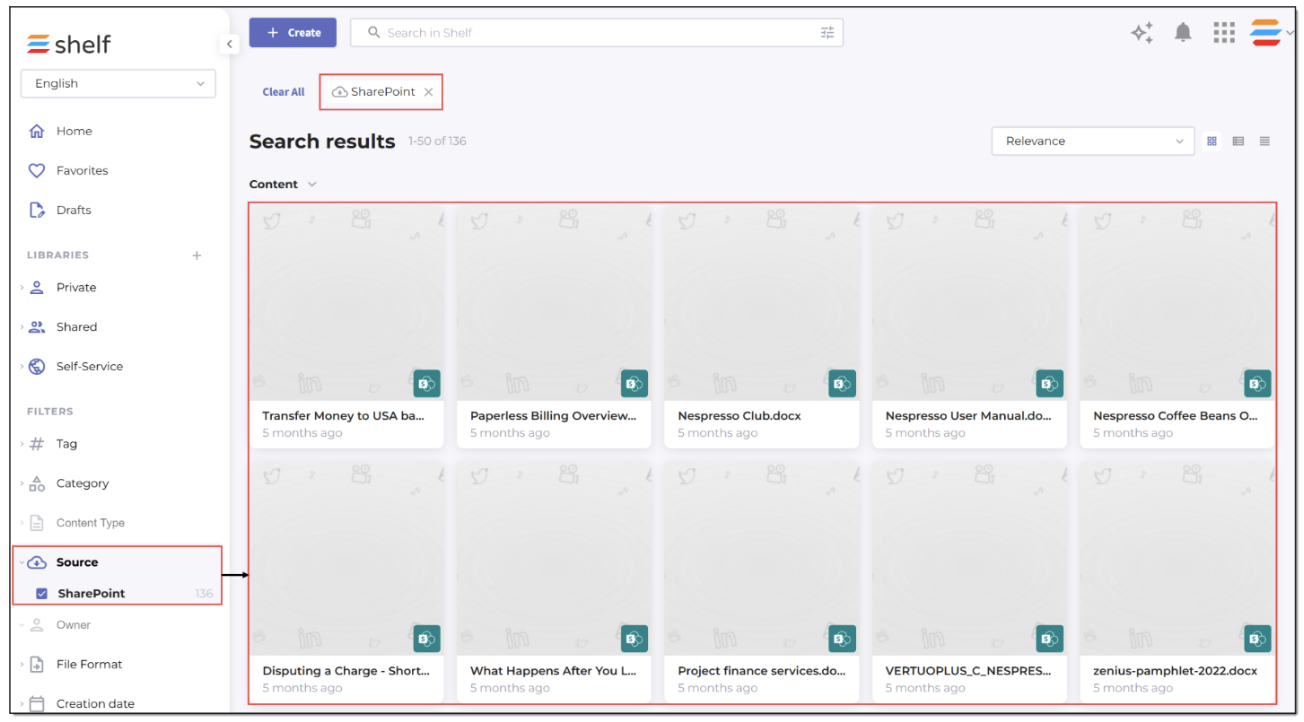 Figure 49. Viewing content synced from SharePoint into Shelf
 Figure 50. Viewing content item in SharePoint
Now, you can enjoy all the benefits, including the AI-enabled features such as Search Copilot, of Shelf KMS in relation to your content synced from SharePoint.
In particular, you can filter this content using the Collections filter in Shelf KMS’s advanced search, as shown in the figure below.
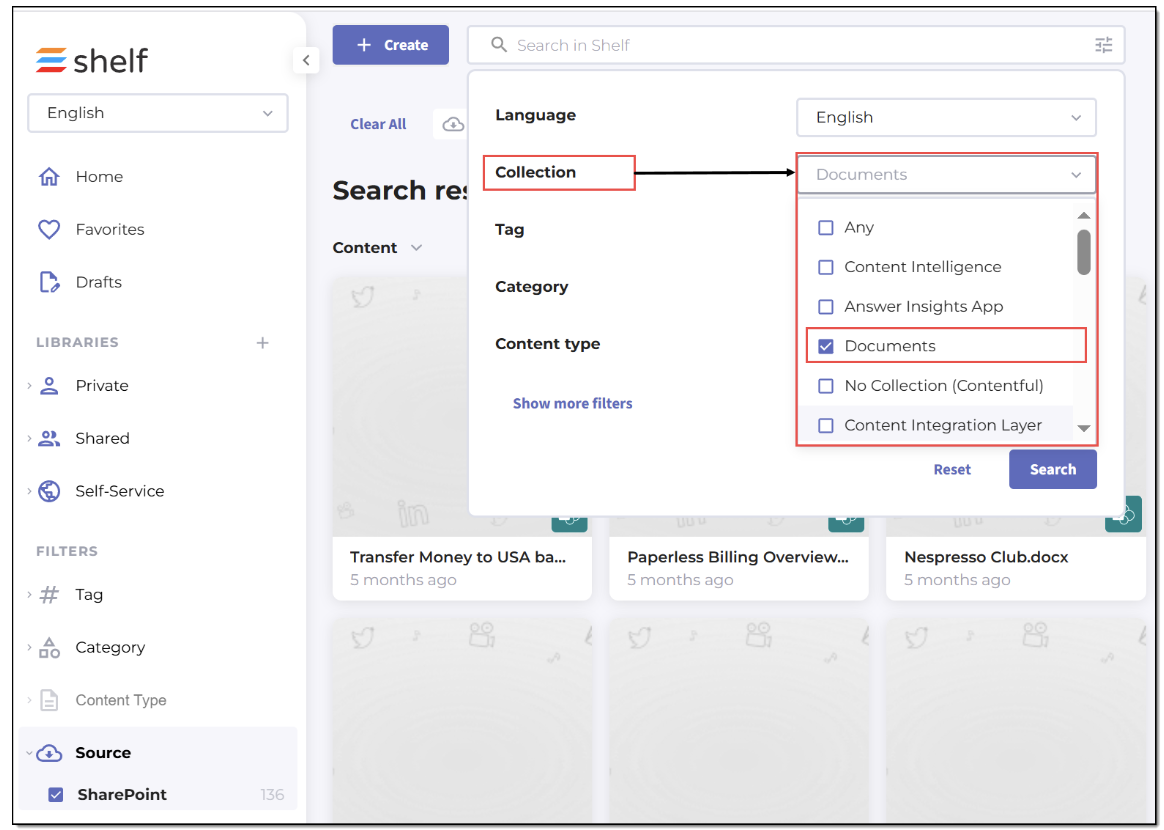 Figure 51. Searching synced content using Collections filter in Shelf KMS search
You can also search across the articles synced from SharePoint by title, description, and content (keyword(s) or phrase(s)). Generally, you can use virtually all the capabilities of Shelf KMS in relation to searching, viewing, and managing content synced from SharePoint.
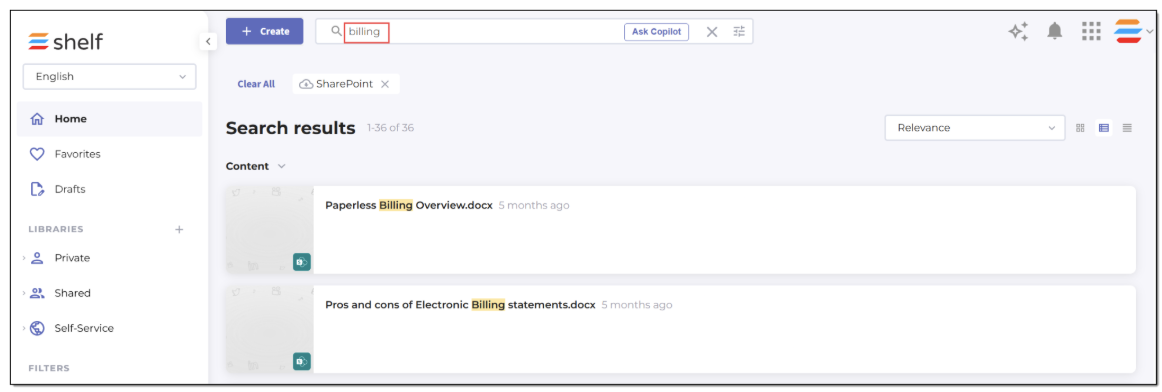 Figure 52. Viewing search results for SharePoint articles
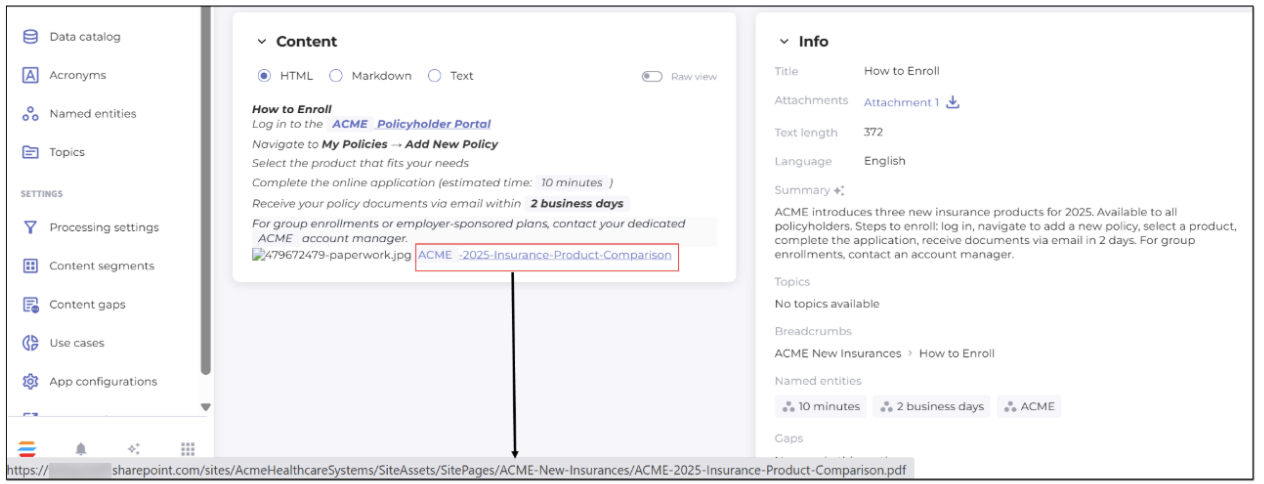
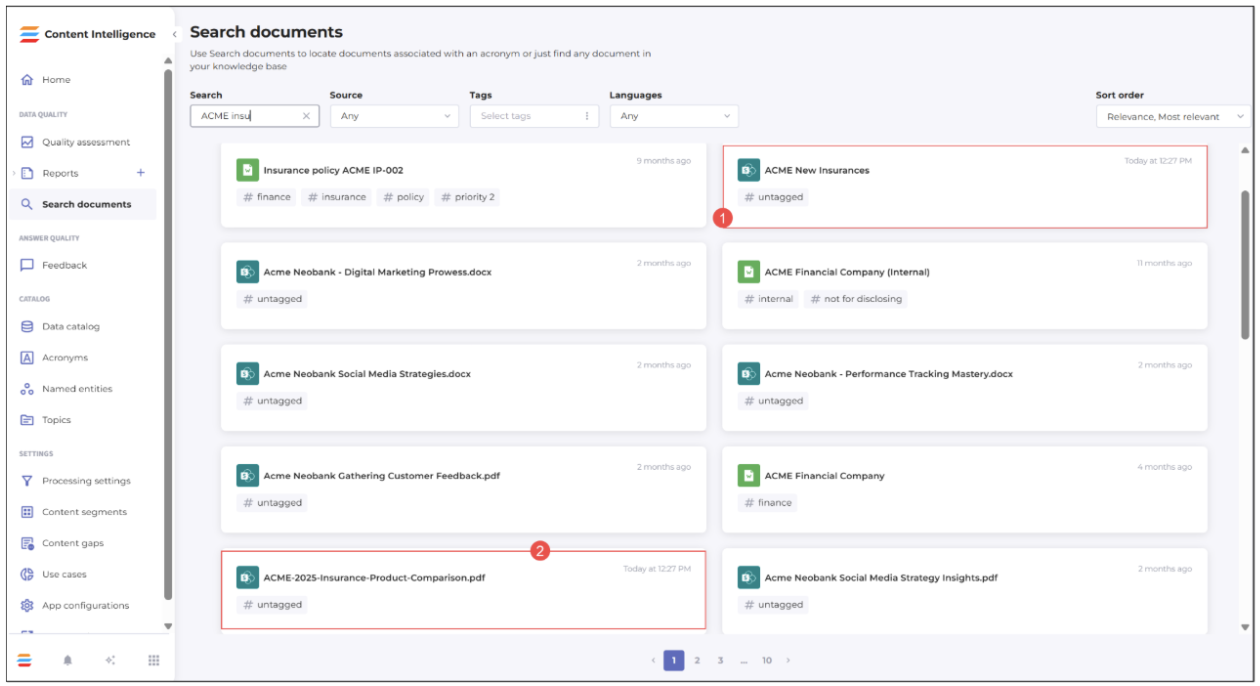
If you have synced a SharePoint Page and added its library - Site Pages - to the permitted collections via Admin panel > User Groups > [your_user_group] > Collection permissions, and if this Page has other document(s) embedded into it, Shelf will display this Page itself as a Gem and will also display each of the embedded documents (for example, PDFs) as standalone Gems as well.
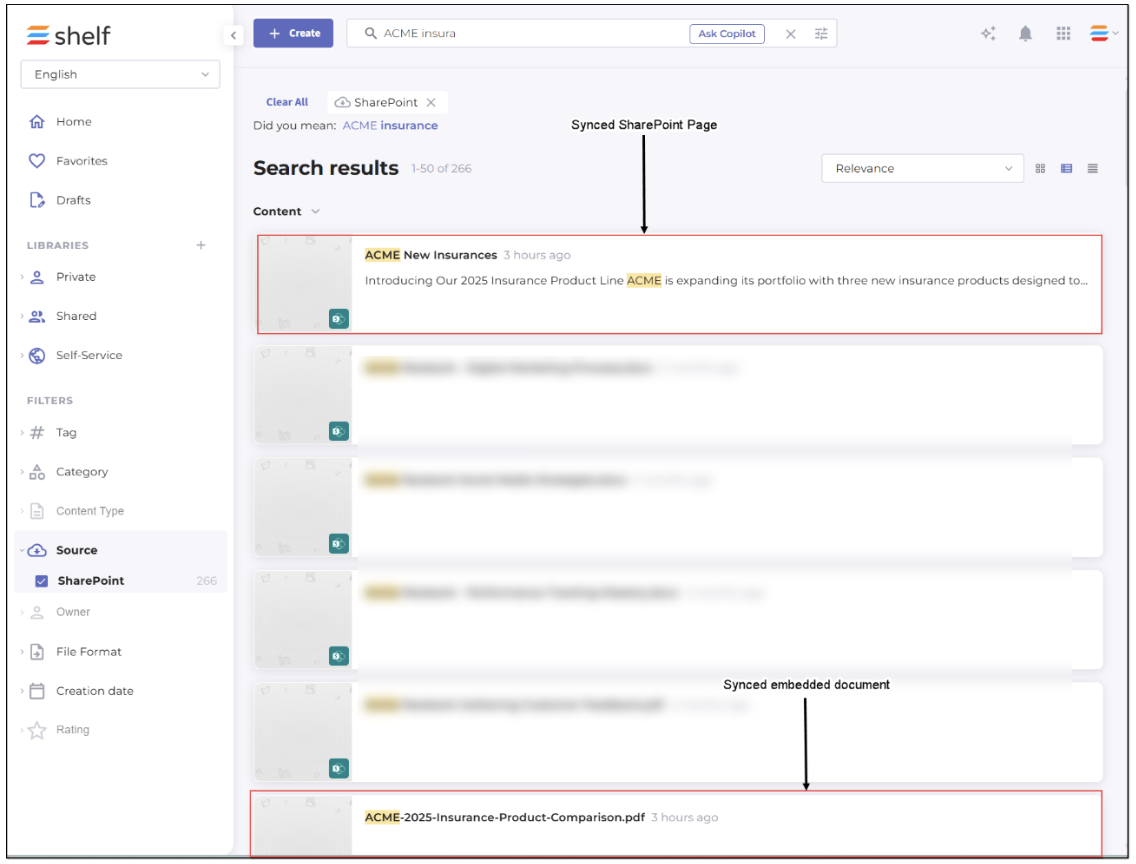 Figure 53. Viewing synced SharePoint Page and its embedded document in Shelf KMS
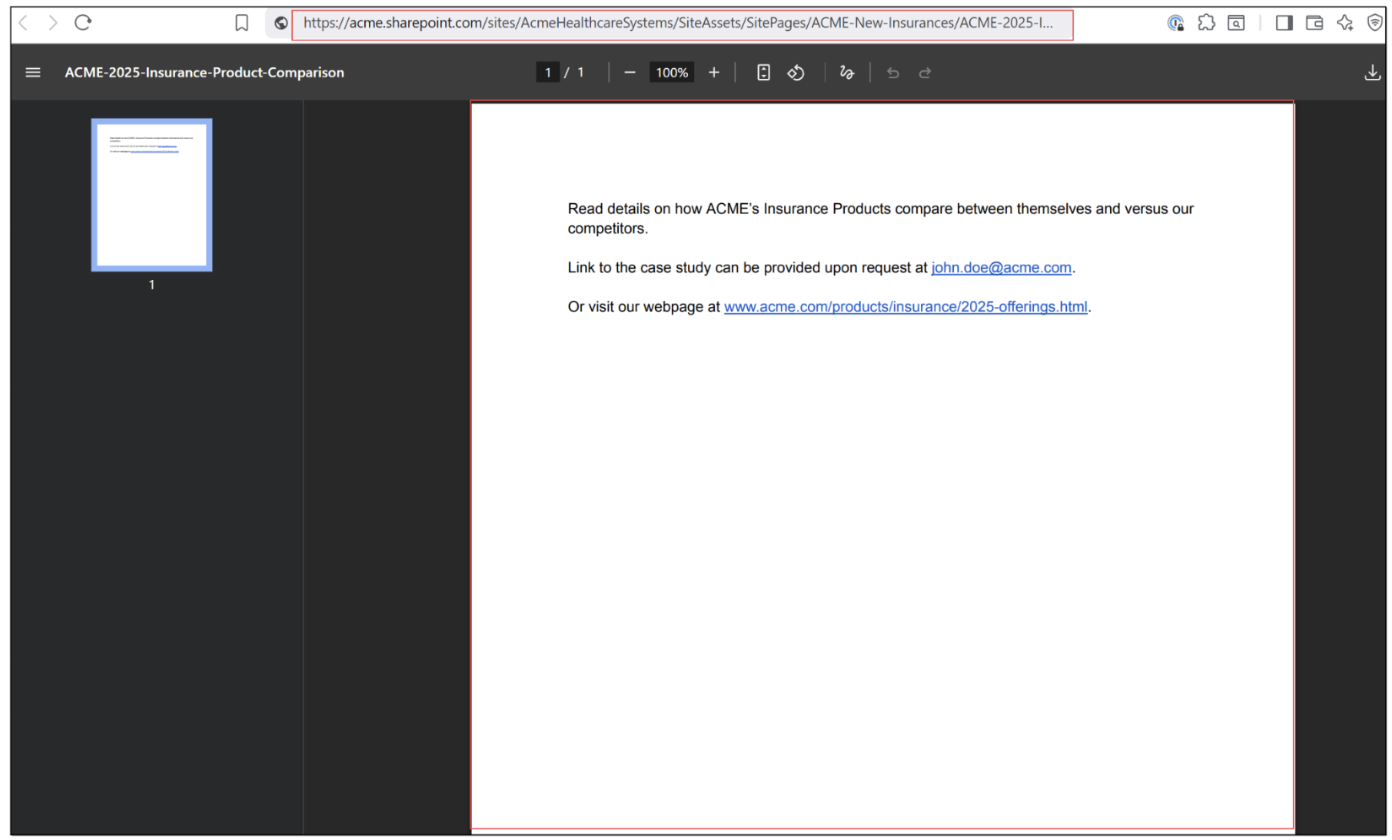
Figure 54. Viewing Page-embedded document (synced as separate Gem) in SharePoint
Using SharePoint metadata in Content Intelligence
Custom columns as Content Intelligence custom fields
Custom columns from the SharePoint library will be mapped to custom fields on the document in Content Intelligence. For supported columns, their values appear on the Custom fields tab for each document. For example, if you have a Tags column defined in SharePoint as a managed metadata field, the selected tag values will populate the Tags custom field for the corresponding document in Content Intelligence.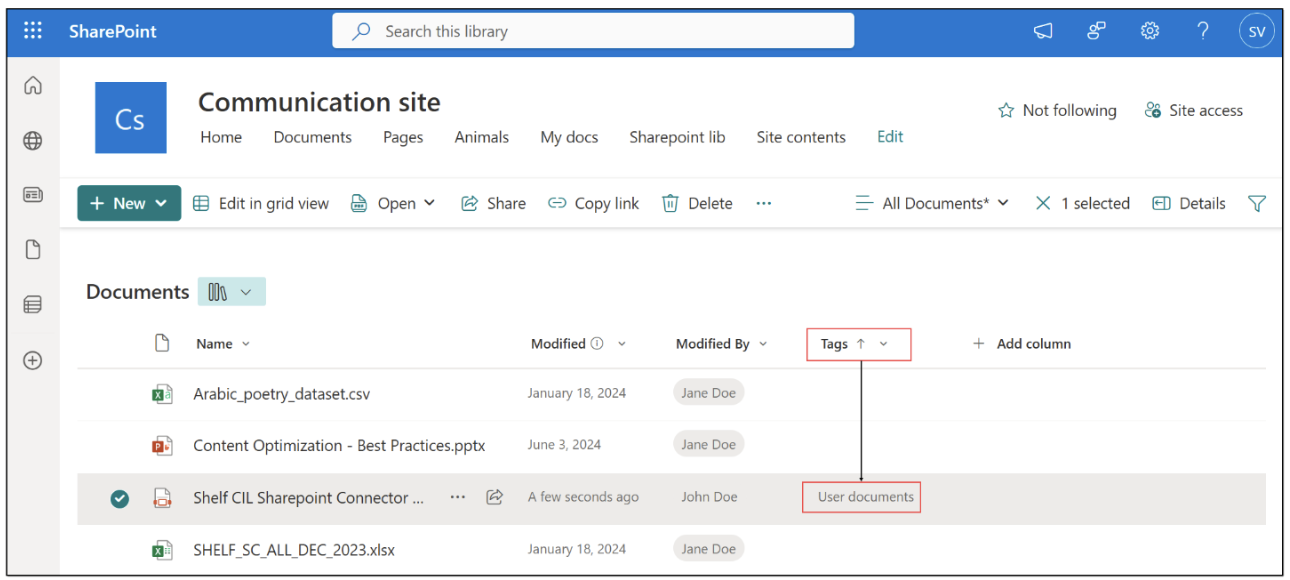 Figure 55. Adding and viewing Tags column for SharePoint document
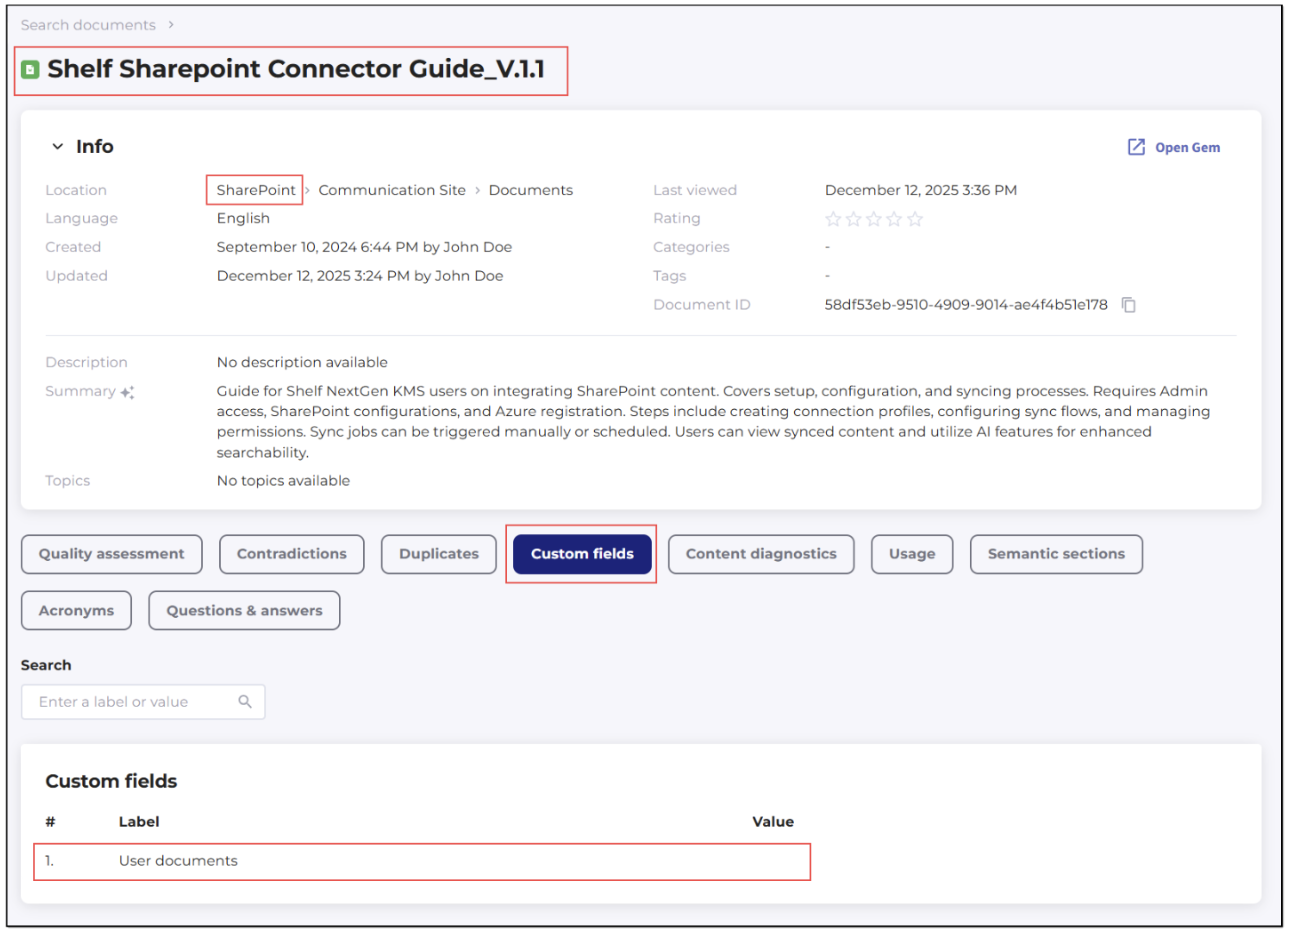
Figure 56. Verifying User documents custom field (tag) retrieved by Content Intelligence
Content Intelligence custom field types
The SharePoint connector syncs specific SharePoint custom column types from your SharePoint content and surfaces them as document‑level custom fields in Content Intelligence.
Table 1. SharePoint Column Types and Their Representation in Content Intelligence
SharePoint column type | Description | Synced to CI custom field? | How it appears in Content Intelligence |
|---|---|---|---|
Single line of text | Stores a short single line of plain text (for example, a code, short label, or ID). | Yes | One text custom field per column, showing the same value as in SharePoint. |
Multiple lines of text | Stores longer blocks of text, optionally with formatting; good for notes or explanations. | Yes | One text custom field per column, containing the full text value. |
Number | Stores numeric values (integers or decimals) for counts, scores, or other calculations. | Yes | One numeric custom field per column, showing the stored number. |
Currency | Stores monetary values with consistent formatting and currency handling. | Yes | One numeric custom field per column, showing the stored currency amount. |
Location | Stores location information such as address, city, state, or coordinates. | Yes | One custom field per column, representing the stored location value. |
Date and Time | Stores calendar dates and optionally times (for example, due dates, review dates). | Yes | One custom field per column, showing the same date/time value as in SharePoint. |
Image | Stores an image associated with the item (for example, an icon or illustration). | Yes | One custom field per column, representing the image linked to the item. |
Managed metadata (term sets / tags) | Stores terms from a taxonomy (term set), often used for tags, topics, or classifications. | Yes | Imported as custom fields; multi‑value tags (such as a Tags column) appear as multi‑value custom fields on the Custom fields tab. |
Lookup | Displays values from another list to create relationships between lists. | No | Not imported; ignored during sync and does not appear on the Custom fields tab. |
Hyperlink | Stores a URL and optional display text for linking to web pages or resources. | No | Not imported; ignored during sync and does not appear on the Custom fields tab. |
Person or Group | References users or groups from your organization’s directory. | No | Not imported; ignored during sync and does not appear on the Custom fields tab. |
Yes/No | Stores a simple Boolean choice such as true/false or on/off. | No | Not imported; ignored during sync and does not appear on the Custom fields tab. |
Columns marked No are ignored during sync and do not appear on the Custom fields tab.
Complete information about SharePoint’s columns and their types can be found in the dedicated SharePoint Help article.
For the most up‑to‑date list of supported SharePoint column types in your environment, or if you need additional column types to be supported, contact Shelf Support or your Shelf representative.
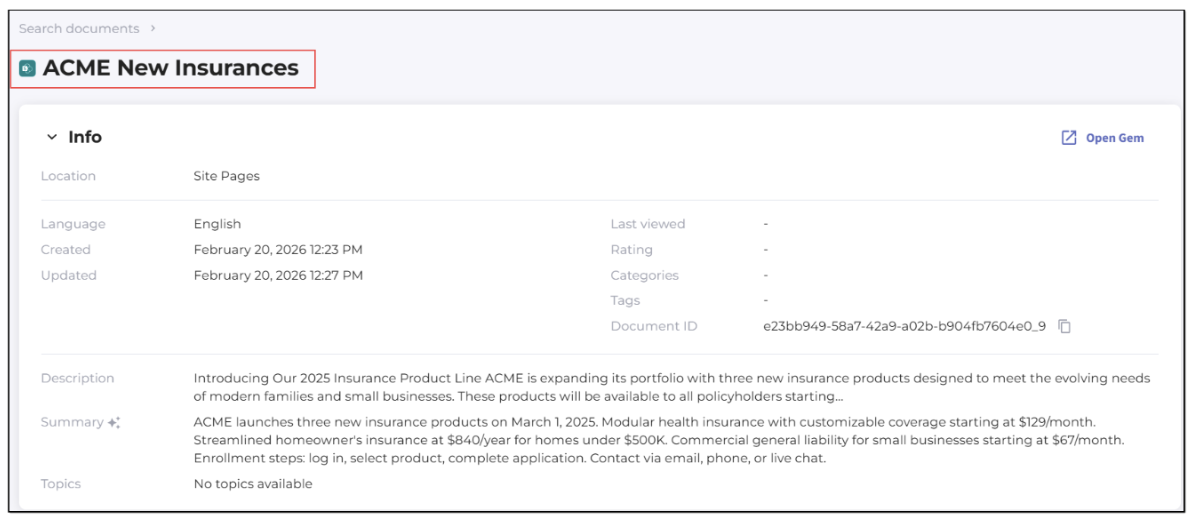
Processing and display of SharePoint Pages in Content Intelligence
When a published SharePoint Page is synced to Shelf, its content goes through an extraction and conversion process before it becomes available in Content Intelligence. This chapter explains what to expect when you open a synced Page in Shelf.
 | For Content Intelligence to process synced SharePoint Pages, you must add the Site Pages library to your Sources in the Processing settings within Content Intelligence. Without this step, synced Pages will appear as Gems in Shelf but will not be processed, indexed, or surfaced by Content Intelligence.  |
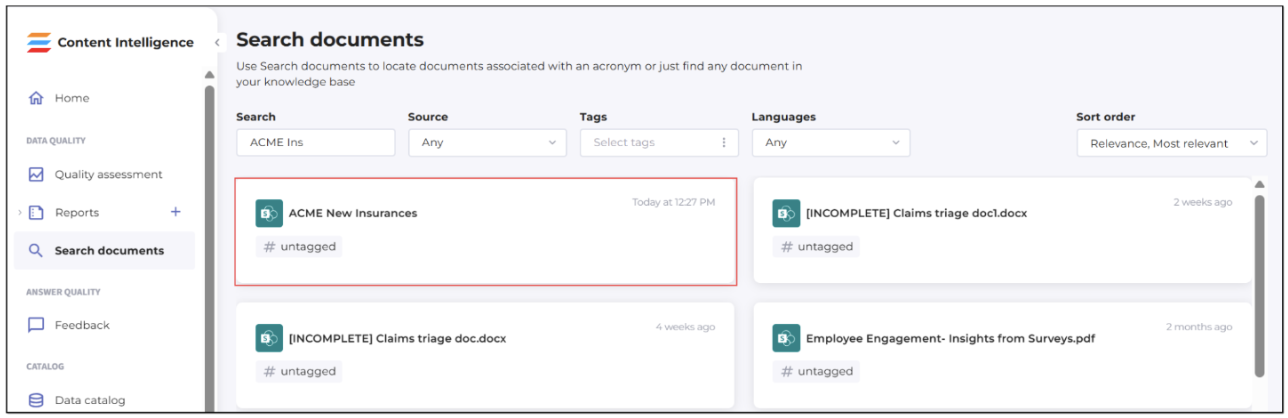
Figure 57. Viewing synced SharePoint Page in CI’s Search Documents results
When you open it, the content is presented as a structured HTML document that reflects the original organization of the page. Note that the synced content item (Page) in Content Intelligence will have the semantic section-specific structure.
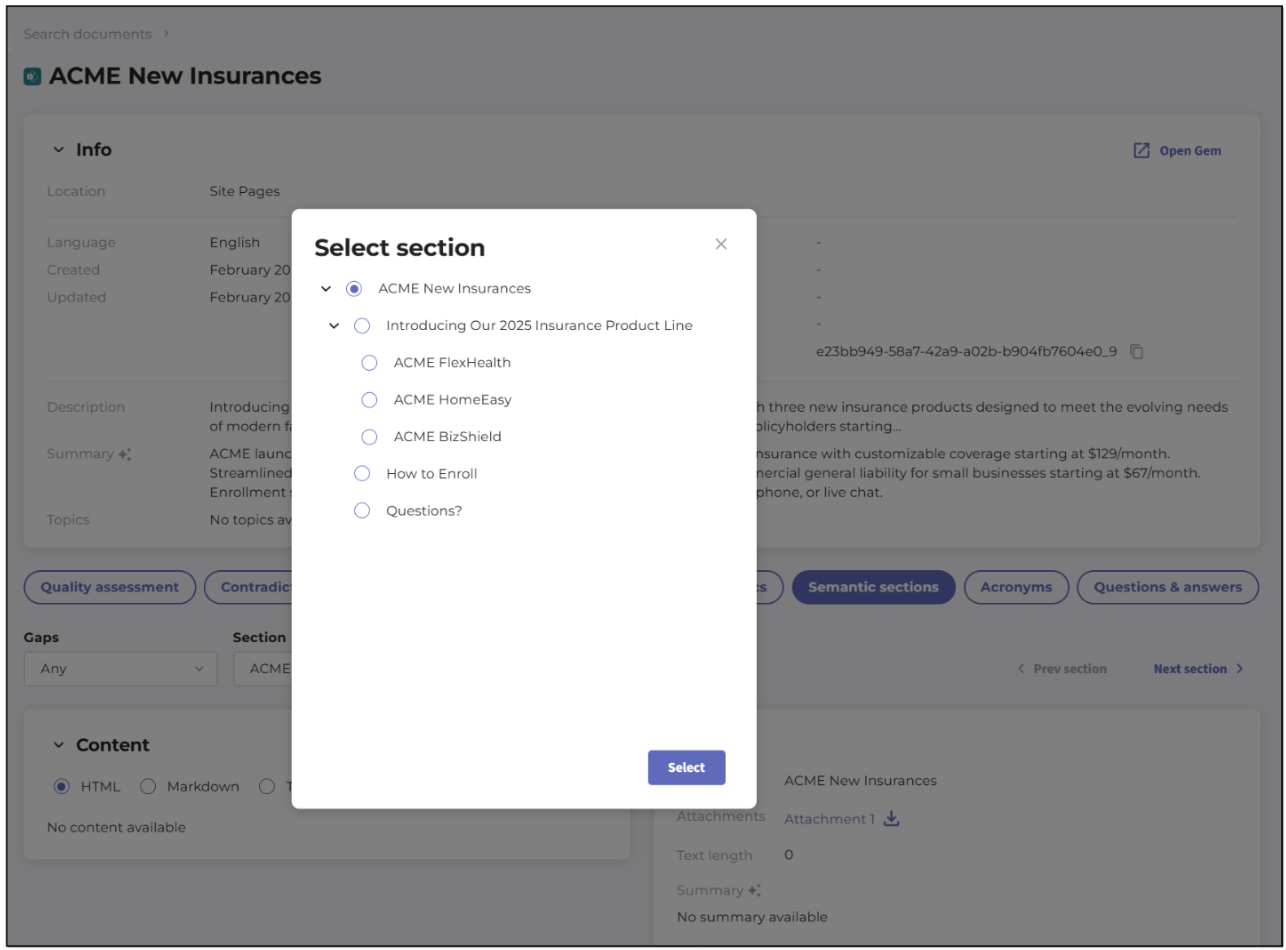
Figure 58. Viewing content item’s semantic sections in Content Intelligence
Inside these semantic sections, the content remains consistent, specifically:
The page title appears as the main heading.
Banner information (title and author), if any, appears as a secondary heading beneath it.
- Text blocks retain their formatting — paragraphs, headings, bold, italic, and lists all carry over.
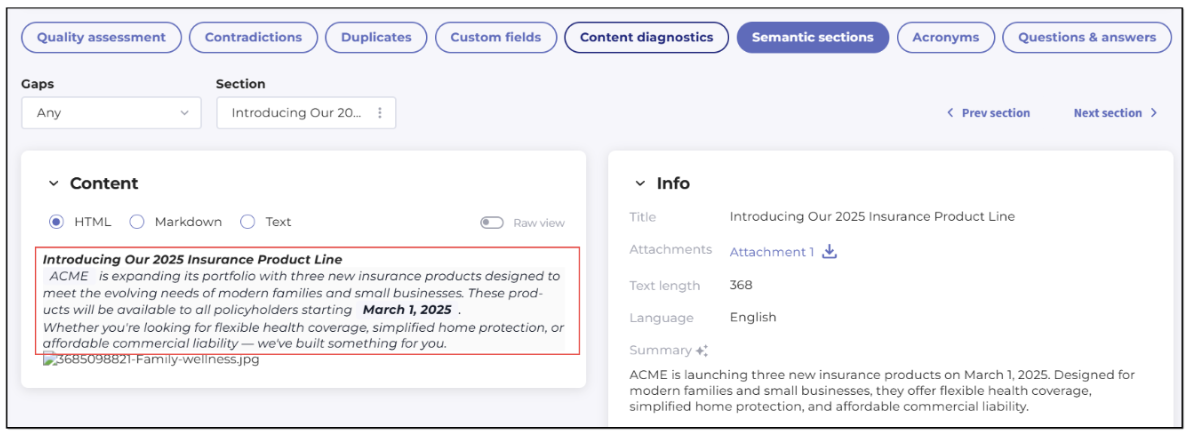
- Images are referenced with their source URL and alt text (if any). They may render differently than they appear on SharePoint (or not render at all), but the informational content is preserved.

- Files and media embedded on the original page (such as PDFs or Word documents displayed through a viewer) appear as links pointing back to their SharePoint location — not as inline previews or attachments of the Gem.
- Hero sections are captured as a set of links to the documents or images they reference. The visual tile or card layout from SharePoint is not replicated.
The section and column structure of the original page is maintained. For example, if the SharePoint Page used a two-column layout with a 60/40 split, the synced content will reflect that same content grouping. However, the visual rendering in Shelf focuses on the informational value of the content, not on replicating the exact look and feel. Colors, fonts, background images, gradient effects, and precise spacing from SharePoint are not carried over.
Figure 59. Finding and downloading extracted Page’s HTML content
When you download and open this attachment, you can see the structure and content of the synced and processed Sharepoint Page as close to its original look as possible.
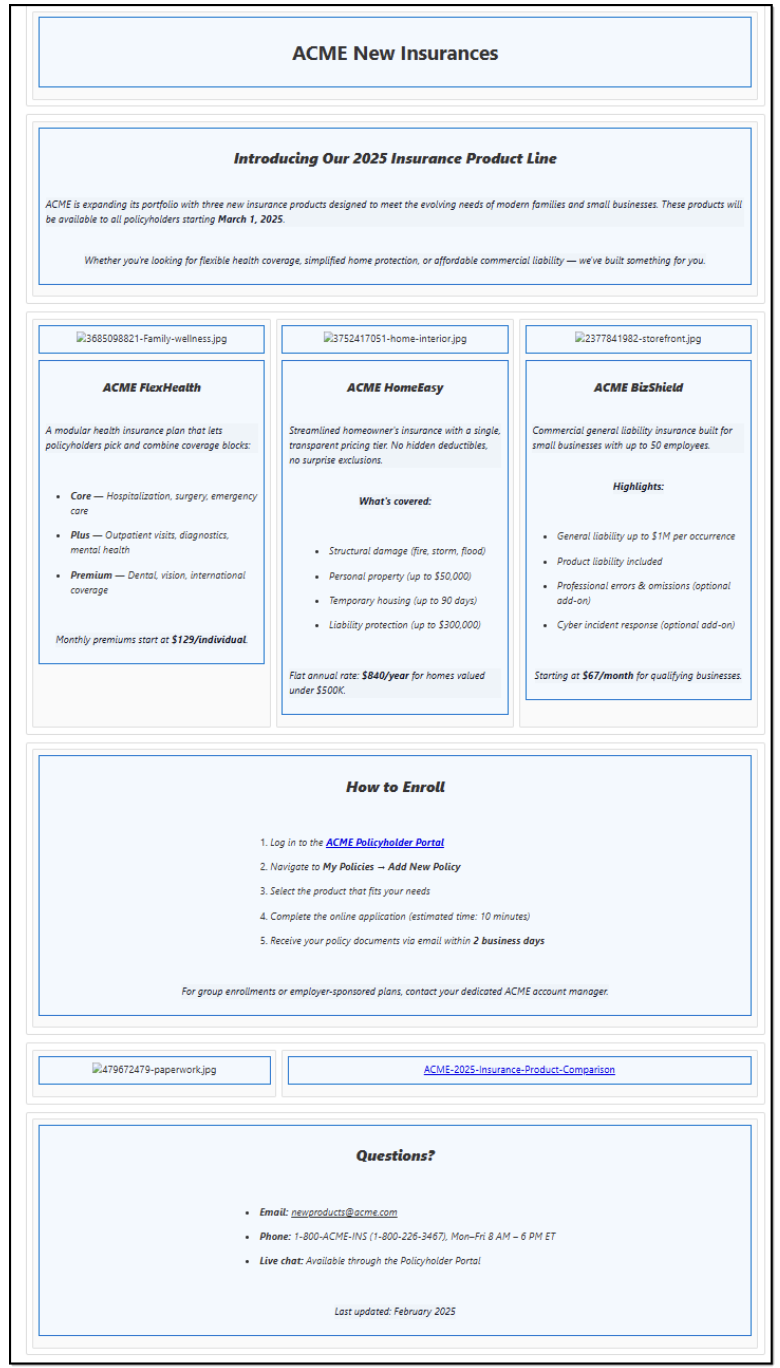
Figure 60. Viewing attachment containing extracted HTML content of SharePoint Page
If you see empty or blank areas in a synced Page, this means that section of the original SharePoint Page contained a web part type that Shelf does not currently process. Examples include Quick Links, News, Events, YouTube embeds, Microsoft Forms, Code Snippets, and Markdown blocks.
Also, content within SharePoint's "Flexible" layout sections is not synced. If a section of your page uses a Flexible layout, that entire section will be absent from the synced version in Shelf. To ensure all content is captured, use standard layouts when building your SharePoint Pages (single-column, two-column, three-column, one-third/two-thirds split, or full-width).
The content is not lost — it remains safe in SharePoint. It is simply not extracted by Shelf at this time.
Processing files referenced on SharePoint Page
Files that appear on a SharePoint Page (through "File and Media" or "Hero" web parts) are handled in two complementary ways: