
Document version history
Version number | Modified by | Modifications made | Date modified | Status |
1.0 | Shelf | Initial release of the document. | 15 Sep 2023 | Expired |
1.1 | Shelf | New chapters have been added to the document to reflect addition of two new parameters in the Connection Profile settings. | 23 Apr 2024 | Expired |
1.2 | Shelf | The document was updated to reflect major changes and improvements in the Shelf integration with Atlassian Confluence. | 24 Nov 2025 | Active |
Document purpose
What is the Shelf Content Integration Layer?
- What purposes does this feature serve?
- What is a Contentful connector?
- How is it configured?
- How is it used in practice?
If you require further assistance, feel free to contact us at support@shelf.io or from the in-app chat support within the Shelf platform.
Glossary
Prior to starting to learn about the Contentful connector and its configuration and usage, you need to learn the terminology used by Shelf.
Shelf KMS (Knowledge Management System) is a knowledge management platform that employs AI capabilities to create, edit, process, store, export/import, and otherwise handle various content. The platform sports multiple AI-enabled features such as Search Copilot, Analytics Copilot, Semantic Search, Content Intelligence etc., all of which are intended to optimize and centralize customer organizations’ knowledge and provide fast, accurate, and consistent answers.
The Content Integration Layer (CIL) in Shelf Knowledge Management System (Shelf KMS) is a feature that allows for the seamless integration of various types and formats of content into the system. It enables users to import and organize content from various sources and knowledge repositories.
A connector is an entity that defines which external Content Management System Shelf KMS needs to connect to via Content Integration Layer (e.g. the Contentful connector is a set of API parameters to define how to connect Shelf to Contentful). Shelf KMS has a set of preconfigured connectors (Contentful, Zendesk, Sharepoint, Confluence connectors, etc.) but also allows for creating the custom ones.
A connection profile is a feature that allows users to establish a connection to various external applications or sources. It enables seamless integration and collaboration between Shelf KMS and other platforms such as external content repositories. Using Shelf’s connection profiles, users can import and synchronize various content and generally streamline workflows between Shelf KMS and external systems. This feature enhances the overall efficiency and effectiveness of knowledge management processes by enabling easy access to relevant information from different sources within the Shelf platform.
A sync flow is a feature that is responsible for the synchronization of content from external sources to Shelf KMS. Shelf’s sync flows can work on schedule or on demand, making it a versatile tool for content synchronization and prompt knowledge delivery.
An API key is a unique identifier used to authenticate a user, developer, or calling program to an API (Application Programming Interface). Simply put, an API key is like a password that allows applications to communicate with each other. For the purpose of this document, API key is a unique identifier that allows Shelf KMS access Contentful for content retrieval and synchronization.
A virtual collection is a fallback Shelf collection the Contentful connector uses when you’re not using a real “collection” structure from Contentful.
When enabled (or when an entry has no collection), all synced entries are placed into a single Shelf collection named No Collection (Contentful).
It behaves like a normal Shelf collection in Shelf (permissions, navigation, filters), but does not correspond to any specific content type or entry in Contentful.
It’s typically used when:
You don’t configure collectionContentTypeId / collectionFieldId, or
You set useSingleVirtualCollection: "true" in the runtime settings, or
An entry can’t be matched to a configured collection — in that case it falls back to the virtual collection.
Prerequisites
For proper operation of your Contentful connector and successful synchronization of your content from the Contentful platform into Shelf KMS, the following preconditions must be met:
- Admin Panel must be accessible on your Shelf KMS account
- Settings menu must be accessible for you on your Contentful account
- Content items (articles, documents, etc.) must be available on your Contentful account.
Content Integration Layer and its purpose
The Content Integration Layer feature makes it possible to integrate various content types and formats into a single platform, Shelf KMS, from where users can further derive useful information to deliver accurate and relevant answers to their clients.
The Content Integration Layer ensures that content is indexed, tagged, and categorized appropriately, making it easily searchable and accessible to users within the knowledge management system. It provides capabilities for content mapping, transformation, and synchronization, enabling the consolidation and synchronization of data from multiple sources.
CIL also ensures that the latest version of content is always available to users and facilitates efficient content updating and maintenance.
Overall, the Content Integration Layer plays a crucial role in providing a centralized repository of relevant and up-to-date information, making it easier for users to find and access the knowledge they need.
The detailed information about the CIL feature can be found in the relevant chapters of the Shelf Content Integration Layer Feature User Guide available from Shelf upon request.
Understanding the Content Integration Layer workflow
In-depth configurations and use cases of the Shelf Content Integration Layer are described in the dedicated Shelf Content Integration Layer Feature User Guide mentioned above, but the short example of the CIL workflow is as follows:
- You access the Content Integration Layer feature in your Shelf KMS (Admin Panel).
- You select one of Shelf-preconfigured connectors or create your custom one (based on the external content repository from which you need to sync content)
- You create a connection profile that uses the selected or created connector, and configure it: indicate credentials (username/password/API key/token/etc.) to access your external repository. All these credentials and access details can be taken from that external platform, and in the respective section below we will show you how to get them on Contentful.
- You create a sync flow that uses the created connection profile and configure this sync flow to run either on some specific schedule or on demand. It is here where you can apply filters to tell CIL which exactly content needs to be synced.
- You run the created sync flow manually (if set to run on demand) or wait for the scheduled run, and get your content from the needed external source right in Shelf KMS.
For the proper operation of the Contentful connector to sync your content from Contentful into Shelf KMS, you need to do certain actions both in Contentful and in Shelf. Read the chapters below to learn what exactly you need to do.
Configurations in Contentful
First, to make the configurations described below, you need to have the Administrator role permissions in Contentful.
To check your user role permissions, once logged in to your Contentful account, go to the Settings menu and select the Roles and permissions option.
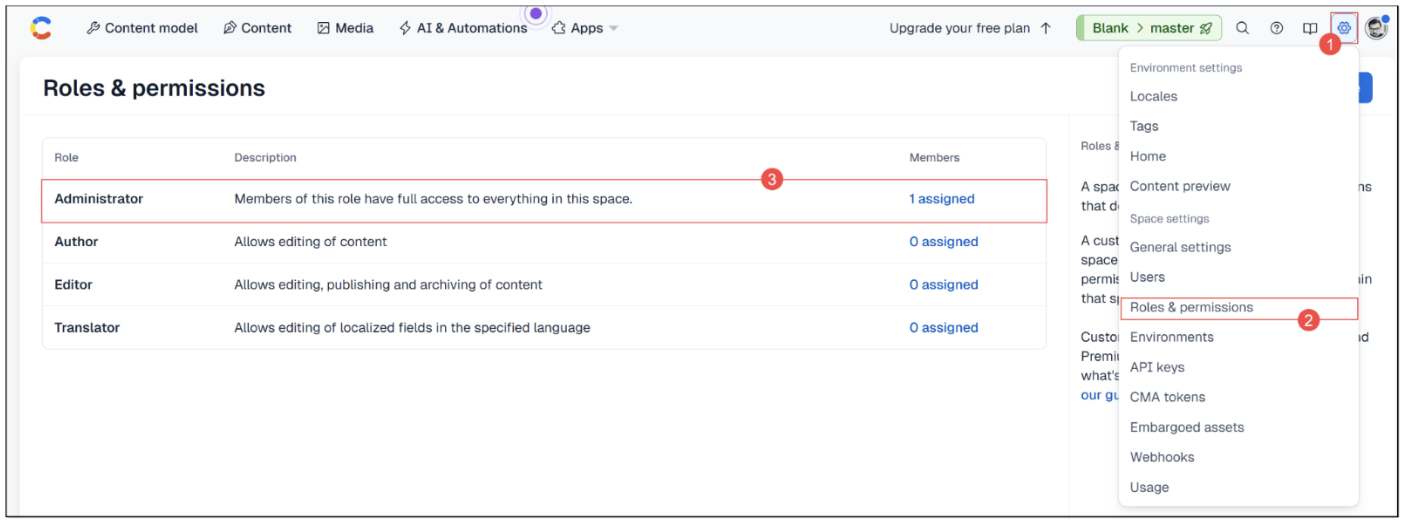 Figure 1. Accessing Roles and permissions settings in Contentful
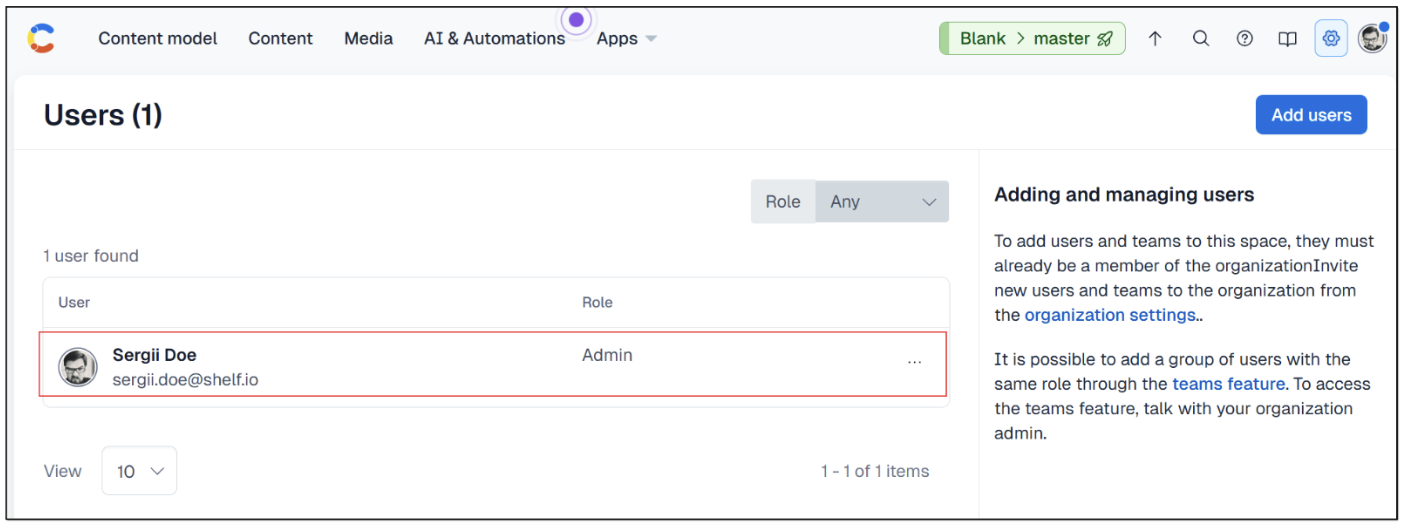 Figure 2. Checking user role and permissions in Contentful
Obtaining API key for your Contentful storage
Once you have confirmed your Administrator permissions, it is time to enable Shelf KMS access to your Contentful storage for content syncing.
To do so, you need either to get the existing API key for your Contentful space or create a new dedicated API key specifically for Shelf KMS. We recommend creating a new API key as it may help prevent unauthorized access to sensitive content stored in your Contentful space.
Creating new API key
To create a dedicated API key, follow the below steps.
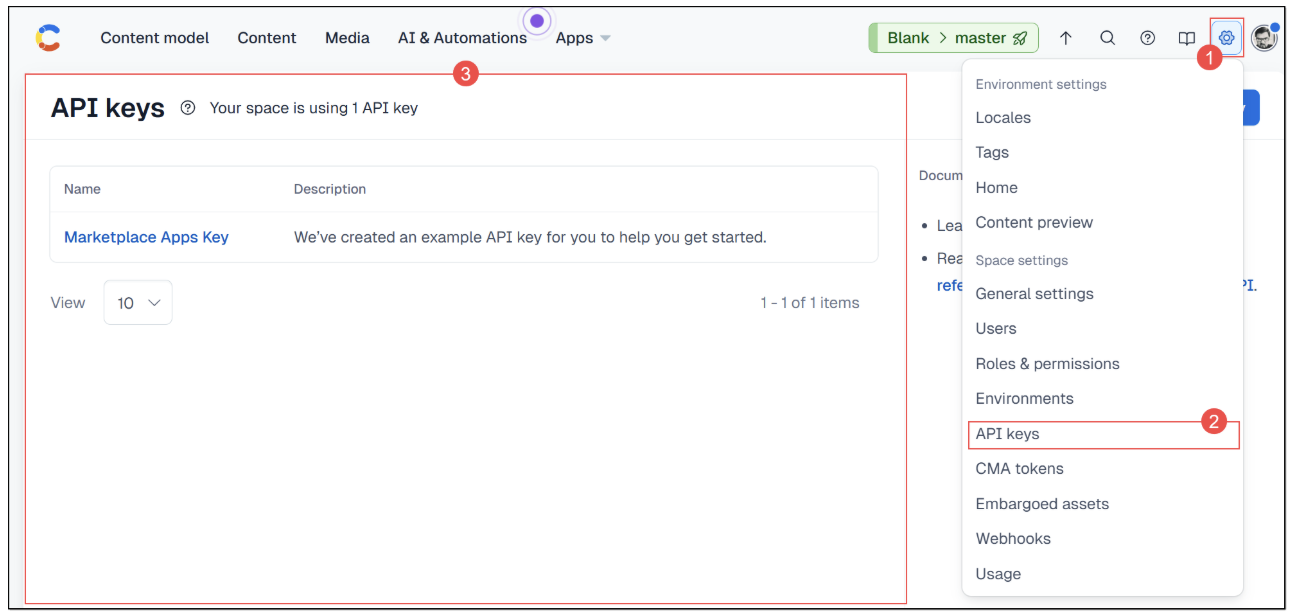 Figure 3. Accessing API keys parameters in Settings
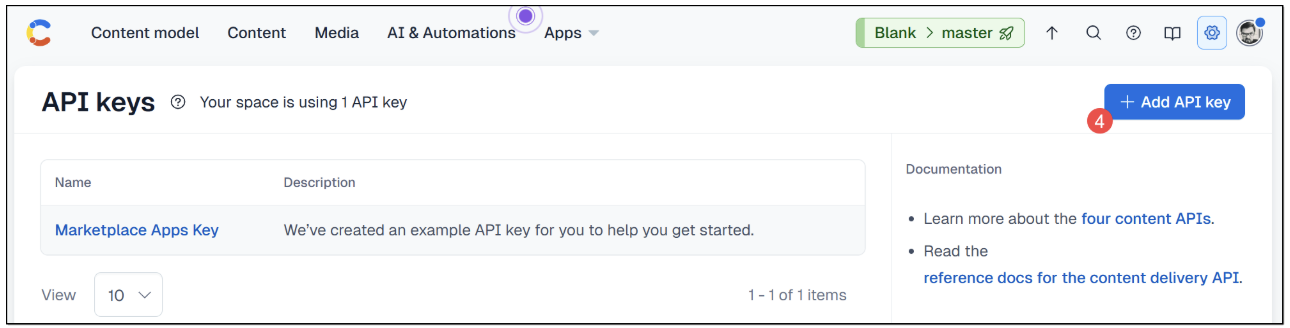 Figure 4. Starting API key creation process in Contentful
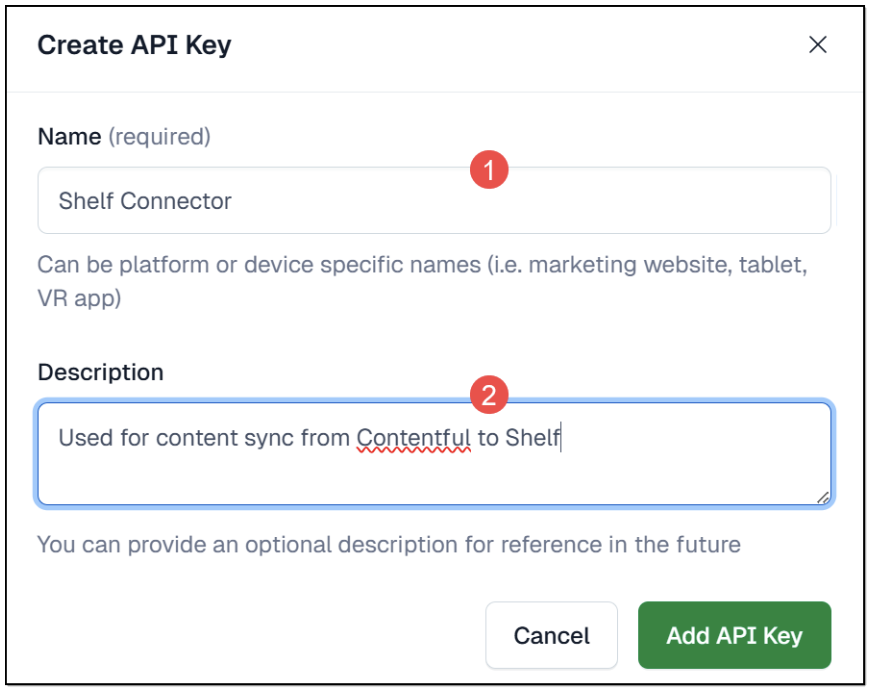 Figure 5. Creating API key
Name (1): a mandatory field that contains the name of the API key you add.
Description (2): an optional field containing some description for the API key.
Space ID (3): a platform-generated identifier of your Contentful storage that is needed for configuring communication between Shelf and Contentful. Copy and save it somewhere for further use.
Content Delivery API - access token (4): a platform-generated identifier that acts as an authentication and authorization means for your Contentful storage and can be used by other systems - Shelf KMS - to access and sync your content. You also need to copy and save it for further use.
Content Preview API - access token (5) and Environments (6) parameters are not needed for the purposes of this document.
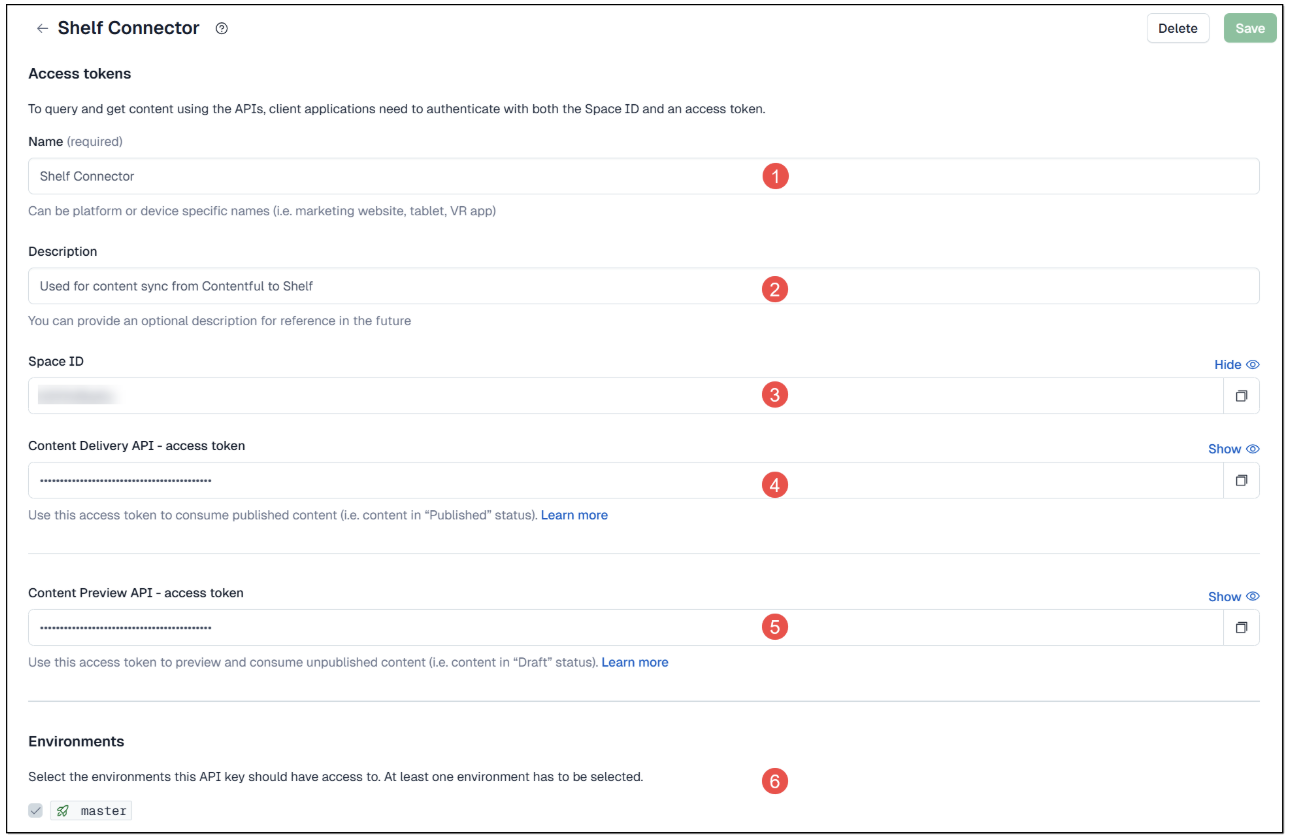 Figure 5. Viewing/copying API key parameters
Using an existing API key
If you don’t need to create a new API key to let Shelf KMS connect to your Contentful storage, you may use one of the existing keys, if any.
To do so, go to the API keys option in the Settings menu (Figure 3), select and open the needed API key in the APIs page (Figure 4), and, finally, find and copy the Space ID and Content Delivery API access token values (Figure 5).
Once you have created a new API key or used an existing one and copied the relevant values, you are done with the configurations on the Contentful side. Before proceeding to the configurations on the side of Shelf KMS, make sure you have content in your Contentful storage. Also, make sure you have properly identified your content structure on Contentful as described in the section below.
Identifying Contentful content structure
Before you configure the Shelf Contentful Connector, you need to know exactly where your key content lives in Contentful. After reading this chapter you will learn how to identify the content type and fields that the connector uses for titles, descriptions, rich text content, and (optionally) collections/categories. This information becomes the input
for your field mappings when you create the dedicated Contentful connection profile in Shelf.
Open your content model in Contentful
1) Sign in to Contentful.
2) Select the appropriate Space and Environment.
3) In the top navigation, go to Content model.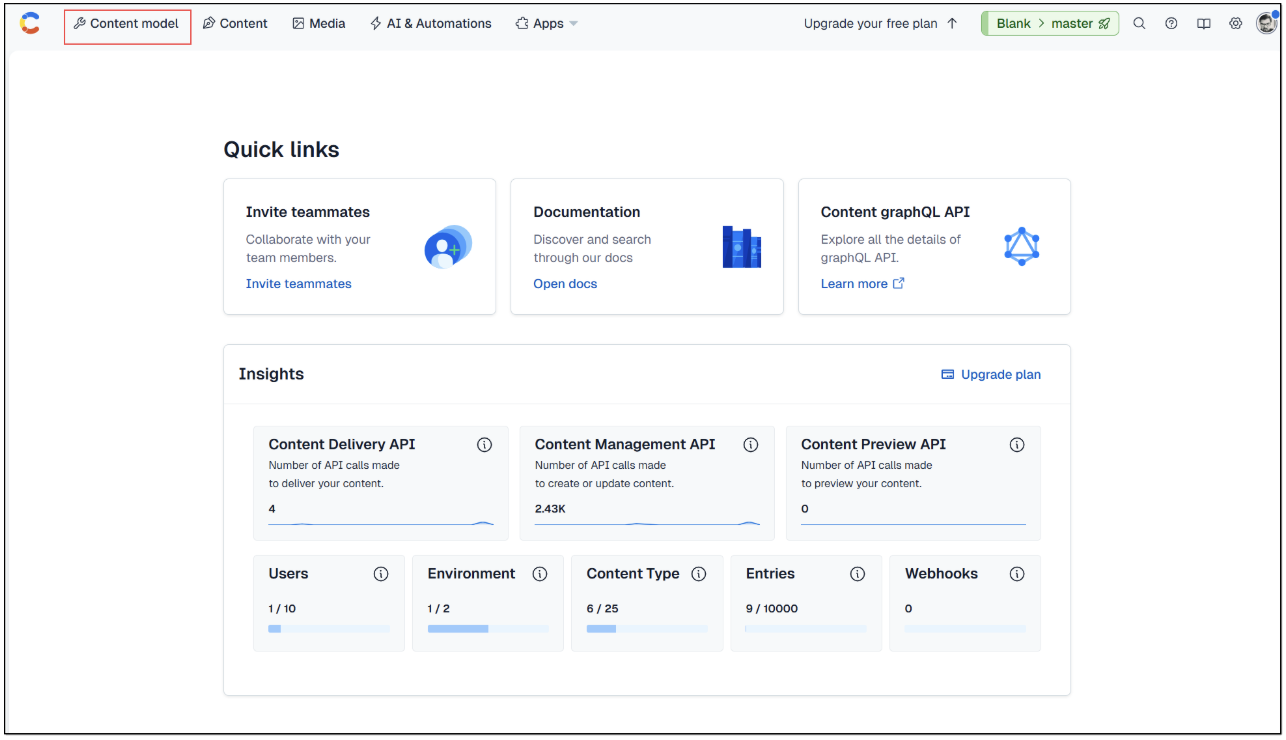 Figure 6. Accessing Content model page in Contentful
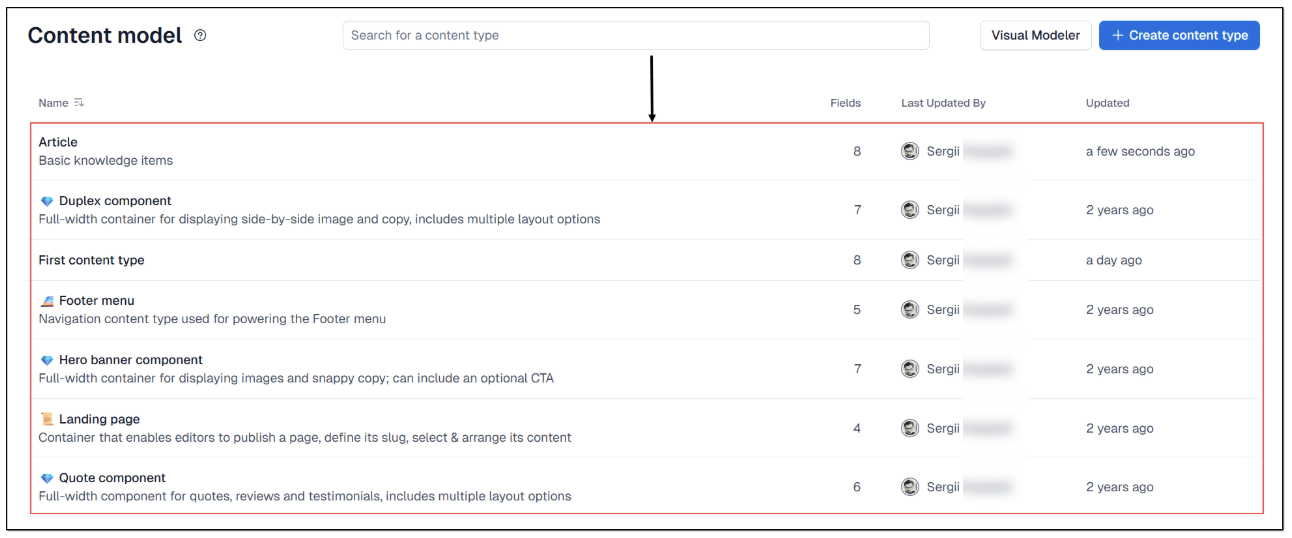 Figure 7. Viewing all content models available for you in Contentful
Choose your primary content type
Your primary content type is the template that represents the main items you want to sync into Shelf (for example, Article, Help page, Landing page, or Knowledge base article). In our case, it is the Article content type.
1. On the Content model page, in the list with all available content types, find and click the content type you want to sync into Shelf via the Shelf Contentful Connector.
You can find it in the browser URL, or
- Copy it directly from near the content type name, in our case - Article.
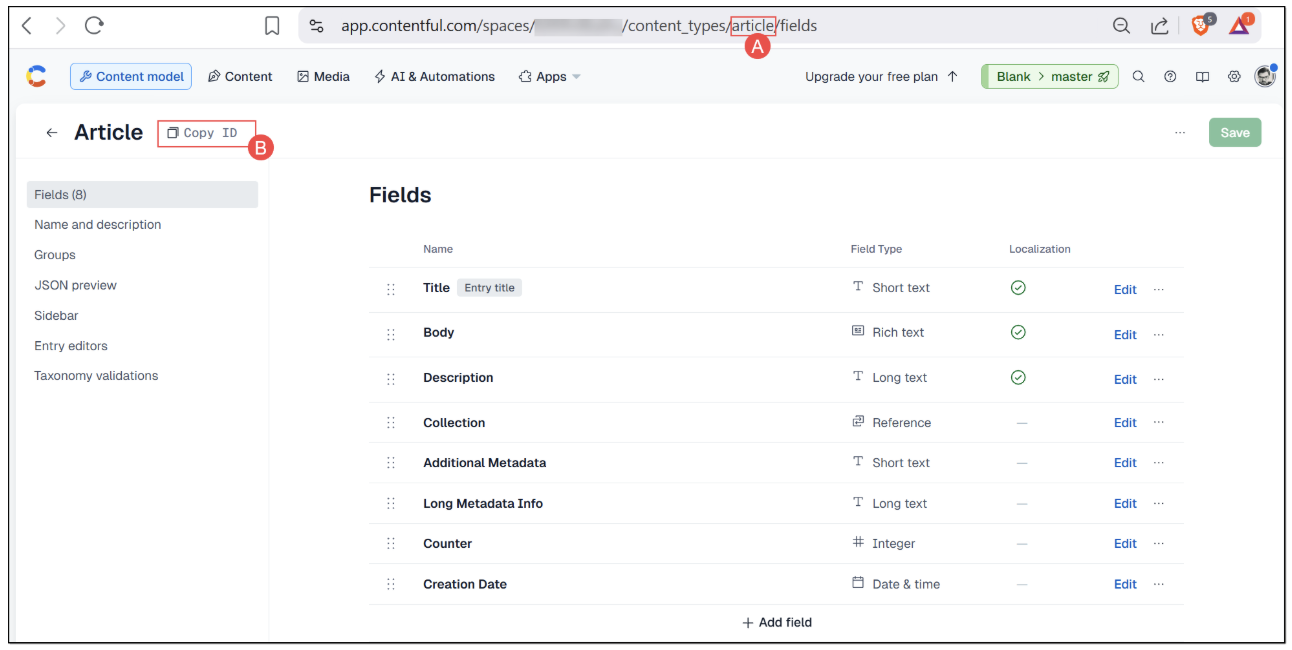
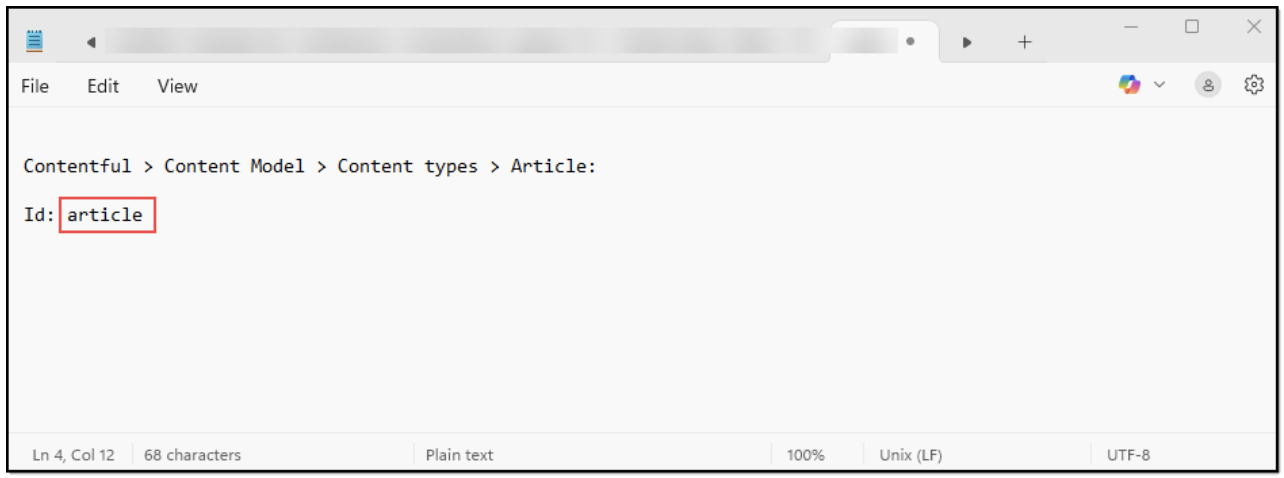 Figure 8. Finding / copying content type ID in Contentful
| Key concept: The connector works with one primary content type (your main content) and optionally one collection content type (for organizing content into collections). |

Identify key fields within the content type
On the content type’s Fields pane, you’ll see a list of fields with their Name and Field type. For each of the following, identify both the human-readable name and the Field ID.
For finding the relevant Field ID, open the needed field for editing and search for its ID in the window that appears. Repeat for all fields needed for configuring your Contentful connector in Shelf.
 Figure 9. Finding / copying Field ID for one of your Article content type fields in Contentful
Title field (required)
Find the field that represents the title of your content, for example:
Title
Headline
Name
Confirm:
Field type is usually Short text.
Field ID (e.g., title, headline, name) is what you’ll map to the Shelf title property.
| Important: Entries without a title are labeled as “Untitled” in Shelf. This title mapping is critical. |

Description field (recommended)
Find the field that best represents a short summary or description, for example:
Summary
Short description
Excerpt
Confirm:
Typically Short text or Long text.
Note the Field ID (e.g., summary).
You can map this to the Shelf description property to improve search results and previews.
Rich text field(s) for main body content (required)
Find the field(s) that contain the main body of the content, for example:
Body
Content
Rich text
Instructions
Confirm:
Field type is usually Rich text (or sometimes Long text if you’re not using rich text).
Note the Field ID (e.g., body, content).
| Key concept: The connector automatically converts Contentful rich text into HTML so it can be displayed and searched in Shelf. |

If your rich text content is stored on a referenced entry (for example, a field like localisedContent that points to another content type):
Identify the reference field (e.g., localisedContent).
Open one of the referenced entries to find the field that holds the body (e.g., body).
Note both parts as a path using dot notation (e.g., localisedContent.body).
| Key concept: Reference fields link one entry to another. The connector supports reference traversal using dot notation, such as localisedContent.body. |

Collection reference field (optional)
If you use Contentful to organize content into collections, look for a field that links each entry to its collection, for example:
Collection
Confirm:
Field type is usually Reference (often to another content type such as Collection).
Note the Field ID (e.g., collection).
You can map this field so Shelf knows which collection each entry belongs to.
| Key concept: If an entry doesn’t have a collection assigned, Shelf places it in a “virtual collection” named No Collection (Contentful). |

Record your findings
Create a simple reference list or table with the IDs you’ve identified. You’ll use this when you configure the connector and set up field mappings in the Contentful connection profile configuration.
Example:
Space ID: abc123xyz
Primary Content Type: article
Title Field: title
Description Field: description
Rich Text Field: body
(Optional) Collection Field: collection
Keep this list handy; it is your “source of truth” when you specify which Contentful fields map to Shelf properties.
Understanding how Shelf Contentful connector uses these fields
The detailed information about how exactly these Contentful content fields are mapped to Shelf’s ones can be found in the Configuring Contentful connection profile chapter below.
Configurations in Shelf
Accessing Content Integration Layer
From the standard workflow described above you see that to start configuring and using your Contentful connector you need to access the Content Integration Layer feature. To do so, perform the following steps:
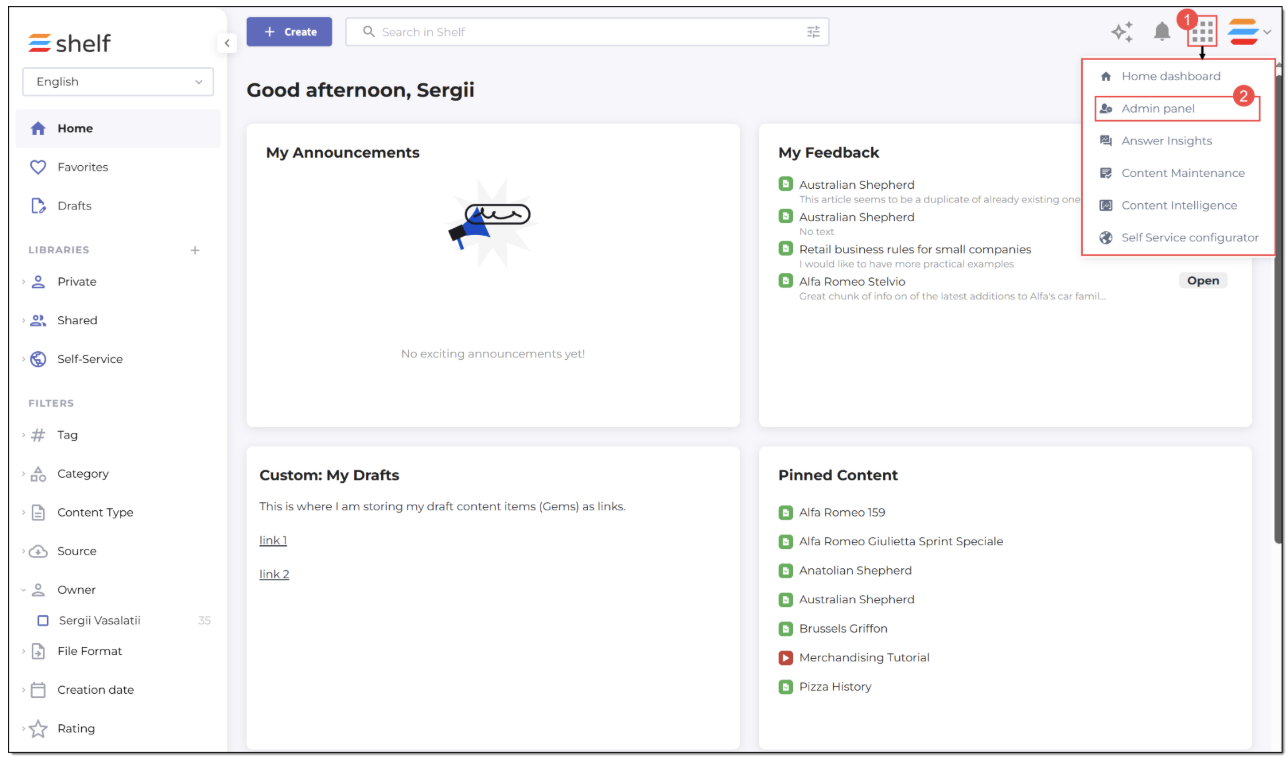 Figure 10. Accessing Admin panel in Shelf KMS
 Figure 11. Accessing CIL modules in Admin panel
Configuring Contentful connector
In fact, no configurations are needed for your Contentful connector. It is prebuilt and preconfigured by Shelf. You can see it in the connector list that appears once you select the Custom Connectors option in the Content Integration Layer section.
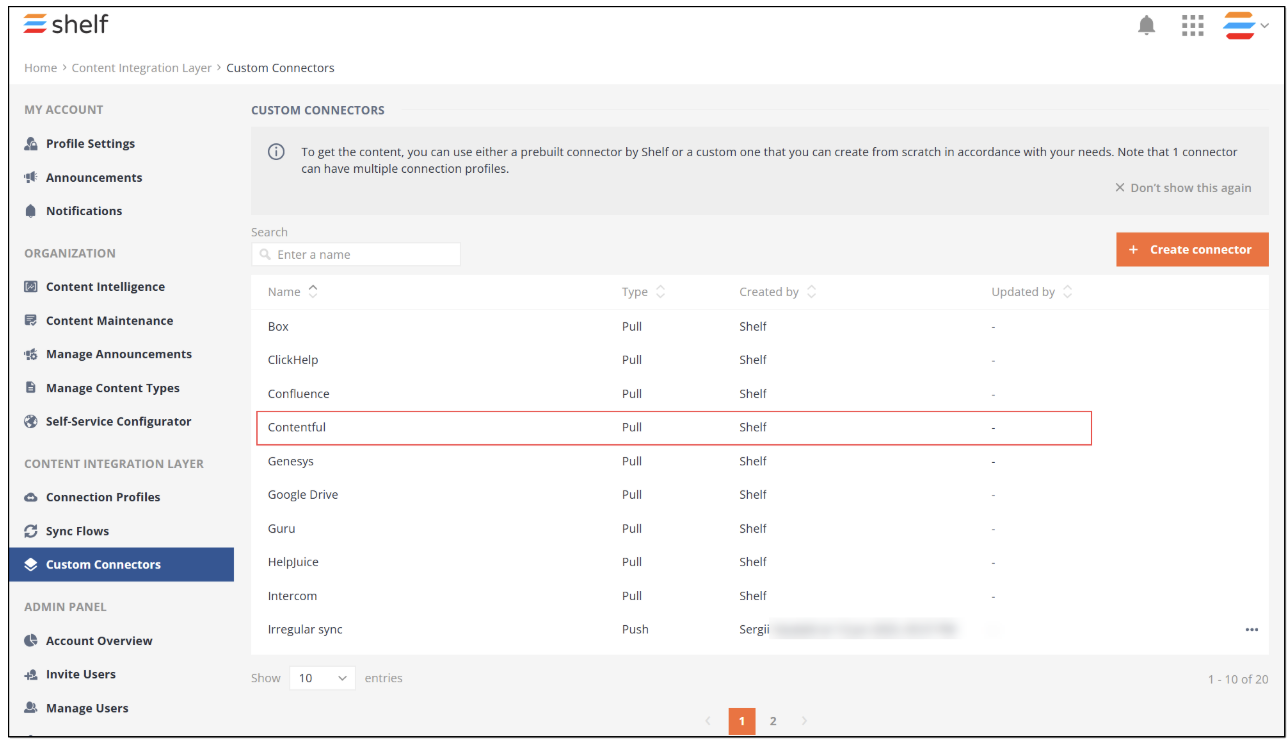 Figure 12. Viewing Contentful connector in CIL
What you need to do next is to create and configure a connection profile dedicated to work with the external content source such as your Contentful instance.
Configuring Contentful connection profile
The Contentful connection profile is a feature that uses the prebuilt Contentful connector and allows Shelf KMS to access, authenticate on Contentful, and communicate with it to find and sync content stored there. But to enable its proper operation, you need to create and configure it as described in the procedure below.
2) In the CONNECTION PROFILES window that appears, you see the list of available connection profiles. Neither the prebuilt nor other custom connection profiles can be used for communicating with Contentful, so you need to create a new connection profile. Click the Create connection profile button to start.
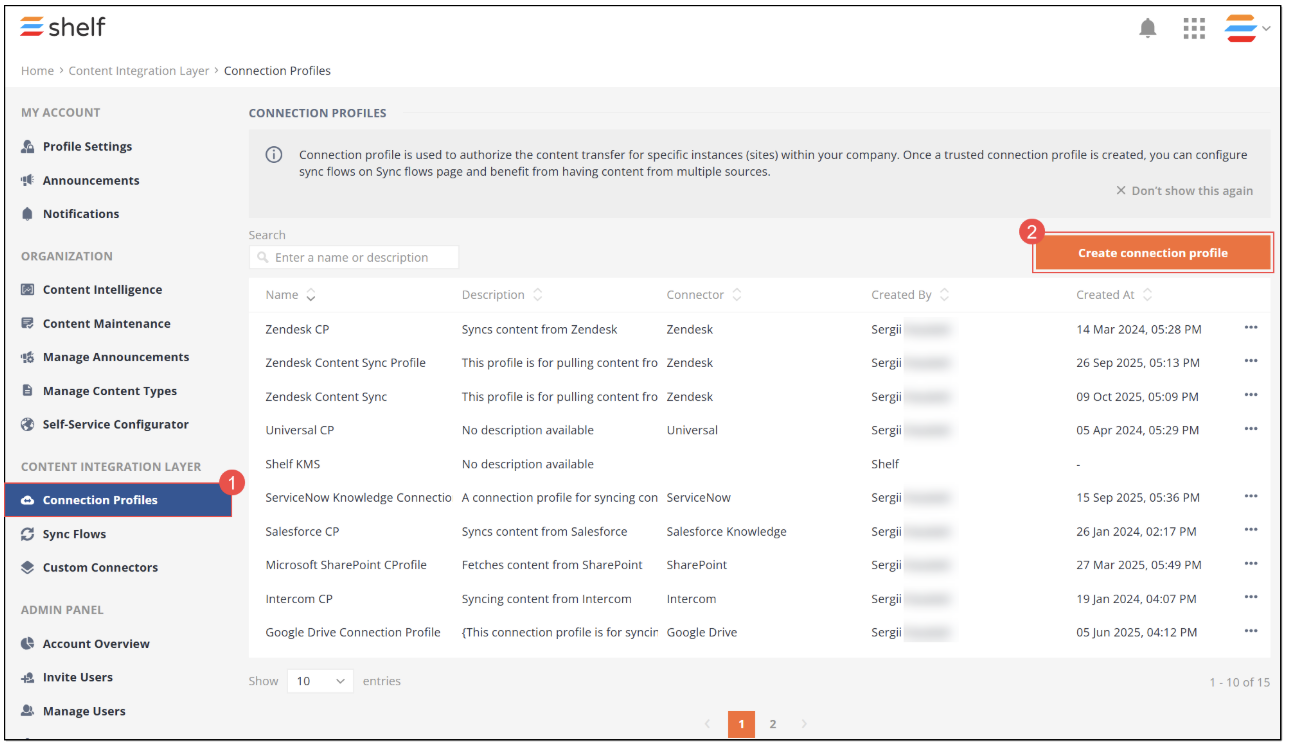 Figure 13. Accessing CIL connection profiles and starting creating new connection profile
 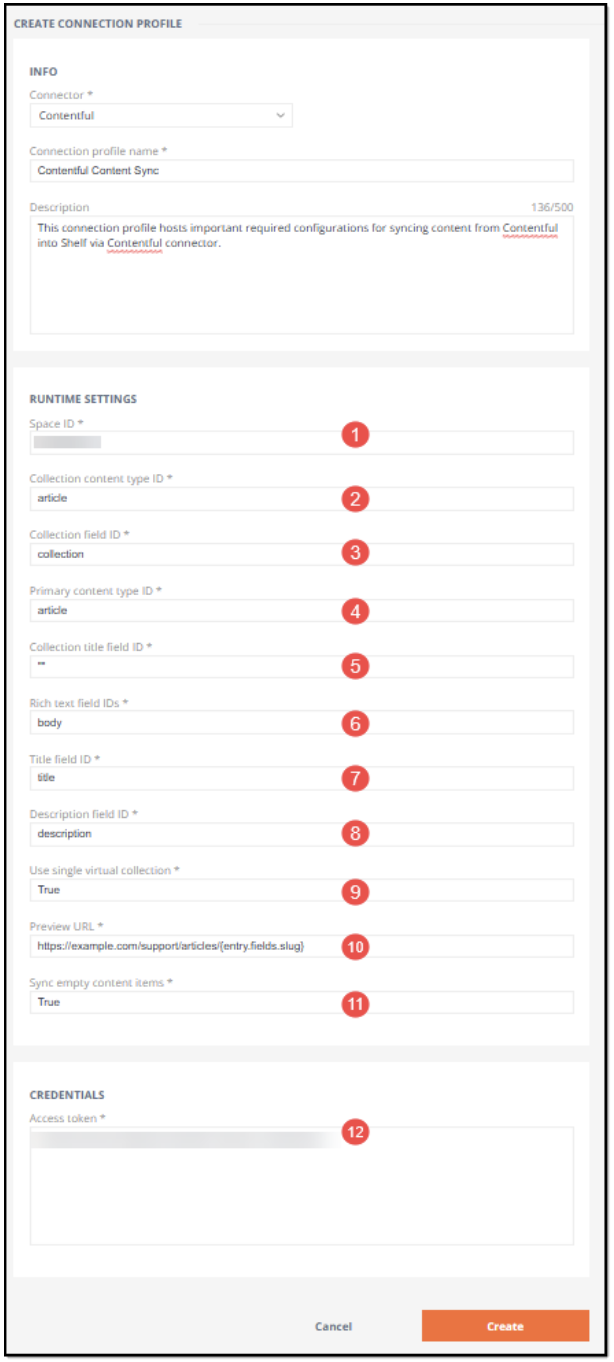 Figure 14. Configuring Contentful connection profile in Shelf
In the RUNTIME SETTINGS section, you need to use your Contentful Space ID (1) you have previously copied from the Contentful settings. In this section, you also fill in other fields required to identify content collections and items stored in Contentful.
(2) Сollection сontent type ID: This parameter identifies the type of content in a specific collection. The value 'article' suggests this collection contains Article type content
(3) Collection field ID: With the value ‘collection’ this parameter identifies the field in the data that contains information about the collection
(4) Primary content type ID: - This parameter identifies the main type of content in the collection. In our case, the primary content is 'Article'
(5) Collection title field ID: This identifies the field that contains some collection-specific value related to the title
(6) Rich text field IDs: With the value 'body' this identifies the field that contains the main body of text in the content, likely formatted in a rich text format that allows for more complex layouts than just plain text
(7) Title field ID: With the value 'title' this identifies the field that contains the title of the individual content items
(8) Description field ID: With the value 'description' this parameter identifies the field that contains a description
(9) Use single virtual collection: This parameter is used to tell Shelf how you want to categorize the content synced from Contentful: under individual collections (as used in Contentful) or under one virtual collection. The value here can be ‘False’ if you go with the first case or ‘True’ if you choose the second option
(10) Preview URL: This parameter allows you to preview content created in a Contentful space either in a local or an online version of your website or app. The value to be placed here looks as follows: https://[YOUR_PREVIEW_DOMAIN]/[PLACEHOLDER_TOKEN]
In our case, we can use the placeholder URL looking as follows: https://example.com/support/articles/{entry.fields.slug}. Details of this parameter and explanation of its operation can be found in the respective section below
(11) Sync empty content items: This parameter can have either “True” or “False” value and allows to sync the published global Contentful articles WITH local articles which are inside such global content items and have the draft or unpublished status. See the details in the relevant section below.
| Note that some of the parameters even if marked by an asterisk as mandatory can be populated with the "" placeholder to allow for the correct operation of the connection profile you are creating. In particular, these parameters are:
However, if you want synced content to preserve its original association with collections, you need to set the Use single virtual collection parameter to True and then populate the mentioned collection-specific fields with their proper values from Contentful. |

| Fields with the asterisk symbol (*) are mandatory. If they are left blank, you are not able to save the connection profile you are creating. |

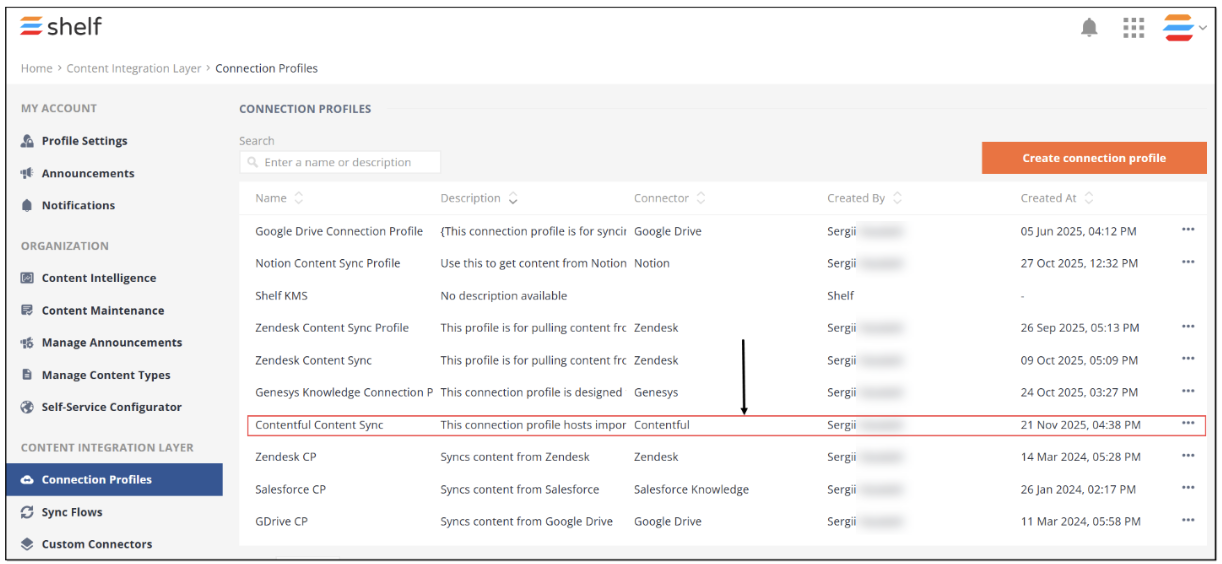 Figure 15. Verifying Contentful connection profile is created and available for use
Configuring Contentful sync flow
Now that you have configured the Contentful connector and connection profile, you need to create and configure the Contentful sync flow. Sync flows are basically sets of instructions telling Shelf KMS what content and when it needs to pull from external sources, in our case - Contentful.
To create and configure the Contentful sync flow, perform the following steps.
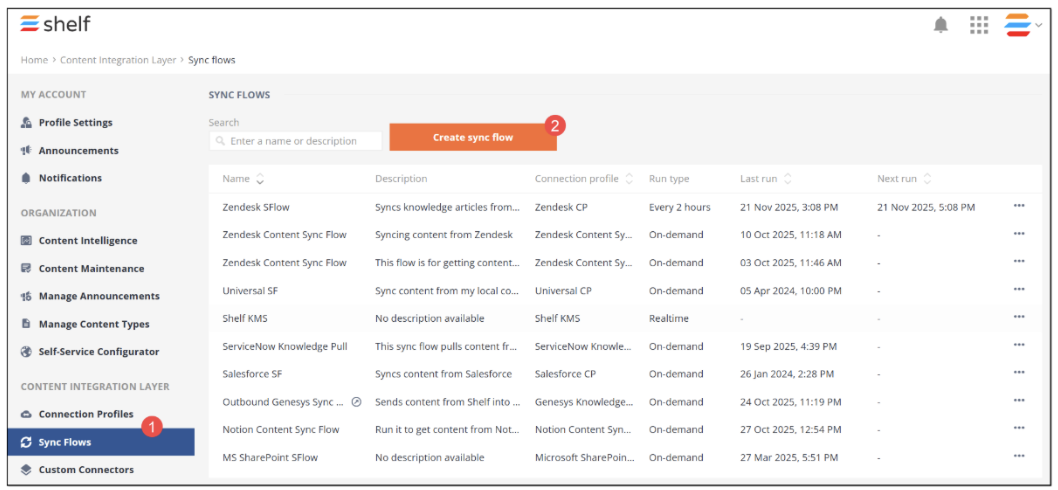 Figure 16. Starting creating Contentful sync flow
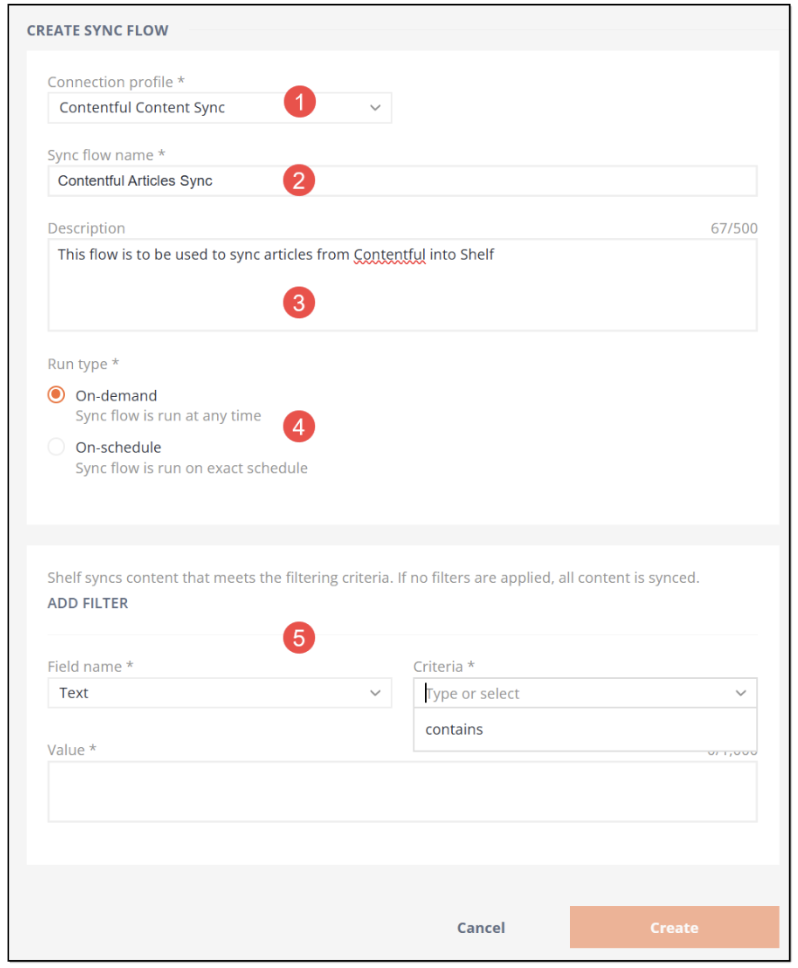 Figure 17. Configuring Contentful sync flow
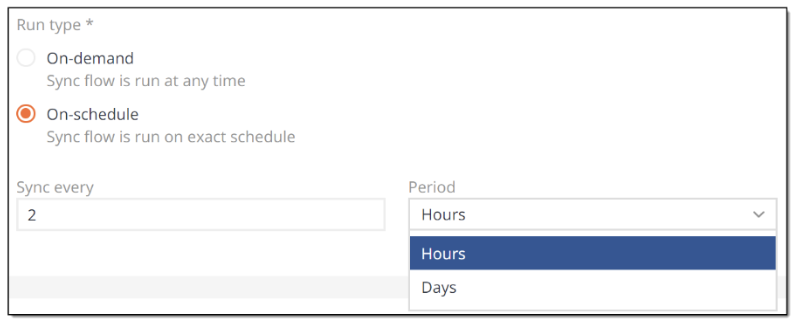 Figure 18. Configuring scheduled run of Contentful sync flow
The Shelf Contentful connector currently supports one (1) filter—Text, which can be further streamlined by the contains criterion. It means that if this filter and criterion are applied, the Shelf Contentful connector will sync only those content items from Contentful that contain words/phrases/text you have indicated in the Value field.
Running Contentful sync job
Once you have created the Contentful sync flow, you can either wait until it performs the content sync per schedule (if you have selected the On-schedule option for the sync flow run type), or start the sync manually at any time (if you have selected the On-demand option for the run type).
To manually start syncing your content from Contentful into Shelf, follow the below steps.
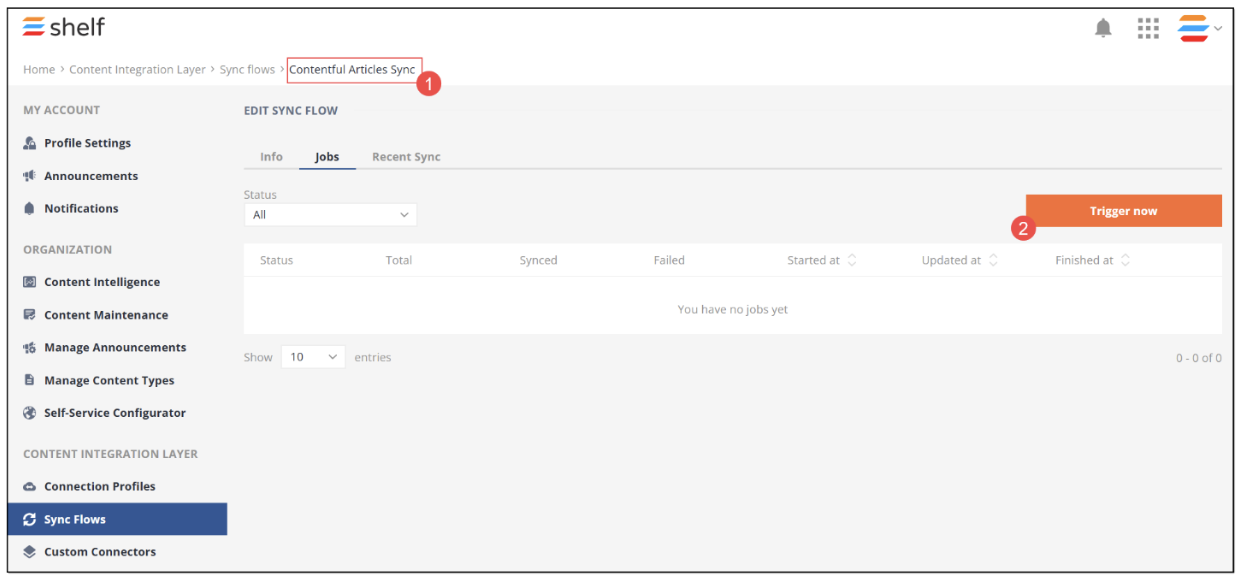 Figure 19. Manually running content syncing from Contentful into Shelf
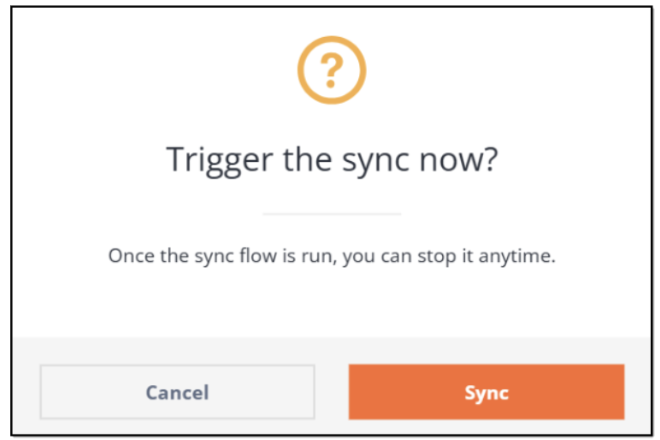 Figure 20. Confirming sync start
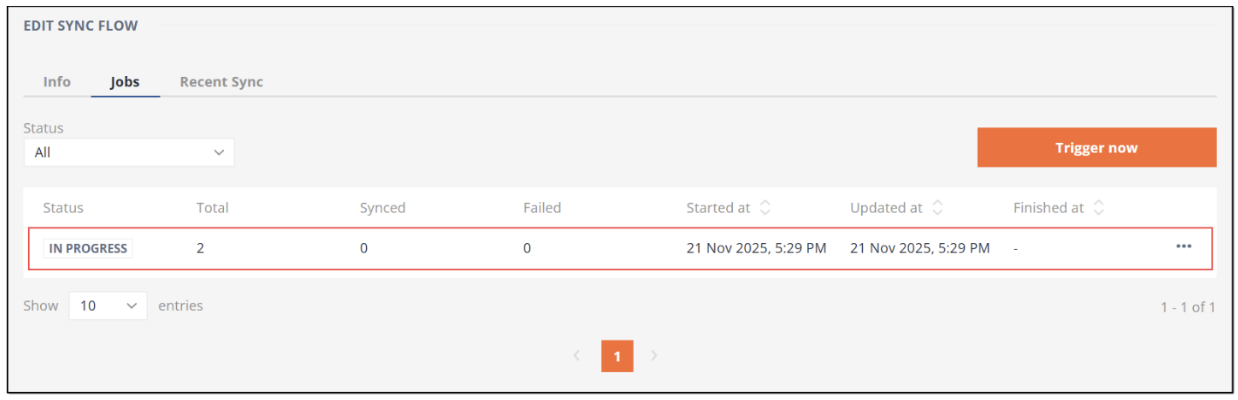 Figure 21. Viewing running Contentful sync job
| The sync job can be triggered manually both for the on-schedule and on-demand sync flows, unless there is a sync job running at that time. In the first case, the manually triggered job overrides the schedule set for the sync flow. At the same time, the sync flow execution will resume to occur per schedule after the manually triggered sync job is finished. If you manually trigger the sync flow job, it starts immediately. If there is a running sync job in this sync flow when you attempt to start a new job, this new job will not be created and, respectively, the content sync will not be started. In this case you will see the error message informing that the job is already running. If there are no other sync jobs running in this sync flow, the Jobs tab window refreshes, and a new job with the IN PROGRESS status appears in the table grid.. |

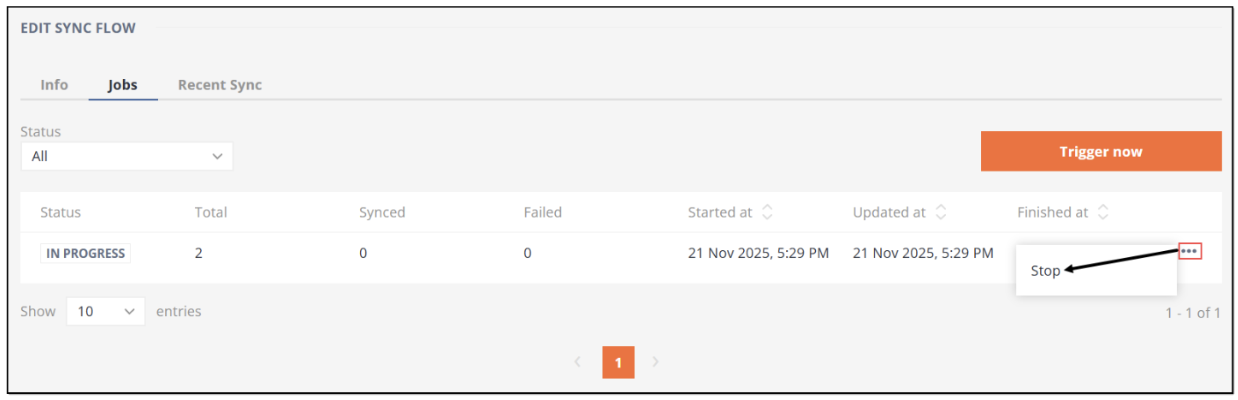 Figure 22. Stopping sync job
Checking syncing results
Once the sync job triggered manually or on schedule is finished, you will see it to change the status to SUCCESS (if the sync was successful) or FAILED (if some issues occurred during the sync). In the latter case, check your configurations in the Contentful connection profile and sync flow and rerun the sync job.
If the sync was successful, you can see the recently sync content directly from this window. To do so, open the Recent Sync tab and check the content items synced from Contentful into Shelf.
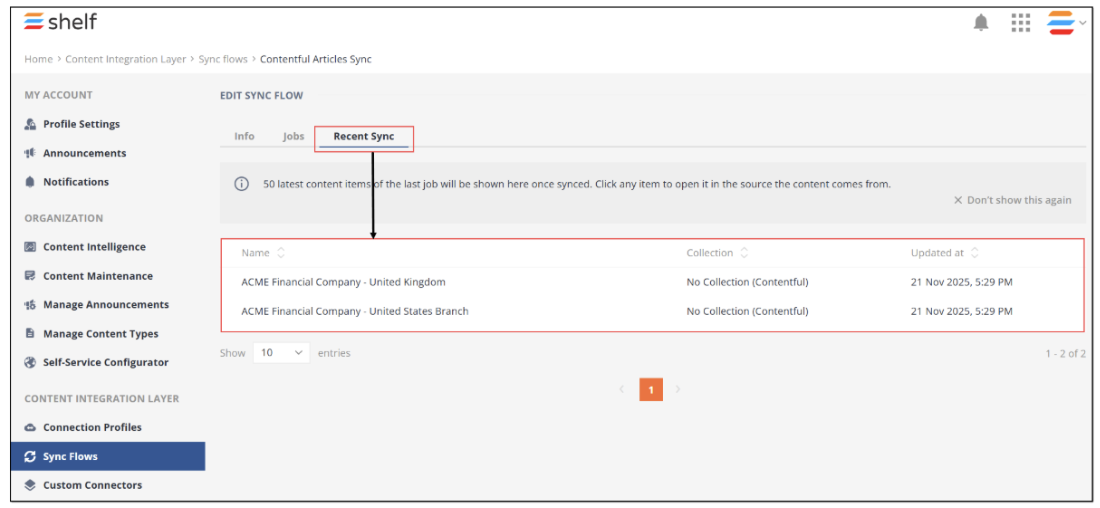 Figure 23. Viewing recently synced content from Contentful
Configuring Contentful permissions in User Groups
Even when you successfully configured the Contentful connector, connection profile, sync flow, run the sync job and pulled the content from your Contentful repository, if you have configured your Contentful connection profile so that your synced Contentful content will preserve its associations with original Contentful collections, you need to add those collections to the permitted sources via Shelf’s User Groups feature. Otherwise, you will not be able to search for the synced content and otherwise manage it in Shelf KMS.
To set the mentioned collection permissions, go back to the Admin panel, find and select the User Groups option in the navigation menu. Select the needed user group from the list to open it.
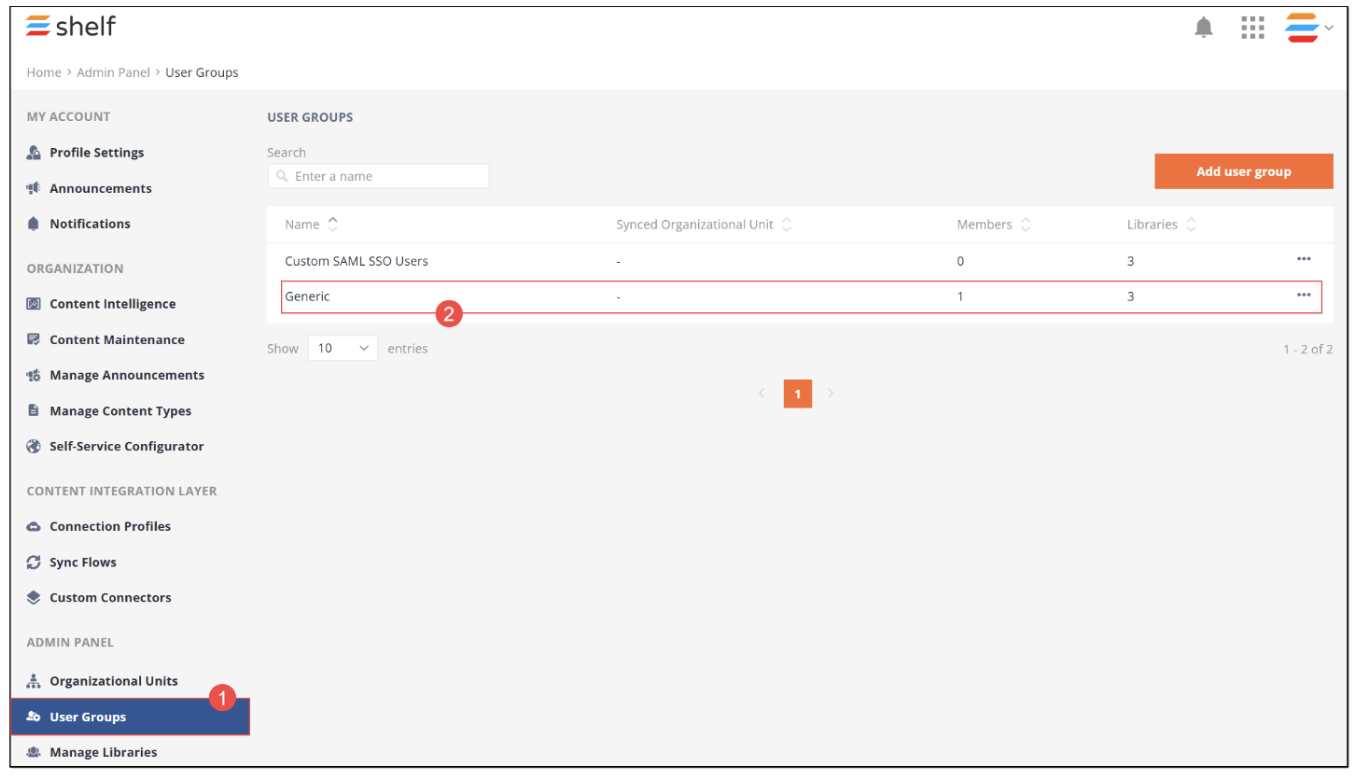 Figure 24. Accessing User Groups in Shelf
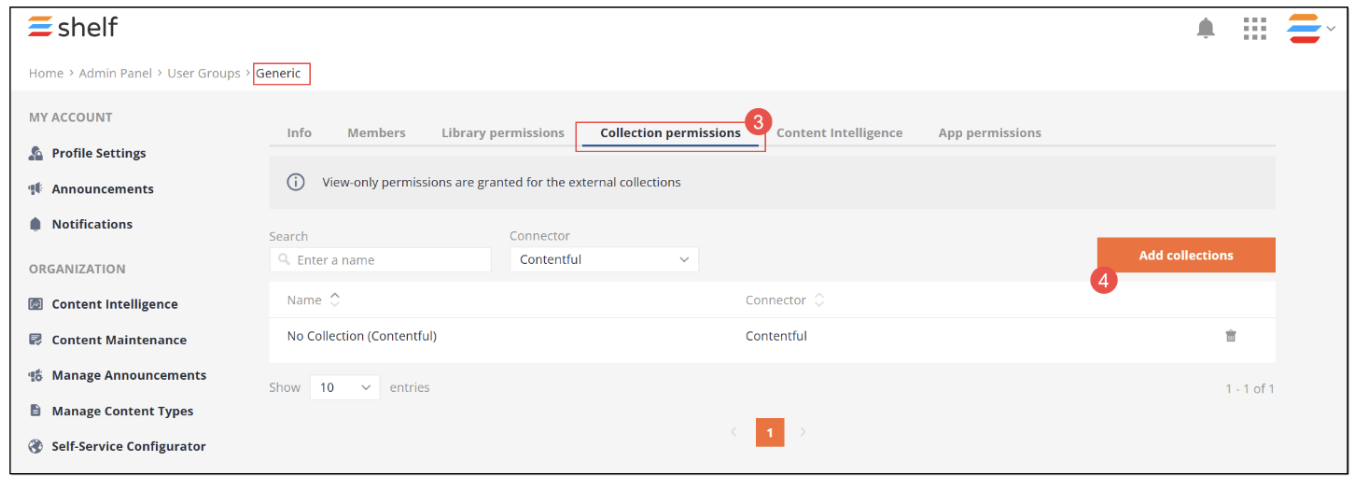 Figure 25. Starting to set Contentful collection permissions in Shelf
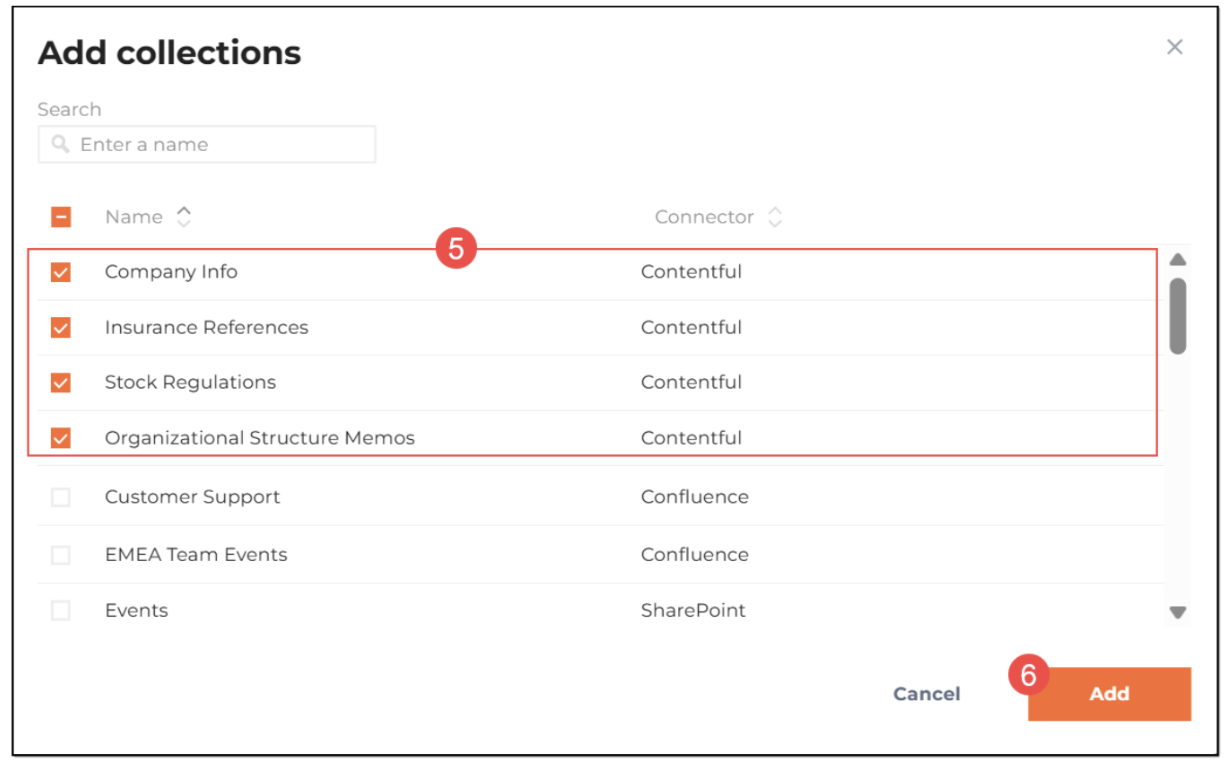 Figure 26. Selecting Contentful collections
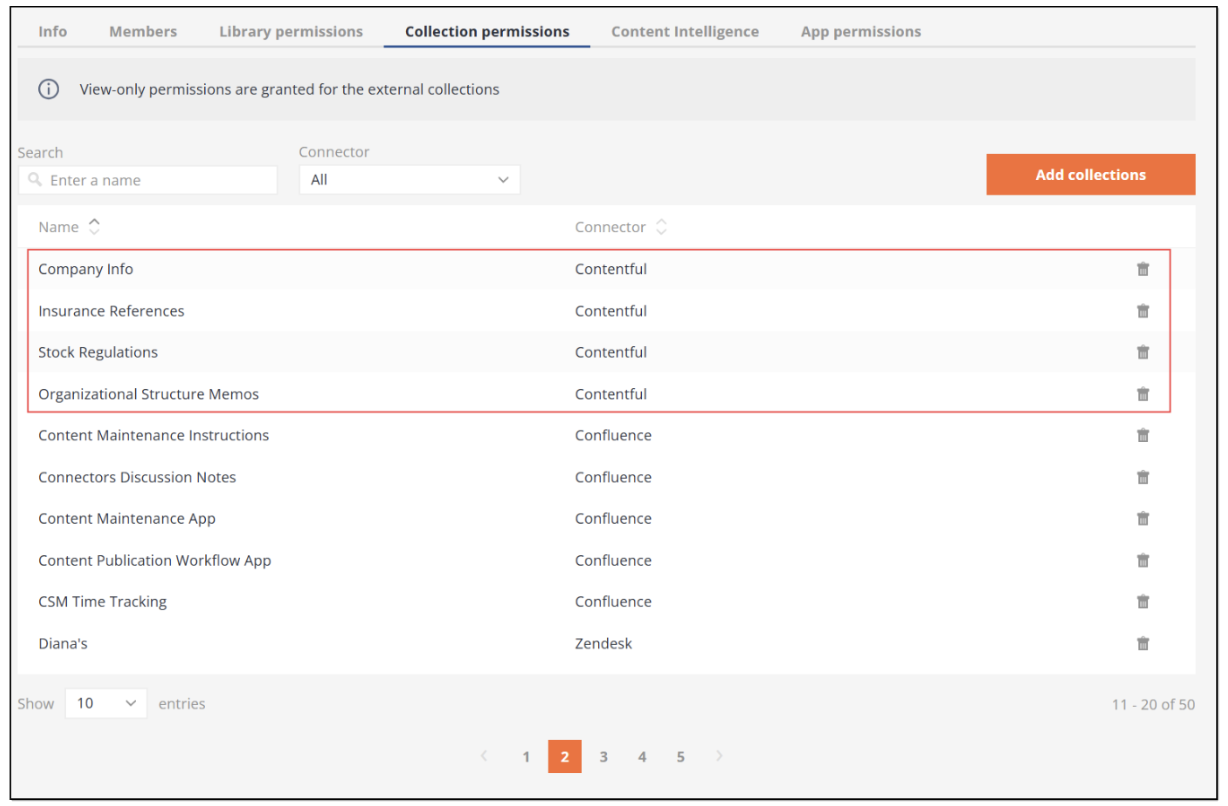 Figure 27. Viewing added Contentful collections
Viewing Contentful resources in Shelf
Go back to Shelf KMS homepage and select Contentful as the needed source in the navigation panel.
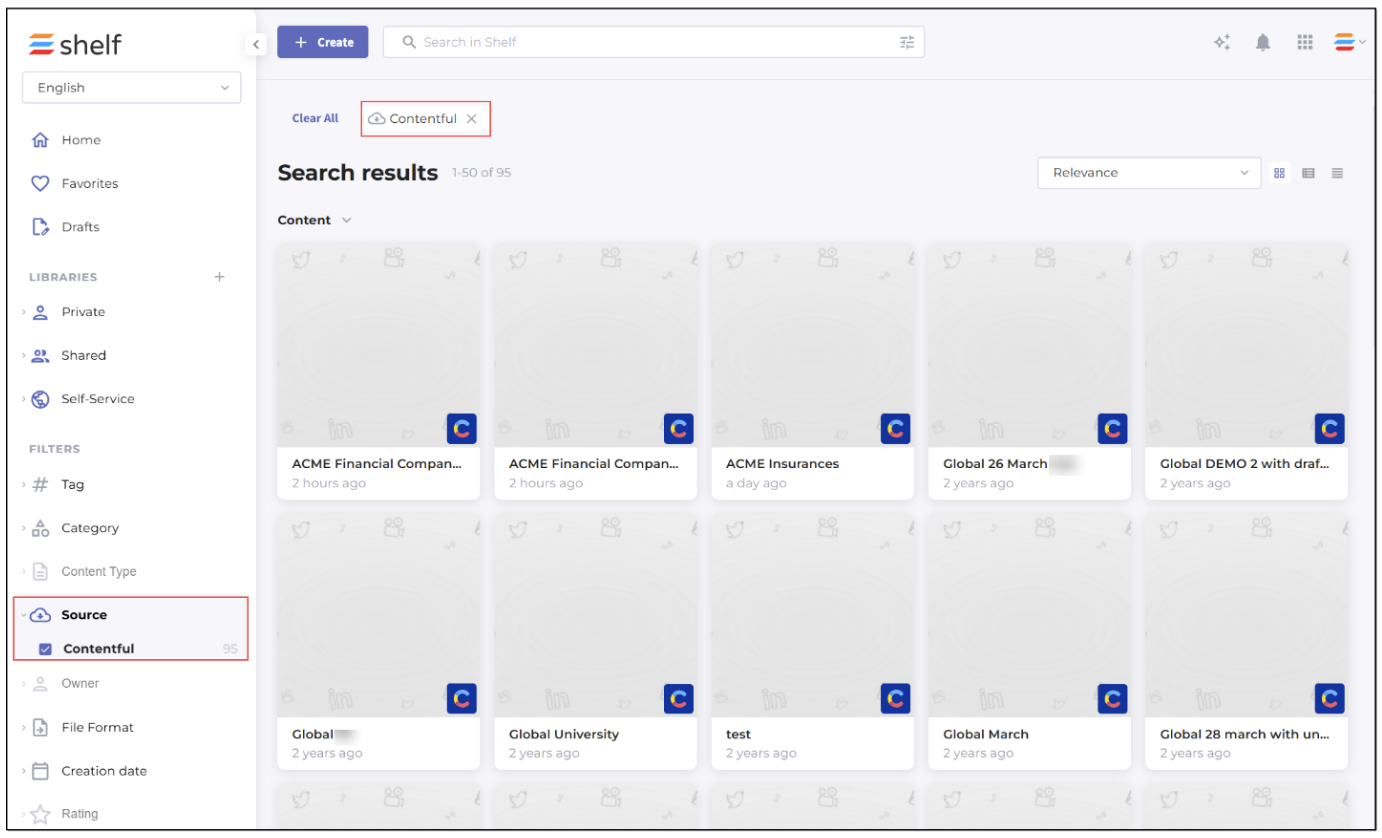 Figure 28. Viewing content synced from Contentful into Shelf
Note that if you select any content item synced from Contentful it will open not in Shelf KMS but in Contentful, or in your relevant online website or app, if the Preview URL parameter in the Connection profile settings is configured accordingly.
 Figure 29. Viewing content item in Contentful
Now, you can enjoy all the benefits, including the AI-enabled features such as Shelf Search Copilot, of Shelf KMS in relation to your content synced from Contentful.
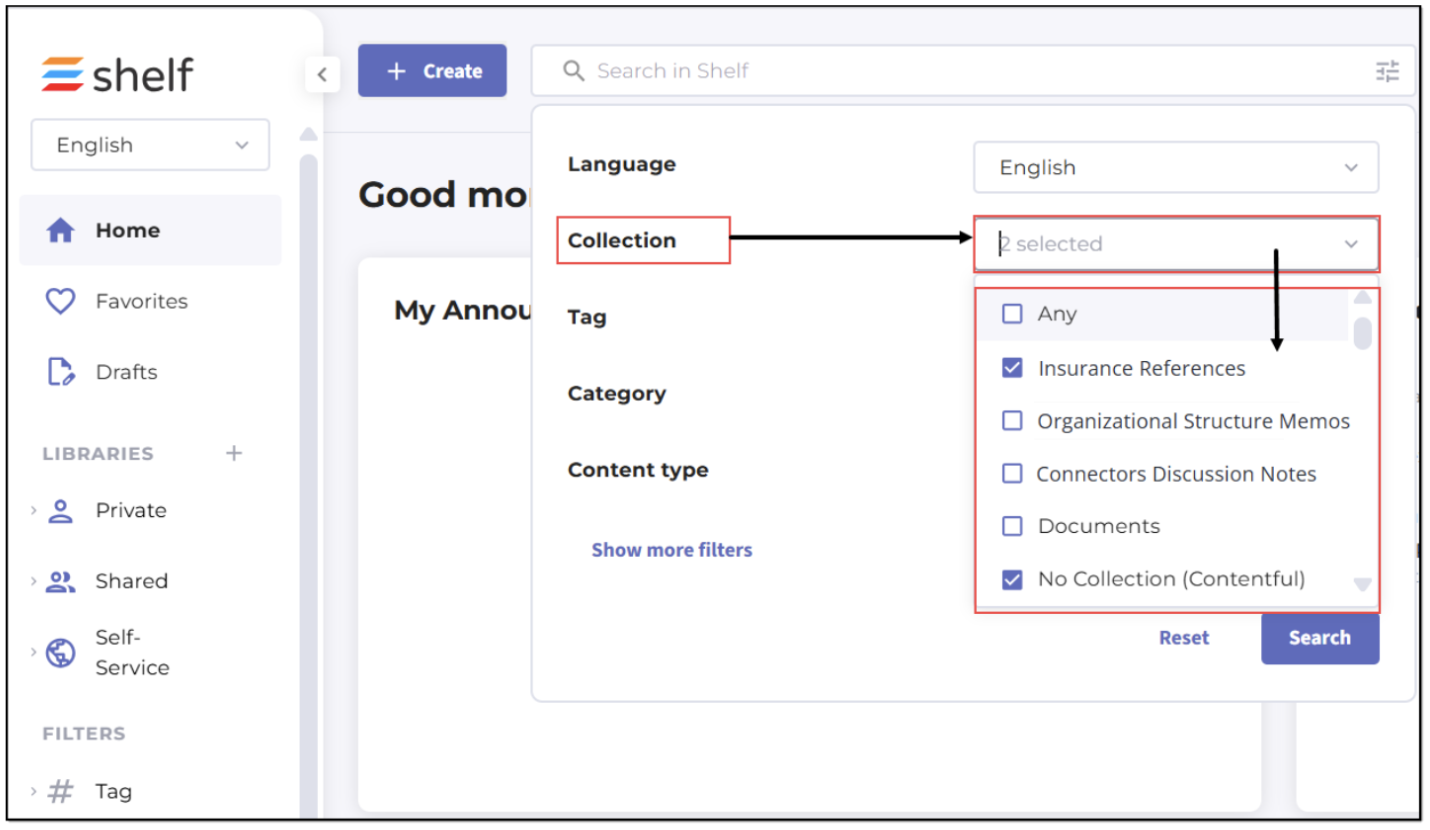 Figure 30. Searching synced content using Collections filter in Shelf KMS search
 Figure 31. Viewing search results for Contentful articles
Viewing Contentful resources in other platforms/websites/apps
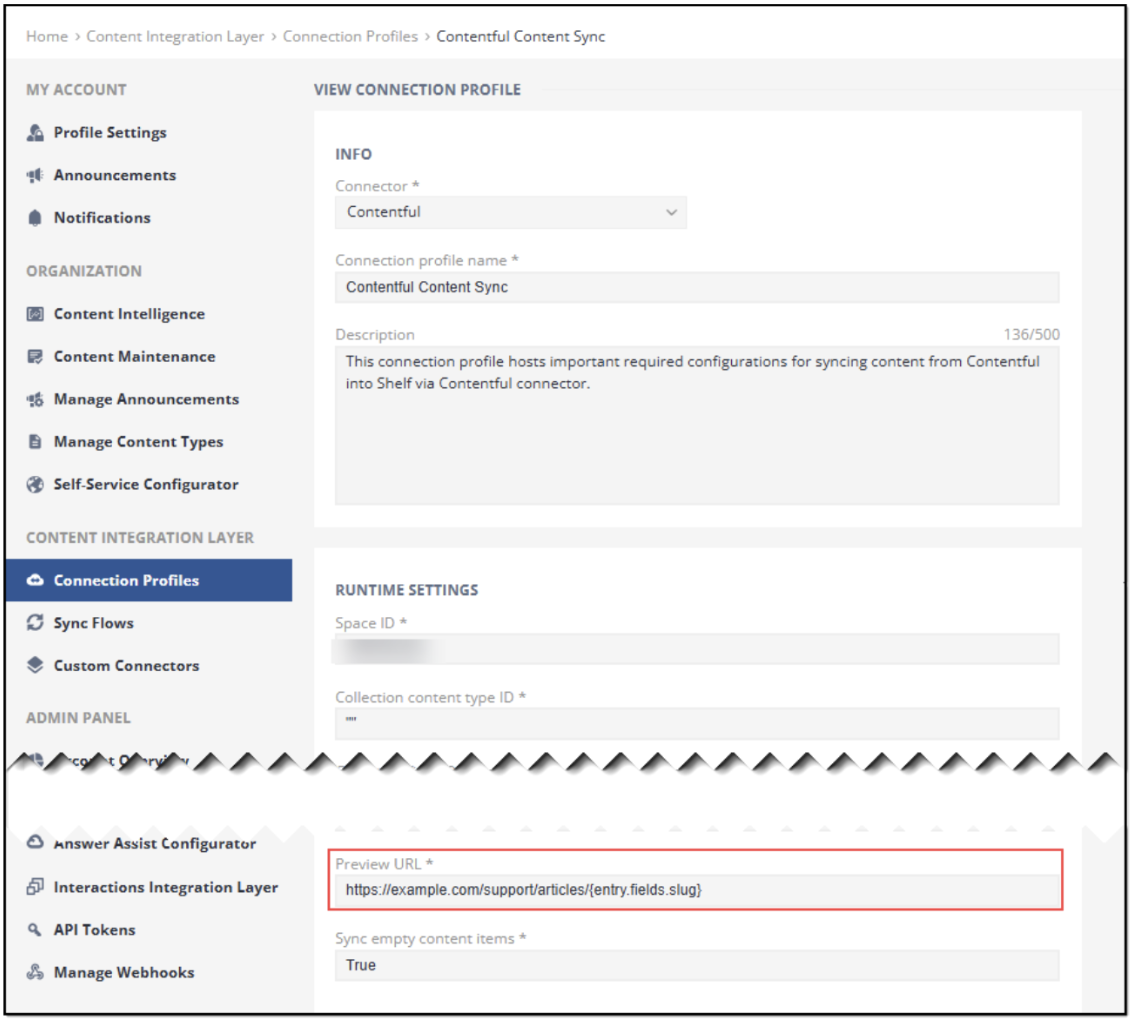 Figure 32. Viewing Preview URL parameter in Contentful connection profile settings in Shelf
This capability—viewing Contentful articles on platforms, websites, or applications other than Shelf KMS and Contentful—is derived from the Contentful Preview functionality and works in a similar way. When configured, the Preview URL lets Shelf build a link to your own frontend (for example, your public help center) instead of opening the Contentful web app. If the Preview URL is not provided or is invalid, the connector automatically falls back to the default Contentful app URL for previewing entries.
How Preview URL works
The Preview URL is a URL template that Shelf uses to generate preview links for synced entries:
Field name in configuration: previewURL
Type: String
Required: No
Length: 1–1024 characters
Description: URL template for generating preview links. Use placeholders that will be replaced with actual entry values.
The general pattern is:
https://[YOUR_PREVIEW_DOMAIN]/[…placeholders…]
Where:
YOUR_PREVIEW_DOMAIN is the base path of your preview platform, website, or app (for example, https://example.com/support/articles/).
Placeholders are expressions that reference fields or system properties of the current Contentful entry. At sync time, Shelf reads the entry from Contentful and replaces each placeholder with the corresponding value.
| In other words, you define placeholders in Shelf (in the previewURL template), but the field IDs and values they refer to come from your Contentful content model and entries. |

Placeholder rules
Placeholders in the previewURL template are evaluated by the Shelf Contentful connector, using data from the underlying Contentful entry. They are based on Contentful’s entry structure (entry.fields and entry.sys), but the connector only supports a specific pattern for placeholders.
Before you configure placeholders in Shelf, you must know the Field IDs in your Contentful content type (for example, slug, helpId, seo, etc.). These are defined in the Content model menu in Contentful.
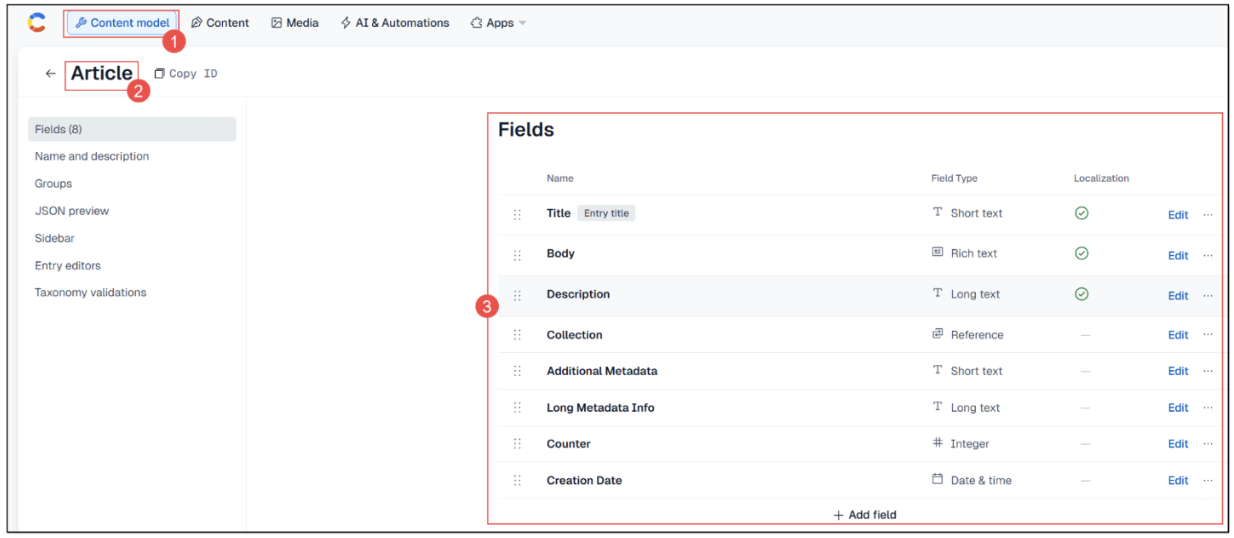
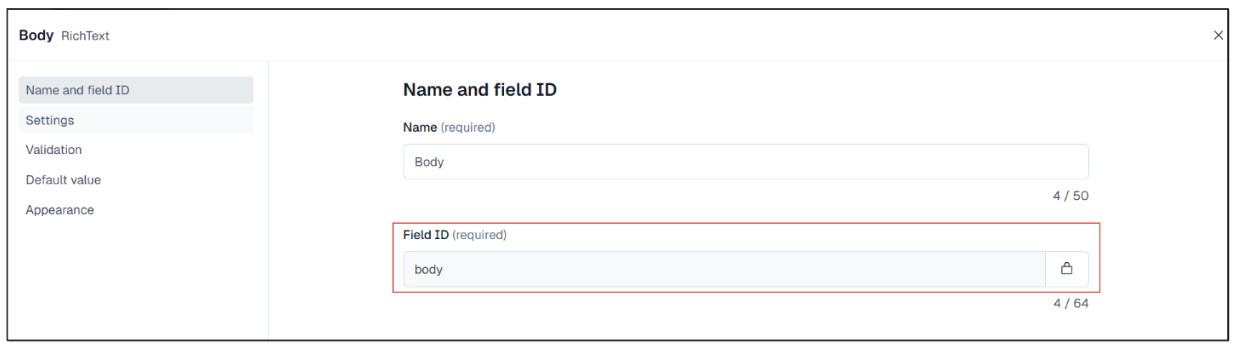 Figure 33. Finding fields and field IDs for specific content type in Contentful
Placeholders must:
Use the format {entry.fields.fieldName} for fields, or {entry.sys.property} for system properties.
Refer to fields/properties that actually exist on your content type in Contentful.
Use values that are strings or integers (so they can safely be used in URLs).
Supported patterns (examples, not exhaustive):
Field values (any field ID in your content type):
{entry.fields.slug}
{entry.fields.category}
Nested/reference fields following Contentful’s JSON structure, for example:
{entry.fields.seo.fields.title}
System properties:
{entry.sys.id}
{entry.sys.createdAt}
These are examples only. You can use any valid field ID from your Contentful content type (for example, {entry.fields.helpId}, etc.), as long as it follows the {entry.fields.…} format.
| Contentful’s own preview feature also documents additional tokens such as {env_id}, {locale}, {entry.linkedBy.sys.id}, {entry.linkedBy.fields.slug}, etc. These are not supported in the Shelf previewURL setting because they do not start with {entry.fields. or {entry.sys.. If you use them, validation will fail and the connector will fall back to the default Contentful app URL. |

| None https://example.com/support/articles/{entry.fields.slug} |
| None https://example.com/articles/{slug} ❌ (invalid because the placeholder is missing the required entry.fields prefix) |
| It’s recommended to validate and/or sanitize slug fields in your own frontend to avoid unsafe characters (spaces, #, %, quotes, etc.) that can break URLs |

Adding Preview URL value in Shelf
As mentioned in the Configuring Contentful connection profile section above, the Preview URL parameter in the Connection Profile settings allows viewing Contentful articles on other platforms, even when such articles are synced to Shelf KMS via Contentful connector.
To enable this:
In Contentful, identify your fields and Field IDs
Go to the Content model menu in your Contentful space.
Open your primary content type (for example, Article).
Note the Field IDs you want to use in the URL (for example, helpId, slug, seo, etc.).
Decide your preview base URL
Choose which domain and path you want to use as your preview base, for example:
https://example.com/support/articles/
Build a previewURL template using the correct placeholder syntax
Use the Contentful Field IDs you identified in Step 1 above.
Wrap them in the supported placeholder format {entry.fields.fieldId}.
Example template:
https://example.com/support/articles/{entry.fields.HelpId}/{entry.fields.slug}
In the example:
https://example.com/support/articles is YOUR_PREVIEW_DOMAIN.
{entry.fields.HelpId} references the helpId field on your Contentful entry (for example, a numeric or string ID segment).
{entry.fields.slug} references the slug field on your Contentful entry (for example, acme-financial-company-united-kingdom).
Enter the template into Shelf
In Shelf, start creating your dedicated Contentful connection profile as detailed in the relevant chapter above.
In the Preview URL field, enter your template (for example, https://example.com/support/articles/{entry.fields.helpId}/{entry.fields.slug}).
Save the Contentful connection profile
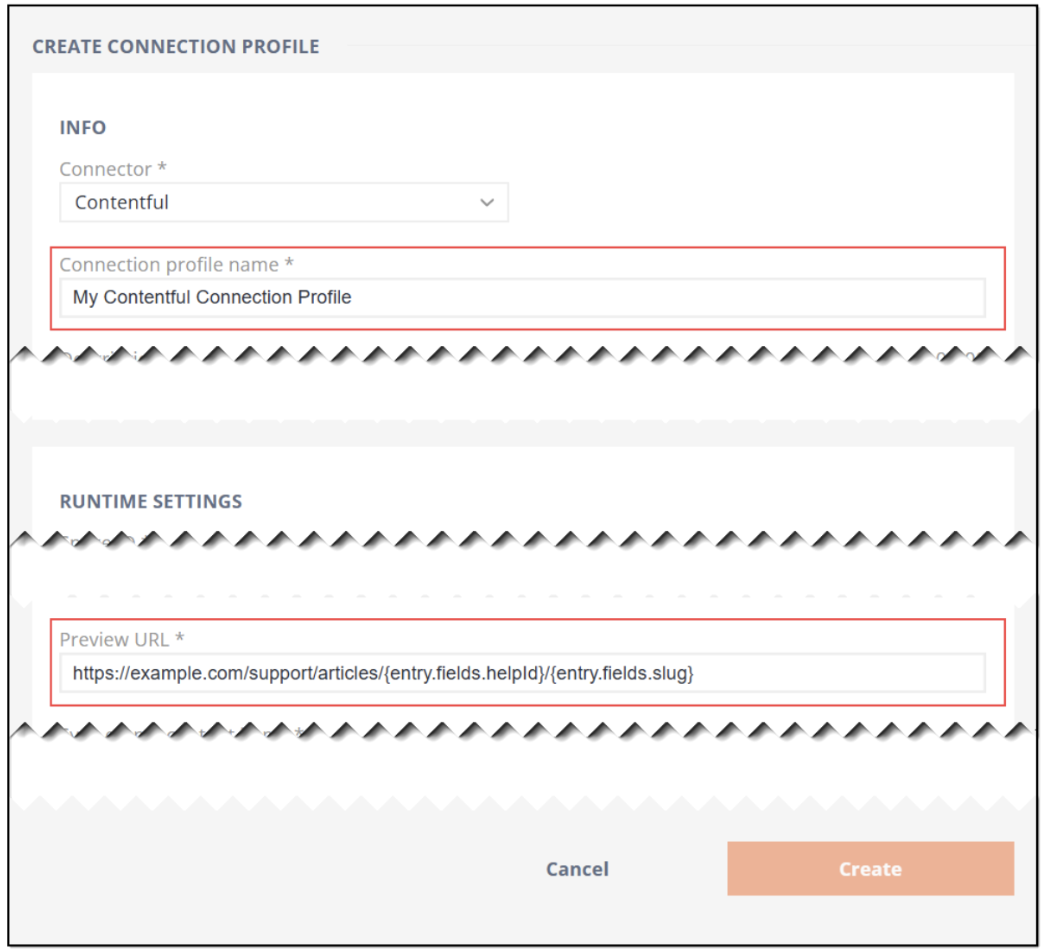 Figure 34. Adding Preview URL template for Contentful connection profile in Shelf
If the template is empty or uses invalid placeholders (for example, {slug} instead of {entry.fields.slug}), Shelf will fall back to the default Contentful app URL for previewing entries.
Adding Preview URL configurations in Contentful
This step is about providing data for the fields that your template references. Contentful itself does not store or know about the previewURL template you configured in Shelf; it only stores the entry fields and their values.
To ensure Shelf can generate correct preview URLs using your template:
 Figure 35. Creating / starting editing content item (Article) in Contentful space
helpId = 1234
slug = acme-financial-company-united-kingdom
When Shelf syncs this entry:
It reads the entry from Contentful.
It takes the previewURL template from the connection profile.
It replaces {entry.fields.helpId} with 1234 and {entry.fields.slug} with acme-financial-company-united-kingdom.
It produces a URL such as: https://example.com/support/articles/1234/how-to-reset-your-device
If any referenced field is missing or empty, or the template is invalid, the connector falls back to opening the entry in the Contentful app instead.
Creating and running Shelf sync flow for Preview URL feature
Now we need to create a dedicated sync flow to sync the article we want to see.
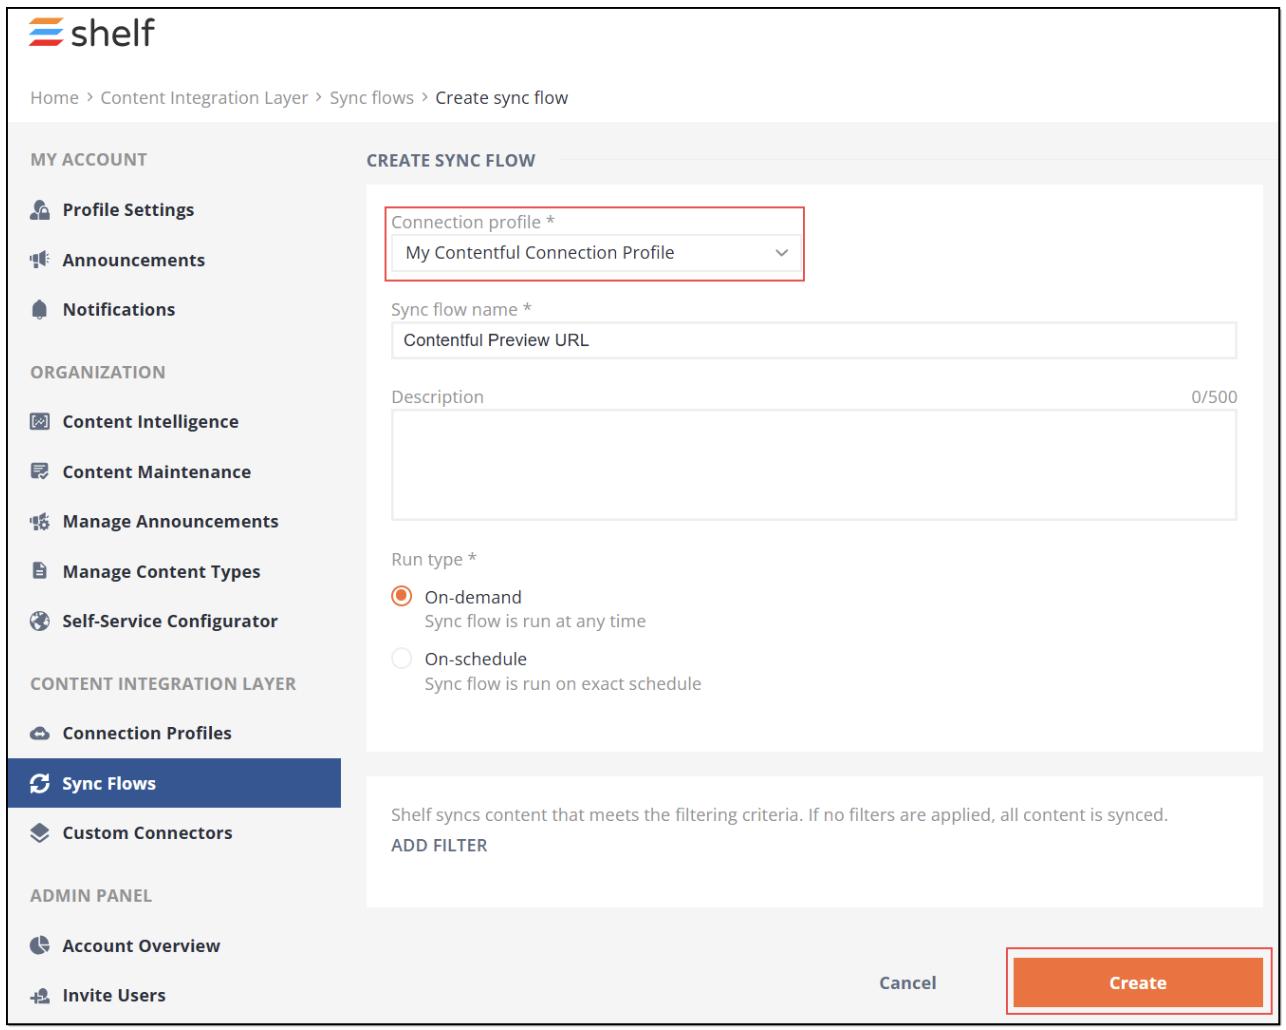 Figure 36. Creating dedicated sync flow in Shelf
 Viewing articles on external platform
Once all the above configurations are made, go to your Shelf KMS homepage, select Contentful as the needed source, and look for the needed article in the synced content.
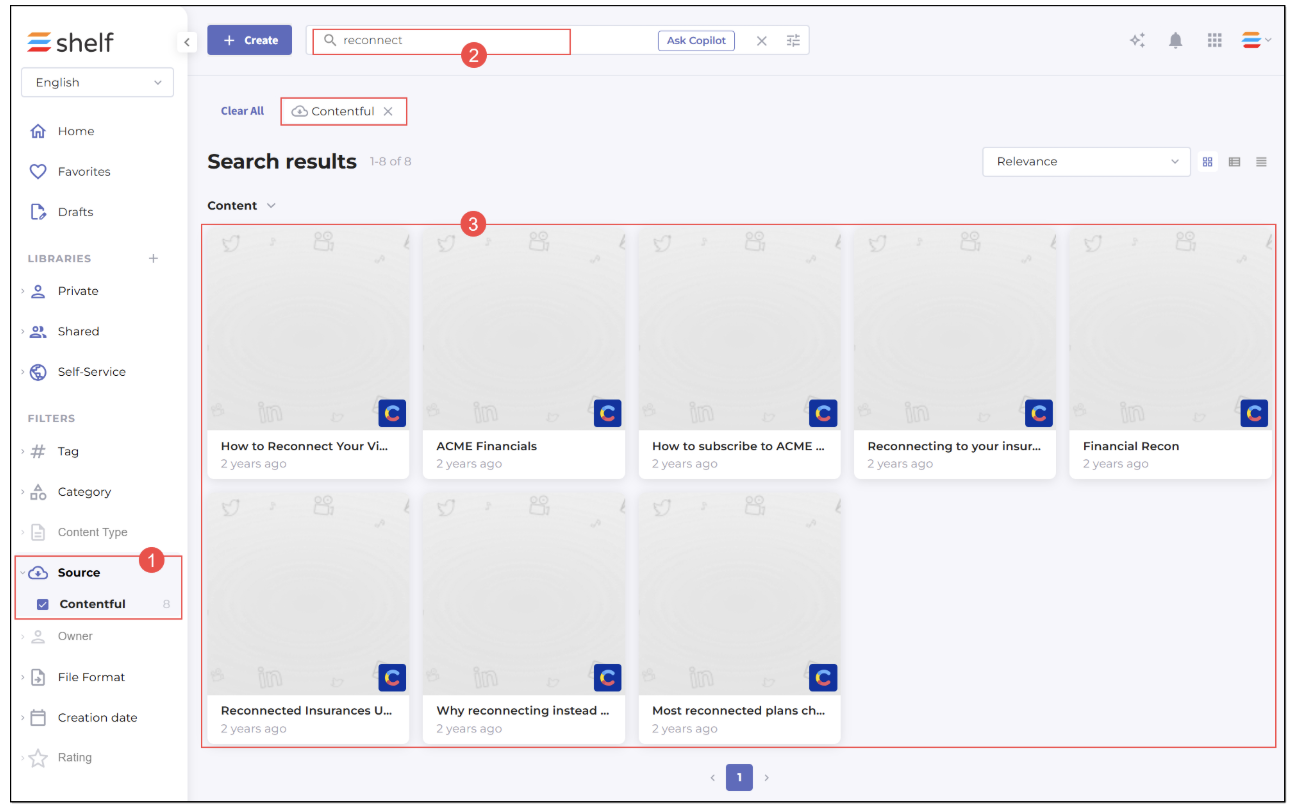 Figure 37. Selecting Contentful as content source and searching for specific Contentful content in Shelf
| If you want to change the way the Preview URL is created in the future, you will need to set up a new connection profile with the updated value and sync your content again. |

Syncing Contentful entries with or without empty content

Figure 38. Viewing Sync empty content items parameter that allows syncing unpublished (draft) content
In the connection profile’s RUNTIME SETTINGS, this option is stored as the syncEmptyContent field:
Field name: syncEmptyContent
Type: String
Required: Yes
Allowed values: true or false (must be a string, not a boolean)
Meaning: Controls whether entries that are missing a title or rich text content are synced.
By default, Shelf recommends using `syncEmptyContent: "false"` for production knowledge bases. In this mode, entries without a title or without rich text content are skipped and never appear in Shelf search results. This keeps your knowledge base clean and ensures end users only see complete, ready-for-use content.
If you change this setting to `syncEmptyContent: "true"`, the connector will sync entries even if they are missing a title or rich text content. This mode is useful in internal or draft environments where authors and reviewers want to search and open in-progress entries in Shelf while they are still being written.
How empty content is determined
For the purposes of this setting, an entry is considered to have empty content if:
The field you configured as the Title field is missing or empty, or
The field(s) you configured as Rich text fields (main body) are missing or empty.
When `syncEmptyContent` is `"false"`:
Entries that do not have a value in the Title field, or do not have any content in the configured rich text field(s), are skipped during sync.
Only entries that have both a title and rich text content are synced and made available in Shelf.
This is the recommended setting for live, customer-facing knowledge bases.
When `syncEmptyContent` is `"true"`:
Entries are synced even if their title or rich text content is missing.
Entries without a title are still created in Shelf, but their title is displayed as “Untitled”.
Entries whose rich text fields are empty are synced without a body of content or attachments (they will appear as items with little or no visible article content).
This mode is best suited for internal or draft workspaces where authors want everything to be visible and searchable, including partially completed articles.
Configuring Sync empty content items setting
When you create or edit a Contentful connection profile in Shelf:
Go to the RUNTIME SETTINGS section.
Locate the Sync empty content items option (stored as `syncEmptyContent`).
Choose one of the following values:
`false` – sync only entries that have both a title and rich text content (recommended for production).
`true` – sync all entries, including those missing a title and/or rich text (recommended only for internal/draft workspaces).
Save the connection profile.
Next, create or update your Contentful sync flow to use this connection profile, and run a sync job:
With `syncEmptyContent` set to `false`, verify that incomplete entries (for example, entries with an empty body or no title) do not appear in Shelf search or in the Recent Sync tab.
With `syncEmptyContent` set to `true`, run the sync again and check that these same entries are now present in the Recent Sync tab and searchable in Shelf (titles may appear as “Untitled”, and articles without rich text will have no visible body).
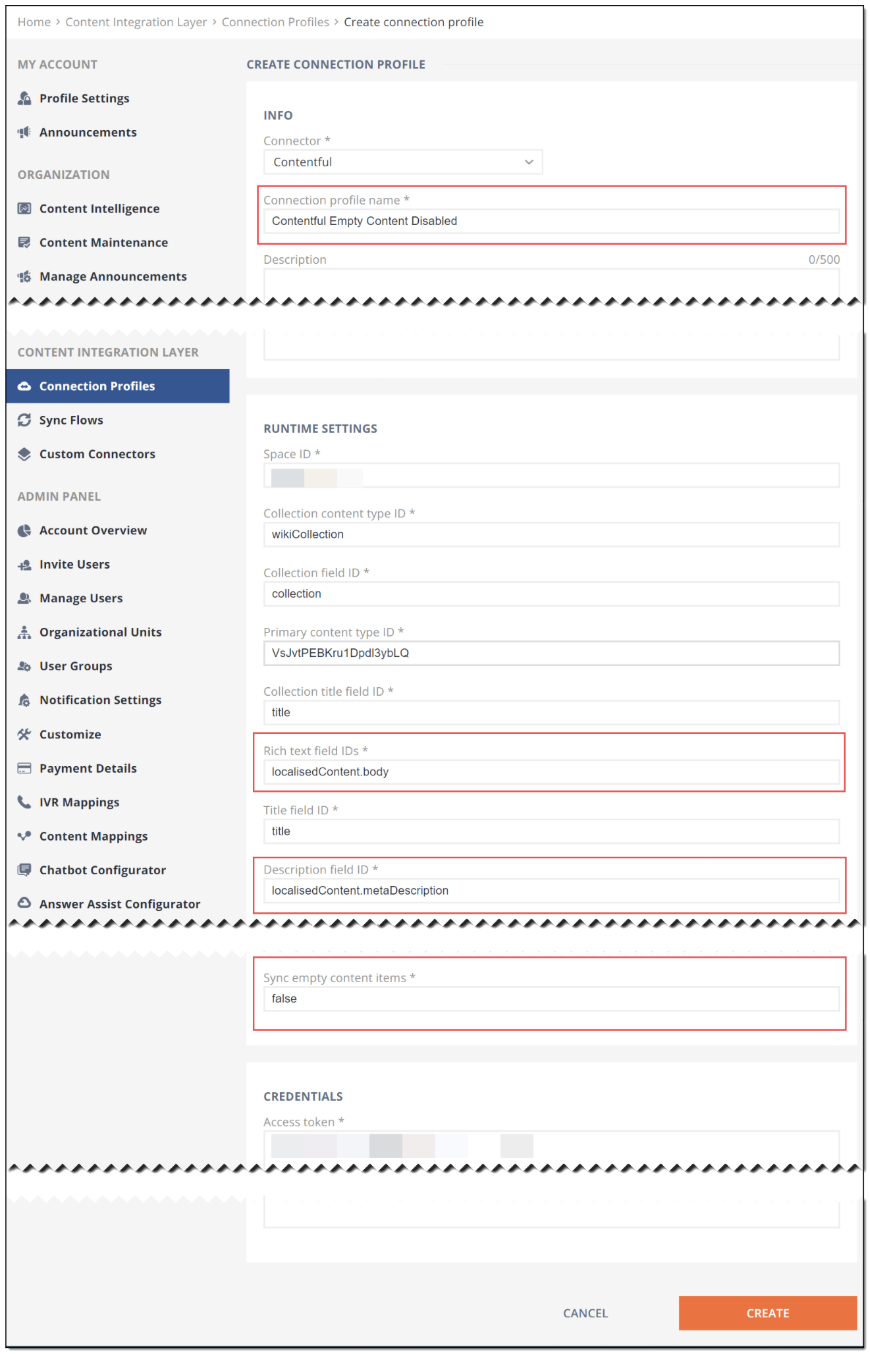
Figure 40. Creating/configuring Contentful connection profile with disabled empty content syncing
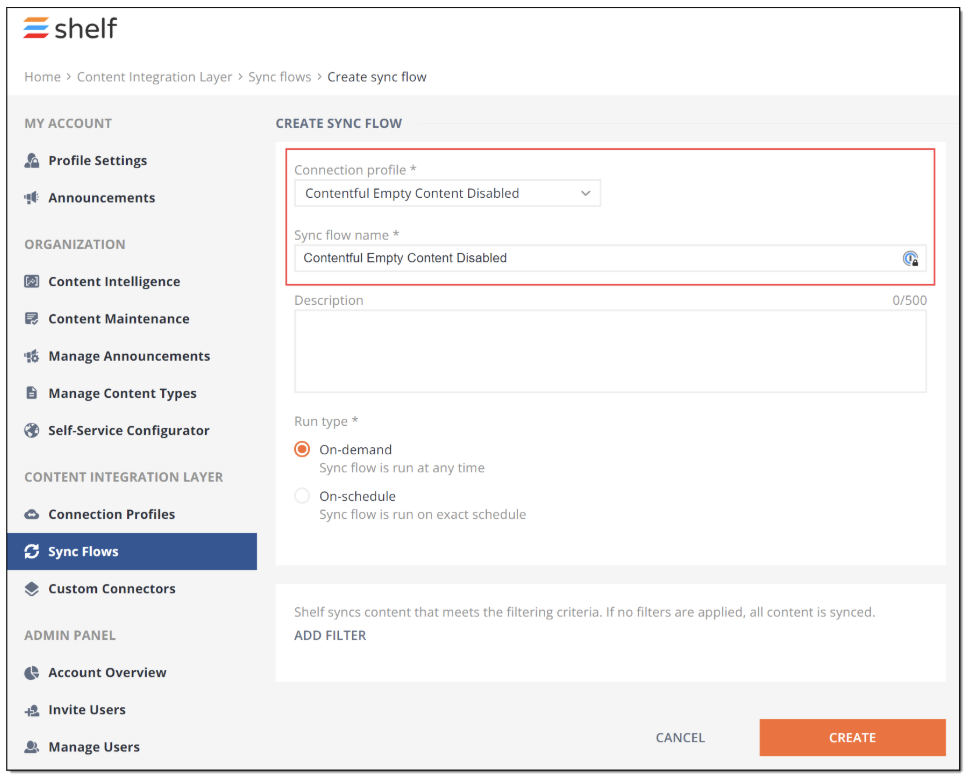 Figure 41. Creating and configuring Contentful sync flow
 Figure 42. Running Contentful sync job
 Figure 43. Viewing sync job status
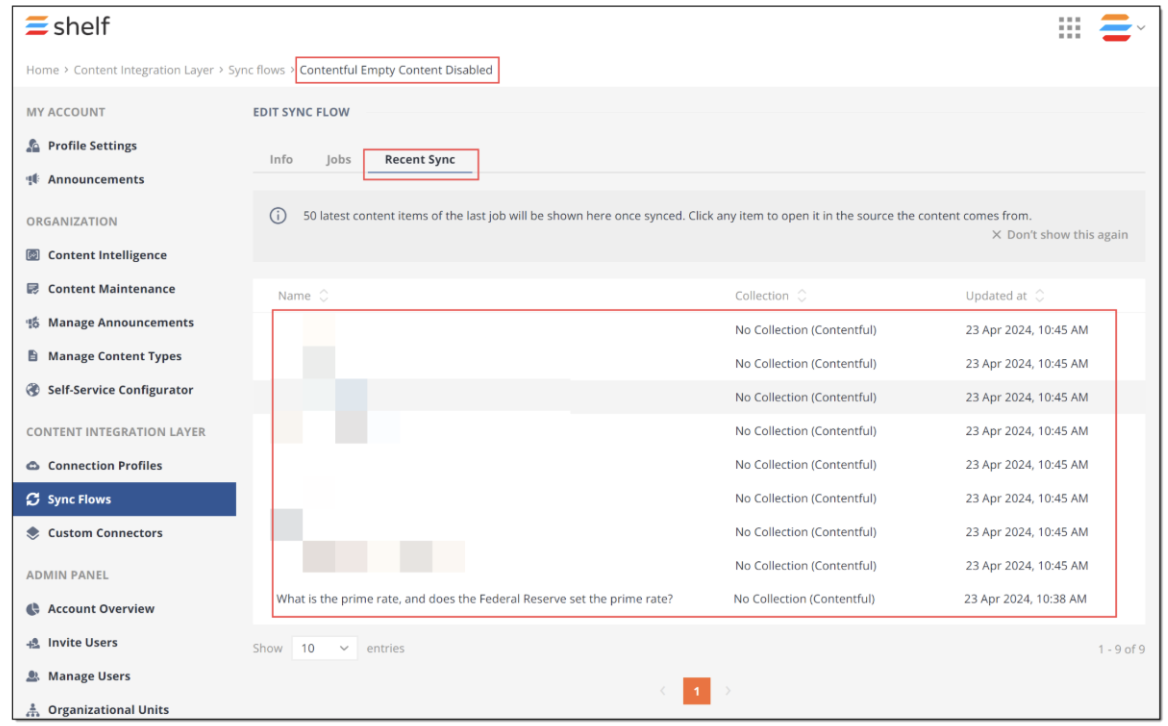 Figure 44. Checking whether Contentful articles with empty body or title (incomplete/draft) are synced to Shelf
As seen in Figure 44 above, the article that has no title or has the empty rich text field(s) is not synced because the Sync empty content items parameter has been set to false.
Now, let’s see what would change if we set this parameter to true and then create the relevant sync flow and run the relevant sync job.
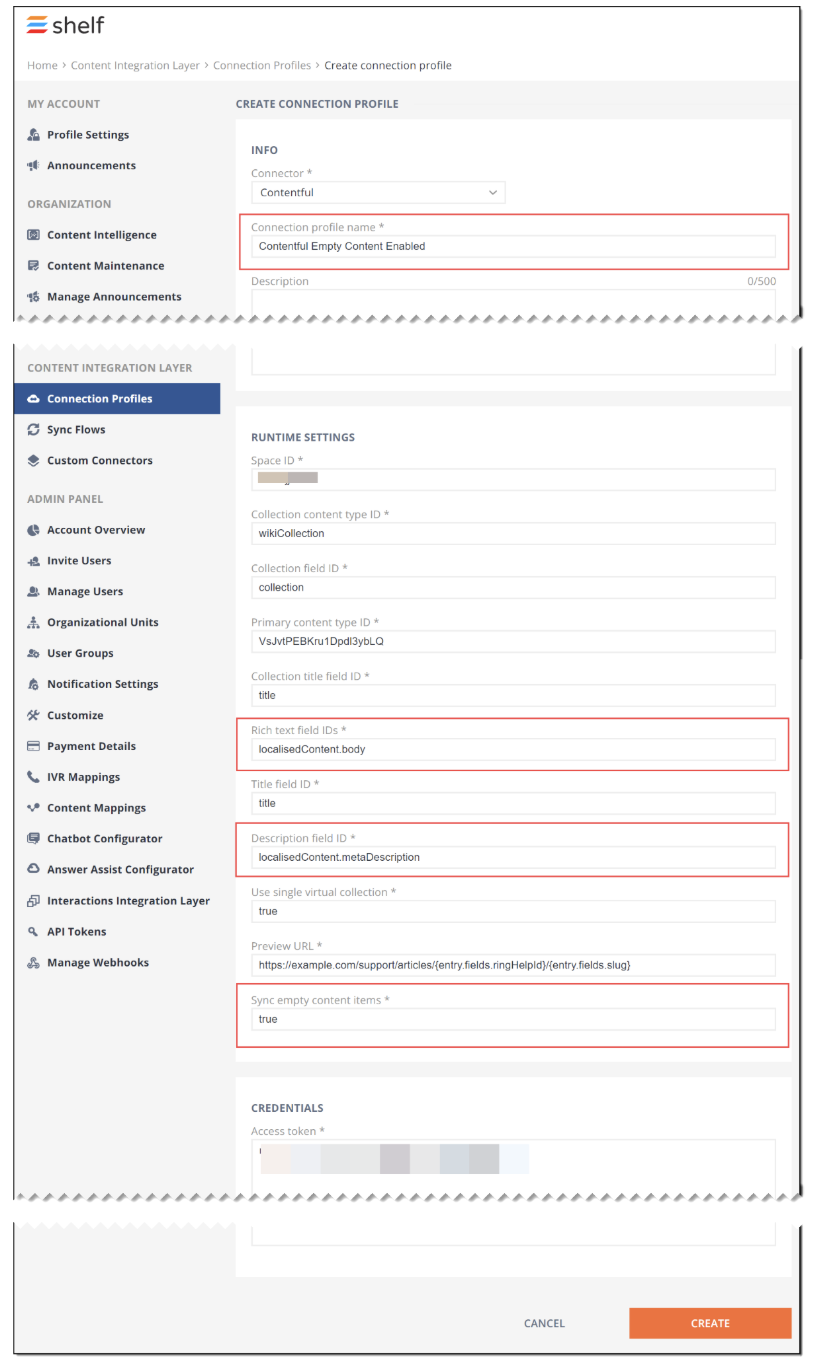 Figure 45. Creating/configuring Contentful connection profile with enabled empty content syncing
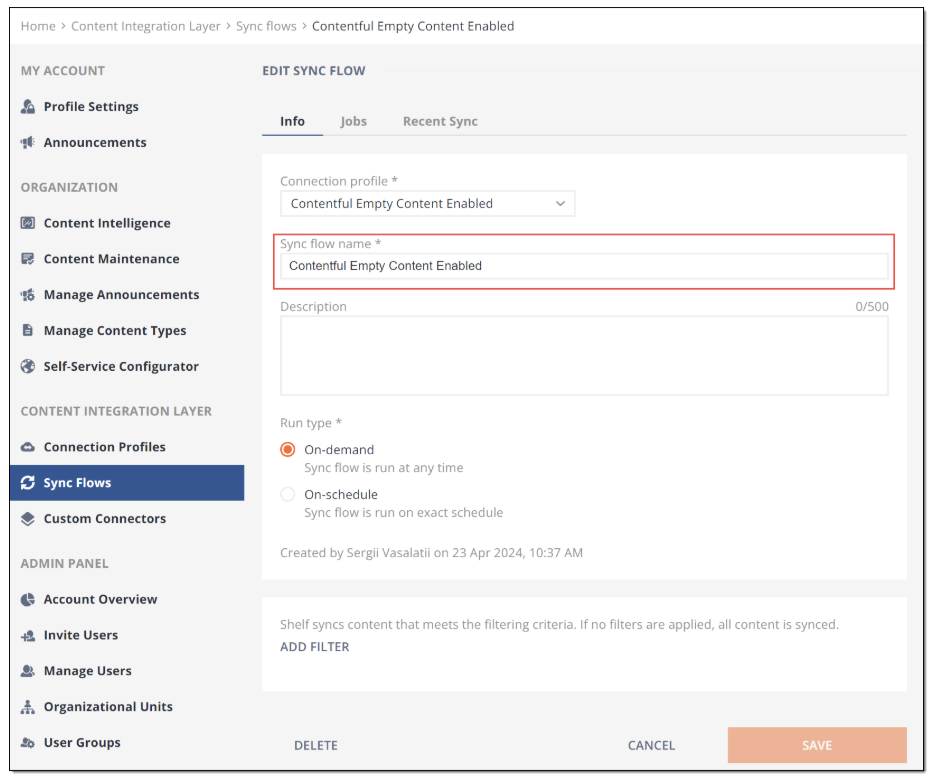 Figure 46. Running Contentful sync job
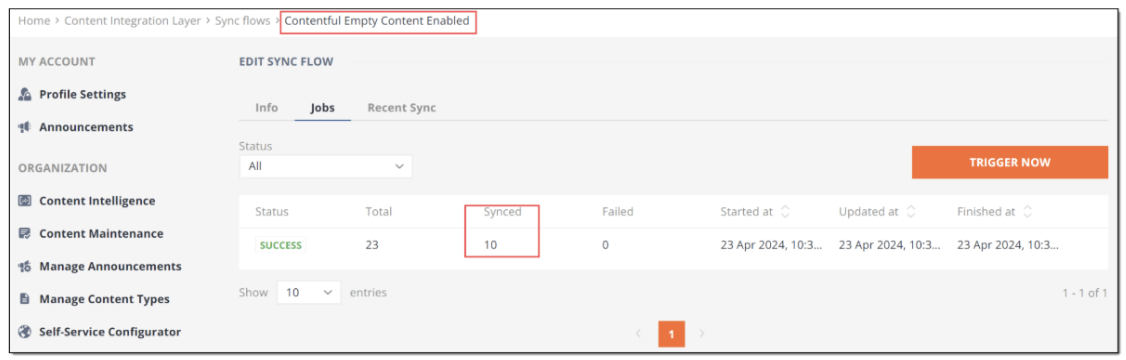 Figure 47. Running Contentful sync job and checking its status
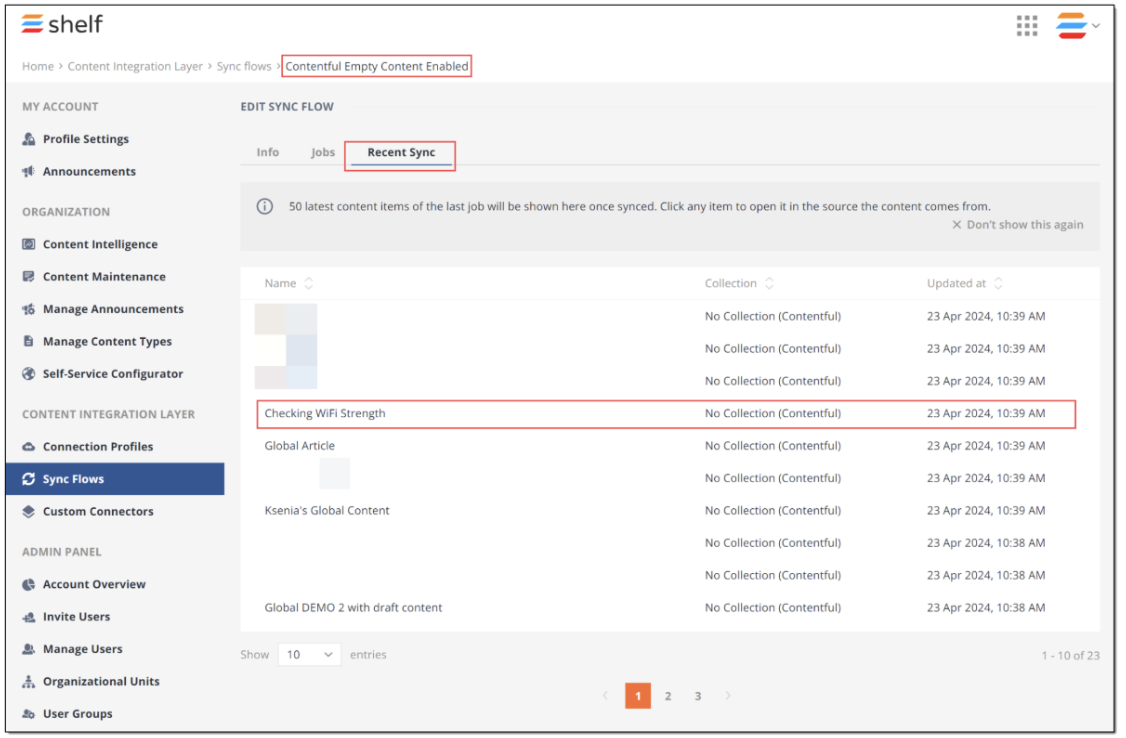 Figure 48. Verifying that Contentful article with no title or with empty rich text field inside it is synced
If, after opening the Recent Sync tab in the Contentful sync flow you can see the needed article on the list, it means that you have successfully enabled the empty content items syncing for your Contentful connection profile.